Welcome to my blog

I hope you will find the recipe you are looking for your occasion here.

Now video instructions are available for select recipes and can be accessed at

Gardening and Cooking Made Easy

The latest 5 recipes are displayed on the
main page. For more recipes, you can browse the archive, click on the labels in the index to the left or use the Custom search below to look for a specific recipe.


Search for more results

Custom Search

Wednesday, September 18, 2019

Sprouted Whole Wheat Bread

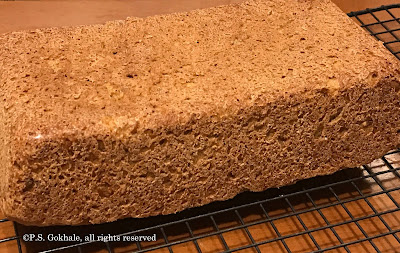
I enjoy sprouting wheat and used to make sprouted wheat bread a few years ago. I had forgotten the exact recipe and decided to try my hand at another version of it. It was difficult to find much online where the wheat berries were directly used instead of the sprouted wheat flour. I found a reference to Ezekiel bread which is a mixture of wheat and lentils and then decided to try out a basic bread recipe and see where it goes. The result was surprisingly tender and moist. The bread was hearty and delicious.
Ingredients
3 cups sprouted whole wheat berries (wheat berries were soaked overnight in water and then placed in a big sieve. These sprouted over a period of 48 hours).
A little water if needed to grind berries
2 tsp instant yeast (or if you have starter dough from another batter, add a handful instead and let this ferment overnight)
1 tsp salt
1 tbsp oil
Whole wheat flour a couple of 1/4 - 1 cup, depending on the moisture in the berries


Method
Grind the whole wheat berries to make a coarse batter. Use the minimal amount of water required in your blender or food processor. I used a food processor. Add the salt, yeast and oil and then add a little flour at a time to create a soft dough. It’s ok if it is a little sticky. Keep aside for 15-20 mins and then knead again to make a smooth dough. (I added a ball of dough from another overnight no knead recipe that I had made in the earlier day instead of the yeast and let it ferment overnight.)


Shape it into a ball and place in a bowl greased with oil to prevent sticking. Let this rise till double in volume. Will take about an hour or more. Then flatten out the dough and shape into a rectangle about 5x9 inches in size. My baking tin is 9 inches long. The length should be approximately the same as your bread baking rectangular tin.
Then roll into a tight roll with the shorter end parallel to you so that you have a 9 inch rolled bread dough.
Grease the baking tin with oil or butter and place the dough in it for a second rise. Once the dough had doubled in size, almost to the edge of the tin, bake at 350F for about 1.5 hours. I baked it for 40 minutes but the bread was not completely baked, so I continued to bake it till the center measured 200F, which took another 40 minutes approximately.
This bread does take longer to bake than normal. You can tent it with foil if you think the top is getting too brown.
The end result has crusty edges and a moist interior, is nutty and delicious. A hearty bread which is not at all dense.

Tips
Precook the wheat and try this bread. I will be trying that version the next time I make it. 

Thursday, September 12, 2019

A Hybrid of Gyoza/Potsticker/Springroll - gluten free

Every year I make ukadiche modak (steamed rice flour covered modak) at least once and most of the times I end up with left over rice flour dough. I usually save this extra dough by covering it with plastic wrap and keeping it in an airtight container. Most of the times I make some more sweet stuffing and then use the leftover dough to make more modaks. However, this time I didn't want to indulge in more sweets and wanted to use the dough for something else. We had eaten gyozas a couple of weeks earlier and I thought why not make something similar using this dough. The filling I made was similar to the springroll filling and the resultant hybrid gyoza-springroll was crispy and delicious. I plan to use this recipe often instead of using rice flour dough only for modaks.


Ingredients
1 cup rice flour
1 cup water
1/8 tsp salt
1 tsp ghee
1 small onion or 1/2 onion finely chopped
1 carrot finely grated
1/4 cabbage finely shredded
5-6 green beans, finely diced
3-4 garlic cloved, finely minced
1/2 inch ginger, finely grated
1 green chili, finely diced (optional)
2 tbsp oil
1 tsp vinegar
soy sauce to taste
salt to taste
chilli sauce to taste


Method
For the dough
To make the rice dough, bring the water to a boil in a deep saucepan, add ghee and salt.  Once the water is boiling, add the rice flour, stir and turn off heat. Cover this and keep aside for 10 mins. Then knead the dough while still warm but can be handled without getting burnt,  till it is glossy and shiny.
Your dough is ready. Cover with a towel and keep aside.

For the filling
Heat oil and add the onion, green chili (if using), ginger and garlic and cook till onion is translucent. Then turn up the heat and add all the other vegetables one at a time starting with the green beans, carrot and then cabbage. Stir fry till the veggies are cooked but still crunchy. Add the vinegar, salt, soy sauce and chili sauce. Taste and adjust seasoning. Turn off heat and let this cool down.

To make the gyoza
Take a ball of dough, about a fistful, and shape into a smooth ball. Flatten it make a disc and then using your fingers, thin this disk as much as possible to create a flat round thin disc. The dough should be thin enough that it doesn't break.

Then put 1-1.5 tbsp of filling on one side of the center leaving enough space around the edges,  to fold the disc onto itself in a semi circle and seal the edges. You can pinch the edges down to make a design. You can also shape this into a modak shaped dumpling.

To cook, heat a broad saucepan (ceramic or nonstick will help prevent sticking), and add 1 tbsp of oil to the pan. Once it heats up, place the gyozas on the pan and let one side cook till the side starts to brown a little and releases from the pan easily. Then flip it over. Add 1/4 cup of water to the pan and cover the lid immediately. Let this steam on medium heat till all the water evaporates (3-4 mins). The water will splutter, so be careful during this step. Then, remove the lid and let the gyoza brown. Flip and make sure both sides are golden brown. Serve hot with a sauce of your choice (gyoza, or springroll sauce).


Tips
Use a food processor, if available,  to knead the dough this so that your fingers don't burn.

Thursday, March 21, 2019

Pudachi Vadi/ Sambar Vadi

Pudachi vadi was definitely something completely new for me.  This is a deep fried delicacy where the stuffing is primarily made of cilantro. The closest snack which is similar to it would be bakarvadi. I hadn’t heard of it till a couple of years ago. And the way I learnt about it was from a Marathi daily soap (who says watching television isn’t educational, eh!). 
So fast forward to  present day, I was having a conversation with friends and family and this came up. I was  told ‘it tastes great. I used to enjoy eating it.’  So, I thought, why not try making it at home. That is the only practical way for me to taste it. 
This is also known as sambar vadi in Nagpur and supposed to be a speciality from the region (not related in anyway to the lentil based sambar). This is because coriander/cilantro is called sambar in Nagpur. I recently found out that it is also available in Kolhapur.
Of course the challenge with making something you’ve never seen or eaten before is that you don’t know if what you create is the right thing.  But my taster attested that, it had turned out exactly what he had eaten growing up.
It is delicious, the family loved it and I think I’ll be making it again and again.


Ingredients
Stuffing 
2 bunches cilantro - finely chopped, use thin stalks too
2 tsp white poppy seeds/khuskhus
2 tsp sesame seeds/til
1/2 cup dry coconut flakes
4 green chillies
4 large garlic cloves
10-12 green onion leaves
2-3 garlic scapes/leaves if available
1/2 red onion finely chopped
Salt to taste
1 tsp goda masala
For the cover 
2/3 cup whole wheat flour
1/3 cup all purpose flour
1/2 tsp baking powder
2 cups besan
1 tsp haldi
1 tsp chili powder
Salt to taste
3 tbsp oil
A Paste made of 2 tsp goda masala, 1 tsp tamarind concentrate, 1 tsp sugar, salt to taste


Method
Mix all the ingredients for the cover. Then add little water at a time and knead it into a hard dough (like for a puri). Set aside.
In a pan dry roast khus khus, and sesame seeds. Then dry roast the coconut flakes. Let it cool and the grind to a coarse powder. Grind the chillies and garlic. I used a mortar and pestle to make grind it.
Heat oil in same pan and add the chopped. The Add the garlic chili paste to the onions. Cook well and add the cut onion greens and garlic scapes. Sauté for a few mins and then add the cilantro. Cook for a few minutes then add 1 tsp goda masala. Cook for a few mins to dry out. And let cool. Then add salt to taste and mix well. This stuffing should be fairly dry.

Take a small ball of dough, enough to roll into an oval puri about 3 inches long. Roll small oval puri about 2 mm thick. Not too thin and transparent but more like samosa cover. Then apply a layer of the paste made with goda masala and tamarind.
Then line up about 2-3 tsp of the filling in the center along the length of the oval. Then wrap the two shorter ends together to make a roll. Seal the edges well. Use some water along the edges if needed to make sure that they edges stick. Using your fingers and palm shape the roll into a triangular shape if you like. This is not required but provides a shape to your vadi.

Heat oil in a kadhai. Fry on medium heat like a samosa till very well browned and crispy. They will crisp up further as they cool. On a ceramic electric stove top, I started the process at 7 and then fried it at 5.
Cut into smaller pieces and serve or serve full rolls. These taste amazing even when warm and can be served immediately upon frying.
Can also store in airtight container for 2-3 days or refrigerate for longer storage. Warm up in oven to crisp up if stored for a longer time.


Tips
Wash all the greens and let them dry before cutting. This will minimize the moisture introduced into the stuffing. If the edges are not sealed well, the roll will unravel and the filling will spill into the oil.
You can lightly panfry them with a tsp of oil before frying, to ensure a tight seal, cooking the sealed edge. Make sure that you do not brown the rolls during this pre-cooking process.
If you feel the rolls are not crisp enough after cooling down, then bake them in hot oven heated to 400F for 10 mins. Place them on a cooling rack and then on a baking cookie sheet/tray before placing in the oven for good air circulation and to avoid darkening on one side of the roll because it is in contact with a baking sheet/tin.
If you don’t have goda masala, substitute with dhania-jeera powder (1:1 ratio).

Thursday, November 15, 2018

Mysore Pak

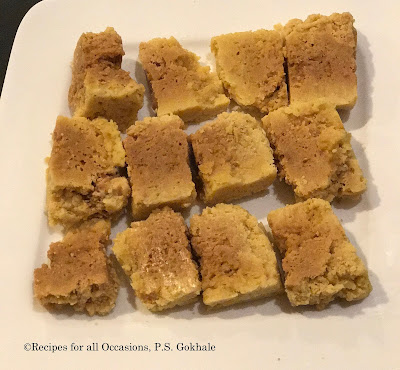
I hadn't made this before because everyone said it was too tricky and laborious, but finally decided to give it a try and it turned out great. I was very happy to see the perforations/lattice as well as the color gradations in the Mysore pak.


Ingredients
1 cup sugar
1/2-3/4 cup water, enough to cover the sugar
1 cup besan/chickpea flour
1 cup ghee
1 cup sunflower oil


Method
Grease a deep tin and set it aside. I used a 8x4 bread baking tin.

Pour the sugar into a broad pan and the water, stir them together and heat. Heat this on low- medium heat (3-4 setting on electric stove). Also, in a sauce pan, mix the ghee and oil together and start hearing this mixture at the same low-medium heat setting.

As the sugar syrup is cooked, sieve the besan to remove all lumps. Check the syrup and once it gets sticky but before reaching the single thread consistency, add 1/3rd besan and mix well till lumps are dissolved. Do this in a couple of batches till the besan is completely mixed into the syrup. If they are any lumps, use a sieve or strainer to push the lumps out by pouring the lumpy syrup through it.
Now keep stirring this mixture. After a couple of minutes, you will see bubbles in this mixture as you stir it.  At this stage you are ready to add the ghee oil mixture that is being heated.

Add one ladle at a time and stir it into the besan syrup mixture. Continue this till you reach the stage where the ghee oil mixture is no longer absorbed into the besan. When you are nearing this stage, you will notice that as you add the ghee oil mix into the besan syrup mixture, it starts to froth. Add the last ladle of ghee oil after you see that it is not really getting absorbed and let the froth form. Then pour this mixture into the tin to create a tall slab. My tin was much bigger and so I filled it just halfway (see pic for reference). Gently level the top to make sure not to destroy the lattice structure formed by the frothing. Now let it set for 5 minute and then make the cuts in the Mysore pak to form rectangles. Make sure to cut t through and completely. I didn't cut it entirely and once it was cool it was difficult to separate and cut it out. Now let it cool for a couple of hours, and remove the Mysore pak slices from the pan.


Tips
All the ghee oil mixture didn't get used up. About 1/2 to 3/4 cup remained. Make sure to add the besan before the single thread, so that it doesn't become too dry. The reason to go for a tall thick slab is so that the central part continues to cook at the part of the
Mysore pak exposed to the air and at the bottom of the tin start to cool first. This is needed to create the different shades/color striations in the mithai.

Monday, September 10, 2018

Zwetschgenkuchen- Austrian Plum Cake

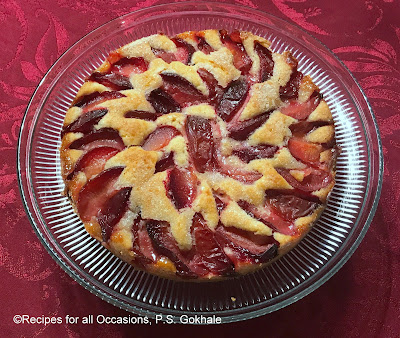
I came across this recipe on Milk Street, by Chris Kimball. This is how I made it. The only change I made was to use two eggs instead of 1 large egg and 1 egg yolk. It was absolutely scrumptious and very rich. And we enjoyed it for the entire week.


Ingredients
1 cup all purpose flour
3/4 tsp baking powder
1/2 cup sugar
2 tbsp sugar for sprinkling on top
1/2 tsp salt
1/2 cup salted butter- softened at room temperature and cut into pieces
2 medium eggs (original recipe calls for 1 large egg and 1 large egg yolk)
1.5 tsp vanilla essence
5-6 pluots (you can also use plums), cut into 1/8th slices. Discard pits


Method


Preheat the oven to 325F. Grease and dust a springform pan with flour. You can use a regular pan, but since the fruit it on top, you will have to be very careful when removing it from the pan and will have to flip it over again to make sure the fruit is on top.

Whisk the dry ingredients together - flour, baking powder, sugar and salt- till well combined. You can even sieve them a couple of times. Then add the butter one piece at a time and mix till the mixture starts to look sandy. Add the eggs and vanilla essence and mix the batter till it becomes a pale yellow and fluffy.
This is a very thick batter and will not flow. Using a spatula, spoon it out into the prepared pan and spread it evenly. Then arrange the pluot/plum slices in two concentric circles. Then sprinkle the 2 tbsp of sugar on top of the fruit and bake for 1 hr 15 mins. Check after one hour has passed and when the toothpick comes out clean, the cake is baked.
Let it cool in the pan for 30 mins on a wire rack and then remove the springform base from the pan.


Tips
If you have a stand mixer, use the paddle attachment.

Guava Jam

I had once found guava jam in the local store and having been deprived of this fruit for many many years, bought a small and expensive jar of jam. The jam wasn't that great, no real guava fragrance or taste. Fast forward a few years, we now have a guava tree and got our first crop of pink guavas. I decided to convert some of the fruit into jam and what a difference! The color is beautiful and it is so fragrant. This is a simple recipe and will perfectly preserve the fruit for us to enjoy it long after the fruiting season ends.


Ingredients 
10 guavas, cut the fruit into tiny pieces. Then push these through a sieve to make pulp and strain the seeds. you can grate it but it will be difficult to remove the seeds
Once you have the guava pulp, weigh it. Then weigh an equal amount of sugar.
Water- to make syrup - 1:1 in volume to sugar 
A pinch of salt- I sprinkled this over the pulp.


Method 
Mix together the sugar and water and heat it. Cook the syrup till it thickens, beyond the two thread stage, and just before the soft ball stage. Then add the guava pulp. Stir and mix well. It will become more fluid. Now cook this mixture till it thickens. To determine if you have the correct consistency, put a spoon of jam onto a plate and pull a finger or the spoon through it. If the pattern stays intact and the jam doesn't flow to fill the path of the finger, then you have the desired consistency.
Take it off the heat and cool completely before storing in a jar. This will take a 5-6 hours.  Refrigerate this jam. Use dry spoons when removing the jam from the jar to extend shelf life. It will be good in the fridge for a few months.


Tips
If the guavas are not ripe and soft, then boil them till they become soft before making the pulp.