Welcome to my blog

I hope you will find the recipe you are looking for your occasion here.

Now video instructions are available for select recipes and can be accessed at

Gardening and Cooking Made Easy

The latest 5 recipes are displayed on the
main page. For more recipes, you can browse the archive, click on the labels in the index to the left or use the Custom search below to look for a specific recipe.


Search for more results

Custom Search
Showing posts with label whole wheat. Show all posts

Wednesday, September 18, 2019

Molasses Bread - Cheesecake Factory style

This is a beautiful brown bread that comes very close to the bread that is served in the Cheesecake Factory. Warm bread slathered with butter is delicious and just melts in the mouth. In my opinion, this version of home baked bread is tastier than that served at the restaurant. 
I was able to make 5 decent sized loaves of bread and they lasted a few weeks. I stored each by covering tightly with plastic wrap and then foil and then freezing it. 


Ingredients
2 1/4 cups All purpose Flour or bread flour. I used all purpose flour
1 2/3 cups White whole wheat flour -I used roti flour (ashirwad aata). You can also use regular whole wheat flour
1 Tablespoon sugar
1 1/2 Teaspoons Salt
2 1/4 tsp of Instant Yeast
1/4 Cup Honey
1/4 Cup blackstrap Molasses/regular molasses
1 1/4 Cup Warm Water
2 Tablespoons unsalted butter at room temperature
1 Egg lightly beaten with a tsp of water to make egg wash
1/4 cup of Oats

Method
In the bowl of a stand mixer fitted with a dough hook add the flours, yeast, sugar, and salt. Mix until combined. Slowly add the honey, molasses and water. Mix until the dough forms. Add the softened butter and keep mixing until the dough forms. Knead till the dough separates from bowl.  You may need to add a little bit flour if it is still too sticky. Then knead the dough with hand till the dough is soft and smooth.
Grease a bowl large enough to hold double the volume of bread dough with some oil and place the ball of dough and cover with plastic wrap. Let the dough double in size about 45-90 mins depending on ambient temperature. It will take longer on colder days.
Remove dough from bowl and divide into 5 equal parts and shape into logs. Place these on a well greased trays (I needed two cookie trays) and let rise till double in size. Cover loosely with plastic wrap.
Preheat oven to 350 F. Brush the tops and the sides of the bread logs with the egg wash and sprinkle with the oats.
Place the trays in the oven and bake for 25-30 minutes of until ready. The easiest way to determine if the bread is well baked is to test the internal temperature. If it is 200F or more the bread is baked. Else you can also tap on the bottom and if it has a hollow sound it is baked.
The use of blackstrap molasses gives the bread a deep brown color. This bread has a slightly sweet taste and is delicious.


Tips
If kneading by hand, use the banging of the dough onto the kneading surface and then stretching with your palm strokes technique of kneading bread dough till a soft dough is formed.

Sprouted Whole Wheat Bread

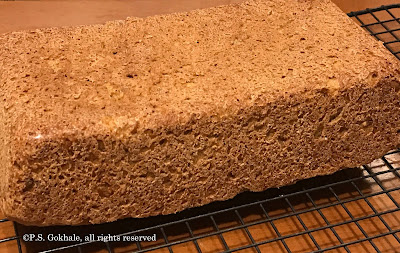
I enjoy sprouting wheat and used to make sprouted wheat bread a few years ago. I had forgotten the exact recipe and decided to try my hand at another version of it. It was difficult to find much online where the wheat berries were directly used instead of the sprouted wheat flour. I found a reference to Ezekiel bread which is a mixture of wheat and lentils and then decided to try out a basic bread recipe and see where it goes. The result was surprisingly tender and moist. The bread was hearty and delicious.
Ingredients
3 cups sprouted whole wheat berries (wheat berries were soaked overnight in water and then placed in a big sieve. These sprouted over a period of 48 hours).
A little water if needed to grind berries
2 tsp instant yeast (or if you have starter dough from another batter, add a handful instead and let this ferment overnight)
1 tsp salt
1 tbsp oil
Whole wheat flour a couple of 1/4 - 1 cup, depending on the moisture in the berries


Method
Grind the whole wheat berries to make a coarse batter. Use the minimal amount of water required in your blender or food processor. I used a food processor. Add the salt, yeast and oil and then add a little flour at a time to create a soft dough. It’s ok if it is a little sticky. Keep aside for 15-20 mins and then knead again to make a smooth dough. (I added a ball of dough from another overnight no knead recipe that I had made in the earlier day instead of the yeast and let it ferment overnight.)


Shape it into a ball and place in a bowl greased with oil to prevent sticking. Let this rise till double in volume. Will take about an hour or more. Then flatten out the dough and shape into a rectangle about 5x9 inches in size. My baking tin is 9 inches long. The length should be approximately the same as your bread baking rectangular tin.
Then roll into a tight roll with the shorter end parallel to you so that you have a 9 inch rolled bread dough.
Grease the baking tin with oil or butter and place the dough in it for a second rise. Once the dough had doubled in size, almost to the edge of the tin, bake at 350F for about 1.5 hours. I baked it for 40 minutes but the bread was not completely baked, so I continued to bake it till the center measured 200F, which took another 40 minutes approximately.
This bread does take longer to bake than normal. You can tent it with foil if you think the top is getting too brown.
The end result has crusty edges and a moist interior, is nutty and delicious. A hearty bread which is not at all dense.

Tips
Precook the wheat and try this bread. I will be trying that version the next time I make it. 

Thursday, July 3, 2014

Whole Wheat Thin Crust Pizza with White Sauce

For a long time, I couldn't stand the taste of store bought whole wheat breads. They seemed dense, dry, and bland, almost cardboard like. However, I am finding that my taste has matured and changed for the better, especially after eating home made whole wheat breads. And of course, eating whole grains is much better for health than all purpose flour.

Whole wheat breads are denser in texture than their counterpart white breads. This is mainly because all purpose flour which is used to make white breads, doesn't contain the germ and bran parts of the wheat grain. The bran in the flour hampers the creation of gluten (wheat protein) strands which is needed to create the fluffy bread texture. While I have made several breads with whole wheat flour, I hadn't tried a whole wheat recipe to make pizza before. When I came across a whole wheat thin crust pizza from America's Test Kitchen, I had to try it out. The recipe called for whole wheat flour and the bread flour to boost up the gluten content. Due to the mix of the flours, we are able to have a great texture and chew.

I made a few modifications, used the cheeses that I had on hand and a variety of toppings and the end result was fabulous.


Ingredients
For the pizza base
1.5 cups whole wheat flour
1 cup bread flour
2 tsp honey
3/4 tsp rapid rising instant yeast
1.5 cups cold water
2 tbsp
1 and 3/4 tsp salt
all purpose flour/bread flour to flour your working surface

For the pizza base sauce
1/4 cup extra virgin olive oil
2 garlic gloved, finely chopped
1/2 tsp black peppercorns (whole or ground) (this will add heat to the sauce, so you can adjust quantity to taste)
1/2 tsp dried oregano
1/8 tsp red chilli  flakes (optional) (this will add heat to the sauce, so you can adjust quantity to taste)
1/8 tsp salt
10 basil leaves (optional)
2 cups shredded mozarella cheese
2 cups shredded mixed cheese (cheddar, mozarella)

Toppings used here
broccoli
artichokes in brine solution
olives
onion, sliced
tomato, diced
mushroom, sliced

Additional topping suggestions
green bell pepper
colorful (red/yellow/orange) sweet bell peppers
spinach (add this after the pizza is baked)
pineapple
jalapeno slices


Method

To make the dough
Mix together the whole wheat flour, yeast, honey. Add the water and combine till there is no dry flour and keep the dough aside for 10 minutes. Keep it covered. Add the salt and oil and knead the ingredients together, till the dough comes together and is smooth. If you have a food processor or a stand mixer, you should use it to knead the dough. It will take less than a minute for the first step and 3-4 minutes for the second step. If not using a mixer, it will take about 10 minutes of kneading to get a smooth dough. Even if you use the food processor, knead the dough by hand for about a minute and shape it into a smooth ball.
Then put it in an oiled bowl and cover with a plastic wrap. Put it in the fridge for at least 18 hour up to 48 hours.

Pizza sauce
Heat the extra virgin olive oil and to it add the garlic, peppercorns, oregano, red chilli flakes (if using). Let the garlic get lightly browned (takes less than a minute). Take the oil off the heat and add the salt. Let this cool.

Pizza assembly
One hour before you start to put your pizza together, place a pizza stone on the top rack of your oven (4-6 inches from the broiler heating element) and pre-heat the oven to 500F and let the pizza stone heat for the entire hour.

At the same time, get your pizza dough our of the fridge, divide it into 2 parts and roll them into balls. Place them apart from each other (leaving space for the dough to expand) on an oiled flat pan or baking dish or separate plates. Cover with plastic wrap and let it stand for an hour

Dust your rolling surface liberally with flour. Take one of the dough balls and roll it flour to cover it and then using your fingertips and palm, flatten it and into a 12 inch pizza round. Dust the pizza peel that you will use to place the pizza base into the oven and transfer the pizza base. to your pizza peel. Flatten it further into about a 13 inch round.

Switch the oven to broiler, high setting for 10 minutes while you spread the toppings on the pizza.

Now, spread half of the flavored oil that you made above onto the pizza. Leave a small border around the pizza, about 1/4 inch. Place the basil leaves onto the base of the pizza (if using) and then layer 1 cup of each cheese onto the base. The add the toppings. I have listed the toppings that I used and also other suggestion. You can use any combination that you want.


Switch the oven back to bake at 500F. Slide the pizza very carefully onto the pizza stone. Bake till the crust is browned and cheese melts and is bubbly. It takes about 10-12 minutes for this to occur. The time may vary based on your own oven, so check on the pizza and keep an eye on it after 8 minutes.
Rotate the pizza halfway through the baking process, at around the 5 minute mark.

Remove your pizza and let it cool a little before cutting it. Place it on a wire rack.

Then return your oven to broil and using the same process work with the second piece of dough and add the toppings. Turn the pizza back to bake at 500 and then place the second pizza into the oven.

Serve hot.

Tips
Make the dough the previous evening, when you want to make it for dinner (about 24 hours). You can use whole or you can grind these to make a fine powder and use pepper powder instead. It will add heat to the sauce, so adjust the amount of pepper you want to use, based on taste. I used whole peppercorns and then picked them out of the oil before spreading the oil onto the pizza surface.
You can use a mixture of mozarella, parmesan and cheddar cheese on the base. If you are choosing more than one cheese, mix a little together at first and taste it and check if you like the combination.
Heating the stone at 500F for an hour creates a kiln effect and ensures that the pizza gets cooked properly and there are no uncooked spots under the toppings. This helps create a nice crispy crust.
Place the pizza on a wire rack, so that the steam doesn't pool under the pizza crust and make it soggy.


Tuesday, December 4, 2012

Oats and Whole Wheat Bread

The last month was filled with cooking a lot of Diwali sweets and snacks. I also made cakes for a couple of birthday parties. It was a great month. We ate a lot of great food and had fun with all the different celebrations. However, in the midst of all this activity, I just didn't get time to do any leisurely baking. I had been wanting to bake bread, but I just didn't get to it. I have been wanting to make some whole wheat breads, and I finally got to bake a loaf  last weekend. This is a recipe from the book "Whole Grain Baking" and the first one that I tried from it. Considering the success of this recipe, I am looking forward to trying the other bread recipes from this book. Since, all the recipes in this book include whole grains, they should be healthy as well.


This bread recipe contains whole wheat flour as well as rolled oats. It turns out very delicious and moist. A perfect sandwich bread.


Ingredients
1 and 1/4 cups boiling water
1 cup old fashioned rolled oat (not the quick cooking ones)
2 tbps unsalted butter, cut into 3 pieces
1.5 tsps salt
1/4 cup honey
1 cup whole wheat flour
1 and 2/3 cups unbleached all purpose flour/maida
1/4 cup milk powder
2 tsps instant yeast
some oil to grease the bowl and pan
1-1/2 tsp melted butter (optional)


Method
Mix together the oats, salt, honey and butter and pour the boiling water and stir. Let the mixture cool to a lukewarm temperature. This will semi cook and soften the oats. Also, make sure that the temperature is lukewarm and you can easily dip your finger (clean) in the mixture and hold it for a minute without burning it. If it is not cool enough and you add the yeast, the yeast die.
Then add the flours, milk powder, yeast into this mixture and knead the dough. Knead well till the dough is soft and smooth. If you are doing this by hand then you will need about 10-15 minutes kneading time. Shape the dough into a ball.

To see step by step photographs of the process see the Whole Wheat Bread recipe.

Then, place this in a well oiled bowl and roll the dough in the bowl, so that the dough is lightly covered with oil. Then, cover the bowl with a plastic wrap and let the dough rise till it has doubled in size. This will take about an hour to an hour and half, depending on the ambient temperature.

Then, deflate the dough and shape it into a log which can fit in your rectangular bread pan. Now cover this lightly with a plastic wrap and let the dough rise again till it has doubled in size, which will take another hour to hour and half.

Preheat the oven to 350 and bake the bread on the center rack in the oven for about 45 minutes.  After 20 minutes have passed, check and if you see that the top has lightly browned, then take a piece of aluminium foil (large enough to cover the pan), fold it in the center to create a crease, then  open it up and create a tent on top of the baking tin. Let the bread bake for the next 25 minutes, covered with foil.

Take the bread out of the oven and set to cool for 5 minutes before removing it from the tin. If you want, you can lightly brush the entire bread with some butter. This will help retain the moisture and keep it soft and moist.  Slice it as you go.


Tips
Yeast should never be added to hot water or hot mixtures, as that will kill the yeast. If you are not sure, add the yeast to room temperature ingredients. If the temperature in the room is very cold, it will take longer for the dough to rise. You can keep the dough in the oven, with its light on to provide the warmth for the yeast, so that the bread will rise. Else, add additional time to the rising process. The key to look for is, if the dough has doubled in size. Similarly, if the room temperature is really warm (think hot summer weather), then you may need just 45 mins or an hour for the dough to complete doubling in size. For photos on how to shape the dough into a loaf after the first rise, see the Whole Wheat bread recipe.

Tuesday, November 6, 2012

Multigrain Ladoo/ Laddoo - Multigrain Sweet Balls

This is a delicious and a very healthy sweet. I made this for the first time, about one year ago. I needed a healthy and filling snack which would be easy to store and carry. Also, it needed to be appealing to a child and easy to hold and eat. My daughter enjoys besan laddoo and one day I thought it would be great if I tried to make laddoos with other grains and flours. This recipe was a great success.  My family enjoyed it and I was okay if dinner occasionally constituted of one laddoo and milk.


Ingredients
2/3 cup whole wheat flour
1/2 cup soy bean flour
1 cup mung dal
2/3 cup urad dal
1/2 cup ragi flour
1.25 cups of ghee/clarified butter
2 and 1/3 cup of powdered sugar
1/4 tsp cardamom powder
1/4 cup raisins (optional)
1/4 cup blanched and peeled almond slices (optional)


Method
Dry roast the whole wheat flour, soy bean flour and ragi flour separately. The flour should be roasted till it gets a toasted fragrance. The soy bean flour will take the minimum time. Roast each flour and grain separately, as each flour will need different amounts of roasting time. Roast the urad and mung dal till they turn reddish brown, taking care to not burn the grain. Grind each grain, separately into powder. It can be slightly coarse, which will give the laddoo some texture. Once all the flours are roasted and grains have been ground into flour, heat ghee in a pan. The pan should be large enough to hold all the ingredients. The powdered flours approximately amount to about 5 and a half cups. Once the ghee has melted, add the flours and mix them well with the ghee. Turn off the heat. Once the mixture turns warm, add the powdered sugar, raisins and almonds (if using them) and mix well. The mixture should not be cold, else it will be difficult to incorporate the sugar. Mix it well till all the sugar is incorporated into the flour and ghee mixture.

Then take a fistful of the mixture and roll it between the palms of your hands to roll it into small balls. Store in an airtight container. These do not need refrigeration, however you can  store them in the fridge if any remain after a couple of weeks to keep them fresh.


Tips
If you store the laddoos in the fridge, warm them up in the microwave for 5-10 seconds before eating. You can switch out the whole wheat flour with besan/chickpea flour. Or you can even add in besan as an additional flour. You can adapt this recipe by trying out different proportions of the various grains or flours. Just make sure that you roast the flour before using it in the laddoo. It can be made gluten free by substituting the wheat flour with chickpea flour.

Wednesday, August 31, 2011

Baati - Baked Whole Wheat Dumplings

The first time I ate authentic dal baati was in Indore, about eleven years ago. I was visiting family and there were two occasions when I was able to savor this delicacy. The baatis were authentically cooked in an earthen stove. Then, they were dunked in ghee and served with hot delicious dal. I can never forget that experience. The taste of the baatis being roasted and baked in an authentic kiln can just not be replicated in a modern kitchen. After I got married, I was pleasantly surprised to find that my husband liked this dish and even knew how to make it. Eventually, we started making it quite often. While one can't get the rustic taste, only possible using an earthern stove, the ones baked in the oven are also equally delicious. This is supposed to be a delicacy, however, I make this so often, that I am not sure I can realy classify it as a delicacy in our house anymore! I must mention that once you make this, you will realise it is much easier than toiling for hours on an elaborate menu. However, your guests will be very impressed with this dish. It is so easy that you may get hooked and make this a regular feature on your menu as well.


Ingredients
2 cups whole wheat flour
1/4 cup besan/chickpea flour
1 cup yogurt
1/2 tsp salt
2 tbsp ghee
1/4 tsp baking soda
water to knead


Method
Mix together all the dry ingredients. Then create a well in the center of the flour mixture. Into this add the ghee and yogurt. Then mix this. If the yogurt is watery, then you may not need to add any additional water to knead it all together into a soft dough. It shouldn't be too loose, nor too dry and hard. Knead the dough well and let it rest for 15-30 mins. Cover the dough with a damp cloth so it doesn't dry out.


Preheat the oven to 350F. Then roll out the dough into small balls about 1-1.5 inches in diameter. Place these on a baking sheet with enough space between them to allow for expansion. Bake in the oven for about 20-40 mins, till well browned. The baati will expand and break open and develop cracks as it cooks. The end result shouldn't be hard. When warm, pour a little ghee so that it gets absorbed through the cracks in the baati. Serve with hot dal and additional ghee.


Tips
Instead of adding ghee to the flour, you can add the milk solids that are left behind when you make ghee at home. This is a wonderful use of these solids, especially if you have used salted butter. If the milk solids are salted, then reduce the amount of additional salt that you add to the flour. Traditionally the baatis are soaked in ghee before being crushed and then hot dal is ladled onto this and is eaten hot.
To simulate an eathern kiln, use a pizza stone. Preheat it and then place the baatis onto this to be baked. 

Monday, April 18, 2011

Wheat Germ Pudding - "Gahu chi Kheer" - A Delicacy

"Gahu chi Kheer" is one of the tastiest dishes I have come across. In fact I wasn't even aware of how healthy it was until after polishing the bowl. "Gahu" translates to wheat and "kheer" is used to describe a dessert which has a pudding/custard kind of a consistency. Up until last year, the only wheat pudding I had eaten or made was made from "cracked wheat" or "dalia". Then I visited my husband's aunt last summer. She had made various delicacies for our visit and oh what exquisite dishes they were! Among the many dishes she had made, she had also taken time to make specialities and delicacies like misal (a spicy lentil snack), puran poli (tortilla stuffed with sweet yellow lentils) and gahu chi kheer (wheat pudding). After my first bite of the wheat kheer I realised that this was no ordinary pudding made from cracked wheat, but it was so much tastier and had a wonderful sweetness. So naturally, before we left, I asked her for her recipes and she readily shared (thank you!).


The key to this tasty kheer is that whole wheat is sprouted and then this wheat germ is used to make the kheer. The wheat germ is incredibly sweet and extremely nutritious. In fact, based on everything I have read, wheat germ is something you should add to your regular diet. It is very high in vitamins and provides essential elements. Also, along with the sweetness of the wheat, the sweetner used was not sugar, but jaggery which brought it up another notch. This is a recipe I highly recommend and I am sure once you taste it, you will want to eat it over and over again!!!


Ingredients
1 cup wheat (whole wheat grains/berries)
4 cups of water
1.5 tsp poppy seeds (white)/ khus khus
5 tbsps jaggery
2 cardamom pod seeds (about 10-15 seeds), powdered (elaichi)
2 tbsp sliced almonds
1/4 cup grated fresh coconut
1/2 cup cooked rice

when serving
hot milk
ghee/clarified butter


Method

To germinate the wheat grains
Soak the wheat grains in two cups of water for at least 12 - 15 hours (you can soak it upto 24 hours). The grains should be completely submerged in the water. Then, drain the wheat and tie this up in a cotton cloth or a cheese cloth. The cloth should be porous so that the grains have air to breathe. Keep this in a warm place for 24 hours. After a day, you will notice small white sprouts on the wheat grains. At this point, the wheat is germinated and will be soft. If you taste it at this point, you will  notice that the wheat is very sweet.


To cook the pudding/kheer
Add two cups of water to the wheat germ and you can either cook it in the pressure cooker, or boil it till softened. It if better to pressure cook, as the cooking time is very small and nutrients are retained better through this process. However, if you do not have a pressure cooker, you can just boil it. While the wheat cooks, in a blender, grind together the poppy seeds, cardamom and cococnut. Then, add the cooked wheat to this and blend together till the wheat is broken into smaller pieces. Heat this mixture in a deep pan and add the cooked rice to it. Cook it all together for a minute and then add the jaggery. You can add more jaggery if you want it to be sweeter. Sprinkle in the almonds. The kheer is ready.  Before you serve it, add a spoonfull of ghee and then pour some hot milk.


Tips
This rice should be cooked to a soft texture. Pressure cook it along with the wheat by layering the two containers on top of each other. The wheat takes longer to cook, so keep the wheat container closer to the base of the cooker. If you are using long grain rice, you may want to break the cooked rice, into smaller pieces by using a spoon. Do not add the cooked rice into the blender along with the wheat as the rice will get mushy and the pudding will get starchy and mushy. It will take a couple of whistles in a stove top cooker or about 10 minutes on manual mode high pressure in the Instant Pot. Let the pressure fall naturally.

Wednesday, December 29, 2010

Greek Pizza

This is a very simple, and elegant dish. It's colorful, full of flavor and textures. It is also a whole meal, hearty and filling. The best part is that this takes less than half an hour to put together. I orginally ate a version of this at a friend's place. She was inspired by a pita pizza she had eaten at a restaurant and wanted to try it out. I have taken the concept and used the same base, but created a Greek salad to top the pizza.  This recipe makes about four to five pita pizzas. This can be used as an appetizer recipe too or finger food for a party. Just cut the pita into slices and serve.


Ingredients
4-5 pita rounds
1 cup hummus
4-5 greek olives, diced
2 cucumbers, diced
1 cup baby spinach leaves
1 tomato, diced
1 cup sweet bell pepper mix, diced (yellow/red/orange)
1 tbsp olive oil
1 tsp dried oregano
1/4 onion, sliced
salt to taste
1/8 tsp black pepper
1 lemon, juiced
2-3 tbsp feta cheese, crumbled


Method
Mix together the diced cucumber, bell pepper mix, onion and olives. In a bowl, mix the olive oil, oregano and lemon juice. Pour this over the vegetable mixture. Add the salt and pepper and mix all the ingredients together. Heat the pita bread on a flat pan so that they become a little crisp. Apply a layer of hummus  over the pita bread round. Then spread a layer of the vegetables. Add some spinach leaves over the pita and then sprinkle some feta cheese. Eat this as soon as you have added all the layers, else the base will become soggy.


Tips
You can use a flavored hummus to add more flavors to the recipe. Dice all the vegetables in similar sized cubes.

Wednesday, August 11, 2010

Fodni Chi Poli/ Chapati with Seasoning

This is one of my favorite breakfast dishes. We call it "khous khous" at home. I am not sure how the name was created, but it stuck and I still call it "khous khous" to this day. It takes me back to childhood. I remember all those mornings when I used to sit at the dining room table, carefully breaking previous night's rotis into small pieces. I also remember taking an inordinate time trying to make even pieces and making my mom rush to get it into the tadka in time. Ah good old days! These days it is rare that I have enough rotis left over to make this dish but I really love to make it when I can. It is generally made with at least a day old rotis and is one of the ways to use up the chapatis from the previous day. The old rotis give it a crisper texture.


Ingredients
5-8 chapatis/rotis/phulkas - generally a day old
1-2 green chillies to taste
salt to taste
1/2 tsp  sugar
1/8 tsp turmeric
1/8 tsp mustard seeds
1/8 tsp cumin seeds
1/2-3/4 onion diced
pinch of asafoetida
cilantro for granish
1 tbsp oil


Method
Heat the oil and add the mustard and cumin seeds to it. Once these seeds crackle, add the onions and fry till light brown. Add the green chillies and turmeric. Tear the rotis into small pieces. You can use a food processor to cut them up. The pieces need to be about 1-2 cms in size. To these roti pieces add the salt and sugar. Add this to the fried onion tadka. Stir well and mix.  Cook for a few more minutes. Serve hot. Garnish with cilantro.


Tips
Serve with some lime, pickle or yogurt. The longer you keep it on the heat, the crisper it will get.