Welcome to my blog

I hope you will find the recipe you are looking for your occasion here.

Now video instructions are available for select recipes and can be accessed at

Gardening and Cooking Made Easy

The latest 5 recipes are displayed on the
main page. For more recipes, you can browse the archive, click on the labels in the index to the left or use the Custom search below to look for a specific recipe.


Search for more results

Custom Search
Showing posts with label potato. Show all posts

Sunday, August 21, 2016

Mixed Vegetable Kurma - Coconut Based Curry

This is a delicious, vegetable rich curry with a coconut base which forms the gravy. I ate this for the first time in a South Indian style restaurant with Uttapam (thick rice pancakes). I absolutely loved it. I  then started making it at home whenever I would have grated coconut on hand. I believe this has its origins in Karnataka. It is very different from the mixed vegetable kurma which is found in North Indian style restaurants where the gravy base is onions and tomatoes.

This pairs very well with phulkas, uttapams and is worth being on a feast menu when served with puris. If is also a great gravy accompaniment with simple pulao. I love this preparation and hope you enjoy it too.


Ingredients
1 onion, finely chopped
2 carrots, cut into small cubes
15 green beans, finely diced
1 potato, cut into small cubes
¼ cauliflower, cut into small florets
½ cup peas
2 tbsp oil
¼ tsp cumin seeds/jeera
2 bay leaves/tej patta
salt to taste
water to form the gravy

For the gravy masala paste
1/2 onion, chopped
1 cup fresh coconut
4-5 garlic cloves
1 inch ginger
1-2 green chillies (to taste)
¼ cup cilantro/coriander leaves loosely filled (approximately leaves yielding from 10-15 stems)
½ tsp turmeric
½ tsp tamarind paste (soak tamarind in warm water and once it is softened, remove seeds and any fibers and extract the pulp from the tamarind)
1 tsp garam masala (optional)
water to grind the ingredients together to form a thick paste


Method
Blend all the ingredients listed under the fresh coconut masala paste into a fine thick paste. Cut all the vegetables into approximately similar sized pieces. To reduce the overall cooking time, you can steam cook these or cook these in the microwave till partially cooked. Do not overcook them. It is not necessary to semi-cook the vegetables. It will just take a little longer for the kurma to cook if raw vegetables are added. If using frozen peas, just thaw them. Do not cook them with other vegetables as thawed peas cook really quickly.

Heat a pan. Add oil and then cumin seeds and bay leaves. Once the cumin seeds crackle, add the coconut paste and cook it till the raw smell of onion and garlic goes away and it starts to brown slightly. Next add the cut vegetables – the carrots, beans, peas, potato and cauliflower. Stir to coat these in the coconut masala and let these cook for a few minutes. Then add about ½-1 cup of water to create a gravy, based on your preference. Add salt to taste. Let the vegetables boil till completely cooked.

Serve hot with chapati, puri or uttapam.


Tips
Do not use cold or frozen coconut directly when making the masala paste. Thaw it and warm it a little. If it is very cold, the oil will separate out during the grinding process. Also, use warm water to grind the masala. You can also add 10-12 cashews (not roasted, raw) to the paste to give it a richer taste.

Saturday, August 22, 2015

Achari Aloo - Potatoes tempered with Indian pickle spices

I am updating my blog after several months. As it happens, things have become very hectic and I haven't had the energy to update the blog. I have received some really nice feedback on my site in the past few months and I have been motivated and looking for some spare time in which I could compose a recipe. I am hoping I an interrupted hour as I type this.

For those that are regular readers of my blog, you know that I recently started cooking and experimenting with chicken dishes. Also, that some members of my family are vegetarian while others relish chicken and other meat. So, when I make chicken, I need to make sure that I have a good vegetarian meal by its side as well. I decided to make "achari chicken" earlier this week. I thought what I could make as a vegetarian entree and I thought why not make "achari potatoes" using the same gravy base. It turned out to be a great idea and both turned out lip smacking delicious.

So what is "achari"? "Achar or Aachaar" in Hindi means pickle. The concept behind Indian pickles is the same as everywhere else, it is used to preserve some kind of a vegetable in brine. However, this brine is also tempered with different spices. The spices used vary from region to region and every household has their own special recipe. So, this dish uses the same spices that are used for pickles that are usually made in Northern part of India and have components like onion and fennel seeds. If you have a mixed Punjabi pickle which uses a similar spice profile, addition of a little of this pickle to finish the dish gives it a restaurant quality taste.


Ingredients

For the gravy
1 tbsp oil
1 large red onion, finely chopped
3 tomatoes (canned or fresh), finely chopped
1 tbsp ginger and garlic paste
1/ 2 cup yogurt, well beaten
1/8 tsp turmeric
1/8- 1/2 tsp red chilli powder - to taste
1-2 green chillies - to taste
4-5 potatoes - peeled and chopped into 1/2 inch pieces
salt to taste
1/2 cup water (more if gravy becomes to thick)
1 tbsp Punjabi mixed pickle (same spice profile) - optional

For the tempering
1 tbsp oil (mustard if available)
1/4 tsp cumin seeds
1/4 tsp mustard seeds
10-12 black peppercorns
1/4 tsp fennel seeds
1/8 tsp kalonji/onion seeds
1-3 red chillies (dried), to taste
1/4 tsp crushed coriander seeds
6-8 methi/fenugreek seeds


Method
Heat oil in a pan and add the onions. Saute them till they start to brown and add the ginger garlic paste. Cook till well browned and then add the tomatoes. Once the tomatoes are cooked down add turmeric, chilli powder and the green chillies. Mix well and let this cook for a couple of minutes. Then add the yogurt and let this cook till the mixture thickens a bit and the yogurt starts to look cooked.

While the gravy is being cooked, heat oil for tempering in a separate pan. Add the mustard and cumin and once it starts to crackle, add the rest of the spices and then turn the heat off. Let the spices bloom in the hot oil.

Add the potatoes to the gravy and salt to taste. Add some water and stir. Then add the tempering, cover the pan and let the potatoes cook. Keep stirring and cook till the potatoes are cooked through but stop before they over cook or get mushy.

If you have Punjabi mixed pickle, add a tbsp of this to the curry just as the potatoes are done cooking and mix well. Garnish with cilantro leaves. Serve hot with white rice or naan or chapati.


Tips
To shorten the time needed to brown the onion, add some salt after you add the chopped onions. This helps pull out the moisture from the onion and helps in browning the onions faster.  Canned tomatoes are precooked and will cook faster. A good ingredient to have on hand when you need to cook something elaborate in a short amount of time. To crush coriander seeds, use whole seeds and lightly pound them in a mortar and pestle to open them up. Do not grind them into a powder form. Fenugreek is bitter, so use a little. Avoid the temptation to increase the amount a lot even if you scale up the quantity of the dish. Beat the yogurt well and make sure it is smooth before you add it to the gravy to reduce the curdled look. As the yogurt gets cooked down, it will get an even look. Use mustard oil for the seasoning if possible to get an authentic flavor. 

Saturday, January 5, 2013

Navratan Korma - A Royal Vegetable Dish

I wish all the readers of my blog a very Happy New Year. I hope 2013 brings you good health, happiness and great food. Since food tastes good only when the cook is happy, I hope each day of yours is filled with great joy which in turn will lead to tastier food.


I have been wondering what recipe I should start the new year with and I couldn't make up my mind. Should I start with a starter and follow through with a complete meal or shall I start with a decadent sweet? Well inspiration just struck and I sat down to pen down this wonderful recipe. This is a medley of vegetables, in a rich, flavorful sauce which is also a little sweet. The dish is called "Navratan Korma". "Navratan" means nine gems and "Korma" means a medley. So literally it is a dish which has at least 9 starring ingredients, mainly vegetables, fruit or dry fruit and paneer. It is cooked in a rich cashew based sauce traditionally with cream added to finish it off. I wanted to lighten the recipe. Also, as I was planning to serve this to many people, I did not want to use any nuts in case of allergies. It was a great success and I must say that I received the best compliments from my friend's nine year old who not only ate all the vegetables, but asked for seconds and told her Mom that this was one of the best vegetable curry she had ever tasted.


Ingredients
1 large red onion, finely diced
1 tbsp + 1tsp butter
3-4 canned whole tomatoes (puree it)
1 tsp corriander/dhania powder
red chilli powder to taste
1/8 tsp turmeric powder
2 tsp corriander-cumin powder (dhania jeera powder)
1 tbsp garam masala
2 tsp ginger garlic paste
1 green chilli, sliced into 2 pieces
1 potato, diced
1/2 red bell pepper, diced
1 carrot, diced
1/2 cup peas
1/4 cauliflower, florets separated into medium size pieces
1/2 cup  green beans, diced
6-7 baby corns, diced into 1 inch pieces (I used canned baby corn)
1/2 cup paneer, diced into 1/2 inch pieces
3-4 sliced of pineapple (I used the ones which are canned, but not in syrup)
1/4 cup raisins
1/4 cup low fat milk
3/4 cup cream
salt to taste
1 cup water


Method
Heat 1 tsp butter in a flat pan, sprinkle some salt and shallow fry the paneer pieces till they are lightly browned on all sides. Keep aside.


Heat the butter in a pan which will be able to accommodate all the vegetables. Add the red onion and saute it till it is softened and translucent. Then add the ginger garlic paste, and the green chilli and fry this till the raw smell goes away. Next, add the tomato puree and cook this mixture for a few minutes. Stir and do not let this brown. Then add the turmeric, garam masala, dhania jeera powder and dhania powder. Stir and fry these spices for 2-3 minutes. Then add 1/2 cup water. Then, add the potatoes, green beans, carrots, cauliflower and red bell pepper and boil this for a few minutes, till the vegetables a partially cooked through. Then, add the rest of the vegetables, the corn, pineapple, and the peas. And finally add the paneer. Cook all of the ingredients together till the all the vegetables, especially the potatoes and cauliflower are cooked through. Then, in a small bowl, mix the milk and cream together and slowly add this mixture to the gravy. Add salt and raisins and boil for a couple of minutes. Serve hot, with some naan or tandoori roti. You can garnish this with some grapes.


Tips
Feel free to choose any combination of vegetables. You can use fewer than 9 ingredients as well. If you do not want the sweet tinge, then don't add the pineapple and raisins. If you want a richer gravy, then soak 1/4 cup of raw cashews for a couple of hours and make a paste of these cashews.  Add this paste along with the cream instead of milk. You can also add yogurt instead of cream. Make sure to whisk it till it is smooth.
I used canned baby corn and pineapple. If you use the fresh version, then remember the cooking time will increase and you should either add it in along with the potatoes (specially the corn) or may be semi-cook these in the microwave for a minute before adding to the gravy.
If you don't have canned tomatoes, then you can use fresh tomatoes. To peel them, boil water, then add the tomatoes to the boiling water. As soon as you see the skin is starting to tear up, remove these and put them in a bowl of cold water (ice water is preferred). It will be very easy to remove the skins then.

Monday, September 17, 2012

Aloo Gobhi - Curried Potatoes and Cauliflower

This is the other curry dish that I had in the first menu list. Aloo in Hindi means potato and Gobhi is cauliflower. It is again a very popular dish. Aloo gobhi can easily be found on any Indian restaurant menu, especially in the US. It is a great preparation. It is simple to make, and very tasty. It has very few components and is probably one of the simplest recipes in the Indian cuisine. I always wonder how and why such a simple dish finds such prominence on Indian restaurant menus and perhaps it is because of the simplicity that it is such an attractive dish. Well whatever the reason, it is great on a party menu or as part of your weekday dinner. It also doesn't need a lot of fussing with and you can let it cook, while you get other things ready.


Ingredients
2-3  tbsp oil
1/8 tsp jeera/cumin seeds
a pinch of asafoetida
1/8 tsp turmeric powder
1 inch ginger, cut into thin strips
2 potatoes, diced into medium pieces
1 cauliflower separated into individual florets
1-3 green chillies, to taste, slit along the length
salt to taste
cilantro to garnish (optional)


Method
Heat the oil and add the cumin seeds to it. Once they start to crackle and turning a light brown, add the asafetida, green chillies, ginger. Fry for a minute till you can smell the fragrance of the ginger and then add the turmeric. Immediately add the potatoes and stir well. Cook for a couple of minutes and then add the cauliflower florets. Next add the salt. Stir so that the cauliflower florets are also well coated with the tempered oil and salt and then let it all cook till the vegetables are cooked through. Garnish with cilantro and serve hot.


Tips
You can reduce the oil to 2 tbsp when using a non stick pan. You can cover the pan to speed up the cooking process. However, be careful and remember to take if off every few minutes and check. It is easy to overcook the potato when the pan is covered and it will get mushy.

Tuesday, August 21, 2012

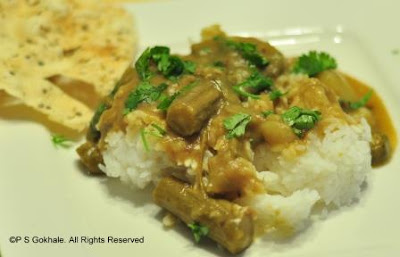
Sindhi Kadhi - A Delicious Stew

This is a recipe that my aunt gave me recently and asked me to try it out. It is called Sindhi Kadhi. It is a delicious stew or curry prepared with chickpea flour (besan) and vegetables. However, it does not conform to my traditional view of what “kadhi” should be. All the different versions of kadhi that I have made or eaten so far have always had yogurt and besan/chickpea flour as the main ingredients. The main difference in all these versions was the seasoning that I used, however the main ingredients always stayed the same i.e. yogurt and besan. I had never made or tasted Sindhi Kadhi prior to this attempt, and I am glad I finally did. It has definitely changed my perception of what kadhi can be. This particular version of the kadhi does make use of the besan flour, however it differs in the fact that, instead of using yogurt, tamarind water is used to give it a sour taste. Also, this recipe has a lot of vegetables. And while I made it with the vegetables that my aunt listed, I am sure you can change the combination of the vegetables based on what is available. The end result is a hearty, healthy and delicious stew. We enjoyed the preparation and I will definitely be making it again.


Ingredients
1 tbsp oil
1/8 tsp jeera/cumin seeds
pinch of asafoetida
1/8 tsp turmeric powder
1 cup okra/bhindi/ladies fingers ( diced)
3 tsps besan/chickpea flour
1 cup potatoes (1 large or 2 small potatoes), diced into big pieces
1 cup banana squash/red pumpkin/laal kaddu/ laal bhopla,
1 cup cluster beans /gavar /gowar, diced
1 drumstick, cut into 1-2 inch pieces
chilli powder to taste
5-6 curry leaves
1 tsp tamarind paste or 1 inch ball of tamarind
salt to taste


Method
If using tamarind paste, dissolve it in about 2 cups of water and keep aside. If using regular tamarind,  soak it in warm water and then remove the pulp and dissolve it in 2 cups of water and keep aside.


Heat the oil. To this add the cumin seeds. Once they being to crackle, add the hing/asafoetida, and the okra pieces. Stir fry the okra till well cooked and a little browned. Then add the besan flour and cook the besan flour till you get the fragrant roasted smell for the besan. Then add the cluster beans, drumstick pieces, potato and pumpkin. Stir it and add the turmeric powder and chilli powder and cook it all for a minute.  Then add the tamarind water, stirring continuously while adding the water, so that no lumps formed. Add the curry leaves. Add more water if needed. All the vegetables should be covered with the water. Then cook till the curry till it starts to boil and thicken. Add the salt. Taste and add a little more of tamarind paste if you want a more sour taste. Check to see if the vegetables are cooked. The curry shouldn’t be too watery or too thick. Garnish with cilantro leaves. Serve hot with white rice.


Tips
Steam cook or pressure cook (1 whistle) the guvar/cluster beans and the drumsticks so that they are semi cooked and softened.  This will reduce the overall cooking time. Do not precook the potato and pumpkin, since they do not need a long cooking time and will get cooked through as the curry boils. If precooked, they will turn to mush. Fry the besan and the okra well. The okra needs to be crispy and the besan needs to be a brown color which will impart a brown color to the curry.
If you decide to change the vegetables, use hearty vegetables which will not become mushy when the kadhi is being boiled. You can also add in some tomatoes in this recipe. They should be added along with the potato and other vegetables. 

Wednesday, May 30, 2012

Potato Chips

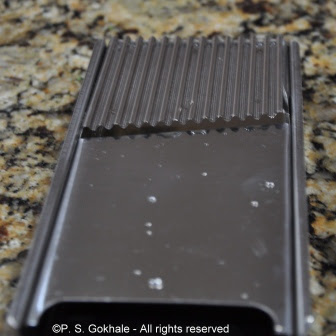
This is a recipe that takes me right back to childhood. When I was a little kid, I used to help my mom in all her tasks around the kitchen, well whatever she allowed me to do. One of the things she used to do in summers was to prepare various kinds of chips. Now these were special dried chips, which used to be stored in big bins and fried for special occasions or when we were expecting guests. She used to make these chips out of tapioca, raagi, and other grains but one that she used to always make were these dried potato chips. She used to make a few versions.  They used to be the regular flat chip, the wavy kind, shredded chips and  a lattice one. The lattice shaped chip was probably the most fascinating. in fact I used to think it was magic because the grater she used just had a wavy edge and I couldn't understand how she managed to get the lattice pattern in the potato. It always felt like magic.


Well last year, I spotted these chips at a friend's house. She mentioned that she had the grater and so I borrowed it. Again, I saw that this grater just had wavy edge and so naturally I called up my Mom to ask her how to get the lattice patter. This was when the mystery was finally solved. The key to making this lattice lay in the way the grater was used. Read ahead for instructions on how to use the grater. 

I finally made the chips and enjoyed making these and reliving childhood.


Ingredients
2 large potatoes
water, enough to cover the potoato chips completely
salt, to salt the water
a pinch of alum, optional

oil to deep fry the chips
salt
chilli powder (optional)
powdered sugar (optional)


Method
Wash and peel the potato. Grate the first chip, using the wavy edge of the grater. This first chip will be a wavy chip. Then, turn the potato 90 degrees to the original position and then grate the 2nd chip. This chip will have a lattice pattern. Again, turn the potato 90 degrees to grate the 3rd lattice patterned chip. Continue this till the entire potato has been grated.


As you grate out these chips put them in a bowl full of salted water. This will stop the oxidation of the potatoes and help keep it blemish free. Make sure that the water covers the chips completely. Once all the chips have been created, start heating the bowl. Bring it to a boil and then turn off the heat. Let it cool down a bit. At this stage, the chips will be slightly transluscent. At this stage the chips are cooked however not so soft that they will fall apart or get mushy. Now, drain the water and on a large cotton or plastic sheet, spread these out. Space them out and lay them flat to dry. You can dry these in the sun or even in your kitchen. It will take a little longer indoors, however they dry up completely in about 3-5 days depending on the season.


The chips shrink to almost half the size and become very tiny. Once the chips are completely dry, they will turn hard and brittle. You can store them in an airtight box at this stage.

When you are ready to eat them, heat up oil in a frying pan. Once the oil heats up, fry the chips and as you scoop them out, sprinkle a mixture of salt, sugar and chilli powder on the warm chips. 

You can also store these fried chips for a few weeks in an airtight box.


Tips
Sometimes it may happen that the dried potato chip may turn red or brown in color,  upon frying . To avoid this and to ensure that the potato chip remains blemish free and doesn't become red or discolored while frying, alum is used. However, this is optional. A couple of large potatoes will make several chips.
You can use the same method to make shredded potato chips or flat potato chips. Just use the appropriate grater edge.
Turn off the heat when the chips are transluscent. We don't want the chips to be over cooked.
To determine if the oil is hot enough, drop a small chip in the oil and if it comes up immediately, then the oil is hot. Turn the heat to medium and fry the remaining chips.
Though the chips shrink to a very tiny size upon drying, they will puff up as they are fried.
Make sure the chips are cool before storing them in a box.
This is also a side when an elaborate, traditional Indian meal is prepared along with a variety of fried chips and papads.

Sunday, May 27, 2012

Veggie/Garden Burger - Another Flexible Recipe

This is a great recipe to get your kids to eat their vegetables. The veggie patty in this recipe includes lots of vegetables as well as soy granules. It is delicious and very nutritious at the same time. Patties are great recipes to use leftovers too. I like to experiment with ingredients in the fridge as well as different vegetables to come up new and innovative ways to make the burger patties at home. Any extra patties can be frozen for a couple of months. They are very handy on days when you are rushed to make a quick meal.

If you don't wish to use these patties in burgers or sandwhiches, you can also make mini-sized medallions as sides to your meal or even as an appetizer which can be relished with some ketchup or green chutney.


Ingredients
2 medium potatoes, boiled and mashed
1 cup of soy nugget granules
5-6 green beans, chopped
1 carrot, cut into fine pieces
1/2 cup broccoli florets
½  cup peas
Green chillies, to taste
1inch ginger
Salt to taste
2 bread slices
1/4 cup rava or bread crumbs
oil to shallow fry the patties

burger bun
onion, sliced
lettuce
tomato, sliced
pepper
salt
ketchup
mustard
cheese slice


Method
Boil the soy granules  in 4 cups of water for 10 minutes. Drain and upon cooling, squeeze water out of the cooked granules. Wash the green beans, carrot, broccoli, peas.  Place these vegetables in a vessel and pressure cook for 1 whistle. Alternately, you can also steam cook the vegetables till soft or cook in the microwave for a couple of minutes till softened.

Make a paste of green chillies and ginger.

Mix together the potatoes, soy granules, pressure cooked vegetables and peas.  Mash all the ingredients together. To this add the chilli and ginger paste and salt. Add bread slices if the resultant mixture becomes watery, else you can skip the bread.  Spread out rava or bread crubms in a flat dish. Roll out the mixture into a small ball and flatten it. Then roll it in the rava or bread crumbs. Shallow fry in a flat pan.


To assemble the burger, apply ketchup and mustard on one half of the bun. Next lay a cheese slice, a lettuce leaf, a couple of onoin rings, a slice of tomato and then the patty. Serve with chips or a fresh salad.


Tips
If you are using frozen peas, wash them and then cook them for a minute or two in the microwave. These are pretty soft already and if you cook them in a pressure cooker, they will turn mushy.
If it is just a little soft, you can add a little cornflour. Also, if you want to avoid wheat and not use bread, substitute cornflour instead of bread.
I have also used some lefover beans or lentils and rice in lieu of soy granules. You can also use a variety of vegetables in the patty.

Saturday, December 17, 2011

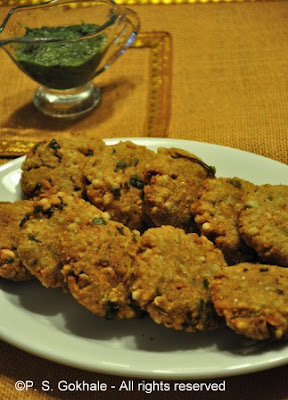
Sabudana Vada/Wada - Tapioca and Potato Fritters

This is an absolutely delicious delicacy. Tapioca is called "sabudana" in the Hindi and Marathi languages (the pronounciation varies a little), and Vada/Wada refers to deep fried dumplings. "Sabunada Vada are deep fried fritters/dumplings made with tapioca and potato, with a lot of ground peanuts sprinkled in. Absolutely lip smacking!! This is a dish that is reserved for special occasions and is one of the foods approved to be eaten on fasting days. However, most folks make it because it is so tasty. Over the years I have eaten this often, in different restaurants, at home and cooked by others and I must say, sometimes the vada can taste terrible, very chewy and dry. As a result, I had always been hesitant to make it, thinking that the recipe to get it perfect could be quite complicated. Finally, upon my family's repeated requests, I decided to try it out. I followed the advise of mom and lo and behold the end result was delicious. I am always thrilled when I am able make a recipe that I have always thought to be difficult. This one has a great end result,  and I hope you enjoy this recipe as well.


Ingredients
2 cups tapioca/sabudana (it should measure 2 cups after being soaked. Start off with 1 cup dry tapioca)
2 large potatoes, boiled and mashed
1 cup shingada/singada/singoda flour (water chestnut flour)
1 cup ground nut powder (see tips for how to make this)
1 tsp cumin powder
green chillies, finely chopped (5-8, to taste)
1/4 tsp baking soda
salt to taste
1/2 cup cilantro, chopped
1 tsp lemon juice
1/2 tsp sugar
1 tsp oil, luke warm
oil to fry


Method
See tips on how to soak the tapioca. Take the soaked tapioca and then crush it lightly, by processing in a blender or food processor. This will make it easier to mix it in with the potatoes. Then mix together the processed tapioca, singoda flour and potates. Add salt, cumin powder, ground nut powder, baking soda, and the cilantro. Add the lemon juice, sugar and the luke warm oil. Now mix this all together and knead a little, to form a dough. Take a fistfull of this dough and form it into a ball. Then flatten it to make a disc. Rest these discs on a plastic paper/sheet, so that it doesn't stick to the plate. The discs should be about 2-3 inches in diameter.


Heat the oil in a deep pan. There should be at least 3 inches of oil so that the vada can be entirely immersed in it. To test if the oil has heated enough, drop a inch of dough into the oil. If it rises up slowly, the oil is hot enough. The vadas need to be fried medium heat, so that they cook through. If fried on high heat, they will get cooked on the outside but will stay raw in the center.  Now, slowly release one vada from the side of the pan, it will go to the base of the pan and then slowly rise, once the vada starts gettting cooked. The vada will puff up and once browned, is ready to be taken out. Let the vadas rest on a paper towel to absorb the oil. These vadas will be light and very crispy. Serve with green chutney.


Tips
Singoda/shingada is water chestnut. You can find singoda/shingada flour in the local Indian store. Fry only 1-2 vadas at a time. As soon as the vada is added to the oil, the temperature of the oil decreases. So, fry only a couple at a time so that they get fried evenly and cooked through completely.
I also baked this dough, at 405 F for about 10-15 minutes, turning it over once, but these were not as crispy, though definitely low in calories.
To soak the tapioca, cover it completely with water such that there is enough water to cover all of hte tapioca and then add some more so that the water level is about a centimeter above the level of the tapioca. Soak this for at least 3-4 hours or overnight and then drain the water.

Wednesday, October 5, 2011

Batata Vada/Wada (Fried Potato Fritter)

"Batata vadas" are fried spicy potato fritters. It is one of the most common street foods in Maharashtra. Sandwhich one in a bun, add chutneys and voila, it is now a very Indian "burger". I have so many fond memories related to batata vadas. One that stands out is one rainy afternoon when my Dad and I had gone on a short hike on the outskirts of the city. There was a bracing wind, and a slight drizzle which soon turned into a downpour. Fortunately, we took found a small restaurant and took refuge there. Then, my dad ordered a plate of batata vadas with some hot tea. It was just fabulous! While the restaurant was pretty run down, the vadas were hot and tasty and the hot tea,the perfect drink for two drenched souls. Now, whenever it rains, I always wish that someone would hand me some vadas and tea. Well, I finally fried some when it rained the last time and they were lip smacking. So, next time it is dull, grey and pouring cats and dogs, whip up a batch and enjoy.


Ingredients
For the stuffing
1/2 onion, finely diced
2 large potatoes, boiled and mashed
salt to taste
2 garlic pods
1/2 inch ginger
2 chillies
1/4 cup cilantro, chopped
1/2 tsp sugar
1/2 lemon
2 tsp oil
1/8 tsp mustard seeds
1/8 tsp cumin seeds
a pinch of asafoetida/hing
pinch of turmeric

For the cover
1 cup besan/gram flour
1 tsp chilli powder
1 tsp oil, warm
1/4 tsp baking soda
salt to taste
1/8 tsp turmeric
water

oil to fry the vadas - there should be about 2-3 inches of oil, so that the entire potato fritter can be fried easily.


Method
Grind the green chillies, ginger and garlic into a paste. Mix it into the mashed potatoes. Mix in the onions and cilantro. Then add the sugar and salt to the mixture. In a small pan, hehe at the oil and add mustard and cumins seeds. Once they crackle, add the hing and turmeric. Turn off the heat and pour this onto the mixture. Mix well. Then squeeze some lemon juice into this mixture.

Roll out the potato mixture into small balls, about 1.5 - 2 inches in diameter. Keep aside.


In a mixing bowl, mix together the besan, chilli powder, salt and baking soda. Add some oil which has been warmed and then add some water. Add a little water at a time and mix to form a batter. The consistency of the batter should be thick so that when you dunk the potato balls the batter should coat it evenly.


Heat the oil. Then, dunk a potato ball into the batter and gently drop it into the oil. (be very careful not to splash any oil on you). Add about 3-4 vadas only at a time. Do not over crowd your frying pan. Fry the vadas till the cover is brown. Serve with spicy mint chutney and tamarind chutney.


Tips
If you add more water to the cover batter by mistake, add a little more flour and adjust the salt and chilli levels to taste. To check if the oil is hot enough, drop a little batter into the oil and if the droplets come up immediately, then the oil is hot and ready to fry the vadas.