Welcome to my blog

I hope you will find the recipe you are looking for your occasion here.

Now video instructions are available for select recipes and can be accessed at

Gardening and Cooking Made Easy

The latest 5 recipes are displayed on the
main page. For more recipes, you can browse the archive, click on the labels in the index to the left or use the Custom search below to look for a specific recipe.


Search for more results

Custom Search
Showing posts with label snack. Show all posts

Friday, September 27, 2019

Khasta Kachori

I was never fond of kachoris while growing up and hadn't tried making them at home. However, after a request from a family member, I decided to make it at home. These kachoris turned out delicious. I saw a few videos on youtube and understood that the key to a pastry/khasta texture and bite is to fry the kachori on really low heat. 

Also, I have realized the kachoris taste delicious with stuffing like aloo sabji or choley instead of just chutney. So next time you make or buy kachoris, try it out with some stuffing.


Ingredients:
The cover
4 cups all purpose flour
3 tsp salt
8 tsp ghee
water to knead a soft dough

The filling
4 heaped tsp coriander seeds
3 heaped tsp fennel seeds
1 heaped tsp cumin seeds
2 tbsp oil
¼ tsp Asafoetida / Hing
1 inch ginger, grated
2-3 green chillies, finely chopped
1 tbsp kasoori methi, crushed between palms
1 tsp red chili powder
2 tsp - garam masala
1/2 cup besan/chickpea flour
1 cup - Moong dal (soaked and coarse ground)
1 tsp black salt

salt to taste
1 tsp sugar
1 tbsp - amchoor /raw mango powder

oil for deep frying


Method 
For the cover
Add the salt and ghee to the all purpose flour and rub the ghee in. The ghee should be very well mixed with the flour. The test to check if the quantity of ghee is enough is to clench some flour in your fist and when you open your fist, it should retain its shape and not fall apart. Then add water to the flour and make a soft dough. Knead till soft and pliable and then keep aside to rest. Cover it with a towl or platic wrap. Taste the dough, and make sure it has a slight salty taste and not bland. Else after frying, the cover will taste very bland.

For the filling
Soak the mung dal till soft (2 hours) Mix together the coriander, fennel and cumin seeds and coarsely grind it. Heat oil in pan and add the hing and then add the ground seed mixture. Stir fry till fragrant and then add the ginger and green chillies, then add the garam masala, kasuri methi, red chilli power, black salt and black pepper. Then add the besan and mix well and cook till the besan starts to smell fragrant. Then add the the mung dal and cook till a dry mixture is formed. If you feel it is too dry, you can add some more oil. However, since this is going to be deep fried, I didn't add anymore. Add salt, sugar, and amchoor powder. Mix well and taste, adjust seasoning if needed. The dough should be slightly salty, since it will get less salty after frying.

Assembly and frying
Take a fistfull of dough and roll it out into a thick 2.5"-3" puri. It should be not be thin. Then add a 2-3 tsp of filling in the center. Gather the edges and bring it together and bring the dough together and pinch it well to seal well. If there is any extra dough, remove it. Flatten into a disc using your palm and roll it lightly to form a thick disc, about 3" diameter. Make sure that the cover is not too thin while you do that.
Heat oil in a deep frying pan. The oil should be luke warm and not too hot. Keep the heat on low/low flame. Then add the kachoris. It should take a couple of minutes for the kachori to start to puff up and start coming to the surface of the oil. Do not be tempted to increase the heat. Once they are puffed up, you can increase the heat slightly, and then fry them till golden brown on both sides.

Serve warm with chutney or potato curry or chole.


Tips
Soak the mung dal in hot water. The mung dal will be ready to be ground in 30-40 mins. This recipe will make about 20 good sized kachoris. Each batch of kachoris takes about 15-20 mins to fry.


Thursday, March 21, 2019

Pudachi Vadi/ Sambar Vadi

Pudachi vadi was definitely something completely new for me.  This is a deep fried delicacy where the stuffing is primarily made of cilantro. The closest snack which is similar to it would be bakarvadi. I hadn’t heard of it till a couple of years ago. And the way I learnt about it was from a Marathi daily soap (who says watching television isn’t educational, eh!). 
So fast forward to  present day, I was having a conversation with friends and family and this came up. I was  told ‘it tastes great. I used to enjoy eating it.’  So, I thought, why not try making it at home. That is the only practical way for me to taste it. 
This is also known as sambar vadi in Nagpur and supposed to be a speciality from the region (not related in anyway to the lentil based sambar). This is because coriander/cilantro is called sambar in Nagpur. I recently found out that it is also available in Kolhapur.
Of course the challenge with making something you’ve never seen or eaten before is that you don’t know if what you create is the right thing.  But my taster attested that, it had turned out exactly what he had eaten growing up.
It is delicious, the family loved it and I think I’ll be making it again and again.


Ingredients
Stuffing 
2 bunches cilantro - finely chopped, use thin stalks too
2 tsp white poppy seeds/khuskhus
2 tsp sesame seeds/til
1/2 cup dry coconut flakes
4 green chillies
4 large garlic cloves
10-12 green onion leaves
2-3 garlic scapes/leaves if available
1/2 red onion finely chopped
Salt to taste
1 tsp goda masala
For the cover 
2/3 cup whole wheat flour
1/3 cup all purpose flour
1/2 tsp baking powder
2 cups besan
1 tsp haldi
1 tsp chili powder
Salt to taste
3 tbsp oil
A Paste made of 2 tsp goda masala, 1 tsp tamarind concentrate, 1 tsp sugar, salt to taste


Method
Mix all the ingredients for the cover. Then add little water at a time and knead it into a hard dough (like for a puri). Set aside.
In a pan dry roast khus khus, and sesame seeds. Then dry roast the coconut flakes. Let it cool and the grind to a coarse powder. Grind the chillies and garlic. I used a mortar and pestle to make grind it.
Heat oil in same pan and add the chopped. The Add the garlic chili paste to the onions. Cook well and add the cut onion greens and garlic scapes. Sauté for a few mins and then add the cilantro. Cook for a few minutes then add 1 tsp goda masala. Cook for a few mins to dry out. And let cool. Then add salt to taste and mix well. This stuffing should be fairly dry.

Take a small ball of dough, enough to roll into an oval puri about 3 inches long. Roll small oval puri about 2 mm thick. Not too thin and transparent but more like samosa cover. Then apply a layer of the paste made with goda masala and tamarind.
Then line up about 2-3 tsp of the filling in the center along the length of the oval. Then wrap the two shorter ends together to make a roll. Seal the edges well. Use some water along the edges if needed to make sure that they edges stick. Using your fingers and palm shape the roll into a triangular shape if you like. This is not required but provides a shape to your vadi.

Heat oil in a kadhai. Fry on medium heat like a samosa till very well browned and crispy. They will crisp up further as they cool. On a ceramic electric stove top, I started the process at 7 and then fried it at 5.
Cut into smaller pieces and serve or serve full rolls. These taste amazing even when warm and can be served immediately upon frying.
Can also store in airtight container for 2-3 days or refrigerate for longer storage. Warm up in oven to crisp up if stored for a longer time.


Tips
Wash all the greens and let them dry before cutting. This will minimize the moisture introduced into the stuffing. If the edges are not sealed well, the roll will unravel and the filling will spill into the oil.
You can lightly panfry them with a tsp of oil before frying, to ensure a tight seal, cooking the sealed edge. Make sure that you do not brown the rolls during this pre-cooking process.
If you feel the rolls are not crisp enough after cooling down, then bake them in hot oven heated to 400F for 10 mins. Place them on a cooling rack and then on a baking cookie sheet/tray before placing in the oven for good air circulation and to avoid darkening on one side of the roll because it is in contact with a baking sheet/tin.
If you don’t have goda masala, substitute with dhania-jeera powder (1:1 ratio).

Friday, July 20, 2018

Sev Khamani

This is usually made with chana dal batter and is delicious.  I had made a mixed dal batter earlier in the week and had been making different things from it- idli, dosa, pizza base. So, I decided to use it to make sev khamani and it turned out great. No one realized that they were eating the same batter that had been used to make dosa the previous night! And it is a protein rich, delicious item which can be served stand alone and will make a complete meal. Or you can serve it as an item on a chaat menu. This is also a gluten free dish.


Ingredients
1 cup each of idli rice, tur dal, urad dal, mung dal, chana dal - soak for a few hours and grind it to make a thick batter (idli consistency)
Ferment overnight.

For the khamani
3 cups of the fermented batter
1/4 tsp turmeric
Salt to taste
For seasoning
3 tbsp oil
1/4 tsp mustard
1/4 tsp jeera
1/8 tsp hing
6-7 large garlic cloves, finely minced
2 tsps sugar, adjust to taste
Juice of 1 lime, adjust to taste
Thin besan sev (one used for bhel)


Method
Grease a bowl with some oil and pour the batter in. Add the salt and turmeric and stir well. Then steam cook it for 20 mins, till it sets (like dhokla or idli). Remove the bowl, let it cool a bit and the break up the cooked batter with the help of a spatula. If it is warm it will be soft and clumpy and won't separate into small pieces but that's ok.
In a large saucepan, heat up the oil and and the mustard and jeera seeds. Once you hear them crackle, add the hing and the garlic. Sauté the garlic for a minute or two and then add the cooked batter pieces and mix well with the seasoning. Now cook this on a low medium heat till the mixture starts to dry up a little and starts separating into smaller pieces instead of being stuck together in large clumps. Since the batter is already cooked, this just provides the texture. Before turning off the heat, add the sugar and lime juice and mix well and turn off the heat. The taste should be sweet and sour and garlicky.
And as it cools down the batter will stiffen and provide the right shev khamani texture.
Now pour this into your serving platter and sprinkle the besan sev liberally on it. Garnish with cilantro. If available add pomegranate seeds as a garnish.


Tips
You can make a different combination of dals and try the recipe.

Friday, March 23, 2018

Samosa Wraps

This recipe came about when I was trying to decide what to cook for dinner one weekday and all I could think of was eating samosas. Deep fried samosas; cooking them on a busy weekday evening in less than an hour's time seemed impossible. And I would have still had to cook something more to make it a balanced complete meal. Instead I decided to add lentil flour to whole wheat flour and make  rotis which would be a nutritious wrap cover. To make sure that it was well balanced with vegetables and a complete meal, I used cabbage and carrot for the stuffing which were the vegetables I was planning to use up that week. And then I roasted these on a flat pan/tava with about a teaspoon of oil per wrap. What could have been a regular roti sabji meal was now transformed into a delicious and exotic fare which the kids enjoyed thoroughly. It turned out so well, that I get requests to make it often.


Ingredients
1/2 cup urad  dal flour
1/2 cup chick pea flour/besan
1/2 cup green mung dal flour
2 cups whole wheat flour
1 tsp salt 
1 tbsp oil
water (1to 2 cups) to knead a dough that is soft to roll out the chapatis
1 napa cabbage head, shredded or finely sliced
1 carrot, grated
1 onion, sliced
2 garlic cloves, finely chopped
2 tsp tava fry masala
1/2 tsp garam masala
Salt to taste
Chili powder, optional, to taste 
1 tbsp oil
Oil to pan fry the samosas 


Method
Combine all the flours in a bowl and mix them. Mix the tbsp of oil and salt in and then add a little water at a time to knead the dough. It should not be too stiff. Cover and let it rest for 20 mins, if you have the time. If it is sticky, add a little more wheat flour.
Now, take a fistful of dough, and roll it out into a thin round roti/chapati/poli. And then roast each chapati till it is partially cooked, a couple of minutes on each side. Since it is going to be cooked again, make sure to not cook them through completely. Stack these up and keep aside. 

In a flat and large saucepan, heat up the remaining tbsp of oil and add garlic and onion to it when hot. Stir fry them till the onion is transparent and then add the carrot and napa cabbage. Let it cook for a couple of minutes. Then add the tava fry masala, garam masala and salt (and chili powder if using). Mix well and let it cook till the cabbage is cooked through. The water should evaporate as it cooks. If there is any water left after cooking, drain it.

Heat up a flat saucepan or tava on which you can pan fry the samosas. Now cut each partially cooked chapati into a semi circle. Roll it up into a cone and then add the napa cabbage and carrot stuffing into the cone. Since the chapati is partially cooked, you will not be able to seal the cone opening. Spread a couple of tsps of oil onto the pan surface. Now place the stuffed chapati cone onto the pan with the open side face down, so that the open side gets cooked first. Now let this cook on medium heat till the chapati is cooked well and starts to crisp up. Then flip it over and cook the other side till crisp. You can cook a few samosa cones at a time. Be careful when flipping it over to make sure that the stuffing doesn't fall out and add oil as needed while pan frying them.  Serve warm with ketchup.

This can be a main meal for a weekday dinner as it is a wholesome, healthy and tasty meal.


Tips
Since the dough has a lot of lentil flour, the resultant dough maybe a little sticky. You can use some wheat flour or oil to reduce the stickiness.
Napa cabbage has a lot more water content than regular cabbage and hence a large open pan will provide enough surface area for the quick evaporation of the water that is released from the cabbage. If you stuff uncooked chapatis you will be able to seal it properly, however since the cabbage will retain some water, the result may end up being soggy and uncooked. Hence the chapati is partially cooked to reduce the moisture content. 
Place the cooked ones on a wire rack if possible as you cook the entire batch. This will help keep the samosa crisp till it is served. You can use the same recipe with a variety of vegetables. If you cannot find tava fry masala, add 1/4 tsp of fennel powder or 1/2 tsp of fennel seeds and 1/4 tsp of aamchur instead and increase the quantity of the garam masala to 1 tsp.

Wednesday, March 21, 2018

Vegetable Croquettes

This is a delicious recipe which is full of nutritious and delicious vegetables, has chickpea flour and bread crumbs and can make for a complete meal on a busy weekday. These are cooked in an appe pan also known as an abelskiver pan to keep them nutritious without impacting taste or texture. You can also deep fry them.


Ingredients
1/2 small cauliflower
3 potatoes, peeled
2 carrots, peeled
1/2 inch ginger, grated
2 garlic cloves, finely chopped
1/2 onion, finely chopped
15 green beans
1 green chili (can increase to make it spicy)
2 tsp garam masala
1/4 tsp haldi
1 tsp cumin powder
1/2 tsp dhania powder
Salt to taste
2 cups panko bread crumbs/ regular bread crumbs 
1/2 cup besan flour
Rava/semolina and bread crumbs to coat the croquettes
Oil


Method
Chop all the vegetables (except onion, ginger and garlic) and put them in a pressure cooker vessel. Pressure cook for 2-3 whistles till the vegetables are mushy and completely cooked. Drain any water released from the vegetables and mash the vegetables. Then add the seasonings - salt, chili, ginger, garlic, onion, garam masala. Mix it wee. Then add the bread crumbs and besan. Taste and adjust salt and if you want to make it spicy you can add chili powder or more green chilies. Mix all of these ingredients well. The resultant mixture shouldn't be sticky but should come together like a dough. Spread bread crumbs or rava on a plate. I made some flat patties that were coated in breadcrumbs and rolled the ball shaped croquettes in rava. Rava can withstand the heat from the cast iron appe pan better than the breadcrumbs and the outer crust doesn't burn or char while the inner part of the croquette ball is cooked. 

Heat the appe pan and add a little oil to each appe mold. Place the croquette balls in the appe and roast them evenly by turning them throughout the process on medium heat. Add a few drops of oil as necessary when rotating the balls. 

Cut croquette to show how a completely cooked croquette looks from the inside


You can also flatten them into patties and roast them on a pan. To cook the flat patties, I added a couple of teaspoons of oil to a pan and roasted them well on both sides, till the bread crumb coated crust was golden brown. 

You can also deep fry these croquettes on medium heat.


Tips
You can steam cook or boil the vegetables till cooked to a soft texture where they can be mashed.

Friday, August 8, 2014

Mango Cake

One of the best things about summer (other than the summer vacation) while growing up, was the abundance of mangoes and getting to eat mango and all the different dishes made from raw and ripe mangoes. I must confess, it is my favorite fruit. Of course, the best varieties that I have tasted have been in India and of all the ones available there while growing up, the "Alphonso" was my absolute favorite. The memory of walking into a room filled with the smell of ripe mangoes is still one of my happy memories.

The varieties that I have come across in the stores here are generally from the Phillipines or Mexico and I have found that they are more fibrous. The one that I like most among the ones that are easily available here, is the Ataulfo mango. Now, while this is found in the local store all through the year, the best taste is only found during summer, which is when the mango is in season.

I have made and different kind of dishes made with mangoes, but had never eaten a mango cake, which was infused with flavors of mango within the cake. So, I decided to experiment and the result was delicious. In fact, the first time I made it, it was gone before I could take a singe picture. I managed to sneak in one picture the second time I made it. I have also used it as a base in a mango mousse cake. It is absolutely mouth watering. Hope you like it as much as I did, when you make it.


Ingredients
1 and 1/4 cups, plus 2 tbsp of all purpose flour (maida)
1 tsp baking powder
1/8 tsp salt
1/2 cup butter - room temperature
1 cup sugar
2 eggs
1 tsp vanilla essence
1/4 cup mango pulp ( it is generally sweetened. it can be found in a store which carries Indian products)
1/4 cup milk
1/4 cup mango pieces, diced


Method
Grease a baking dish with some butter and dust with some all purpose flour. Preheat the oven to 350F.

Sieve all the dry ingredients together and keep aside. Sieve these ingredients a couple of times. In another bowl, whisk together the butter and sugar. Beat it till the butter is fluffy. Add one egg at a time to this and beat each egg into the mixture till it is nice and fluffy. Add the vanilla essence. Add one third of the dry ingredients to the batter and fold it in. Mix the mango pulp and milk together. Then add half of this mixture to the batter. Alternate between the milk and mango mixture and the dry ingredients till they are all incorporated into the batter. Then add the mango pieces to the batter and fold it in carefully. Do not over mix and deflate the batter.

Bake the cake at 350 F for about 30 minutes. Use a knife and insert it into the center of the cake. If it comes out clean then the cake is ready. If not, bake for a few more minutes.
Take if out and let the pan cool on a wire rack for 10-15 mins. Then invert the pan onto the cooling rack and slide the cake out. Let the cake cool if you wish to ice it.


Tips
To prevent the mango pieces from sinking to the bottom of the pan, dust a little flour on the pieces and coat them before folding them into the batter. Make sure to grease the pan completely and generously, so that the cake doesn't stick. You can also add a parchment paper to the base of the mold and grease it before pouring the batter if you want to be certain that the cake will come out easily. 

Tuesday, December 11, 2012

Mexican Pizza

I have so many photos now, that I am having a hard time trying to decide which recipe to post next. And, as I backup and archive these photos, some recipes are slipping away from memory. So, I am going to try and jot down notes when I cook, so that when I finally post the recipe, I am able to remember all the details.

I am sure that you are wondering what a Mexican pizza is. Is the base made from tortillas or do I top it with salsa? Well, this is an inspiration from a pizza that I have eaten at a restaurant called "California Pizza Kitchen". It is a delicious and flavorful pizza. The pizza has a traditional base and has a thinner crust than the usual one inch crust pizzas. It it topped with blackbeans, tomatoes and onions and green lettuce. And finally the topping of tortilla chips lends the crunchy texture. So every time you bite down into a slice, you hear a nice satisfying crunch. Well, one day I decided to reverse engineer this dish and see if I could create a similar taste. The challenge was to find the right spices to create that similar and oh so tasty flavor. The end result was very close to the original. My family enjoyed it and I got great feedback from the fact that we polished off the entire pizza in one sitting. So, make this the next time your family can't decide on whether to eat Italian or Mexican. This is one tasty alternative which will satisfy everyone.


Ingredients
1 prebaked pizza base OR
pizza dough for 1 pizza
2 cups soaked and cooked black beans, alternately you can use one can of black beans
4 tomatoes, diced (or use canned tomatoes)
green chillies or jalapeno, to taste
1/8th tsp, cumin powder/jeera powder
salt to taste
1/2 onion, diced
1/4 green bell pepper, diced
1/4 yellow bell pepper, diced
1/4 red bell pepper, diced
3-4 green leaf lettuce leaves, sliced into thick ribbons
2-3 green onion stalks and leaves, diced
1 cup shredded mozzarella cheese (can use any other cheese blend)
1/4 tsp sugar, optional
10 tortilla chips, crushed into bite size pieces or you can use tortilla strips
2 tbsp sour cream, adjust to taste


Method
If you are using pizza dough, then roll out the dough to the desired thickness and blank bake (see tips) the pizza till the base is cooked through for about 10-15 minutes at 450 F. This prevents the pizza from getting soggy. While your pizza dough is getting baked, mix together the tomatoes, chillies and add salt. If the tomatoes are sour, add a little sugar. Cook this mixture down, till a thick sauce is created. You will not need a lot of sauce, just enough to cover the pizza base.
Then, heat the cooked black beans, add the cumin powder to this and some salt.
Now, you are ready to assemble the pizza.


Take your prebaked pizza base. Then spread a layer of the tomato sauce. Next spread a generous layer of the black beans. Then, sprinkle the diced onions and bell peppers as the next layer. Finally, add the layer of cheese.  Then, bake the pizza at 350F for 10 minutes or till the cheese has melted completely.


Take it out of the oven. Then, cover it with lettuce, green onion leaves and tortilla chips. Finally, drizzle a layer of sour cream on the pizza.

Serve hot with some salsa on the side.


Tips
You can find an easy to make pizza dough recipe here. You can also find pizza dough at grocery stores these days or even request a pizza restaurant to sell you some. Blank baking, means baking the pizza base without any toppings. This is to cook the pizza base, so that the pizza doesn't get soggy in the center. You can also blank bake the pizza base a couple of days earlier and then use this base when you are ready to add the toppings. Prick the dough before you bake it, else it will puff up. Else, you can place a foil on top of the rolled dough and cover it with some baking weights or beans and then blank bake the base.
If you are using canned beans, make sure to rinse them out before using it. Also, add a little water (a tablespoon or so) to the beans as you cook them with the cumin powder and salt.
If you are starting with dry black beans, then soak them overnight. Next day, pressure cook these till completely cooked and slightly softened. You can add some salt to the beans when you cook them. 

Wednesday, May 30, 2012

Potato Chips

This is a recipe that takes me right back to childhood. When I was a little kid, I used to help my mom in all her tasks around the kitchen, well whatever she allowed me to do. One of the things she used to do in summers was to prepare various kinds of chips. Now these were special dried chips, which used to be stored in big bins and fried for special occasions or when we were expecting guests. She used to make these chips out of tapioca, raagi, and other grains but one that she used to always make were these dried potato chips. She used to make a few versions.  They used to be the regular flat chip, the wavy kind, shredded chips and  a lattice one. The lattice shaped chip was probably the most fascinating. in fact I used to think it was magic because the grater she used just had a wavy edge and I couldn't understand how she managed to get the lattice pattern in the potato. It always felt like magic.


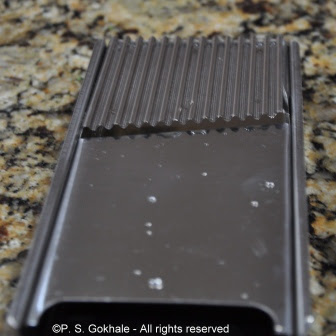
Well last year, I spotted these chips at a friend's house. She mentioned that she had the grater and so I borrowed it. Again, I saw that this grater just had wavy edge and so naturally I called up my Mom to ask her how to get the lattice patter. This was when the mystery was finally solved. The key to making this lattice lay in the way the grater was used. Read ahead for instructions on how to use the grater. 

I finally made the chips and enjoyed making these and reliving childhood.


Ingredients
2 large potatoes
water, enough to cover the potoato chips completely
salt, to salt the water
a pinch of alum, optional

oil to deep fry the chips
salt
chilli powder (optional)
powdered sugar (optional)


Method
Wash and peel the potato. Grate the first chip, using the wavy edge of the grater. This first chip will be a wavy chip. Then, turn the potato 90 degrees to the original position and then grate the 2nd chip. This chip will have a lattice pattern. Again, turn the potato 90 degrees to grate the 3rd lattice patterned chip. Continue this till the entire potato has been grated.


As you grate out these chips put them in a bowl full of salted water. This will stop the oxidation of the potatoes and help keep it blemish free. Make sure that the water covers the chips completely. Once all the chips have been created, start heating the bowl. Bring it to a boil and then turn off the heat. Let it cool down a bit. At this stage, the chips will be slightly transluscent. At this stage the chips are cooked however not so soft that they will fall apart or get mushy. Now, drain the water and on a large cotton or plastic sheet, spread these out. Space them out and lay them flat to dry. You can dry these in the sun or even in your kitchen. It will take a little longer indoors, however they dry up completely in about 3-5 days depending on the season.


The chips shrink to almost half the size and become very tiny. Once the chips are completely dry, they will turn hard and brittle. You can store them in an airtight box at this stage.

When you are ready to eat them, heat up oil in a frying pan. Once the oil heats up, fry the chips and as you scoop them out, sprinkle a mixture of salt, sugar and chilli powder on the warm chips. 

You can also store these fried chips for a few weeks in an airtight box.


Tips
Sometimes it may happen that the dried potato chip may turn red or brown in color,  upon frying . To avoid this and to ensure that the potato chip remains blemish free and doesn't become red or discolored while frying, alum is used. However, this is optional. A couple of large potatoes will make several chips.
You can use the same method to make shredded potato chips or flat potato chips. Just use the appropriate grater edge.
Turn off the heat when the chips are transluscent. We don't want the chips to be over cooked.
To determine if the oil is hot enough, drop a small chip in the oil and if it comes up immediately, then the oil is hot. Turn the heat to medium and fry the remaining chips.
Though the chips shrink to a very tiny size upon drying, they will puff up as they are fried.
Make sure the chips are cool before storing them in a box.
This is also a side when an elaborate, traditional Indian meal is prepared along with a variety of fried chips and papads.

Sunday, May 27, 2012

Veggie/Garden Burger - Another Flexible Recipe

This is a great recipe to get your kids to eat their vegetables. The veggie patty in this recipe includes lots of vegetables as well as soy granules. It is delicious and very nutritious at the same time. Patties are great recipes to use leftovers too. I like to experiment with ingredients in the fridge as well as different vegetables to come up new and innovative ways to make the burger patties at home. Any extra patties can be frozen for a couple of months. They are very handy on days when you are rushed to make a quick meal.

If you don't wish to use these patties in burgers or sandwhiches, you can also make mini-sized medallions as sides to your meal or even as an appetizer which can be relished with some ketchup or green chutney.


Ingredients
2 medium potatoes, boiled and mashed
1 cup of soy nugget granules
5-6 green beans, chopped
1 carrot, cut into fine pieces
1/2 cup broccoli florets
½  cup peas
Green chillies, to taste
1inch ginger
Salt to taste
2 bread slices
1/4 cup rava or bread crumbs
oil to shallow fry the patties

burger bun
onion, sliced
lettuce
tomato, sliced
pepper
salt
ketchup
mustard
cheese slice


Method
Boil the soy granules  in 4 cups of water for 10 minutes. Drain and upon cooling, squeeze water out of the cooked granules. Wash the green beans, carrot, broccoli, peas.  Place these vegetables in a vessel and pressure cook for 1 whistle. Alternately, you can also steam cook the vegetables till soft or cook in the microwave for a couple of minutes till softened.

Make a paste of green chillies and ginger.

Mix together the potatoes, soy granules, pressure cooked vegetables and peas.  Mash all the ingredients together. To this add the chilli and ginger paste and salt. Add bread slices if the resultant mixture becomes watery, else you can skip the bread.  Spread out rava or bread crubms in a flat dish. Roll out the mixture into a small ball and flatten it. Then roll it in the rava or bread crumbs. Shallow fry in a flat pan.


To assemble the burger, apply ketchup and mustard on one half of the bun. Next lay a cheese slice, a lettuce leaf, a couple of onoin rings, a slice of tomato and then the patty. Serve with chips or a fresh salad.


Tips
If you are using frozen peas, wash them and then cook them for a minute or two in the microwave. These are pretty soft already and if you cook them in a pressure cooker, they will turn mushy.
If it is just a little soft, you can add a little cornflour. Also, if you want to avoid wheat and not use bread, substitute cornflour instead of bread.
I have also used some lefover beans or lentils and rice in lieu of soy granules. You can also use a variety of vegetables in the patty.

Sunday, February 5, 2012

Upma - A Farina/Semolina Dish

Upma is a popular snack found almost everywhere in India (well at least the places that I have visited). It is a snack which is as popular as "Poha" and is just as widespread in availability. It is called many names like Uppit, Uppitu, Rava Upma, Sooji Upma, Sanja and so on (just the various names I know it by). It is made out of semolina, which is a wheat product.  It can be made using just onions for seasoning or with a lot of vegetables. It is a very flexible dish, u can use fine or coarse semolina, add as many vegetables as you want and totally make it your own. However, there are some basic principles that must be followed when making it, else the end product becomes dense and lumpy and is not appetizing at all.


Though this is a relatively easy dish, that I have made several times, I had never gotten results that would make me take a picture of the dish and I was never been happy with it. In fact it is one dish I try to avoid cooking, if possible. However, three weeks ago I finally had the bright idea to ask my Mom for her recipe (you would think that I would have the good sense to ask earlier, no??).  After talking to her I realized where I made an error and was able to satisfactorily correct it. Within the past two weeks I have already made this recipe twice with fantastic results and a lot of compliments. I  am quite sure that I will now be making it as frequently as I make my other go to snack - "Pohe". So for all of you out there that see upma as a challenge, this recipe will help you get great results.

Ingredients
1/4 cup oil/ghee (clarified butter)
1 cup semolina/sooji/rava/farina
2-2.5 cups water
1/8 tsp mustard seeds
1  tsp urad dal
a pinch of asafoetida
8-10 curry leaves
a couple of green/red chillies, to taste, sliced into a couple of pieces
1 tsp ginger and green chilli paste
1/4 cup onion, diced finely
1/2 tomato, diced finely
1/4 cup cauliflower florets, diced/separated into small florets
1/4 cup potato, diced
1/8 cup peas
1/8 cup green beans, diced finely
1/8 cup carrots, diced finely
3-4 black pepper pods
1/8 tsp cumin seeds


Method
In a pan, take the rava and roast it on medium heat. You  need to roast it till you start smelling the cooked aroma of the semolina and it no longer has the raw smell. It will be lightly browned. Keep aside.
Start heating the water. The water must be boiling when it is used, so it is important to start heating it in parallel while starting to work on the seasoning. Crush the cumin seeds and peppercorns to a coarse powder and keep aside
In a deep pan, heat the oil/ghee. To it add the mustard seeds and once they crackle, add the urad dal, curry leaves, green/red chillies. Once the urad dal turns slightly brown, add the onions and the ginger-chilli paste. Cook the onions till transparent, then add the rest of the vegetables. Cook the vegetables completely. Then add the salt and add the sugar. Then, add the roasted rava and stir till the rava is well coated with oil. Cook it for a couple of minutes.
At this phase add the crushed cumin and peppercorn to the boiling water. Then pour the water to the rava and stir well. Cover the pan and let it cook. Cook this covered for about five to seven minutes, stirring it occassionally, so that it doesn't stick to the bottom of the pan.
The rava will fluff up and the volume will double. Add cilantro and turn off the heat. Then when it has cooled for a couple of minutes, squeeze the lemon juice and mix. Also, at this phase you can add a tsp of ghee/clarified butter. If you have cooked it in ghee, then it is not necessary to add ghee to at the end.


Tips
You can also roast the rava in the microwave. Stir after every minute and after the first couple of minutes, roast it in 30 second intervals. Do this till the rava loses its raw smell. You can then store it as well.  Store it once it has cooled down.
Do not skimp on the oil. The main reason why my upma turned out not so good was because I was using about 1 tbsp oil and that is very less and will make the rava sticky. Also fry the rava for a few minutes in oil, so that it gets coated with the oil, so it will not stick to each other that much when you add water. You can also use ghee/clarified butter instead of oil to make the upma. This will make it very rich and tasty.
The water that is added in at the end must be at a rolling boil and not just hot. It is convenient if you start heating the water in a pan at the same time that you start heating the oil or even a couple of minutes before that.
You can use a combination of any of the vegetables listed above. For one cup rava, you can use a maximum of about 1 cup of vegetables (upto 1/4 cup less or more). Try and cut all the vegetables to about the same size.
You can also skip all the additional vegetables and use only onion to season it. It even tastes great with just onions and a little tomato.
To make ginger and chilli paste, grind together 1 inch ginger along with 1-2 green chillies and some salt. Then use the required amount.

Saturday, December 17, 2011

Sabudana Vada/Wada - Tapioca and Potato Fritters

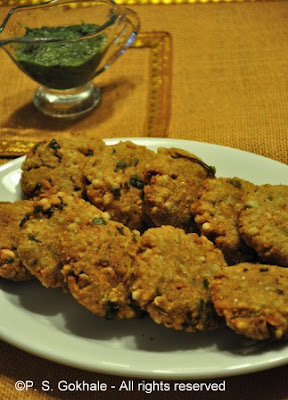
This is an absolutely delicious delicacy. Tapioca is called "sabudana" in the Hindi and Marathi languages (the pronounciation varies a little), and Vada/Wada refers to deep fried dumplings. "Sabunada Vada are deep fried fritters/dumplings made with tapioca and potato, with a lot of ground peanuts sprinkled in. Absolutely lip smacking!! This is a dish that is reserved for special occasions and is one of the foods approved to be eaten on fasting days. However, most folks make it because it is so tasty. Over the years I have eaten this often, in different restaurants, at home and cooked by others and I must say, sometimes the vada can taste terrible, very chewy and dry. As a result, I had always been hesitant to make it, thinking that the recipe to get it perfect could be quite complicated. Finally, upon my family's repeated requests, I decided to try it out. I followed the advise of mom and lo and behold the end result was delicious. I am always thrilled when I am able make a recipe that I have always thought to be difficult. This one has a great end result,  and I hope you enjoy this recipe as well.


Ingredients
2 cups tapioca/sabudana (it should measure 2 cups after being soaked. Start off with 1 cup dry tapioca)
2 large potatoes, boiled and mashed
1 cup shingada/singada/singoda flour (water chestnut flour)
1 cup ground nut powder (see tips for how to make this)
1 tsp cumin powder
green chillies, finely chopped (5-8, to taste)
1/4 tsp baking soda
salt to taste
1/2 cup cilantro, chopped
1 tsp lemon juice
1/2 tsp sugar
1 tsp oil, luke warm
oil to fry


Method
See tips on how to soak the tapioca. Take the soaked tapioca and then crush it lightly, by processing in a blender or food processor. This will make it easier to mix it in with the potatoes. Then mix together the processed tapioca, singoda flour and potates. Add salt, cumin powder, ground nut powder, baking soda, and the cilantro. Add the lemon juice, sugar and the luke warm oil. Now mix this all together and knead a little, to form a dough. Take a fistfull of this dough and form it into a ball. Then flatten it to make a disc. Rest these discs on a plastic paper/sheet, so that it doesn't stick to the plate. The discs should be about 2-3 inches in diameter.


Heat the oil in a deep pan. There should be at least 3 inches of oil so that the vada can be entirely immersed in it. To test if the oil has heated enough, drop a inch of dough into the oil. If it rises up slowly, the oil is hot enough. The vadas need to be fried medium heat, so that they cook through. If fried on high heat, they will get cooked on the outside but will stay raw in the center.  Now, slowly release one vada from the side of the pan, it will go to the base of the pan and then slowly rise, once the vada starts gettting cooked. The vada will puff up and once browned, is ready to be taken out. Let the vadas rest on a paper towel to absorb the oil. These vadas will be light and very crispy. Serve with green chutney.


Tips
Singoda/shingada is water chestnut. You can find singoda/shingada flour in the local Indian store. Fry only 1-2 vadas at a time. As soon as the vada is added to the oil, the temperature of the oil decreases. So, fry only a couple at a time so that they get fried evenly and cooked through completely.
I also baked this dough, at 405 F for about 10-15 minutes, turning it over once, but these were not as crispy, though definitely low in calories.
To soak the tapioca, cover it completely with water such that there is enough water to cover all of hte tapioca and then add some more so that the water level is about a centimeter above the level of the tapioca. Soak this for at least 3-4 hours or overnight and then drain the water.