The latest 5 recipes are displayed on the main page. For more recipes, you can browse the archive, click on the labels in the index to the left or use the Custom search below to look for a specific recipe.
We have two Barbados Cherry bushes, which are about 4 years now and are producing a lot of cherries. We've been picking about a hundred cherries a day over the last 2-3 weeks. Finally the stage has come where our consumption cannot keep up with the number we are harvesting daily. So, naturally the next step was to figure out how to use these to make something tasty out of them. Various options went through my mind. Since these cherries are slightly tart even when ripe, I thought of many options like chutney, jam, jelly or lemonade. All of these will definitely taste good. I started with the intent of making a jelly so that I could preserve it for the year. However, as I was cooking the cherries, we started talking about ice creams and I decided to use the entire cherry pulp to make popsicles.
Now, pitting these cherries like a normal cherry is impossible because they have 3 seeds which have a leaf like structure around them and a lot of the pulp gets stuck to these seeds. So, I decided to cook them and then separate the seeds from the pulp. So, let's get into the details of how I made these popsicles.
Here is the Video Link
https://youtu.be/k5bwUPtUOWs
Ingredients
4 cups Barbados cherries
water
1 to 1.5 cups sugar, adjust to taste
1/8 tsp salt, adjust to taste
1 tbsp lemon juice, adjust to taste (optional)
Method
Place the cherries in a saucepan and add enough water to cover the cherries and bring it to a boil. Boil the cherries for a few minutes till the cherries soften. Then using a spatula, mash the cherries (see video) gently by pressing them to the side of the saucepan. If it is not easy to squeeze out the pulp by doing so, let the cherries cook further and get tender. Then, the seeds will start separating easily as you mash the cherries with the spatula. Then turn off the heat and let it cool down till it is easy to handle. Next strain the pulp mixture through a large sieve. Again using a spatula or your fingers press the pulp down through the sieve till the seeds remain. Discard the seeds.
Now, add the sugar to the pulp and salt. I recommend adding about 1/2-1 cup of sugar to begin with and increase the amount to taste. If needed, add some lemon juice to balance out the taste. I added about a tbsp of lemon juice to balance out the sweetness from the sugar.
Stir this mixture well to dissolve the sugar and salt. Taste the mixture before pouring into molds and make adjustments before freezing. Then pour this into molds and freeze. I was able to make 10 popsicles and froze the remaining mixture in a large glass bowl. I will cut it into slices and serve it as a sorbet.
Tips
If the seeds still have a lot of pulp stuck to them, pour some hot water on the seeds and then using your fingers (a spoon can be used but fingers work best), separate the pulp from the seeds. Strain this pulp through the sieve.
Welcome to our sixth episode of the Culinary Tour of the World. This post takes us to the Carribean islands of Antigua and Barbuda (Antigua is pronounced as "Antigah"). Antigua and Barbuda are islands in the West Indies. As I was researching the cuisine, I learnt that there are many dishes which are similar across the various Caribbean islands like fungie. There are many seafood and other meat dishes which have a variety of vegetables too and and fresh tropical fruits are aplenty! A couple of dishes that I observed were spoken of when speciality from Antigua was discussed in some Caribbean food groups, one was home made ginger beer and the other was ducana. I bought the ingredients to make ginger beer, which was essentially a lot of grated ginger, sugar and water to create a ginger drink (non-fermented), but then realized that this is a commonly brewed drink on other islands too. So, finally I decided to make ducana which is a speciality made with coconut and sweet potato and usually served along with saltfish and vegetables.
It was absolutely delicious!! We topped it with a little ghee (clarified butter) and oh my goodness, it made a delicious dessert. The taste is very similar to the coconut dumpling (modak), except here all the ingredients are cooked together. It is always exciting to find similarities between known dishes and new ones I am exploring through this project!
Link to the video recipe
Ingredients
1/2 cup coconut, grated (fresh or frozen and thawed)
1/2 cup sweet potato, grated (Japanese sweet potato or one which has cream colored flesh)
1/3 cup sugar
2 tbsp water
1/2 to 2/3 cup all purpose flour
1/4 tsp nutmeg powder
1/4 tsp ginger powder
1/2 tsp vanilla essence
banana leaves and foil to wrap the ducanas
water to boil the ducanas
Method
In a bowl, mix together the coconut, sweet potato and sugar. Mix well and then add the water, then add the spices and vanilla essence. Then mix in the all purpose flour. Add only a little to begin with and mix it to see how thick the mixture gets. It should be like a thick cake batter. I needed to use only about 1/2 cup of flour. If you live in a humid climate, or if there is a greater moisture content in your ingredients, you may need to use more flour.
Place a banana leaf (about 8"X4") on top of a foil which has similar dimensions. Add some batter (1/4th of the total) to the center and shape it into a rectangle (see video). Then fold the leaf over the batter, to create a rectangular packet. Then fold the foil to create a rectangular packet.
Boil water in a saucepan or large pan. To this add the foil packets and cook for about 45 mins to an hour. Remove the packets from water and drain well. Serve warm. It is not usually topped with butter or ghee, but adding a dollop really enhances the dish.
Tips
Double the ingredients to make 8 ducanas. This recipe will yield 4 ducanas which are about 2 inches by 4 inches in size. You can use desiccated coconut too, if you cannot find fresh coconut. However, soak it in a little milk before using it. The amount of flour you use will depend on the moisture content of the rest of the ingredients. You need enough to create a thick batter. Too much may yield to a stiff dumpling.
Welcome to our fourth episode of the Culinary Tour of the World. This post takes us to Andorra. Andorra is a very small country, described as a tiny independent principality, in Europe. It is between France and Spain in the Pyrenees mountains. I had not heard about it till I started this project. So far, this has proven to be the a difficult one to choose a recipe from, because there are just a handful of recipes that are called out as traditional Andorran foods. Of those, the majority of them are meat dishes and include delicacies like snails. Also, I really wasn't able to find a blog which was written by a person from Andorra. As I researched vegetarian recipes, I kept coming across just 2-3 recipes which were common across travel sites, blogs and even books. One of them was Pa amb Tomaquet, which is bread rubbed with garlic and tomatoes, and another was spinach with pine nuts and raisins. There was a third once called Trinxat which is potato and cabbage cake or like hash browns which is topped with bacon. I thought I could make all these (skipping the bacon) and make a small meal. However, they were all sides and given how meat heavy the entrees were, taking the meat away would not give the same experience.
So, I asked a friend who lives in France who suggested that I look for Catalan recipes. That was a great suggestion and that took me to menu cards of Andorran restaurants. Since I couldn't find a vegetarian entree, I started looking for desserts and breads. I found a mention of a bread called Coca de Massegada which was listed as a very traditional bread but I was unable to find an authentic recipe for it. I found a list of ingredient, but there were no measurements and I did not want to experiment a lot. Finally, I settled on two choices Bunyols de vent which sounded like doughnuts made from a pate choux dough and Torrijas which is a dessert French toast which has a Catalan/Spanish influence.
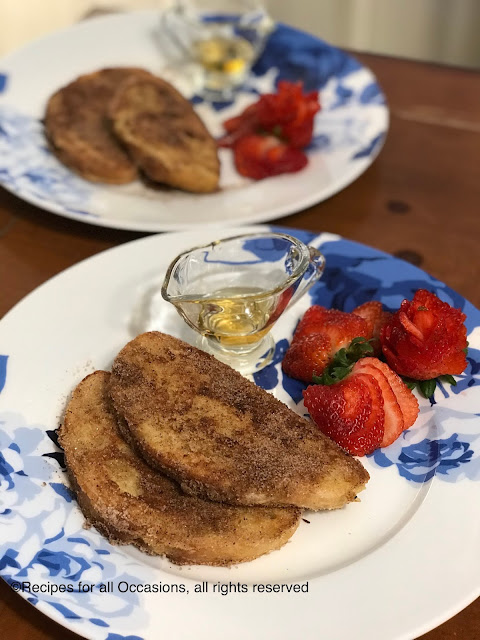
The plan was to make the Bunyols de vent, but I was inspired to make Torrijas for breakfast and the family absolutely loved it. So this is a delicious french toast, where the difference is that the bread is not soaked in an eggy batter like the traditional French toast. Instead the bread is soaked in milk and then dipped in whisked egg and pan fried. Then it is coated with cinnamon sugar and served with syrup. The milk can be boiled with fragrant spices to add more flavor. The end result is similar to churros. The outside gets crispy and the inside is soft and delicious. While this is meant to be a dessert, it is delicious as a brunch too and we have enjoyed this so much, that it has been added to the weekend brunch repertoire. This is a very simple and delicious recipe. Do give it a try!
Here is the video link to the Torrijas recipe
Ingredients
6 slices of Italian bread, stale (any type of bread which is cut into thicker slices than sandwich bread. Can also use sandwich bread bread but make sure it is a little stale and dry)
1 cup milk
4 tbsp sugar (adjust to taste)
1.5 tsp cinnamon powder
2 tbsp oil
2 eggs
1 tsp vanilla essence
Method
Mix the cinnamon and sugar together to create the cinnamon sugar.
Whisk the eggs and vanilla essence together. Warm up the milk till it is lukewarm. If you want to add more fragrant spices to the milk, boil them with the milk and then let the milk cool for a few mins till lukewarm. Add 2 tbsp of sugar to the milk. Pour the milk into a tray and lay the bread slices in the milk. Let it stay till the milk is absorbed, up to 30 mins. Heat a tbsp of oil in a pan and then dip the bread slices in the whisked egg and then place it in the pan. Fry the bread on both sides till golden brown at medium heat. Then place it in the cinnamon sugar and coat it on both sides with the cinnamon sugar. Add more oil and fry the rest of the breads.
Serve with syrup. It was delicious warm as well as cold. As a dessert, it is eaten cold per what I have been able to determine.
Tips
I add vanilla essence to the eggs so that there is no eggy smell. You can skip this or add the essence to the warm milk. Fragrant spices which can be added to the milk are cloves, cinnamon, cardamom, vanilla, and lemon rind/zest.
Laminated dough recipes are lengthy! That is important to remember as you start on this recipe. The first time I made a laminated dough was when I was in 6th grade. I made a puff pastry, under the watchful guidance of my mom who walked me through what each step meant. And the main thing I remember about that was that it took us the entire day to make it. So, I'd not been tempted to make such a pastry again till a few weeks ago.
I came across a video in which they showed a bakery processing dough and laminating it and then finally adding a layer of chocolate dough and baking beautiful chocolate filled croissants. That was motivation enough for me to attempt the croissants. The main difference between croissant dough and puff pastry is that the former is a yeasted dough. You still need a lot of butter, refrigeration between steps and a lot of patience. Now that I am older (and hopefully wiser) I had enough patience to spend a day and half in preparing these. The end result was fantastic! Beautiful lamination, very buttery and flaky!
I used the King Arthur Flour recipe and made modifications as I tried to attempt the beautiful technique I had seen in the video of making the chocolate croissants. I weighed out most of the ingredients and for some noted the volume measurements too which I have noted below in the recipe. I used only half the dough (the rest is in the freezer) and was able to shape 18 medium sized croissants out of these.
Watch the video to visualize the key steps which has the key techniques and tips that go along with the method described below.
Ingredients
2 Eggs
Water, room temperature (read method for quantity)
660 gms + 1 cup all purpose flour (this is about 7 cups of flour in total)
2 1/4 tsp yeast
32 tbsp (4 sticks) unsalted butter
1/2 cup dry milk powder
2.5 tsp salt
1/4 cup sugar
1 tsp vanilla
2-3 tsp of cocoa powder
2-3 tsp water
Method For the sponge
In a measuring cup which can hold 2 cups of water, add the two eggs. Then add enough water, so that the mixture measures a total of 2 cups. You will need about 1 and 3/4 cups of water for this. In a bowl of a stand mixer, mix together 1 tbsp sugar, 360 gms of all purpose flour and the yeast. And then add the water and egg mixture to this and mix well to create a sticky dough. Cover it and let it rest while you get the butter ready.
For the butter slab
Cut out the 2 tbsp of butter from the 1 of the sticks of butter, so that you have 30 tbsp butter. The butter should be at room temperature so that it is malleable. Mix together 60gm (1/2 cup) of all purpose flour with the butter. The easiest method is to use a stand mixer and use a paddle attachment to mix it till you cannot see the flour. Or you can cut the flour into the butter with a fork and then use a spatula to mix it together. Do not whisk it! Then place it on a plastic sheet and then shape it into a 8 inch square. Cover it well and place in the fridge till you work on the dough.
For the dough
Switch out the paddle with a dough hook on your stand mixer and in the same stand mixer bowl which has your sponge, add 2 tbsp of softened or melted butter. I added butter which was very soft and was easily mixed in. In a separate bowl, mix together 3 tbsp sugar, 300 gm of flour, dry milk and salt. Use a whisk to mix these thoroughly and then add the flour mix to the sponge and knead till a dough forms. Add the vanilla. Knead it for 5 minutes and if it is still sticky add more flour till the dough is no longer sticky but still soft. I used about 1/2 cup of flour for this. Once the dough is ready, place it onto a plastic wrap sheet and using your palms and fingers push it out into a 9 inch square. Don't worry if your corners are rounded. Cover it and place it in the fridge to rest for 30 mins. This is to relax the gluten before we start the lamination.
For the final chocolate dough layer, separate out about 1/4 cup (a fistful) of dough and mix in 2-3 tsp of cocoa powder into the dough. Add a couple of tsps of water as needed to make sure that the dough consistency remains the same. Refrigerate this till we are ready to start rolling out the croissants.
Lamination
Remove the butter after about 15 mins of refrigerating the dough. If you have been doing other tasks while getting these components ready, make sure that the butter is not so solid that it will be very hard compared to the dough. The idea is to have the two be of the similar stiffness so that when the dough is rolled out with the butter sandwiched, the butter will spread evenly. My butter was a little harder and I had to let it rest for a bit as I tried to roll it out, and the edges did not have a lot of butter, but after 4 folds, there was no impact to the lamination. If the butter is too soft in comparison to the dough, it will start to spill out. In that case, place it back in the fridge for 10-15 mins.
Turn 1
Roll out the 9 inch square dough into a 12 inch square. Place the slab of 9 inch square dough on the rolling surface which is well floured. Then, place the slab of butter at a 45 degree angle (so it looks like a diamond) and place it on the dough square. Now, there will be 4 triangular corners of the dough which can be seen. Now, bring each triangle of dough into the center of the butter and join all four corners to completely package the butter inside the dough. Use a little water if needed to seal the edges and pinch them so that they are well sealed. Now, flour the rolling surface well, flip over the package and then gently roll out the dough into a rectangle which is 20x10 inches, ensuring that the butter is getting spread. Flour the surface by picking up the dough as you roll it so that it does not stick to the surface and rip. Once the dough is rolled out into the desired size, bring 1/3rd of the dough and cover the center 1/3rd of the dough with it. Then fold the remaining 3rd onto the center to create a package. This will look similar to how a business letter is folded and is called a letter fold. Use some water to seal the edges so that the folds do not slip while rolling the dough. If the dough and butter have softened too much, refrigerate for 15 mins.
Turn 2
Now, turn this by 90 degrees and roll it out again into a 20x10 inch rectangle, rolling out the longer side to 20 inches and shorter one to 10 inches. Then do a letter fold again. This completes the second fold.
Turns 3 and 4
Now repeat steps 2 and 3 to complete a total of 4 turns. Refrigerate in between these steps, as needed.
Once 4 turns are completed cover loosely with plastic and refrigerate. Now refrigerate this for a few hours. I refrigerated it for 4 hours. The dough had started rising and created a dome in the center. Now, cut the dough into two equal halves. You can freeze haf for later use or refrigerate remaining half of the dough while you work on the first half, so that the butter does not melt.
Now, roll out the chocolate dough, which we had kept aside, to a thin sheet which is about 3-4 mm in thickness. Place it on as the final layer and make sure it adheres to the surface and then refrigerate if needed.
Now flour the rolling surface well and roll this out into a 12 inch by 18 inch rectangle. Trim the ends that are not open and are fold ends along the edges, so that the layers are revealed from all sides of the dough. The folded edges can impact the rise. Then cut it into 3 equal halves width wise to create strips that are about 4 inch by 18 inches. Then cut these strips into approximately 3 equal pieces to create a total of 9 rectangles. Now, you can cut each rectangle along the diagonal to make triangular pieces which can then be rolled into crescent shaped traditional croissants. Or you can cut them into smaller rectangles (length wise or width wise) and then shape into log shaped rectangular croissants.
About 1/2 of my dough had was laminated with a top chocolate layer and I used those pieces to make the log shaped chocolate croissants. The rest which had just a little bit of chocolate or no chocolate layer, I rolled into crescent croissants.
Shaping the croissants
For rectangular filled croissants, stretch out the dough a little (use a rolling pin to lightly roll it into a wider and longer piece, but not too thin) place chocolate chips in the center, along the width (shorter length) and then roll the dough similar to a letter fold and then score just the top chocolate layer with a knife to reveal the dough underneath. Place on a parchment lined baking sheet for final proofing.
For crescent shaped croissants, stretch out the dough a little (use a rolling pin to lightly roll it into a wider and longer piece, but not too thin). Now make 3/4th inch long slit in the center of the shortest base of the triangle. Then start rolling the croissant from the base to the tip, till completely rolled. Pull on the two ends, to shape into a crescent and place on a parchment lined baking sheet for final proofing.
Let this prove at room temperature and rise and get puffy for at least an hour to upto 3 hours. Preheat the oven to 400F. Bake this for 7 mins at 400F and then reduce the temperature and bake it for 5-10 mins at 350F till a deep brown.
Let the rest for 10 mins before serving warm!
These are delicious and flaky and perfect!!
Tips
If using salted butter, reduce the quantity of salt in the recipe to 1.5 tsp. I was only going to laminate 1/4th of the total dough with chocolate dough covering, and that is why I only separated out 1/2th cup or a fistful of dough.
I followed the steps of refrigerating the butter and then the dough and when I did the first fold, the butter was too hard. So, make sure that the butter and dough have a similar stiffness when you fold the butter in. For that you must bring out the butter at least 15 mins before you get the dough out. Dust the rolling surface with flour often and liberally to ensure that the dough does not stick to the surface. Dust off excess dough gently using a brush before folding.
Keep an eye on the croissants while baking to make sure they don't burn.
This is a delicious bread filled with a sweet red bean filling. It is inspired by the Japanese anpan bread but is not a traditional recipe. This has been shaped as a star. You can get really creative and shape it in any shape, like how we shaped it into a pretty bun earlier. This is a really great breakfast recipe but we often enjoy it as dessert as well. And it pairs really well with milk or coffee.
You can find a detailed tutorial on how to make the bread at the youtube link below.
Ingredients For the filling
3/4 cup uncooked red beans (we need only 1 cup of cooked beans)
4 cups of water
3/4-1 cup of sugar
For the dough
2 cups all purpose flour
1/4 cup potato flour (optional)
1/2 cup milk
1/2 cup water (minus 1 tbsp)
3 tbsp sugar
2 tsp yeast
1 tsp salt
3 tbsp butter
1 tsp vanilla essence
1 egg - well beaten to be used for the egg wash
Method
Soak the red beans in 2 cups of water for at least an hour. Then discard the water and add the beans to the pressure cooker (or instant pot). Add 2 cups of water and then pressure cook the beans till completely cooked. I cooked it in the instant pot for 30 mins on the beans/chilli mode and then let the pressure release naturally.
3/4 cups of beans cook to make 2 cups of cooked beans. I blended one cup of cooked beans and added 3/4 cup of sugar and made a puree. Then cook the bean paste in a pan to thicken it. Let it cool down.
While the beans are cooking, make the dough. First add the milk, 1/2 the water, sugar and yeast to the bowl of a stand mixer, and set aside for 10 mins to activate the yeast. The mixture will get frothy. Sift the flours together, so that there are no lumps. Then add the salt, vanilla essence and butter to the frothy liquid. Turn the mixer on and using the dough hook, add the flour. Then slowly add the rest of the water, a little at a time till till a soft dough is formed. Then knead for about 7-10 mins. Scrape the bowl down as needed. Shape the bread into a ball and transfer to a lightly oiled bowl. Cover it with plastic wrap and let it rise for about an hour till it is doubled.
Divide the dough into 4 equal parts and shape into balls and let them rest for 10 mins. Divide the bean filling into 3 equal parts.
Now roll one dough piece into a circle with a 10 inch diameter. Place this on a baking sheet lined with parchment paper. Then, apply the egg wash. Dot the surface with the filling and use your finger tips to spread it. Then, repeat this process 2 more times. Once the final circle of dough is placed, then it is time to shape the dough
Place a small bowl/cookie cutter/measuring cup with about a diameter of 1.5-2 inches in the center of the dough. Then make 16 equal part of the dough. The bowl in the center will prevent the dough from getting cut through. At the end of this there will be small circle in the center where the bread is joined together and 16 strands. Take two strands, and twist them outwards twice (opposite in direction to each other) and then pinch the ends together to form a sharp point. You will have 8 star petals and the bread will look like a star or a flower.
Cover it lightly with plastic wrap and let it rise for 45 mins to an hour till it is risen and puffy. Then, apply the final layer of egg wash.
Preheat the oven to 400F and then bake the bread for 15-20 mins. The bread is ready when the internal temperature reaches 200F, which takes about 20 mins. You can also tap the bread to check for the hollow sound.
Cool the bread for 10 mins on a cooling rack and then it is ready to eat. You can also bake it the previous night for breakfast. Heat it in the oven at 350 F till it is warmed through, about 10 mins and then serve warm. It tastes great with milk.
Tips
The potato flour helps retain moisture and keeps the bread moist after baking. You can skip this ingredient. Use room temperature water and milk so that you do not accidentally kill the yeast. Resting the dough relaxes it makes it easy to roll out. If you try to spread the filling with a spatula, you may stretch or tear the dough and it is easier to gently spread it using the finger tips. When shaping the dough, pinch the edges well, so that they don't unravel when the dough proves the second time. Instead of a star, you can shape it into any other shape and then let the dough undero a second rise.
I lovingly remember the wheat halwa or as she called it "lapsi", that my mom used to make for us when I was a young child and I remember relishing it. She used to make this especially if we were hurt because of the simple and nourishing ingredients. I also recently got to know that the same is also offered as "kadah prasad" in gurudwaras.
I hadn’t made it because it felt too much of a guilty indulgence given the amount of ghee and sugar/jaggery that are needed. However, I finally caved into my craving and made it. My mom used to make it using jaggery, but I didn't have the time to grate jaggery, so I added blackstrap molasses to the sugar to get a similar taste. The fragrance and the taste catapulted me back to childhood. A delicious and satiating dessert.
Ingredients
1/2 cup wheat flour
1/2 cup ghee
1/2 cup minus 1tbsp sugar
1 tbsp blackstrap molasses
1.5 cups water
Method
Heat ghee and wheat flour together and roast the flour till golden brown and fragrant. In another saucepan, add the sugar, water and molasses and stir and warm till sugar is dissolved.
Now slowly add the water solution to the browned flour and stir it in, taking care to protect yourself from any spluttering of the ingredients that occurs.
Stir well till thickened and you can see the ghee staring to separate. At this point the halwa will easily move away from the edges of the pan and will freely move in the pan. The halwa is ready. Enjoy warm.
Tips
When water is added to the fried wheat flour, it will splutter, so make sure you are far away from the pan and if possible hold a cover over the pan so that it doesn't spoil the cooking surface.
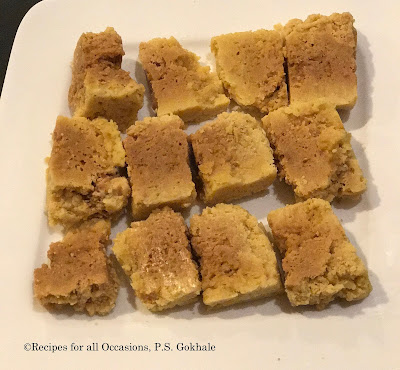
I hadn't made this before because everyone said it was too tricky and laborious, but finally decided to give it a try and it turned out great. I was very happy to see the perforations/lattice as well as the color gradations in the Mysore pak.
Ingredients
1 cup sugar
1/2-3/4 cup water, enough to cover the sugar
1 cup besan/chickpea flour
1 cup ghee
1 cup sunflower oil
Method
Grease a deep tin and set it aside. I used a 8x4 bread baking tin.
Pour the sugar into a broad pan and the water, stir them together and heat. Heat this on low- medium heat (3-4 setting on electric stove). Also, in a sauce pan, mix the ghee and oil together and start hearing this mixture at the same low-medium heat setting.
As the sugar syrup is cooked, sieve the besan to remove all lumps. Check the syrup and once it gets sticky but before reaching the single thread consistency, add 1/3rd besan and mix well till lumps are dissolved. Do this in a couple of batches till the besan is completely mixed into the syrup. If they are any lumps, use a sieve or strainer to push the lumps out by pouring the lumpy syrup through it.
Now keep stirring this mixture. After a couple of minutes, you will see bubbles in this mixture as you stir it. At this stage you are ready to add the ghee oil mixture that is being heated.
Add one ladle at a time and stir it into the besan syrup mixture. Continue this till you reach the stage where the ghee oil mixture is no longer absorbed into the besan. When you are nearing this stage, you will notice that as you add the ghee oil mix into the besan syrup mixture, it starts to froth. Add the last ladle of ghee oil after you see that it is not really getting absorbed and let the froth form. Then pour this mixture into the tin to create a tall slab. My tin was much bigger and so I filled it just halfway (see pic for reference). Gently level the top to make sure not to destroy the lattice structure formed by the frothing. Now let it set for 5 minute and then make the cuts in the Mysore pak to form rectangles. Make sure to cut t through and completely. I didn't cut it entirely and once it was cool it was difficult to separate and cut it out. Now let it cool for a couple of hours, and remove the Mysore pak slices from the pan.
Tips
All the ghee oil mixture didn't get used up. About 1/2 to 3/4 cup remained. Make sure to add the besan before the single thread, so that it doesn't become too dry. The reason to go for a tall thick slab is so that the central part continues to cook at the part of the
Mysore pak exposed to the air and at the bottom of the tin start to cool first. This is needed to create the different shades/color striations in the mithai.
We have had a great fig harvest his year. Other han enjoying the figs straight off the tree, I have been using them in various desserts. I made a fig crostata (recipe on the blog), fig icecream, fig danish braid. Then I thought an upside down cake would be delightful. The result of the experiment was delicious!!
Ingredients
10 ripe fresh figs, cut into eighths or small pieces
1 tbsp butter
1 tbsp sugar
1 and 1/4 cups all purpose flour
1 tsp baking powder
1/8 tsp salt
1/2 cup butter
1 cup sugar
2 eggs
1 tsp vanilla essence
1/2 cup milk
Method
Butter a baking pan and cover the base with parchment paper.
Preheat the often to 350F.
In a saucepan, heat the butter. Once it melts, add the figs and sugar and give it a stir. Cover with a lid and let it cook for a couple of mins and then stir again. Cook covered for 5-10 mins, stirring frequently, till the figs release their juices and soften and start to caramelize.
Pour this into the baking pan and spread in a layer on the parchment paper.
Sift or whisk the flour, salt and baking powder so they are mixed well and the baking powder is evenly distributed.
Whisk together the butter and sugar. Once the mixture stars looking fluffy like icing, add one egg at a time and mix these in. Then, add the vanilla essence. Next fold one third of the flour into the batter, followed by half the milk. Alternate between the flour and milk incorporated into the batter using the folding motion.
This is a thick batter. Now pour or scoop this over the fig layer. Use a flat spatula to spread it out. Then bang the pan on the counter a couple of times to remove any large air bubbles.
Bake for about 30 mins (check at 20 mins). Use a toothpick or knife to check for doneness. Pierce the cake in the center. If the knife/toothpick is clean, the cake is done.
Let the cake cool for a few mins in the pan and then invert it onto cooling rack. Peel off the parchment paper. The cake doesn't need to be inverted again as the fig layer comes on top of the cake. Cut after the cake cools.
Tips
Let the figs caramelize. When you start cooking them it may seem that there isn't much moisture of they are not getting sweet, so cook with the lid on and let them stew in their juices. Figs become very sweet once they release their sugar which converts into a delicious syrup. Do not add more sugar unless you are using figs which are under ripe. If you do not have fresh figs, you can use dried figs too. Soak them for a few hours to rehydrate. Once they are plump cut them into small pieces and follow the recipe.
This is a halwa I had eaten eons ago as a kid when I visited Mumbai. We didn't indulge in this sweet a lot because the ones that are store bought are made using hydrogenated oil and were thought to be too unhealthy. I was searching for this recipe because a sweet that a friend shared reminded me of it. I came across many recipes but they all used semolina/rava as the main ingredient. The original version is made using corn starch. I wanted to make it as close to the store bought version but use clarified butter or ghee instead of hydrogenated oil. I liked the video demonstration of the technique on Bhavna's kitchen channel. It is a fairly straightforward recipe and the only thing that makes it challenging is the continuous stirring that it essential to getting the right texture.
Ingredients
1/4 cup corn starch
1/4 cup plus 2 tsp ghee (you can increase the ghee amount to 1/2 cup if you want)
1 cup water or milk
1 cup sugar
1 tsp rose water (optional)
1/2 tsp cardamom powder
15-20 strands of saffron crushed
1 tbsp finely sliced almonds and pistachio (optional)
Method Make sure to prepare the surface on which you will roll the halwa ready. You can use a silicone mat and a sheet of parchment or a couple sheets of parchment (approx 2 ft in length). If using aluminum foil or the back surface of a baking sheet, make sure to grease it with ghee before you start the cooking process. I do not use plastic sheets as the mixture is hot and I do not want any plastic leaching into the halwa.
In an open flat saucepan (helps with faster evaporation) mix together the corn starch,1/4 cup ghee, water/milk and sugar. Stir it and keep it aside for 20-30 mins and let the ingredients soak. Then stir the mixture well to dissolve most of the sugar and ensure that there are no lumps of cornstarch. Then put it on low medium heat and stir this mixture continuously. In the beginning while it is still very fluid, you do not need to stir it constantly but as soon as the mixture starts to heat up, keep stirring constantly to avoid lumps. This is a little laborious but well worth it in the end. Keep the heat at medium low and keep stirring and press down any lumps that start to form( about 20-30 mins) till it comes together like a dough. Now turn off the heat and add the remaining 2 tsps of ghee and knead it with your spatula and bring the mixture together and then mix in the rose water, if using.
Now it is important to work fast. Pour this dough onto a silpat/parchment/prepared aluminum foil. Place another parchment paper on top of the dough sandwiching the dough between the two. Then roll out the dough as thin as possible. Peel the paper intermittently and check how thin it is. It should be transparent. That's when you know it is at the right thinness. Then sprinkle the cardamom, saffron and nuts over the rolled dough, place the parchment paper again and lightly roll over the sprinkled spice and nut mixture embedding it into the halwa. Now peel the paper and let it dry.
When it is semi dry, cut the rolled sheet into squares. It can take from a couple of hours to a few hours or overnight for the halwa to dry and get the perfect texture, depending on the weather, humidity, and rolled dough thickness. Separate into squares when completely dry. Alternate wax paper or parchment paper sheets cut to the same dimensions as the halwa, between each halwa slice. Your halwa is ready to serve. Store in the fridge.
Tips
If you use rose water when the heat is still on, the fragrance will disintegrate and you may not get that rose fragrance. You can also make colorful halwa by adding a few drops of color to the mixture when you soak the ingredients together.