

The first week of January has passed by and we are inching towards 14th of January, when the first Indian festival of the year will be celebrated. This is "Sankrant" also known as Makar Sankrant in India. It is a festival to celebrate the harvest season. This is one festival which almost always falls on the 14th of January (this year it was on the 15th) and is based on the movement of the Sun rather than the Moon. It is celebrated throughout India and is called by different names in different states. Some names that I am familiar with are Lohari (in Punjab), Uttarayan (in Gujarat), Makar Sankrant (in Maharashtra) and Pongal (in the southern states). In Gujarat, the entire day is spent on the terrace of the houses and in streets flying kites. It is one of the most colorful scenes I have ever seen. In Andhra Pradesh, it is celebrated over a period of three days.

In Maharashtra, it is celebrated by distributing sweets made from sesame seeds and jaggery. These are called "til gul vadi" and the tradition is to say "til gul ghya ani goad goad bola" which translates to "please take this sweet and speak sweetly". There are multiple variations in how this sweet is made, some are really hard in texture, some are brittle and some are soft. Each family has it's own recipe and tradition of making this sweet.
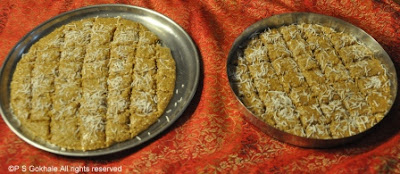
The ones I make have a soft texture and are easy to bite into and extremely simple to prepare. You can roll it into a ball and make a "laddoo" or you can flatten it and cut it into "vadi/barfi" akin fudge pieces. This is my Mom's recipe and my favorite version of this sweet. I hope you will give it a try and enjoy it.
Ingredients
1 cup sesame seeds
1 cup peanuts (shelled and without the peel)
1 cup finely cut jaggery, cup should be packed
1 tbsp ghee/clarified butter
2 tbsp of grated dessicated coconut, for garnish
some ghee to grease the plate in which the sweet will be set.

Method
Take a plate with an edge or a pan with a small edge and grease it with some ghee.
In a dry skillet, on low to medium heat, roast the sesame seeds till you get the aroma of the sesame seed. Keep it aside and let it cool. In the same skillet roast the peanuts following the same method as for the sesame seeds. Be careful not to burn these ingredients. Once these cool down, coarsely grind them separately and then mix the two powders together.
In a pan, add the ghee and jaggery and keep it on a very low flame to cook. The jaggery will start melting. Be sure to keep it on very low heat.. Stir the jaggery so that it doesn't caramelize. Within a couple of minutes, the jaggery will start bubbling and foaming. At this stage, turn off the heat and add the powdered mixture of peanuts and sesame seeds and mix well together. Then pour this mixture (it will be quite thick) into the greased plate. Then using another bowl/measuring cup (grease the bottom), pat the this hot mixture and even it out into the plate. Make sure to level it properly. Then sprinkle the dessicated coconut all over the top and using the cup, pat it into the mixture. All this must be done while the mixture is hot.
Then, after the mixture cools a little, cut it into square pieces of about 1 inch sides. Let the mixture cool completely befor you take the individual pieces out of the plate.

Tips
You can roast the peanuts and the sesame seeds in the microwave. Initially you can do it for 1 minute intervals. Stir it after each minute and then you can reduce that to 30 second intervals. It takes about 2-3 minutes based on the power settings of your microwave. Let them cool completely and then grind.
If jaggery is kept on high heat, it will start caramelizing as soon as it melts, so be careful of the temperature. Also, it is necessary to turn off the heat as soon as the jaggery foams to get the soft consistency, the longer it is cooked, the harder the end product will be. If you feel that the jaggery syrup has become very thick, you can add some more ghee or alternately add a couple of tbsp of milk to the syrup to thin it out (if you add milk, this shortens the shelf life, so be sure to keep it refrigerated and eat it in a couple of days). If after adding the sesame and peanut powder, the mixture becomes very dry and powdery, then sprinkle a teaspoon of warm milk and stir (while the mixture is hot). The mixture will immediately become moist (if it becomes too soft and moist, then re-heat it). Then spoon the mixture into the greased plate.
If you forget to remove the pieces and then it gets difficult to take them out, heat the bottom of your plate or keep it in a warm oven for a couple of minutes and then it will be very easy to get the pieces out.
In Maharashtra, it is celebrated by distributing sweets made from sesame seeds and jaggery. These are called "til gul vadi" and the tradition is to say "til gul ghya ani goad goad bola" which translates to "please take this sweet and speak sweetly". There are multiple variations in how this sweet is made, some are really hard in texture, some are brittle and some are soft. Each family has it's own recipe and tradition of making this sweet.
The ones I make have a soft texture and are easy to bite into and extremely simple to prepare. You can roll it into a ball and make a "laddoo" or you can flatten it and cut it into "vadi/barfi" akin fudge pieces. This is my Mom's recipe and my favorite version of this sweet. I hope you will give it a try and enjoy it.
Ingredients
1 cup sesame seeds
1 cup peanuts (shelled and without the peel)
1 cup finely cut jaggery, cup should be packed
1 tbsp ghee/clarified butter
2 tbsp of grated dessicated coconut, for garnish
some ghee to grease the plate in which the sweet will be set.
Method
Take a plate with an edge or a pan with a small edge and grease it with some ghee.
In a dry skillet, on low to medium heat, roast the sesame seeds till you get the aroma of the sesame seed. Keep it aside and let it cool. In the same skillet roast the peanuts following the same method as for the sesame seeds. Be careful not to burn these ingredients. Once these cool down, coarsely grind them separately and then mix the two powders together.
In a pan, add the ghee and jaggery and keep it on a very low flame to cook. The jaggery will start melting. Be sure to keep it on very low heat.. Stir the jaggery so that it doesn't caramelize. Within a couple of minutes, the jaggery will start bubbling and foaming. At this stage, turn off the heat and add the powdered mixture of peanuts and sesame seeds and mix well together. Then pour this mixture (it will be quite thick) into the greased plate. Then using another bowl/measuring cup (grease the bottom), pat the this hot mixture and even it out into the plate. Make sure to level it properly. Then sprinkle the dessicated coconut all over the top and using the cup, pat it into the mixture. All this must be done while the mixture is hot.
Then, after the mixture cools a little, cut it into square pieces of about 1 inch sides. Let the mixture cool completely befor you take the individual pieces out of the plate.
Tips
You can roast the peanuts and the sesame seeds in the microwave. Initially you can do it for 1 minute intervals. Stir it after each minute and then you can reduce that to 30 second intervals. It takes about 2-3 minutes based on the power settings of your microwave. Let them cool completely and then grind.
If jaggery is kept on high heat, it will start caramelizing as soon as it melts, so be careful of the temperature. Also, it is necessary to turn off the heat as soon as the jaggery foams to get the soft consistency, the longer it is cooked, the harder the end product will be. If you feel that the jaggery syrup has become very thick, you can add some more ghee or alternately add a couple of tbsp of milk to the syrup to thin it out (if you add milk, this shortens the shelf life, so be sure to keep it refrigerated and eat it in a couple of days). If after adding the sesame and peanut powder, the mixture becomes very dry and powdery, then sprinkle a teaspoon of warm milk and stir (while the mixture is hot). The mixture will immediately become moist (if it becomes too soft and moist, then re-heat it). Then spoon the mixture into the greased plate.
If you forget to remove the pieces and then it gets difficult to take them out, heat the bottom of your plate or keep it in a warm oven for a couple of minutes and then it will be very easy to get the pieces out.


