Welcome to my blog

I hope you will find the recipe you are looking for your occasion here.

Now video instructions are available for select recipes and can be accessed at

Gardening and Cooking Made Easy

The latest 5 recipes are displayed on the
main page. For more recipes, you can browse the archive, click on the labels in the index to the left or use the Custom search below to look for a specific recipe.


Search for more results

Custom Search
Showing posts with label bread. Show all posts

Saturday, June 6, 2020

Sweet Red Bean Bread

This is a delicious bread filled with a sweet red bean filling. It is inspired by the Japanese anpan bread but is not a traditional recipe. This has been shaped as a star.  You can get really creative and shape it in any shape, like how we shaped it into a pretty bun earlier. This is a really great breakfast recipe but we often enjoy it as dessert as well. And it pairs really well with milk or coffee.


You can find a detailed tutorial on how to make the bread at the youtube link below.


Video, detailed Instructions for the sweet red bean bread

Ingredients
For the filling
3/4 cup uncooked red beans (we need only 1 cup of cooked beans)
4 cups of water
3/4-1 cup of sugar

For the dough
2 cups all purpose flour
1/4 cup potato flour (optional)
1/2 cup milk
1/2 cup water (minus 1 tbsp)
3 tbsp sugar
2 tsp yeast
1 tsp salt
3 tbsp butter
1 tsp vanilla essence
1 egg - well beaten to be used for the egg wash


Method
Soak the red beans in 2 cups of water for at least an hour. Then discard the water and add the beans to the pressure cooker (or instant pot). Add 2 cups of water and then pressure cook the beans till completely cooked. I cooked it in the instant pot for 30 mins on the beans/chilli mode and then let the pressure release naturally.

3/4 cups of beans cook to make 2 cups of cooked beans. I blended one cup of cooked beans and added 3/4 cup of sugar and made a puree. Then cook the bean paste in a pan to thicken it. Let it cool down.

While the beans are cooking, make the dough. First add the milk, 1/2 the water, sugar and yeast to the bowl of a stand mixer, and set aside for 10 mins to activate the yeast. The mixture will get frothy.  Sift the flours together, so that there are no lumps. Then add the salt, vanilla essence and butter to the frothy liquid. Turn the mixer on and using the dough hook, add the flour. Then slowly add the rest of the water, a little at a time till till a soft dough is formed. Then knead for  about 7-10 mins. Scrape the bowl down as needed.

Shape the bread into a ball and transfer to a lightly oiled bowl. Cover it with plastic wrap and let it rise for about an hour till it is doubled.

Divide the dough into 4 equal parts and shape into balls and let them rest for 10 mins. Divide the bean filling into 3 equal parts.

Now roll one dough piece into a circle with a 10 inch diameter. Place this on a baking sheet lined with parchment paper. Then, apply the egg wash. Dot the surface with the filling and use your finger tips to spread it. Then, repeat this process 2 more times. Once the final circle of dough is placed, then it is time to shape the dough

Place a small bowl/cookie cutter/measuring cup with about a diameter of 1.5-2 inches in the center of the dough. Then make 16 equal part of the dough. The bowl in the center will prevent the dough from getting cut through. At the end of this there will be small circle in the center where the bread is joined together and 16 strands. Take two strands, and twist them outwards twice (opposite in direction to each other) and then pinch the ends together to form a sharp point. You will have 8 star petals and the bread will look like a star or a flower.

Cover it lightly with plastic wrap and let it rise for 45 mins to an hour till it is risen and puffy. Then, apply the final layer of egg wash.

Preheat the oven to 400F and then bake the bread for 15-20 mins. The bread is ready when the internal temperature reaches 200F, which takes about 20 mins. You can also tap the bread to check for the hollow sound.

Cool the bread for 10 mins on a cooling rack and then it is ready to eat. You can also bake it the previous night for breakfast. Heat it in  the oven at 350 F till it is warmed through, about 10 mins and then serve warm. It tastes great with milk.


Tips
The potato flour helps retain moisture and keeps the bread moist after baking. You can skip this ingredient. Use room temperature water and milk so that you do not accidentally kill the yeast. Resting the  dough relaxes it makes it easy to roll out. If you try to spread the filling with a spatula, you may stretch or tear the dough and it is easier to gently spread it using the finger tips. When shaping the dough, pinch the edges well, so that they don't unravel when the dough proves the second time. Instead of a star, you can shape it into any other shape and then let the dough undero a second rise. 

Tuesday, May 26, 2020

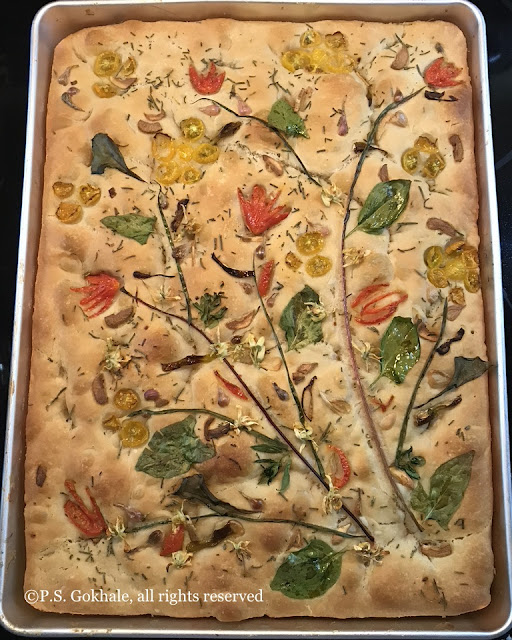
Sourdough Focaccia Bread

It has been a while since I have updated the blog, however the experimentation is going strong and I have been able to create delicious, repeatable recipes. I have been wanting to work with sourdough for a while and I had even gotten some starter from a friend a few years ago, but didn't really end up using it. I love baking breads and instant yeast ones have always been my go to.  So, with the COVID-19 situation, and lack of yeast and flour in the stores and tonnes of sourdough posts online, I thought I would give it a serious try again. I kept procrastinating though to start my starter and when a friend offered to share her sourdough starter, I took her up on the offer.

So the way I view it, sourdough is very much like a biga and when it is fed it is more active and the resultant dough rises faster than when using an unfed starter. Also, the rise time is very variable depending on the amount of starter used, whether it is fed or not etc. But given that you don't have to activate the yeast, as long as you are patient to wait for the first and second rises till the dough doubles, you will be successful with sourdough. 

This focaccia recipe is based on my previously documented recipe.  That is a yeast based recipe and I converted that to a sourdough based recipe. Just I doubled the quantity to make a large loaf in my rectangular 11X14 cake tin. So you can make 2 smaller loaves or halve it to make a smaller bread. To store it, let it cool down completely and then wrap in cling wrap and then foil. This can then be frozen or stored in the fridge for a longer time.


Ingredients
For the bread dough
1 and 2/3 cups of sourdough starter
2 cups water
4 tbsp oil 
5 cup all purpose flour
3 tsp salt

For baking the bread
4 tbsp oil to bake the bread
1 tbsp oil for marination
vegetables, sliced or shaped for placing on dough (sliced onions, garlic, cherry tomatoes, thin slices of beet root, thin slices of eggplant, chives, scallions, beet root leaves, spinach etc)
rosemary or other herbs


Method
Mix together the starter, water and oil and stir. Then add the flour and stir it in. This can be done with a wooden/steel spoon. It will become a very sticky and soft dough. Keep aside for 20 mins. Then sprinkle the salt over the dough and mix it well, into the dough.  Then let the dough rise for 30 mins.

The dough will rise. Coat a scraper or spatula with some oil and then use it to fold the dough in towards the center, while turning the bowl. Fold the dough and then turn the bowl 90 degrees, this is the first turn. Do this 7 more times for a total of 8 turns till all the dough is folded towards the center. Cover the bowl with plastic wrap  and then let the dough rise for another 30 minutes. Again repeat the process of folding the dough and then let the dough rise for another 30 minutes. Again fold the dough and let it rise for 30 minutes. (At the end you would have a total of 3 foldings and 3 rises)

Now prepare a 11X13 rectangular pan by pouring 2 tbsp oil and swirling it around the pan to coat it.  At this point in time, you can split the dough into two small equal parts and use two baking tins to bake two individual breads. Place the dough into the tin and then using your fingertips stretch it to cover the pan. If it cannot be stretched and springs back, then let it rest for 10-15 mins and stretch again to fill the pan.

At this point you can bake it but if you want the sourdough taste and added depth of flavor, refrigerate this pan overnight or for 8-12 hours for the sourdough taste to develop.

Next day or when baking the bread, remove the pan from the fridge and let it sit at room temperature for 30-60 mins. At this point the bread dough will be bubbly and will have risen to at least double the volume.

Toss the vegetables that you want to decorate with in some oil and keep aside. Preheat the oven to 425 F.

Dimple the bread by poking it lightly with your finger tips, being careful to not deflate the bread too much. Then drizzle the remaining 2 tbsp oil over the bread. Some of it will pool in the dimples created on the dough.

Then sprinkle herbs (I use rosemary a lot while making focaccia), arrange the vegetables that you want to flavor it with or you can take it a step further and decorate the bread with the vegetables. (This is optional.)

Bake it for about 40 mins till it is a golden brown. The bread is ready when it registers 200 F on a cooking thermometer. Let it cool for 5-10 minutes in the pan and then remove it and let it cool on a rack.

Another indication of whether the bread is ready is when you tap on it, you can hear a thud to indicate its hollow and baked. Since this is a big bread and in the pan, it will be difficult to use this method but you can use it if baking two smaller breads.

Serve it warm with soup or cheese. Or you can make delicious sandwhiches with it.  Or just enjoy it plain.


Tips
To store bread, wrap it in cling wrap and then in foil. Frozen bread can last for 4-6 months. Ensure that it is well wrapped so it does not pick up smells from the fridge or freezer. If you have a pizza stone, place it in the oven when pre-heating it. To reheat, heat it in the oven.If the vegetables start to burn, you can tent the pan with a foil after 20-25 mins. Also, you can add vegetables that may burn during the last 15 mins of baking time.

Wednesday, September 18, 2019

Molasses Bread - Cheesecake Factory style

This is a beautiful brown bread that comes very close to the bread that is served in the Cheesecake Factory. Warm bread slathered with butter is delicious and just melts in the mouth. In my opinion, this version of home baked bread is tastier than that served at the restaurant. 
I was able to make 5 decent sized loaves of bread and they lasted a few weeks. I stored each by covering tightly with plastic wrap and then foil and then freezing it. 


Ingredients
2 1/4 cups All purpose Flour or bread flour. I used all purpose flour
1 2/3 cups White whole wheat flour -I used roti flour (ashirwad aata). You can also use regular whole wheat flour
1 Tablespoon sugar
1 1/2 Teaspoons Salt
2 1/4 tsp of Instant Yeast
1/4 Cup Honey
1/4 Cup blackstrap Molasses/regular molasses
1 1/4 Cup Warm Water
2 Tablespoons unsalted butter at room temperature
1 Egg lightly beaten with a tsp of water to make egg wash
1/4 cup of Oats

Method
In the bowl of a stand mixer fitted with a dough hook add the flours, yeast, sugar, and salt. Mix until combined. Slowly add the honey, molasses and water. Mix until the dough forms. Add the softened butter and keep mixing until the dough forms. Knead till the dough separates from bowl.  You may need to add a little bit flour if it is still too sticky. Then knead the dough with hand till the dough is soft and smooth.
Grease a bowl large enough to hold double the volume of bread dough with some oil and place the ball of dough and cover with plastic wrap. Let the dough double in size about 45-90 mins depending on ambient temperature. It will take longer on colder days.
Remove dough from bowl and divide into 5 equal parts and shape into logs. Place these on a well greased trays (I needed two cookie trays) and let rise till double in size. Cover loosely with plastic wrap.
Preheat oven to 350 F. Brush the tops and the sides of the bread logs with the egg wash and sprinkle with the oats.
Place the trays in the oven and bake for 25-30 minutes of until ready. The easiest way to determine if the bread is well baked is to test the internal temperature. If it is 200F or more the bread is baked. Else you can also tap on the bottom and if it has a hollow sound it is baked.
The use of blackstrap molasses gives the bread a deep brown color. This bread has a slightly sweet taste and is delicious.


Tips
If kneading by hand, use the banging of the dough onto the kneading surface and then stretching with your palm strokes technique of kneading bread dough till a soft dough is formed.

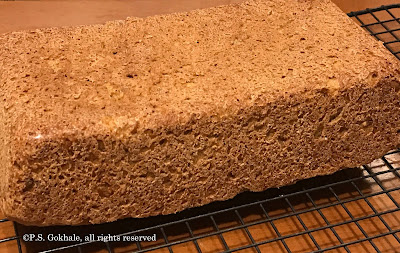
Sprouted Whole Wheat Bread

I enjoy sprouting wheat and used to make sprouted wheat bread a few years ago. I had forgotten the exact recipe and decided to try my hand at another version of it. It was difficult to find much online where the wheat berries were directly used instead of the sprouted wheat flour. I found a reference to Ezekiel bread which is a mixture of wheat and lentils and then decided to try out a basic bread recipe and see where it goes. The result was surprisingly tender and moist. The bread was hearty and delicious.
Ingredients
3 cups sprouted whole wheat berries (wheat berries were soaked overnight in water and then placed in a big sieve. These sprouted over a period of 48 hours).
A little water if needed to grind berries
2 tsp instant yeast (or if you have starter dough from another batter, add a handful instead and let this ferment overnight)
1 tsp salt
1 tbsp oil
Whole wheat flour a couple of 1/4 - 1 cup, depending on the moisture in the berries


Method
Grind the whole wheat berries to make a coarse batter. Use the minimal amount of water required in your blender or food processor. I used a food processor. Add the salt, yeast and oil and then add a little flour at a time to create a soft dough. It’s ok if it is a little sticky. Keep aside for 15-20 mins and then knead again to make a smooth dough. (I added a ball of dough from another overnight no knead recipe that I had made in the earlier day instead of the yeast and let it ferment overnight.)


Shape it into a ball and place in a bowl greased with oil to prevent sticking. Let this rise till double in volume. Will take about an hour or more. Then flatten out the dough and shape into a rectangle about 5x9 inches in size. My baking tin is 9 inches long. The length should be approximately the same as your bread baking rectangular tin.
Then roll into a tight roll with the shorter end parallel to you so that you have a 9 inch rolled bread dough.
Grease the baking tin with oil or butter and place the dough in it for a second rise. Once the dough had doubled in size, almost to the edge of the tin, bake at 350F for about 1.5 hours. I baked it for 40 minutes but the bread was not completely baked, so I continued to bake it till the center measured 200F, which took another 40 minutes approximately.
This bread does take longer to bake than normal. You can tent it with foil if you think the top is getting too brown.
The end result has crusty edges and a moist interior, is nutty and delicious. A hearty bread which is not at all dense.

Tips
Precook the wheat and try this bread. I will be trying that version the next time I make it. 

Wednesday, June 14, 2017

Pav or White Dinner Rolls

There are certain Indian dishes which must be eaten with white dinner rolls rather than a flatbread like chapati/roti or naan. Specially dishes like Pav Bhaji or Vada Pav can only be enjoyed when served along with a this kind of a dinner roll called "pav". These dinner rolls are usually based as one sheet of rolls, so only the top and base of the bread are browned and the sides are soft. In Marathi such a sheet of rolls is called "ladi-pav" and is usually store bought.  The main difference between these rolls and the white dinner rolls that we get in the store here is that the ones found here have a slight sweet tinge.

I made batata vadas recently along with the garlic chutney and I wanted the authentic pav that goes along with it to give it the perfect taste. So, the store bought roll wouldn't do and I decided to make the bread. I used the Amish Country Loaf recipe on the Bob's Red Mill flour bag as a guideline and altered it a little to create rolls out of it rather than a bread loaf. It turned out great and it was fairly easy and quick. After having experienced this great taste after many years, and the fact that it was very easy, I have decided to stick with this recipe and make it whenever I make sure dishes.


Ingredients
3 cups bread flour/all purpose flour
1 cup water
3/4 tbsp yeast
2 tbsp sugar
3 tbsp oil
1 tsp salt


Method
Warm up the water to a luke warm temperature, it should be less than 110F.  Add the water, sugar and yeast to it, stir and keep aside for 5 mins. If you are using a stand mixer or a food processor, you can add it to the bowl of the mixer. Once you see the yeast getting frothy, you will know that the yeast is active and will give a good rise. If the water doesn't turn frothy, and is fairly clear, the yeast is either too old and not active or the water temperature was too high and it has killed the yeast. Discard and start again.

Add salt and oil to the water, stir. Then add the flour about a cup at a time and knead it, till all the flour has been incorporated.  Knead it on low speed in the stand mixer. Use a steel blade if using the food processor.  Knead it till it comes together. Then turn it onto a lightly floured surface and knead it till the dough is smooth.
If kneading by hand, you will have to knead this for about 10 minutes after the dough comes together.

Place it in an oiled bowl and turn it over in the oil to coat the dough. Cover the bowl with plastic wrap and let it rise till doubled in size, which will take about an hour. If the weather is cold, if may take a little longer.

Then punch down the dough and knead it again for a couple of minutes. Divide the dough into equal parts and then divide each part into equal parts again till you have 12 pieces of dough. Shape each piece of dough into an oval shape (mine were a little rounder than traditional) and place them in a greased baking tin. The rolls should be spaced out at least about 1.5 inches from each other.  Then cover the tin with a loose plastic wrap and let these rise for 30 minutes. As they rise and expand they will start merging into each other to create a sheet of dinner rolls or ladi pav.


Pre-heat the oven to 450F and adjust the rack to the center of the oven.

After 30 mins, place the tin in the oven and bake these rolls till nicely browned on the top. This takes about 8-12 minutes based on your oven. Check at 8 minutes. Let the tin cool for 10 minutes and then place this sheet onto a cooling rack. Let the bread cool completely before serving. It will be very soft when warm. Pull apart to separate the dinner rolls.


Serve these as white dinner rolls or pav with pav bhaji or vada pav.


Tips
If the water temperature is too hot, it will kill the yeast. So, if you are not sure then use room temperature water. Kneading ensures that the gluten strands develop and this is what creates the structure of the bread as it rises. The bowl used for the rise should be big enough to hold the risen dough.

Tuesday, October 22, 2013

Multi-seed Crackerbread

This is a wonderful cracker bread to be server prior to dinner as an appetizer or as a snack with some drinks or tea. I visit an Italian restaurant nearby and one of the things that I enjoy most is the bread basket that the bring out once  you are seated. The bread basket comes with sourdough bread and multiseed crackebread which is sprinkled with Parmesan cheese, which is lightly browned. The crackerbread is absolutely delicious. I have searched in the bakery section of may stores, but unfortunately have never come across it. So, it made me very excited when I came across a multiseed cracker bread recipe in a King Arthur Flour cook book. This recipe came very close to the one I enjoy in the restaurant. The main difference is that the one in the restaurant is made of all purpose flour while this is made with whole grain flour. This is definitely the healthier version and was enjoyed by everyone at the last dinner party we had. Serve it with butter and it makes a perfect accompaniment to warm soup.


Ingredients
1 cup whole wheat flour
1 cup unbleached all purpose flour
1/2 cup ragi flour
1/2 cup whole yellow cornmeal
2 tsp salt
2 tbsp olive oil
1 cup water
1/2 cup assorted seeds - like white sesame, black sesame, poppy, fennel, caraway, anise and cumin
(adjust the ratio based on your preference.)
2 tbsps assorted dried herbs like rosemary, basil, dill, taragon and thyme
(adjust the ratio based on your preference.)
1 tsp coarsely ground black pepper


Method
Mix the assorted seeds, herbs and cracked pepper in a bowl and keep aside.

Take a large mixing bowl, and add the flours, salt and olive oil to it. Adding a little water at a time, mix the ingredients till the dough is formed. The dough should be stiff and not crumbly. So make sure to add a liittle water at a time till you get the desired consistency. If the atmospheric conditions are humid, you may need less water versus making this recipe in dry weather. Knead the dough till it is well mixed and supple.

Divide the dough into small pieces (about 8-10) and cover this with a slightly damp cloth or plastic wrap.
Take one piece and flatten it into a disc. Sprinkle some of the seeds, herb and pepper mixture on to the rolling surface. Press the dough disc into the seeds and roll it out. If the dough starts to stick to the surface, pick it up, sprinkle a few more seeds and continue rolling. Roll the dough as thin as possible, about 2 mm in thickness. Try to roll it into a rectangle, which will make it easy to cut the dough into triangles. Cut this into small triangles about 4 inches in length and 2 inches in width at the largest side.

Preheat the oven to 450F.  Arrange the crackers on a baking sheet and place on the center rack of the oven. Bake for 7-10 minutes till the top is medium brown.

Store in airtight container after all the crackers are completely cool.


Tips
The original recipe called for pumpernickel or whole rye flour instead of ragi flour. However, I didn't have this, so I used ragi flour instead. The recipe also called for 1 tbsp of coarse salt to be added to the mixture of seeds, herbs and pepper. However, this made the crackers quite salty and so I skipped it in subsequent batches. If you do want to have a salty feel on the outside of the cracker, then reduce the salt that is added to the dough. You can grate and sprinkle some parmesan cheese on the crackers after they have been baking for about a couple of minutes. If you add the cheese at the beginning, it may burn. You can also add shredded cheddar cheese.
Alternately, you can add the cheese and toast the crackers in the oven just before serving, heating the crackers till the cheese has melted and turned a golden brown.
When baking, the initial few batches will take longer, but as the process continues, the subsequent batches will get baked faster. So keep an eye on the crackers and remove them as soon as they are medium brown.

Tuesday, December 4, 2012

Oats and Whole Wheat Bread

The last month was filled with cooking a lot of Diwali sweets and snacks. I also made cakes for a couple of birthday parties. It was a great month. We ate a lot of great food and had fun with all the different celebrations. However, in the midst of all this activity, I just didn't get time to do any leisurely baking. I had been wanting to bake bread, but I just didn't get to it. I have been wanting to make some whole wheat breads, and I finally got to bake a loaf  last weekend. This is a recipe from the book "Whole Grain Baking" and the first one that I tried from it. Considering the success of this recipe, I am looking forward to trying the other bread recipes from this book. Since, all the recipes in this book include whole grains, they should be healthy as well.


This bread recipe contains whole wheat flour as well as rolled oats. It turns out very delicious and moist. A perfect sandwich bread.


Ingredients
1 and 1/4 cups boiling water
1 cup old fashioned rolled oat (not the quick cooking ones)
2 tbps unsalted butter, cut into 3 pieces
1.5 tsps salt
1/4 cup honey
1 cup whole wheat flour
1 and 2/3 cups unbleached all purpose flour/maida
1/4 cup milk powder
2 tsps instant yeast
some oil to grease the bowl and pan
1-1/2 tsp melted butter (optional)


Method
Mix together the oats, salt, honey and butter and pour the boiling water and stir. Let the mixture cool to a lukewarm temperature. This will semi cook and soften the oats. Also, make sure that the temperature is lukewarm and you can easily dip your finger (clean) in the mixture and hold it for a minute without burning it. If it is not cool enough and you add the yeast, the yeast die.
Then add the flours, milk powder, yeast into this mixture and knead the dough. Knead well till the dough is soft and smooth. If you are doing this by hand then you will need about 10-15 minutes kneading time. Shape the dough into a ball.

To see step by step photographs of the process see the Whole Wheat Bread recipe.

Then, place this in a well oiled bowl and roll the dough in the bowl, so that the dough is lightly covered with oil. Then, cover the bowl with a plastic wrap and let the dough rise till it has doubled in size. This will take about an hour to an hour and half, depending on the ambient temperature.

Then, deflate the dough and shape it into a log which can fit in your rectangular bread pan. Now cover this lightly with a plastic wrap and let the dough rise again till it has doubled in size, which will take another hour to hour and half.

Preheat the oven to 350 and bake the bread on the center rack in the oven for about 45 minutes.  After 20 minutes have passed, check and if you see that the top has lightly browned, then take a piece of aluminium foil (large enough to cover the pan), fold it in the center to create a crease, then  open it up and create a tent on top of the baking tin. Let the bread bake for the next 25 minutes, covered with foil.

Take the bread out of the oven and set to cool for 5 minutes before removing it from the tin. If you want, you can lightly brush the entire bread with some butter. This will help retain the moisture and keep it soft and moist.  Slice it as you go.


Tips
Yeast should never be added to hot water or hot mixtures, as that will kill the yeast. If you are not sure, add the yeast to room temperature ingredients. If the temperature in the room is very cold, it will take longer for the dough to rise. You can keep the dough in the oven, with its light on to provide the warmth for the yeast, so that the bread will rise. Else, add additional time to the rising process. The key to look for is, if the dough has doubled in size. Similarly, if the room temperature is really warm (think hot summer weather), then you may need just 45 mins or an hour for the dough to complete doubling in size. For photos on how to shape the dough into a loaf after the first rise, see the Whole Wheat bread recipe.

Monday, May 14, 2012

Focaccia Bread - A No Knead Recipe

If you have been following this blog for a while or have browsed through this blog, you may have noticed that I enjoy baking. One of the things I have come to enjoy baking, over the last couple of years, is bread. I have realized as I read recipes, watch shows on tv and make different breads that every bread you bake is unique, even when you repeat the same recipe, it will always turn out a little different than the last time (maybe even better). Also, the main ingredients remain the same - i.e. flour, salt, water and yeast. Some recipes call for addition of oil, some of milk and then you can customize breads by adding in different spices. I saw an episode of America's Test Kitchen a few months ago in which they demonstrated how to make focaccia bread and I just had to try it out. The holiday season during the November-December time frame was the perfect time to try it out and oh my, the result was lip smacking, bowl licking delicious. I made two loaves (one plain and one rosemary) and both were gone in less than 24 hours. I finally got a chance to transfer my notes to the blog, so here is the recipe.

Note: This recipe is even more alluring because there is no tedious kneading involved and fancy mixers are not needed to make the job easy either. A bowl and wooden spoon suffice.


Ingredients
Starter dough (biga)
1/2 cup bread flour (the original recipe calls for unbleached all-purpose flour)
1/3 cup warm water
1/4 tsp instant yeast

Dough
2 1/2 cups bread flour
1 1/4 cups warm water
1 tsp instant yeast
2 tsp (and a little bit more) salt 
4 tbps extra-virgin olive oil
1 tbsp dried rosemary (the original recipe called for 2 tbsp of fresh rosemary) [optional]


Method
Mix together the ingredients of the biga in a big bowl, using a wooden spoon till all the ingredients are thoroughly mixed and the water has been completely absorbed. There shouldn't be any dry flour. Cover the bowl with a plastic wrap and let the biga ferment over night or for about 8 hours.


To make the dough, to the biga add flour, yeast and water, and mix thoroughly till no dry ingredients remain. Then let the dough rise for 15 minutes. After this sprinkle two teaspoons of salt over the dough and mix it in to the dough. Then let the dough rise for another 30 minutes. Keep this dough in a large bowl.

The dough will rise around the edges of the bowl. Coat a scraper or spatula with some oil and then use it to fold the dough in towards the center, while turning the bowl. Fold the dough and then turn the bowl 90 degrees, this is the first turn. Do this 7 more times for a total of 8 turns till all the dough is folded towards the center. Cover the bowl with plastic wrap  and then let the dough rise for another 30 minutes.

Again repeat the process of folding the dough and then let the dough rise for another 30 minutes. Again fold the dough and let it rise for 30 minutes. (At the end you would have a total of 3 foldings and 3 rises)

Place a pizza stone or baking stone, in the center rack and preheat the oven to 500F. Heat the stone for at least 30 minutes. This is best done after the 3rd fold when the dough is rising for the final time.

Now place the dough on a floured surface and then divide the dough into two equal parts. Shape each into a round, roughly about 5 inches in diameter, by tucking the dough under the edges.
Oil two round cake baking tins (8/9 inch), each with 2 tbsps of oil. Then sprinkle a little salt to coat the base of the tins. (Be careful not to put too much salt as you have already added salt to the dough). Next, place the dough top side down and slide around to coat the dough with the oil, then flip the dough over and coat the other side.

Cover the pans with plastic wrap and let it rest for 5 minutes. Then using fingertips, gently spread the dough to cover the entire base of the pan. If the dough resists then let it rest for a few more minutes. Then poke the dough with a fork over the entire surface. At this stage, if you want to flavor the bread, you can sprinkle the chopped rosemary leaves. Let the dough rest for another 5-10 minutes till the dough looks bubbly.


Then turn down the temperature of the oven to 450F and then bake the bread for 25-30 minutes. The bread will be golden brown and when you tap on it, you can hear a thud to indicate that it is hollow.


Tips
Make sure to use luke warm water and not hot water. The water should be about 100-110 F. The easiest way to determine this is to touch the water and if it feels warm and you can easily hold your (clean) finger in the water, then it is not too hot. If in doubt, go for a slightly lower temperature. If the water is too hot, it will kill the yeast and your dough will not rise.

In this recipe, we make the starter and let it ferment overnight and then add it to the main dough and then let the bread rise two times. The additional fermentation of starter dough adds a great taste to the dough due to the alcohol and sugars created during this process. The biga/starter can be refrigerated for upto two days.


I had to go out of the house after the stage of folding the dough the second time, so I kept this dough in the fridge. Once I came home, I let the dough come to room temperature and then let it rise and then proceeded with the recipe. Since this is a lengthy process, if you do need to go away from the dough, refrigerate it. The cold temperature slows down the rising process.

The pizza stone provides a kiln effect and helps create a crispy crust for the dough.

Although the original recipe called for all purpose flour/maida, I used bread flour as it was handy. Bread flour had a higher gluten level and will make a softer bread. However, if you don't have it, it is perfectly okay to use all purpose flour.