Welcome to my blog

I hope you will find the recipe you are looking for your occasion here.

Now video instructions are available for select recipes and can be accessed at

Gardening and Cooking Made Easy

The latest 5 recipes are displayed on the
main page. For more recipes, you can browse the archive, click on the labels in the index to the left or use the Custom search below to look for a specific recipe.


Search for more results

Custom Search
Showing posts with label peanuts. Show all posts

Tuesday, January 10, 2012

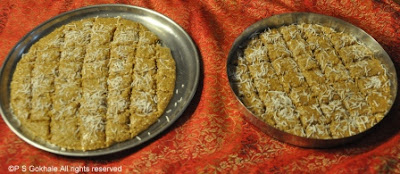
Til Gul Wadi/Vadi - Sesame Seed Fudge

The first week of January has passed by and we are inching towards 14th of January, when the first Indian festival of the year will be celebrated. This is "Sankrant" also known as Makar  Sankrant in India. It is a festival to celebrate the harvest season. This is one festival which almost always falls on the 14th of January (this year it was on the 15th) and is based on the movement of the Sun rather than the Moon. It is celebrated throughout India and is called by different names in different states. Some names that I am familiar with are Lohari (in Punjab), Uttarayan (in Gujarat), Makar Sankrant (in Maharashtra) and Pongal (in the southern states). In Gujarat, the entire day is spent on the terrace of the houses and in streets flying kites. It is one of the most colorful scenes I have ever seen. In Andhra Pradesh, it is celebrated over a period of three days.


In Maharashtra, it is celebrated by distributing sweets made from sesame seeds and jaggery. These are called "til gul vadi" and the tradition is to say "til gul ghya ani goad goad bola" which translates to "please take this sweet and speak sweetly". There are multiple variations in how this sweet is made, some are really hard in texture, some are brittle and some are soft. Each family has it's own recipe and tradition of making this sweet.

The ones I make have a soft texture and are easy to bite into and extremely simple to prepare. You can roll it into a ball and make a "laddoo" or you can flatten it and cut it into "vadi/barfi" akin fudge pieces. This is my Mom's recipe and my favorite version of this sweet. I hope you will give it a try and enjoy it.

Ingredients
1 cup sesame seeds
1 cup peanuts (shelled and without the peel)
1 cup finely cut jaggery, cup should be packed
1 tbsp ghee/clarified butter
2 tbsp of grated dessicated coconut, for garnish
some ghee to grease the plate in which the sweet will be set.


Method
Take a plate with an edge or a pan with a small edge and grease it with some ghee.
In a dry skillet, on low to medium heat, roast the sesame seeds till you get the aroma of the sesame seed.  Keep it aside and let it cool. In the same skillet roast the peanuts following the same method as for the sesame seeds. Be careful not to burn these ingredients. Once these cool down, coarsely grind them separately and then mix the two powders together.

In a pan, add the ghee and jaggery and keep it on a very low flame to cook. The jaggery will start melting. Be sure to keep it on very low heat.. Stir the jaggery so that it doesn't caramelize. Within a couple of minutes, the jaggery will start bubbling and foaming. At this stage, turn off the heat and add the powdered mixture of peanuts and sesame seeds and mix well together. Then pour this mixture (it will be quite thick) into the greased plate. Then using another bowl/measuring cup (grease the bottom), pat the this hot mixture and even it out into the plate. Make sure to level it properly. Then sprinkle the dessicated coconut all over the top and using the cup, pat it into the mixture. All this must be done while the mixture is hot.

Then, after the mixture cools a little, cut it into square pieces of about 1 inch sides. Let the mixture cool completely befor you take the individual pieces out of the plate.


Tips
You can roast the peanuts and the sesame seeds in the microwave. Initially you can do it for 1 minute intervals. Stir it after each minute and then you can reduce that to 30 second intervals. It takes about 2-3 minutes based on the power settings of your microwave. Let them cool completely and then grind.
If jaggery is kept on high heat, it will start caramelizing as soon as it melts, so be careful of the temperature. Also, it is necessary to turn off the heat as soon as the jaggery foams to get the soft consistency, the longer it is cooked, the harder the end product will be. If you feel that the jaggery syrup has become very thick, you can add some more ghee or alternately add a couple of tbsp of milk to the syrup to thin it out (if you add milk, this shortens the shelf life, so be sure to keep it refrigerated and eat it in a couple of days). If  after adding the sesame and peanut powder, the mixture becomes very dry and powdery, then sprinkle a teaspoon of warm milk and stir (while the mixture is hot). The mixture will immediately become moist (if it becomes too soft and moist, then re-heat it).  Then spoon the mixture into the greased plate.

If you forget to remove the pieces and then it gets difficult to take them out, heat the bottom of your plate or keep it in a warm oven for a couple of minutes and then it will be very easy to get the pieces out.
Saturday, December 17, 2011

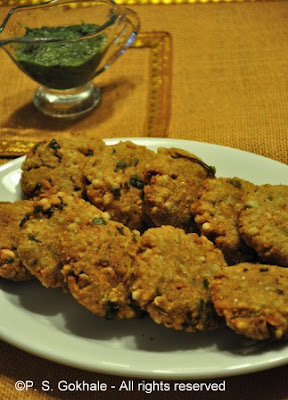
Sabudana Vada/Wada - Tapioca and Potato Fritters

This is an absolutely delicious delicacy. Tapioca is called "sabudana" in the Hindi and Marathi languages (the pronounciation varies a little), and Vada/Wada refers to deep fried dumplings. "Sabunada Vada are deep fried fritters/dumplings made with tapioca and potato, with a lot of ground peanuts sprinkled in. Absolutely lip smacking!! This is a dish that is reserved for special occasions and is one of the foods approved to be eaten on fasting days. However, most folks make it because it is so tasty. Over the years I have eaten this often, in different restaurants, at home and cooked by others and I must say, sometimes the vada can taste terrible, very chewy and dry. As a result, I had always been hesitant to make it, thinking that the recipe to get it perfect could be quite complicated. Finally, upon my family's repeated requests, I decided to try it out. I followed the advise of mom and lo and behold the end result was delicious. I am always thrilled when I am able make a recipe that I have always thought to be difficult. This one has a great end result,  and I hope you enjoy this recipe as well.


Ingredients
2 cups tapioca/sabudana (it should measure 2 cups after being soaked. Start off with 1 cup dry tapioca)
2 large potatoes, boiled and mashed
1 cup shingada/singada/singoda flour (water chestnut flour)
1 cup ground nut powder (see tips for how to make this)
1 tsp cumin powder
green chillies, finely chopped (5-8, to taste)
1/4 tsp baking soda
salt to taste
1/2 cup cilantro, chopped
1 tsp lemon juice
1/2 tsp sugar
1 tsp oil, luke warm
oil to fry


Method
See tips on how to soak the tapioca. Take the soaked tapioca and then crush it lightly, by processing in a blender or food processor. This will make it easier to mix it in with the potatoes. Then mix together the processed tapioca, singoda flour and potates. Add salt, cumin powder, ground nut powder, baking soda, and the cilantro. Add the lemon juice, sugar and the luke warm oil. Now mix this all together and knead a little, to form a dough. Take a fistfull of this dough and form it into a ball. Then flatten it to make a disc. Rest these discs on a plastic paper/sheet, so that it doesn't stick to the plate. The discs should be about 2-3 inches in diameter.


Heat the oil in a deep pan. There should be at least 3 inches of oil so that the vada can be entirely immersed in it. To test if the oil has heated enough, drop a inch of dough into the oil. If it rises up slowly, the oil is hot enough. The vadas need to be fried medium heat, so that they cook through. If fried on high heat, they will get cooked on the outside but will stay raw in the center.  Now, slowly release one vada from the side of the pan, it will go to the base of the pan and then slowly rise, once the vada starts gettting cooked. The vada will puff up and once browned, is ready to be taken out. Let the vadas rest on a paper towel to absorb the oil. These vadas will be light and very crispy. Serve with green chutney.


Tips
Singoda/shingada is water chestnut. You can find singoda/shingada flour in the local Indian store. Fry only 1-2 vadas at a time. As soon as the vada is added to the oil, the temperature of the oil decreases. So, fry only a couple at a time so that they get fried evenly and cooked through completely.
I also baked this dough, at 405 F for about 10-15 minutes, turning it over once, but these were not as crispy, though definitely low in calories.
To soak the tapioca, cover it completely with water such that there is enough water to cover all of hte tapioca and then add some more so that the water level is about a centimeter above the level of the tapioca. Soak this for at least 3-4 hours or overnight and then drain the water.

Tuesday, September 27, 2011

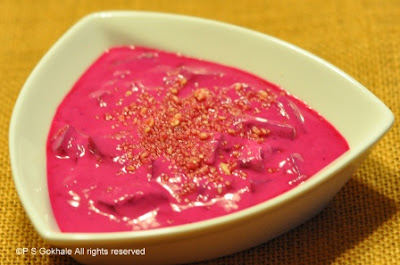
Beetroot Raita/Koshimbir (Dip)

This is a very easy side dish and a wonderful use of beetroot. The ingredients are simple but very nutritious and the taste absolutely delicious. Maharashtrians make many "koshimbirs/raitas" or dips. All of these are side salads which include include chopped vegetables and are generally dressed with yogurt sauce or even some tempered oil. Groundnut features as a prominent ingredient in many of these sides. Beetroot is a beautiful vegetable. It is rich in iron and has a bright red color. It is used as an ingredient in many natural dyes as well. And when it is mixed with yogurt, the dish gets a beautiful pink color and is as appealing to the eye as to the stomach.


Ingredients
1 beetroot
2 tsp groundnut/peanut powder  (take peanuts and grind them to a coarse powder)
salt to taste
chilli powder  to taste (optional)
1/2 tsp sugar
1 cup yogurt
water, as needed

For the tempering (optional)
1 tbsp oil
a pinch of mustard seeds
a pinch of cumin seeds
pinch of asafoetida powder/hing
1 green chilli, slit through the center (optional)


Method
Cook the beetroot. I usually pressure cook it in my cooker and then peel it.  If you don't have a pressure cooker, you can also steam cook it till it is softened. The beetroot should be cooked through but not mushy, so take care not to over cook it. Let it cool, then peel it and cut it into bite sized pieces. Then mix in the groundnut powder, yogurt, sugar and salt. Mix well. If the yogurt is thick, then add a  little water to thin it out a bit. It should be sauce like in consistency. At this stage you can add some chilli powder if you want and can serve it without the tempering. The tempering adds a little spice to it. So, if you wish to add tempered oil, then heat the oil and add the cumin and mustard seeds. Once you hear them crackle, add the asafoetida powder and the green chilli and turn off the heat. Let the chilli cook in the remnant heat and then pour this over the beetroot and yogurt mixture. Mix well. Serve as a side.


Tips
It is much easier to peel a cooked beetroot.  You can easily convert this to a dip by grating the beetroot instead of using diced pieces. You can also use ghee for the tempering instead of oil. To make the peanut powder, take about a cup of shelled peanuts and then pulse it in your blender, till you get a coarse powder. Stop at the stage while it is still in a powder form. If you process it more, you will end up with peanut butter. 

Saturday, May 14, 2011

Sabudana Khichadi - Tapioca Pilaf

This is a dish made on special occasions in Maharashtra. It is made as a special breakfast item and is generally regarded as a delicacy. It is often made on auspicious days when people fast and are allowed to eat limited ingredients. Personally, this is a dish I associate with special celebrations, holidays and spending time with family. This is a rich, festive dish and is generally cooked in ghee (clarified butter), with a lot of peanuts. It doesn't have too many ingredients, but is absolutely flavorful. I don't make it too often, and whenever I do, it is a special treat. I hope you enjoy this treat as much as we do.


Ingredients
1 cup sabudana/tapioca pearls
water, just enough to cover the sabudana
1/4-1/2 cup roasted peanuts, ground coarsely into a powder
green chillies, split lengthwise - to taste
salt to taste
1/4 tsp sugar
1/8 tsp cumin seeds
2-3 tbsp ghee/clarified butter
1 medium potato, boiled and diced


Method
Put the tapioca in a sieve with holes which will not let the sabudana fall through, but will allow the crumbs to be sieved. Then sieve the sabudana. Then rinse it till the water starts running clear. This is an important step to ensure that the sabudana does not become mushy and sticky. Soak the tapioca for a few hours. Do not add a lot of water. You need just enough to cover all the tapoica pearls. You need to soak it till the tapioca is completely softened and this generally take from about 2 to 5 hours. You can even soak it overnight. Then drain the water and keep aside.

To this tapioca, add the ground nut powder, the salt and sugar and mix them so that the tapioca gets lightly coated with these ingredients. This helps in even dispersion of all the ingredients and you don't get any unseasoned bites. Also, add a little salt to the boiled potato pieces and mix to ensure even seasoning.

In a broad pan, heat the ghee and add the cumin to it. Once, the cumin starts to change color (do not let it burn), add the chillies and the potatoes. Cook the potatoes for a couple of minutes till they get a nice fried look. Since you are using boiled potato pieces, you will not need to cook it for a long time (see tips on usage of raw potato). Then add the seasoned tapioca and groundnut mixture and stir fry. As tapioca cooks through, it becomes transparent. You will know it is cooked when all of it has turned transparent. Turn off the heat. Over cooking it will make it dry. Serve with a slice of lemon or with some yoghurt/dahi.


Tips
Do not skimp on the ghee or oil, else the end result will be sticky. Roast the raw shelled peanuts lightly till you can get the roasted smell and they start to darken a little. Then let them cool and grind till you get a coarse powder. Do not grind it for too long, else they will release the oil. To make this a lighter dish, substitute the ghee with olive oil. If you like the potatoes to have a bite, substitute the boiled potato with raw sliced potato. Follow the recipe and fry the potatoes till they are cooked through and then add the remaining ingredients. To prevent raw potato slices from oxidizing and turning dark, cut and put these slices in a bowl of water.

Sunday, May 8, 2011

Puffed Rice Sweet Balls - Kurmura/Murmura Ladoo

This is one of the simplest recipes which takes me right back to childhood. I remember these puffed rice sweet balls that I used to love as a little girl. My mom made these often and it was a delicious treat that I used to look forward to. Now that I have a little girl, I thought this would be the perfect recipe to make with her. And was I right! Both of us had a marvelous time measuring out the ingredients and mixing them together. She enjoyed eating these treats as I rolled them out. This is a recipe that can make any day seem special. You can use this recipe to spend a nice time mixing things, getting messy, tasting as you eat and just having a lot of great fun. I hope you and your kids enjoy this recipe, just as much I did as a child and now do as a mom. Dedicated to my dear mom on Mother's day. Happy Mother's Day to all you wonderful moms out there.


Ingredients
1 tsp ghee/ clarified butter
1 cup jaggery, grated or cut fine
3 cups puffed rice/kurmura/murmura
2 tbsp dal/dalia (roasted chana/gram dal)
3 tbsp peanuts, unsalted


Method
Heat the ghee in a pan, then add the jaggery and let it melt. Once, the jaggery starts becoming frothy, turn off the heat. Add the puffed rice (kurmura), peanuts and dal and mix it all together. Let it cool so that it's easy to handle. Then take a fistfull of this mixture and roll it into balls. (Caution: The mixuture gets very hot, so make sure you let it cool a but before rolling it into balls.) The mixture cools down rapidly and you may not be able to roll all of it into balls. If you are unable to roll it into balls before it cools down completely, then eat the sweet puffed rice as is.


Tips
Coat your hands with a little bit of ghee so that the puffed rice mixture doesn't stick to your hand. The mixture will not roll into balls once it cools down completely.

Monday, February 14, 2011

Karlya chi Bhaaji - Bitter Gourd Curry

This is a recipe that I rarely ate as a kid. In fact, as a kid I didn’t want to eat bitter gourd curry as I always thought that this would be very bitter. To my surprise when I finally tasted it, I loved it. It was savory, spicy, sweet and bitter, all the tastes blending beautifully to create a very tasty curry. We used to grow bitter gourd in our garden, so whenever we had a fresh crop, my mom used to make this curry and the fried chips version. This is a recipe which needs many ingredients and is more involved than the fried version. But it is so delicious, that I decided to buy the vegetable this time with the sole aim of making this curry. I must say we enjoyed it.  I hope you enjoy it too.

Note: To see more details about bitter gourd/karela/karla, see my previous post on “karlya che kaap-bitter gourd chips”


Ingredients
4-5 bitter gourds, diced into cubes
1/2 red onion, chopped (about 1 cup)
1 tbsp ginger-garlic paste
1/8 tsp cumin seeds
1/4 cup dry coconut (unsweetened), sliced/ grated/shredded
1 tsp garam masala
1 tsp goda masala (can substitute cumin-corriander/dhana-jeera powder)
1/8 tsp turmeric
¼ cup groundnut/peanut, ground coarsely into a powder
Red chilli powder to taste
1 inch piece jaggery or 1 tbsp brown sugar
Salt to taste
2 tbsp oil
1-2 cups water


Method
Pressure cook the bitter gourd pieces, by adding sufficient water to cover the pieces.  They should be cooked through and softened, not overcooked.  Alternately, you may boil the pieces in water till they are cooked through, if you do not have a pressure cooker. This step reduces the bitterness. Drain and set aside.

Roast the cumin seeds and the coconut separately. Dry roast them till you can smell the aroma, do not let it burn. Then grind this together to form a powder.


In a pan, add the oil, to this add onions and fry till lightly browned. Then add the ginger garlic paste and fry for a couple of minutes. To this add the cumin, coconut mixture. Then add the garam and goda masalas, the peanut powder, salt, chilli powder, turmeric. Fry this for a minute or so. Add the cooked bitter gourd pieces. Fry for a minute. Then add about 1 cup of water to form the gravy. Add more water if the gravy is very thick. Boil for a few minutes.  Then add the jaggery as the last step, cook for another minute. Serve hot with chapatti or white rice.


Tips
Another method to reduce the bitterness would be to apply salt over the bitter gourd pieces and keep them aside for 10-15 minutes. They will release a lot of water, then rinse and pat them dry.  You can use these directly in the gravy instead of cooking them separately. They may be bitterer than the cooked, drained pieces.  If you have a pressure cooker and are tolerant of bitter taste, then omit the first step and cook the entire preparation directly in the pressure cooker. This is much faster, but the gravy will have a stronger bitter flavor than using cooked and drained pieces.

Saturday, January 29, 2011

Bharli Vangi- Stuffed Eggplant

This is a very "rich" eggplant preparation. It has groundnut and coconut along with sesame seeds. I am not sure how the "traditional" version is prepared, however my version is much quicker and just as tasty if not tastier. This is a wonderfully quick way to prepare a recipe which has several steps traditionally. This is also a very easy vegetable preparation to scale up. I had made this preparation with eighty eggplants for my daughter's first birthday bash. Everyone enjoyed it a lot and several folks had asked me for the recipe. So albeit quite late, it's better than never; I finally got the required photos and am now able to post the recipe. Hope you enjoy making it as much as I do.

Eggplant is also known as brinjal and I may use these interchangeably in the following recipe.


Ingredients
1 red onion large, chopped into small pieces
1/2 cup peanuts/groundnut, ground coarsely (do not grind it till the texture is pasty)
1/2 cup sesame, roasted lightly and ground
1/2 cup grated coconut, fresh or dry
salt to taste
1 tsp sugar
red chilli powder to taste
1 tbsp ginger garlic paste
2 tbsp goda masala
3 tbsp oil
8-10 small eggplants/brinjals (called Indian eggplants in the US)
2-3 cups of water with about 1 tsp salt dissolved in it
2-3 tbsp water, if needed


Method
Make two perpendicular slits in the brinjal/eggplant, from the side opposite to the stem. Do not cut it till the pieces separate. After the cuts, the eggplant should have four pieces and a "+" shape cut. As you cut the brinjal, put it into the salt water. This will prevent oxidation of the cut surface and help retain the color.  If the exposed surface of the brinjal oxidises, it will turn brown. In a mixing bowl, mix together the chopped onion, peanut powder, sesame seed powder, coconut, goda masala, ginger garlic paste, red chilli powder, salt and sugar. Mix the ingredients together. Then, stuff each of the cut eggplants with this mixture. You may be have some left over mixture, which will form the gravy. Then heat the oil in a pan broad enough to hold all the brinjals in one layer. Add each brinjal to the oil and let it cook. Add the remaining stuffing mixture to the pan. Let the brinjals and the onion cook down. Stir gently and cover the pan. After the raw smell of the onion and garlic goes away, if needed add some water to create the gravy. Adjust the amount of water needed, by adding a little at a time. This preparation is more towards the dry side and does not have a watery gravy. Serve hot with chapati or rice.


Tips
Substitute goda masala with the same quantity of of dhana-jeera powder mixture. Do not add water to form the gravy before the onions, garlic and brinjal gett fried well in the oil and are no longer raw, else they will not taste good. The water should be added at the end of the cooking process. You may need to adjust the initial amount of oil, based on the volume of brinjals and the stuffing mixture. If you need to add more oil after you have already added all the ingredients, then heat the oil in another pan and add it to the preparation.