Welcome to my blog

I hope you will find the recipe you are looking for your occasion here.

Now video instructions are available for select recipes and can be accessed at

Gardening and Cooking Made Easy

The latest 5 recipes are displayed on the
main page. For more recipes, you can browse the archive, click on the labels in the index to the left or use the Custom search below to look for a specific recipe.


Search for more results

Custom Search
Showing posts with label besan. Show all posts

Thursday, March 29, 2018

Pithla- A chick pea flour curry

This is the simplest version of pithla. A pudding like curry made with chickpea flour seasoned with garlic. It is perfect for a quick dinner. And it is the ultimate comfort food when paired with white rice and ghee. This is the version that I like which has a pudding like soft texture and is a little fluid and can be easily mixed with rice. 

Ingredients
2 tbsp oil
1/8 mustard seeds/rai
1/8 cumin seeds/ jeera
Pinch of asafetida powder
1/4 tsp of turmeric powder 
1 cup chick pea flour 
4 cups water 
4 large garlic cloves, finely diced
1 onion, finely chopped
1-2 green chilies, slit in the middle or finely diced, to taste 
Salt, to taste
1/4 tsp sugar  


Method 
Mix the chickpea flour, salt, sugar and turmeric powder. Then slowly add the water and mix it together to create a slurry. Make sure that it doesn't have any lumps. 
Heat oil. To it add the mustard and cumin seeds . Once the seeds begin to crackle add the garlic and chillies and cook them for a minute and then add the onions. Cook them till transparent. Then add the chick pea slurry in. Stir well and let it come to a boil. It tends to splatter, so use a splatter screen or a pan that is deep enough to catch the splatter. Let it boil for a couple of minutes and start to thicken. Keep stirring it frequently, so that it doesn't stick to the bottom. Cook it till it has a pudding consistency. Turn off heat. Serve hot with white rice or jowar bhakri.


Tips
Stir the slurry before you pour it in as the flour tends to settle. You can add spice like garam masala or gods masala to flavor it further, though I prefer it without any additional spices. You can also cook it till it is dry and serve is like a sabji.

Tuesday, November 6, 2012

Multigrain Ladoo/ Laddoo - Multigrain Sweet Balls

This is a delicious and a very healthy sweet. I made this for the first time, about one year ago. I needed a healthy and filling snack which would be easy to store and carry. Also, it needed to be appealing to a child and easy to hold and eat. My daughter enjoys besan laddoo and one day I thought it would be great if I tried to make laddoos with other grains and flours. This recipe was a great success.  My family enjoyed it and I was okay if dinner occasionally constituted of one laddoo and milk.


Ingredients
2/3 cup whole wheat flour
1/2 cup soy bean flour
1 cup mung dal
2/3 cup urad dal
1/2 cup ragi flour
1.25 cups of ghee/clarified butter
2 and 1/3 cup of powdered sugar
1/4 tsp cardamom powder
1/4 cup raisins (optional)
1/4 cup blanched and peeled almond slices (optional)


Method
Dry roast the whole wheat flour, soy bean flour and ragi flour separately. The flour should be roasted till it gets a toasted fragrance. The soy bean flour will take the minimum time. Roast each flour and grain separately, as each flour will need different amounts of roasting time. Roast the urad and mung dal till they turn reddish brown, taking care to not burn the grain. Grind each grain, separately into powder. It can be slightly coarse, which will give the laddoo some texture. Once all the flours are roasted and grains have been ground into flour, heat ghee in a pan. The pan should be large enough to hold all the ingredients. The powdered flours approximately amount to about 5 and a half cups. Once the ghee has melted, add the flours and mix them well with the ghee. Turn off the heat. Once the mixture turns warm, add the powdered sugar, raisins and almonds (if using them) and mix well. The mixture should not be cold, else it will be difficult to incorporate the sugar. Mix it well till all the sugar is incorporated into the flour and ghee mixture.

Then take a fistful of the mixture and roll it between the palms of your hands to roll it into small balls. Store in an airtight container. These do not need refrigeration, however you can  store them in the fridge if any remain after a couple of weeks to keep them fresh.


Tips
If you store the laddoos in the fridge, warm them up in the microwave for 5-10 seconds before eating. You can switch out the whole wheat flour with besan/chickpea flour. Or you can even add in besan as an additional flour. You can adapt this recipe by trying out different proportions of the various grains or flours. Just make sure that you roast the flour before using it in the laddoo. It can be made gluten free by substituting the wheat flour with chickpea flour.

Tuesday, August 21, 2012

Sindhi Kadhi - A Delicious Stew

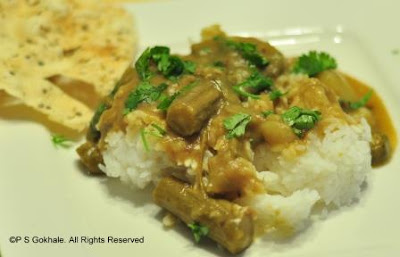
This is a recipe that my aunt gave me recently and asked me to try it out. It is called Sindhi Kadhi. It is a delicious stew or curry prepared with chickpea flour (besan) and vegetables. However, it does not conform to my traditional view of what “kadhi” should be. All the different versions of kadhi that I have made or eaten so far have always had yogurt and besan/chickpea flour as the main ingredients. The main difference in all these versions was the seasoning that I used, however the main ingredients always stayed the same i.e. yogurt and besan. I had never made or tasted Sindhi Kadhi prior to this attempt, and I am glad I finally did. It has definitely changed my perception of what kadhi can be. This particular version of the kadhi does make use of the besan flour, however it differs in the fact that, instead of using yogurt, tamarind water is used to give it a sour taste. Also, this recipe has a lot of vegetables. And while I made it with the vegetables that my aunt listed, I am sure you can change the combination of the vegetables based on what is available. The end result is a hearty, healthy and delicious stew. We enjoyed the preparation and I will definitely be making it again.


Ingredients
1 tbsp oil
1/8 tsp jeera/cumin seeds
pinch of asafoetida
1/8 tsp turmeric powder
1 cup okra/bhindi/ladies fingers ( diced)
3 tsps besan/chickpea flour
1 cup potatoes (1 large or 2 small potatoes), diced into big pieces
1 cup banana squash/red pumpkin/laal kaddu/ laal bhopla,
1 cup cluster beans /gavar /gowar, diced
1 drumstick, cut into 1-2 inch pieces
chilli powder to taste
5-6 curry leaves
1 tsp tamarind paste or 1 inch ball of tamarind
salt to taste


Method
If using tamarind paste, dissolve it in about 2 cups of water and keep aside. If using regular tamarind,  soak it in warm water and then remove the pulp and dissolve it in 2 cups of water and keep aside.


Heat the oil. To this add the cumin seeds. Once they being to crackle, add the hing/asafoetida, and the okra pieces. Stir fry the okra till well cooked and a little browned. Then add the besan flour and cook the besan flour till you get the fragrant roasted smell for the besan. Then add the cluster beans, drumstick pieces, potato and pumpkin. Stir it and add the turmeric powder and chilli powder and cook it all for a minute.  Then add the tamarind water, stirring continuously while adding the water, so that no lumps formed. Add the curry leaves. Add more water if needed. All the vegetables should be covered with the water. Then cook till the curry till it starts to boil and thicken. Add the salt. Taste and add a little more of tamarind paste if you want a more sour taste. Check to see if the vegetables are cooked. The curry shouldn’t be too watery or too thick. Garnish with cilantro leaves. Serve hot with white rice.


Tips
Steam cook or pressure cook (1 whistle) the guvar/cluster beans and the drumsticks so that they are semi cooked and softened.  This will reduce the overall cooking time. Do not precook the potato and pumpkin, since they do not need a long cooking time and will get cooked through as the curry boils. If precooked, they will turn to mush. Fry the besan and the okra well. The okra needs to be crispy and the besan needs to be a brown color which will impart a brown color to the curry.
If you decide to change the vegetables, use hearty vegetables which will not become mushy when the kadhi is being boiled. You can also add in some tomatoes in this recipe. They should be added along with the potato and other vegetables. 

Wednesday, October 5, 2011

Batata Vada/Wada (Fried Potato Fritter)

"Batata vadas" are fried spicy potato fritters. It is one of the most common street foods in Maharashtra. Sandwhich one in a bun, add chutneys and voila, it is now a very Indian "burger". I have so many fond memories related to batata vadas. One that stands out is one rainy afternoon when my Dad and I had gone on a short hike on the outskirts of the city. There was a bracing wind, and a slight drizzle which soon turned into a downpour. Fortunately, we took found a small restaurant and took refuge there. Then, my dad ordered a plate of batata vadas with some hot tea. It was just fabulous! While the restaurant was pretty run down, the vadas were hot and tasty and the hot tea,the perfect drink for two drenched souls. Now, whenever it rains, I always wish that someone would hand me some vadas and tea. Well, I finally fried some when it rained the last time and they were lip smacking. So, next time it is dull, grey and pouring cats and dogs, whip up a batch and enjoy.


Ingredients
For the stuffing
1/2 onion, finely diced
2 large potatoes, boiled and mashed
salt to taste
2 garlic pods
1/2 inch ginger
2 chillies
1/4 cup cilantro, chopped
1/2 tsp sugar
1/2 lemon
2 tsp oil
1/8 tsp mustard seeds
1/8 tsp cumin seeds
a pinch of asafoetida/hing
pinch of turmeric

For the cover
1 cup besan/gram flour
1 tsp chilli powder
1 tsp oil, warm
1/4 tsp baking soda
salt to taste
1/8 tsp turmeric
water

oil to fry the vadas - there should be about 2-3 inches of oil, so that the entire potato fritter can be fried easily.


Method
Grind the green chillies, ginger and garlic into a paste. Mix it into the mashed potatoes. Mix in the onions and cilantro. Then add the sugar and salt to the mixture. In a small pan, hehe at the oil and add mustard and cumins seeds. Once they crackle, add the hing and turmeric. Turn off the heat and pour this onto the mixture. Mix well. Then squeeze some lemon juice into this mixture.

Roll out the potato mixture into small balls, about 1.5 - 2 inches in diameter. Keep aside.


In a mixing bowl, mix together the besan, chilli powder, salt and baking soda. Add some oil which has been warmed and then add some water. Add a little water at a time and mix to form a batter. The consistency of the batter should be thick so that when you dunk the potato balls the batter should coat it evenly.


Heat the oil. Then, dunk a potato ball into the batter and gently drop it into the oil. (be very careful not to splash any oil on you). Add about 3-4 vadas only at a time. Do not over crowd your frying pan. Fry the vadas till the cover is brown. Serve with spicy mint chutney and tamarind chutney.


Tips
If you add more water to the cover batter by mistake, add a little more flour and adjust the salt and chilli levels to taste. To check if the oil is hot enough, drop a little batter into the oil and if the droplets come up immediately, then the oil is hot and ready to fry the vadas.

Wednesday, August 31, 2011

Baati - Baked Whole Wheat Dumplings

The first time I ate authentic dal baati was in Indore, about eleven years ago. I was visiting family and there were two occasions when I was able to savor this delicacy. The baatis were authentically cooked in an earthen stove. Then, they were dunked in ghee and served with hot delicious dal. I can never forget that experience. The taste of the baatis being roasted and baked in an authentic kiln can just not be replicated in a modern kitchen. After I got married, I was pleasantly surprised to find that my husband liked this dish and even knew how to make it. Eventually, we started making it quite often. While one can't get the rustic taste, only possible using an earthern stove, the ones baked in the oven are also equally delicious. This is supposed to be a delicacy, however, I make this so often, that I am not sure I can realy classify it as a delicacy in our house anymore! I must mention that once you make this, you will realise it is much easier than toiling for hours on an elaborate menu. However, your guests will be very impressed with this dish. It is so easy that you may get hooked and make this a regular feature on your menu as well.


Ingredients
2 cups whole wheat flour
1/4 cup besan/chickpea flour
1 cup yogurt
1/2 tsp salt
2 tbsp ghee
1/4 tsp baking soda
water to knead


Method
Mix together all the dry ingredients. Then create a well in the center of the flour mixture. Into this add the ghee and yogurt. Then mix this. If the yogurt is watery, then you may not need to add any additional water to knead it all together into a soft dough. It shouldn't be too loose, nor too dry and hard. Knead the dough well and let it rest for 15-30 mins. Cover the dough with a damp cloth so it doesn't dry out.


Preheat the oven to 350F. Then roll out the dough into small balls about 1-1.5 inches in diameter. Place these on a baking sheet with enough space between them to allow for expansion. Bake in the oven for about 20-40 mins, till well browned. The baati will expand and break open and develop cracks as it cooks. The end result shouldn't be hard. When warm, pour a little ghee so that it gets absorbed through the cracks in the baati. Serve with hot dal and additional ghee.


Tips
Instead of adding ghee to the flour, you can add the milk solids that are left behind when you make ghee at home. This is a wonderful use of these solids, especially if you have used salted butter. If the milk solids are salted, then reduce the amount of additional salt that you add to the flour. Traditionally the baatis are soaked in ghee before being crushed and then hot dal is ladled onto this and is eaten hot.
To simulate an eathern kiln, use a pizza stone. Preheat it and then place the baatis onto this to be baked. 

Tuesday, July 26, 2011

Scallion/Green Onion Stir Fry - "Paati Chi Bhaaji"

This long delicate green is tender onion and is called scallion or green onion. In Marathi its called "Paati cha Kanda" which literaly translates to "Leaves of Onion". Now, occasionally I have confused the word scallion with scallop, but these are nowhere in the same food category. One is a vegetable while the latter is a type of seafood. However, always remember that scallion ends with the word "onion" and that will help you remember that scallions are "green onions". This is a vegetable commonly found in Chinese style stir frys and salads, but usually is not used as a standalone agent. This is possibly one of the only preparations that I have come across where this is the star of the show. When you cook scallions, they tend to shrink and reduce significantly in volume, so you must start off with double the volume of these fresh green onions, so you end up with a sufficient quantity for your meal.


Ingredients
2 tbsp oil
1/8 tsp mustard seeds
1/8 tsp cumin/jeera seeds
1 tsp sesame seeds
1 green chilli
4 cups chopped scallions/green onions (use the green leaves as well as the onions)
1 cup besan/chickpea flour
salt to taste
1/2 tsp sugar
1/8 tsp turmeric


Method
In a bowl, mix the chickpea flour, salt and sugar together and set aside
In a large, broad pan, heat some oil. To it add the the mustard and cumin seeds. Once the mustard seeds start sputtering, add the sesame seeds and the green chilli. Once the sesame seeds are slightly golden, add the chopped white tips of the scallions. Cook till they are transparent and then add the turmeric powder. Next add the greens and stir fry for a couple of minutes. Now, sprinkle the chickpea flour mixture into the stirfry and mix well. This will ensure that most of the leaves and onions will get coated with the mixture. Now, let this cook for ten minutes or so on low to medium heat. You can stop cooking it as soon as the mixture tasted cooked, however I prefer to cook it on longer till the flour coated parts start to brown and crisp up. At this stage, turn off the heat. Serve as a side or with chapati.


Tips
Instead of green chilli, you can use 1/2 to 1 tsp chilli powder (adjust to taste). If you use the chilli powder, mix it into the chickpea flour. Always add the white part of the onion a few minutes before the green leafy part. The white part takes a little longer to cook.  

Wednesday, October 27, 2010

Besan Laddoo/Laadoo - A Sweet made from Chickpea Flour

I enjoy the festive season. It starts with Shravan and then there's Ganpati followed by Navrati, Halloween, then Diwali.  And of course, I love  Thanksgiving and Christmas. Every place is decorated and it's a ton of fun. I love the holiday and festive season. I look forward to the many long weekends after August and there are plenty of excuses to have parties, and cook a variety of delicacies. This year has flown by and Halloween and Diwali are right around the corner. I am still coming up with my list of items to make for Diwali. It's an evolving list, with requests coming in every other day. I enjoy the challenge of making something new each year. There are always a few staples though, and one of them is the ever loved "besan laddoo". It always has a special place on the Diwali menu.
I will be posting a few recipes over the next few days that you can try for Diwali this year. Hope you are enjoying the festive season.


Ingredients
1 cup clarified butter/ghee
3 cups besan/chickpea flour
2 and 1/4 cups of powdered sugar
1/2 tsp cardamom powder
3 tbsp raisins


Method
Heat the ghee and besan together in a pan.  Roast the besan till the besan turns light brown. Take care of stir it often so that it doesn't burn. Alternately, you can roast this mixture in the microwave oven. Start with roasting it for about 2 minutes a couple of times and then you can roast it in 1 minute intervals or lesser depending on how poweful your microwave is. It is very important to keep an eye on the besan when using the microwave, as its very easy for it to burn if its kept for a few seconds more than necessary. Once the besan is well roasted, you will notice a lovely aroma. That indicates that the besan is being cooked. Also, the taste will change from raw to a nice roasted taste. The color, smell and taste are great indicators to determine if your besan is well roasted. If it is not, and if you add the sugar, you will not be able to cook the besan further and will be stuck with raw tasting laddoos.
After the mixture cools down slightly where it feels warm, add the cardamom powder, powdered sugar and raisins. The mixture should not be cold, else it will be difficult to incorporate the sugar. Mix it well till all the sugar is incorporated into the besan. Then take a handful of the mixture and roll it between the palms of your hands to roll it into small balls. Store in an airtight container. I generally store them in the fridge to ensure that they do not spoil, however they do not last for too long.


Tips
This recipe makes about 20-25 small sized laddoos, about 1.5 inches in diameter. Do not use confectioner's sugar. If you do not find powdered sugar, you can grind regular sugar in the blender till it is fine and use it. If you add the sugar when the besan is still being heated or is too hot, it will melt and turn into a syrup and the texture of the laddoos may get spoilt. The sugar should be added when the mixture is warm and can be touched without burning your hands. You can roll the laddoos when it's warm or when the besan and sugar mixture is at room temperature.