Welcome to my blog

I hope you will find the recipe you are looking for your occasion here.

Now video instructions are available for select recipes and can be accessed at

Gardening and Cooking Made Easy

The latest 5 recipes are displayed on the
main page. For more recipes, you can browse the archive, click on the labels in the index to the left or use the Custom search below to look for a specific recipe.


Search for more results

Custom Search
Showing posts with label bake. Show all posts

Sunday, December 29, 2013

Apple Crumble - A delicious fruit dessert

This is a delicious fruit dessert. It is warm and perfect for a cold winter night. Add in a scoop of vanilla ice cream and it is the perfect dessert to satisfy your sweet tooth. Now, there are several recipes of apple crumble out there, however, when I wanted to make this, I turned to a recipe from America's Test Kitchen Cooking School Cookbook. I wanted a recipe which would taste great and have a crunchy crumble and knew that I could rely on this recipe. I needed to make it nut free, and the original recipe called for almonds, so I made a few substitutions and it turned out delicious. Best of all it could be eaten by everyone and I didn't have to worry about those with allergies.


Ingredients
For the crust
1 cup all purpose flour
1/4 cup sugar + 1 tbsp sugar
1/4 cup brown sugar, packed
1/8 tsp salt
7 tbsp butter, cut into cubes at room temperature
1/2 cup traditional rolled oats
2 tsp vanilla essence

For the filling
8 medium sized apples, peeled, cored and diced into 1/2 inch pieces
1/2 tsp cornstarch
4 tsp lemon juice
2/3 cup sugar
1/8 tsp salt
1/8 tsp nutmeg powder
1/8 tsp cinnamon powder


Method
Preheat the oven to a temperature of 350F. Place one rack in the middle of the oven and another baking rack at the lowest level in the oven.

In a large mixing bowl, mix together the lemon juice and cornstarch. Add in the apple pieces, sugar, salt, cinnamon and nutmeg powder. Toss all this together till the apple pieces are well coated. Pour this into a 8 inch square baking tin and cover it tightly with aluminium foil. Keep aside

Keep 1 tbsp of sugar aside. In a food processor, mix together the all purpose flour, salt, both sugars, and vanilla essence. Then add the butter pieces and 1/4 cup of rolled oats. Pulse it all together till the mixture comes together into lumps. Use a spatula to scrape the bowl down. Add the remainder of the 1/4 cup of rolled oats and pulse a couple of times till it is blended into the the mixture, but not completely powdered down.

Place this on a baking tray lined with parchment paper or a silicon mat. Shape it in a square similar to the size of the baking tin containing the apple crumble. It will be about 1/2 inch in thickness. Place this baking tray with the topping  mixture onto the middle rack and the baking tin containing the apple mixture on the lower rack in the oven.

Bake these for 20 minutes. Turn the baking tray once by 180 degrees, so that the crust gets cooked evenly. The crust will be lightly browned at this time.

Remove both the baking tray and tin from the oven. 
Increase the temperature of the oven to 375F.
Remove the foil covering the baking tin and then by lifting the mat/paper slide the crust onto the apple mixture. Sprinkle 1 tbsp of sugar on the top of the crust. Place this tin back into the oven on the lower rack and bake it for 25 minutes till the crust is browned and the apple mixture is bubbling.

Serve warm with a scoop of vanilla bean ice cream.


Tips
If you do not have 8 apples, you can also substitute some pears instead. 
You can use a spatula to break the crust and place it piece by piece onto the apple mixture, till the mixture is covered completely.

Monday, January 2, 2012

Nankhatai - Delicious Eggless Indian Shortbread Cookies

A very Happy New Year to all my blog readers. I hope you had  great first of January and are charged up to start the new year with good food. I thought what was better than to start the new year with a recipe of delicious Indian shortbread cookies, called Nankhatai. These are rather rustic and delicious and moreover eggless and extremely easy to prepare.


These heavenly cookies are rather hard to find. When I was growing up, one could never find them in regular grocery stores. These had to be bought from bakeries (which used to filled with the divine aroma of cookies and cakes). And then there were some door to door vendors who used to cart them in a big tin box on a bicycle and sell them. Of course, the easiest way to access them was when Mom baked them at home, but that not very frequent. And now, I find it is even more difficult to find these. So, when I really want to eat some, I need to order them online from Indian bakeries in other states. I finally decided to make them at home. My husband was quite insistent that these be the original, rustic cookies/biscuits without any nuts or additions and so, I kept it very simple. These turned out absolutely great.  The best part was that my toddler daughter was also involved throughout the making of this recipe and she thoroughly enjoyed it and then ate the cookies with relish.


Ingredients
1 cup maida/ all purpose flour
1/2 cup unsalted butter
1/2 cup powdered sugar
1/8 tsp cardamom powder
1/8 tsp salt
1/4 tsp baking powder


 Method
Sieve together the all purpose flour, salt, cardamom powder and baking powder and keep aside. Whip the butter till it is fluffy. Then add the powdered sugar to it and blend it well together. Then add the all purpose flour mixture, a little at a time till it is completely incorporated into the butter. At this stage, the mixture will come together in a dough like consistency. Knead it to form a smooth dough and then cover it with plastic wrap and keep aside for about 20-30 minutes. Then make small balls of dough, about 1.5-2 inches in diameter. Keep these on a cookie or baking sheet lined with parchment paper or grease the sheet with a little oil. Keep at least an inch between the dough balls, so that there is enough space for the cookies to spread out as they bake.


Preheat the oven to 300F. Bake these for about 20-25 minutes, till lightly browned. Let them cool on a cooling rack. Store in an airtight box.


Tips
You can substitute whole wheat flour (either pastry or the ones used to make rotis) for the all purpose flour. Keep the butter out of the fridge at room temperature for about an hour before you start baking, so that the butter and sugar whip well together. If you use salted butter, then skip the salt. Use powdered sugar, not icing sugar. You can blend regular sugar in the mixer and powder it very fine.

Wednesday, August 31, 2011

Baati - Baked Whole Wheat Dumplings

The first time I ate authentic dal baati was in Indore, about eleven years ago. I was visiting family and there were two occasions when I was able to savor this delicacy. The baatis were authentically cooked in an earthen stove. Then, they were dunked in ghee and served with hot delicious dal. I can never forget that experience. The taste of the baatis being roasted and baked in an authentic kiln can just not be replicated in a modern kitchen. After I got married, I was pleasantly surprised to find that my husband liked this dish and even knew how to make it. Eventually, we started making it quite often. While one can't get the rustic taste, only possible using an earthern stove, the ones baked in the oven are also equally delicious. This is supposed to be a delicacy, however, I make this so often, that I am not sure I can realy classify it as a delicacy in our house anymore! I must mention that once you make this, you will realise it is much easier than toiling for hours on an elaborate menu. However, your guests will be very impressed with this dish. It is so easy that you may get hooked and make this a regular feature on your menu as well.


Ingredients
2 cups whole wheat flour
1/4 cup besan/chickpea flour
1 cup yogurt
1/2 tsp salt
2 tbsp ghee
1/4 tsp baking soda
water to knead


Method
Mix together all the dry ingredients. Then create a well in the center of the flour mixture. Into this add the ghee and yogurt. Then mix this. If the yogurt is watery, then you may not need to add any additional water to knead it all together into a soft dough. It shouldn't be too loose, nor too dry and hard. Knead the dough well and let it rest for 15-30 mins. Cover the dough with a damp cloth so it doesn't dry out.


Preheat the oven to 350F. Then roll out the dough into small balls about 1-1.5 inches in diameter. Place these on a baking sheet with enough space between them to allow for expansion. Bake in the oven for about 20-40 mins, till well browned. The baati will expand and break open and develop cracks as it cooks. The end result shouldn't be hard. When warm, pour a little ghee so that it gets absorbed through the cracks in the baati. Serve with hot dal and additional ghee.


Tips
Instead of adding ghee to the flour, you can add the milk solids that are left behind when you make ghee at home. This is a wonderful use of these solids, especially if you have used salted butter. If the milk solids are salted, then reduce the amount of additional salt that you add to the flour. Traditionally the baatis are soaked in ghee before being crushed and then hot dal is ladled onto this and is eaten hot.
To simulate an eathern kiln, use a pizza stone. Preheat it and then place the baatis onto this to be baked. 

Monday, June 20, 2011

Veg Au Gratin - Baked Vegetables in White Sauce

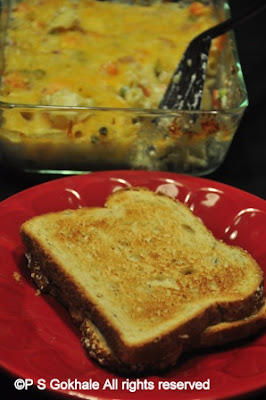
This is the tastiest veg au gratin ever. A wonderful medley of fresh, crisp vegetables in a rich white sauce, with a delicious layer of browned cheese. My favorite version of this dish is the one I used to eat at a restaurant in Pune. It has always tasted the same, ever since the first day I ate it, some 15 years ago. They serve the same size portion,  accompanied by a piece of garlic toast. It is absolutely the yummiest version of this dish. I was remembering and craving a taste of this dish for the longest time. So, I finally decided to experiment and try it out. It did turn out quite close to the original, so this will do for now.


Note: For variation, instead of adding a layer of cheese and baking it, add some hot sauce and eat the vegetables cooked in white sauce.
Ingredients
1 tbsp butter
1/4 cup all purpose flour/maida
2 cups milk (use whole milk, definitely not skimmed milk)
salt to taste
white pepper to taste (can use black pepper if white pepper is not available)
1/4 cup onions, diced into small pieces
1/4 cup peas
1/4 cup potato, diced into small pieces
1/4 cup carrots, diced into small pieces
1 cup shredded cheese
1 tbsp oil


Method
Cook the peas, potatoes and carrots partially. You can do this by cooking them in the  microwave for a couple of minutes. You can also cook them by either adding them to boiling water for a few minutes or steam cooking them for a few minutes. Heat oil in a pan and add the onions. Sautee the onions till they are transluscent. Then add all the vegetables and saute for a couple of minutes. Add salt to taste, turn off the heat and keep aside.


In another deep pan, add the butter and once it melts, add the flour. Cook the flour in the butter till it starts to look slightly pink. Generally at this stage, the raw flour smell disappears. Do not over cook the flour and do not let it turn brown. Then, turn the heat low and add the milk while stirring the mixture with a whisk. It is critical at this stage to keep mixing the milk and flour together so that no lumps are formed. Once the flour is dissolved in the milk, stir it often till it starts to thicken. Add salt and white pepper. As soon as it become thick and gets a sauce like consistency, turn off the heat and add half a cup of grated cheese. Mix thoroughly till the cheese is well incorporated. Add the sauteed vegetables and mix into the sauce. (At this stage all the components are cooked and you can eat the vegetables without baking it further, if you choose.)

Next, pour this mixture into an oven safe dish and layer the remaining cheese on top in an even layer. Bake this for 10-15 minutes at 350F or till the the chee.se has melted and starts to brown slightly.
Serve hot with some garlic bread.


Tips
All the vegetables should be cut to similar size about the size of the peas. If white pepper is available use it. It adds flavor to the white sauce and the specks of pepper cannot be seen in the sauce. If not possible, then add black pepper. If you are using frozen peas, rinse them with water and thaw them out. These will be soft enough and do not need to be cooked again prior to sauteeing. You may want to boil the potato first and then dice it.  You can also use the broil setting on your oven to melt and brown the cheese faster. Make sure you are using a pan that is broiler safe.

If you feel adventurous enough, try adding a few diced pieces of pineapples (canned) along with the rest of the vegetables. The original dish has a few  pineapples pieces in it. However, upon my family's preference,I didn't add it.

Tuesday, May 17, 2011

Poppy Seed Fruit Muffin

This is great breakfast recipe, especially on those morning when you are running late and you don't have time for breakfast. I enjoy baked goods especially muffins. They are the perfect size and you can make a nice batch at a time. Now, I must confess, if you put an assortment of muffins in front of me, I will gravitate to one which has poppy seeds. The black poppy seeds that are used in the muffins add the the perfect texture and just enhance the overall look of the muffin. I love biting into the muffin and finding these little seeds to nibble on. So, I thought, why not make poppy seed muffins at home, which we could eat for breakfast over the week. I did not want to start my day with something very sweet and buttery, so I decided to make a healthy muffin. I have been experimenting with the baking process, cutting back the fat content and replacing it with fruit and this was the perfect time to put it into action and test the results. I used minimal sugar, eliminated the butter/oil and the muffins still came out fluffy and moist. I thoroughly enjoyed this. This is the perfect recipe which lets you indulge in a baked cake without feeling guilty about it. To make  it decadent, add some creamcheese frosting.


Ingredients
1.5 cups whole wheat pastry flour
3/4 tsp baking soda
1/4 tsp salt
1/4 tsp cinnamon powder
3 ripe bananas, mashed
1 cup unsweetened apple sauce
1/2 cup brown sugar
2 eggs
1 tsp vanilla essence
2 tbsp wheat bran
2 tsp black poppy seeds
3 tbsp flax seed powder
1-3 tbsp milk, if required
oil/butter to grease the muffin tin (I used the oil spray)


Method
Preheat the oven to 350F.
Sieve together the flour, baking soda, salt and cinnamon a couple of time to aerate it and keep it aside.  In another bowl, whisk the eggs and vanilla essence together, till the eggs are nicely mixed and frothy. To this add the mashed bananas and apple sauce and mix well. Then add the brown sugar, ground flaxseed and mix. To these wet ingredients mixture, add the sieved dry ingredients a little at a time and incorporate them in. Then add the wheat bran, and poppy seeds. At this time, check the consistency of the batter. If you drop a spoonful, it should fall easily. If it seems a bit thick, thin it out with a little milk. Add about 1 tbsp at a time and thin it out to a consistency that when it falls it create a ribbon.


Fill your muffin tin and bake for about 20-30 minutes till completely baked. Use a sharp knife or a toothpick and pierce the center. If it comes out clean, your muffins are ready. Let the pan cool on a cooling rack for 10 minutes and then it will be easy to remove the muffins.


Tips
When baking, try to avoid overmixing ingredients once you start adding the dry to the wet ingredients. So, mix just enough to incorporate the dry ingredients and make the batter. Fill each muffin mould to about 1/2 or 3/4 level. Leave enough space for the muffin to rise. To see more tips regarding baking, see the tips added to different baked recipes.

Thursday, May 5, 2011

Homemade Brownies with Almonds

Brownies are a cross between a delicious decadent cake and a chocolate cookie. The best ones generally tend to melt in your mouth, filling it with all the chocolately deliciousness. I have eaten several brownies over the years (many from gourmet food shops) and  very few of them have met "the melt in your mouth" standard. I hadn't really ever baked these before, so when I finally decided to make them, I wanted to try a recipe that would be really good. Then I remembered an Alton Brown's brownie recipe that I had filed away sometime ago.  So, I dug it up and finally baked the brownies. I made a couple of changes and added in some almonds. The end result was absolutely delicious! I shared the brownies with a few friends, who then asked for the recipe. So here it is finally. I only had the ingredients list from the original recipe, so I have detailed the method that I used to make the brownies. 


Ingredientsts
1/2 cup all purpose flour/maida
11/4 cups unsweetened cocoa powder
1/2 tsp salt
1 cup sugar
1 cup brown sugar
4 eggs
1 cup butter, melted
2 tsp vanilla essence
1 cup almonds (can substitute pecans/walnuts)


Method
Preheat an oven to 300F. Grease and flour a square baking tin. Sift together the flour, salt and all purpose flour three times. In a bowl whisk together the eggs till they are frothy and then add the vanilla essence. Then add both the sugars to this mixture and mix well. Next add the butter. Then fold in the flour. Finally, fold in the cocoa powder and the walnuts/pecans. Pour this into the greased baking tin. Bake this for about 40 minutes. Insert a toothpick or sharp knife into the center and if it comes out clean, then the brownies are baked. Let it cool on a cooling rack and then remove it from the tin. Cut into equal squares. This makes 16 brownies.


Tips
It is important that you let the brownies cool so that they don't crumble. Using a cooling rack is very helpful so that air circulates around the baked good and condensation doesn't accumulate on the base of the brownie. Since, we are not using any baking soda/powder, we need to aerate the flour and the eggs enough so that the brownies get a light, melt in your mouth texture. So its important to sieve the flour and whisk the eggs till frothy. Also, don't over mix the flour and cocoa powder, but fold it in. These brownies are on the sweeter side. Experiment with a little less sugar (reduce both sugars by 1/4 cup each).