Welcome to my blog

I hope you will find the recipe you are looking for your occasion here.

Now video instructions are available for select recipes and can be accessed at

Gardening and Cooking Made Easy

The latest 5 recipes are displayed on the
main page. For more recipes, you can browse the archive, click on the labels in the index to the left or use the Custom search below to look for a specific recipe.


Search for more results

Custom Search
Showing posts with label ghee. Show all posts

Monday, April 23, 2018

Mahim Halwa/ Ice Halwa

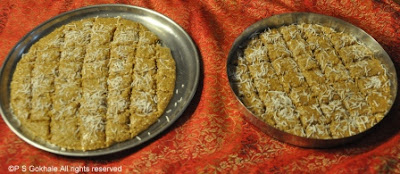
This is a halwa I had eaten eons ago as a kid when I visited Mumbai. We didn't indulge in this sweet a lot because the ones that are store bought are made using hydrogenated oil and were thought to be too unhealthy. I was searching for this recipe because a sweet that a friend shared reminded me of it. I came across many recipes but they all used semolina/rava as the main ingredient. The original version is made using corn starch. I wanted to make it as close to the store bought version but use clarified butter or ghee instead of hydrogenated oil. I liked the video demonstration of the technique on Bhavna's kitchen channel. It is a fairly straightforward recipe and the only thing that makes it challenging is the continuous stirring that it essential to getting the right texture.


Ingredients
1/4 cup corn starch
1/4 cup plus 2 tsp ghee (you can increase the ghee amount to 1/2 cup if you want)
1 cup water or milk 
1 cup sugar
1 tsp rose water (optional)
1/2 tsp cardamom powder
15-20 strands of saffron crushed
1 tbsp finely sliced almonds and pistachio (optional)


Method
Make sure to prepare the surface on which you will roll the halwa ready. You can use a silicone mat and a sheet of parchment or a couple sheets of parchment (approx 2 ft in length). If using aluminum foil or  the back surface of a baking sheet, make sure to grease it with ghee before you start the cooking process. I do not use plastic sheets as the mixture is hot and I do not want any plastic leaching into the halwa.

In an open flat saucepan (helps with faster evaporation) mix together the corn starch,1/4 cup ghee, water/milk and sugar. Stir it and keep it aside for 20-30 mins and let the ingredients soak. Then stir the mixture well to dissolve most of the sugar and ensure that there are no lumps of cornstarch. Then put it on low medium heat and stir this mixture continuously. In the beginning while it is still very fluid, you do not need to stir it constantly but as soon as the mixture starts to heat up, keep stirring constantly to avoid lumps. This is a little laborious but well worth it in the end. Keep the heat at medium low and keep stirring and press down any lumps that start to form( about 20-30 mins) till it comes together like a dough. Now turn off the heat and add the remaining 2 tsps of ghee and knead it with your spatula and bring the mixture together and then mix in the rose water, if using. 


Now it is important to work fast. Pour this dough onto a silpat/parchment/prepared aluminum foil. Place another parchment paper on top of the dough sandwiching the dough between the two. Then roll out the dough as thin as possible. Peel the paper intermittently and check how thin it is. It should be transparent. That's when you know it is at the right thinness. Then sprinkle the cardamom, saffron and nuts over the rolled dough, place the parchment paper again and lightly roll over the sprinkled spice and nut mixture embedding it into the halwa. Now peel the paper and let it dry. 


When it is semi dry, cut the rolled sheet into squares. It can take from a couple of hours to a few hours or overnight for the halwa to dry and get the perfect texture, depending on the weather, humidity, and rolled dough thickness. Separate into squares when completely dry. Alternate wax paper or parchment paper sheets cut to the same dimensions as the halwa, between each halwa slice. Your halwa is ready to serve. Store in the fridge.


Tips
If you use rose water when the heat is still on, the fragrance will disintegrate and you may not get that rose fragrance. You can also make colorful halwa by adding a few drops of color to the mixture when you soak the ingredients together.

Tuesday, November 6, 2012

Multigrain Ladoo/ Laddoo - Multigrain Sweet Balls

This is a delicious and a very healthy sweet. I made this for the first time, about one year ago. I needed a healthy and filling snack which would be easy to store and carry. Also, it needed to be appealing to a child and easy to hold and eat. My daughter enjoys besan laddoo and one day I thought it would be great if I tried to make laddoos with other grains and flours. This recipe was a great success.  My family enjoyed it and I was okay if dinner occasionally constituted of one laddoo and milk.


Ingredients
2/3 cup whole wheat flour
1/2 cup soy bean flour
1 cup mung dal
2/3 cup urad dal
1/2 cup ragi flour
1.25 cups of ghee/clarified butter
2 and 1/3 cup of powdered sugar
1/4 tsp cardamom powder
1/4 cup raisins (optional)
1/4 cup blanched and peeled almond slices (optional)


Method
Dry roast the whole wheat flour, soy bean flour and ragi flour separately. The flour should be roasted till it gets a toasted fragrance. The soy bean flour will take the minimum time. Roast each flour and grain separately, as each flour will need different amounts of roasting time. Roast the urad and mung dal till they turn reddish brown, taking care to not burn the grain. Grind each grain, separately into powder. It can be slightly coarse, which will give the laddoo some texture. Once all the flours are roasted and grains have been ground into flour, heat ghee in a pan. The pan should be large enough to hold all the ingredients. The powdered flours approximately amount to about 5 and a half cups. Once the ghee has melted, add the flours and mix them well with the ghee. Turn off the heat. Once the mixture turns warm, add the powdered sugar, raisins and almonds (if using them) and mix well. The mixture should not be cold, else it will be difficult to incorporate the sugar. Mix it well till all the sugar is incorporated into the flour and ghee mixture.

Then take a fistful of the mixture and roll it between the palms of your hands to roll it into small balls. Store in an airtight container. These do not need refrigeration, however you can  store them in the fridge if any remain after a couple of weeks to keep them fresh.


Tips
If you store the laddoos in the fridge, warm them up in the microwave for 5-10 seconds before eating. You can switch out the whole wheat flour with besan/chickpea flour. Or you can even add in besan as an additional flour. You can adapt this recipe by trying out different proportions of the various grains or flours. Just make sure that you roast the flour before using it in the laddoo. It can be made gluten free by substituting the wheat flour with chickpea flour.

Tuesday, January 10, 2012

Til Gul Wadi/Vadi - Sesame Seed Fudge

The first week of January has passed by and we are inching towards 14th of January, when the first Indian festival of the year will be celebrated. This is "Sankrant" also known as Makar  Sankrant in India. It is a festival to celebrate the harvest season. This is one festival which almost always falls on the 14th of January (this year it was on the 15th) and is based on the movement of the Sun rather than the Moon. It is celebrated throughout India and is called by different names in different states. Some names that I am familiar with are Lohari (in Punjab), Uttarayan (in Gujarat), Makar Sankrant (in Maharashtra) and Pongal (in the southern states). In Gujarat, the entire day is spent on the terrace of the houses and in streets flying kites. It is one of the most colorful scenes I have ever seen. In Andhra Pradesh, it is celebrated over a period of three days.


In Maharashtra, it is celebrated by distributing sweets made from sesame seeds and jaggery. These are called "til gul vadi" and the tradition is to say "til gul ghya ani goad goad bola" which translates to "please take this sweet and speak sweetly". There are multiple variations in how this sweet is made, some are really hard in texture, some are brittle and some are soft. Each family has it's own recipe and tradition of making this sweet.

The ones I make have a soft texture and are easy to bite into and extremely simple to prepare. You can roll it into a ball and make a "laddoo" or you can flatten it and cut it into "vadi/barfi" akin fudge pieces. This is my Mom's recipe and my favorite version of this sweet. I hope you will give it a try and enjoy it.


Ingredients
1 cup sesame seeds
1 cup peanuts (shelled and without the peel)
1 cup finely cut jaggery, cup should be packed
1 tbsp ghee/clarified butter
2 tbsp of grated dessicated coconut, for garnish
some ghee to grease the plate in which the sweet will be set.


Method
Take a plate with an edge or a pan with a small edge and grease it with some ghee.
In a dry skillet, on low to medium heat, roast the sesame seeds till you get the aroma of the sesame seed.  Keep it aside and let it cool. In the same skillet roast the peanuts following the same method as for the sesame seeds. Be careful not to burn these ingredients. Once these cool down, coarsely grind them separately and then mix the two powders together.

In a pan, add the ghee and jaggery and keep it on a very low flame to cook. The jaggery will start melting. Be sure to keep it on very low heat.. Stir the jaggery so that it doesn't caramelize. Within a couple of minutes, the jaggery will start bubbling and foaming. At this stage, turn off the heat and add the powdered mixture of peanuts and sesame seeds and mix well together. Then pour this mixture (it will be quite thick) into the greased plate. Then using another bowl/measuring cup (grease the bottom), pat the this hot mixture and even it out into the plate. Make sure to level it properly. Then sprinkle the dessicated coconut all over the top and using the cup, pat it into the mixture. All this must be done while the mixture is hot.

Then, after the mixture cools a little, cut it into square pieces of about 1 inch sides. Let the mixture cool completely befor you take the individual pieces out of the plate.


Tips
You can roast the peanuts and the sesame seeds in the microwave. Initially you can do it for 1 minute intervals. Stir it after each minute and then you can reduce that to 30 second intervals. It takes about 2-3 minutes based on the power settings of your microwave. Let them cool completely and then grind.
If jaggery is kept on high heat, it will start caramelizing as soon as it melts, so be careful of the temperature. Also, it is necessary to turn off the heat as soon as the jaggery foams to get the soft consistency, the longer it is cooked, the harder the end product will be. If you feel that the jaggery syrup has become very thick, you can add some more ghee or alternately add a couple of tbsp of milk to the syrup to thin it out (if you add milk, this shortens the shelf life, so be sure to keep it refrigerated and eat it in a couple of days). If  after adding the sesame and peanut powder, the mixture becomes very dry and powdery, then sprinkle a teaspoon of warm milk and stir (while the mixture is hot). The mixture will immediately become moist (if it becomes too soft and moist, then re-heat it).  Then spoon the mixture into the greased plate.

If you forget to remove the pieces and then it gets difficult to take them out, heat the bottom of your plate or keep it in a warm oven for a couple of minutes and then it will be very easy to get the pieces out.

Sunday, September 11, 2011

Daal Baati (Dal Bati) - Recipe for the dal

For information related to Dal Baati and the recipe to make Baati, see my previous post. The dal for the dal baati recipe is unique because it is made using urad dal. While I know that urad dal is a key component of idli and dosa batters, I haven't really seen it used as a main ingredient in too many dal recipe. The freshly baked, ghee dipped baati, is broken down into small pieces in a bowl and then piping hot dal is poured over it. The result is absolutely lip smacking. If you make this dish often, it is best to cut back on the amount of ghee that is used after the baking process to prevent those calories from adding up. But it is absolutely okay to indulge once in a while!


Ingredients
1 cup urad dal
4 tbsp split mung (yellow mung) dal
3 tbsp chana dal (yellow split pea)
3 cups water
a pinch of asafoetida powder
2 tbsp ghee or oil
1/8 tsp cumin (jeera) seeds
2 black cardamom (badi elaichi)
2 bay leaves (tej patta)
1 inch cinnamon
2 cloves garlic, crushed or finely minced
1 inch ginger, finely grated or ground
1/2 cup red onion diced
2 tomatoes diced
1-2 green chillies
red chilli powder to taste
salt to taste
1 tsp dhania (corriander) powder
1 tsp garam masala (optional)
1/8 tsp turmeric
additional water to thin out the dal
cilantro/corriander leaves, chopped for garnishing


Method
Mix the three dals together and add water to it. Add asafoetida and cook. See tips on alternatives of cooking dals. The dal mixture should be cooked through and soft. In a large, deep pan, heat the oil or ghee. To this add jeera, black cardamom, cinnamon and bay leaves. Cook these till you can smell the spices. Take care to prevent them from burning. Then add the green chilli, onion, ginger and garlic. Cook these till you do not get the raw garlic smell. The onion should be at the slightly browning phase. Then add the tomato and cook till the tomatoes are cooked through. Then add the turmeric, dhania powder and garam masala. If you want the dal to be spicy, you can add red chilli powder at this stage. Cook the spices for a couple of minutes and then add the cooked dal mixture. Add some water to thin it out a bit. The consistency should not be too watery. It should be like a thick soup. Turn off the heat when the dal boils. Garnish with chopped cilantro/corriander leaves.


Tips
The fastest method to cook dals is using a pressure cooker.  If using a stove top cooker, cook it for 5 or 6 whistles and if using the Instant Pot, 12 mins on manual mode, at high pressure. Let the pressure release naturally. However, if you do not have a pressure cooker, pre-soak the dal in warm water for a couple of hours. Then add water to the soaked dal and cook till soft. If spices being friend initially burn, it is best to start again with fresh oil. Burnt spices add a bitter taste and can potentially alter the taste of the entire dish. The list of ingredients may look daunting, but most of these should be easily available in your Indian grocery store.

Sunday, August 7, 2011

Ghee (Tup) - Clarified Butter/Brown Butter

A lot of Indian recipes call for the use of "ghee". As I experiment with and explore new cuisines, I have come to the realization that many other cuisines use this ingredient as well. A great example is brown butter sauce. The french call it "Beurre noisette", which is nothing but ghee without separating out the milk solids. Ghee is pure fat, and is made from butter. I remember my childhood days, when Mom used to collect the top creamy layer from milk everyday and keep it aside. Eventually, she used to process this to make butter.  This homemade butter is possibly the purest and tastiest form of butter. White like snow, soft, and very, well buttery. She then used to heat the butter to transform this into homemade "ghee". The house used to be filled with the aroma of this wonderful ghee and I used to wait to eat the solids that used to collect at the bottom of the cooking pan. It used to be a special treat that I used to eagerly look forward to.


A dollop of ghee added to something as simple as hot steaming rice or dal or even applied on a hot chapati enhances the taste. Add ghee to a curry or spicy dal preparation and take it to a new level. It is recommended that delicacies, whether sweet or spicy, be cooked in ghee to make the dish all the more special. Ghee is an integral part of the Indian cuisine, and is so easy to make at home. Since, in the US, milk is homogenized, it is not easily possible to separate out the cream from the milk. So, we skip the collection of cream process and start directly with butter as the main ingredient. The overall preparation time is roughly ten minutes or less for about a pound of butter. Hope this very easy method inspires you to make ghee at home.


Ingredients
1/2 - 1 pound of butter (1-2 cups)


Method
In a deep cooking pan melt the butter. As it melts, it will begin to foam and you can get melted butter smell. Keep an eye on the butter and stir it around occasionally. It will start changing color and turning slightly golden as it comes to a boil. At this stage, it will begin to foam again. Check if the butter has turned golden in color. If so, turn off the heat and remove it from the stove. You will also get tthe smell of ghee at this stage. After the foam subsides, you will be left with golden clean liquid and brown milk solids at the bottom of the pan. Gently pour the liquid through a fine metal sieve (plastic will melt) or a fine cheesecloth. The liquid is "clarified butter" or "ghee". Put the lid on the storage container once the ghee has cooled down completely. Keep it moisture free and it should last without refrigeration.


 Tips
The pan should be deep enough so that the butter doesn't overflow as it boils and foams.
If you have used unsalted butter, you can add a spoon of sugar and enjoy the milk solids.You can also use salted butter, if you cannot find unsalted butter. The salt sinks into the milk solids and you can easily separate the ghee from the salty solids once the solids settle to the bottom of the pan. Once the ghee starts to foam the second time around, it is really vital that you pay attention and remove the ghee from the heat, as soon as it turns a golden brown. It is at this time, where you can easily end up burning the ghee. To use the ghee as brown butter, do not separate solids and the liquid after the ghee is formed. Mix if up and serve as brown butter or beurre noisette.
In cooler months, ghee will tend to solidify, so you can heat it before use or serving.

Saturday, May 14, 2011

Sabudana Khichadi - Tapioca Pilaf

This is a dish made on special occasions in Maharashtra. It is made as a special breakfast item and is generally regarded as a delicacy. It is often made on auspicious days when people fast and are allowed to eat limited ingredients. Personally, this is a dish I associate with special celebrations, holidays and spending time with family. This is a rich, festive dish and is generally cooked in ghee (clarified butter), with a lot of peanuts. It doesn't have too many ingredients, but is absolutely flavorful. I don't make it too often, and whenever I do, it is a special treat. I hope you enjoy this treat as much as we do.


Ingredients
1 cup sabudana/tapioca pearls
water, just enough to cover the sabudana
1/4-1/2 cup roasted peanuts, ground coarsely into a powder
green chillies, split lengthwise - to taste
salt to taste
1/4 tsp sugar
1/8 tsp cumin seeds
2-3 tbsp ghee/clarified butter
1 medium potato, boiled and diced


Method
Put the tapioca in a sieve with holes which will not let the sabudana fall through, but will allow the crumbs to be sieved. Then sieve the sabudana. Then rinse it till the water starts running clear. This is an important step to ensure that the sabudana does not become mushy and sticky. Soak the tapioca for a few hours. Do not add a lot of water. You need just enough to cover all the tapoica pearls. You need to soak it till the tapioca is completely softened and this generally take from about 2 to 5 hours. You can even soak it overnight. Then drain the water and keep aside.

To this tapioca, add the ground nut powder, the salt and sugar and mix them so that the tapioca gets lightly coated with these ingredients. This helps in even dispersion of all the ingredients and you don't get any unseasoned bites. Also, add a little salt to the boiled potato pieces and mix to ensure even seasoning.

In a broad pan, heat the ghee and add the cumin to it. Once, the cumin starts to change color (do not let it burn), add the chillies and the potatoes. Cook the potatoes for a couple of minutes till they get a nice fried look. Since you are using boiled potato pieces, you will not need to cook it for a long time (see tips on usage of raw potato). Then add the seasoned tapioca and groundnut mixture and stir fry. As tapioca cooks through, it becomes transparent. You will know it is cooked when all of it has turned transparent. Turn off the heat. Over cooking it will make it dry. Serve with a slice of lemon or with some yoghurt/dahi.


Tips
Do not skimp on the ghee or oil, else the end result will be sticky. Roast the raw shelled peanuts lightly till you can get the roasted smell and they start to darken a little. Then let them cool and grind till you get a coarse powder. Do not grind it for too long, else they will release the oil. To make this a lighter dish, substitute the ghee with olive oil. If you like the potatoes to have a bite, substitute the boiled potato with raw sliced potato. Follow the recipe and fry the potatoes till they are cooked through and then add the remaining ingredients. To prevent raw potato slices from oxidizing and turning dark, cut and put these slices in a bowl of water.