The latest 5 recipes are displayed on the main page. For more recipes, you can browse the archive, click on the labels in the index to the left or use the Custom search below to look for a specific recipe.
Let me start by saying that this is an amazing recipe. It is one of the tastiest Mexican foods that I have eaten in recent memory. It is spicy and has a burst of flavors and everyone in the family absolutely loved it. I am so glad to have found this recipe because it is perfect to use all the roselle hibiscus petals after making tea. And now I have a way to use the large harvest we have had this year. It does not matter if you are using fresh roselle sepals or dried ones in this recipe. The ones in the original recipe were dry whereas I used the fresh ones that I harvested today. The recipe was originally shared by a friend, Ayshica, in a wonderful gardening group called "Gardening in the Desert". She shared this recipe from a YouTube channel called "Views on the road" and highly recommended it. Ayshica is a great cook herself and I trust her food recommendations, so I thought that I had to give this recipe a try.
Now, this recipe requires certain Mexican chillies - Guajillo and Pasilla chillies. After making and eating the tacos I am of the firm belief, that these chillies are a key flavor ingredient for the birria tacos. These chillies lend an earthy taste which reminds me of the mole sauce. Also, when I searched for what birria was and other recipes for birria, I realized that the original version is meat based. The birria is a stew made with the meat and these chillies. However, this version is completely vegetarian and if you use non-dairy cheese, will be a 100% vegan. I did not use any broth or bouillon powder/cubes either and the result was still lip smacking delicious. The roselle sepals add a slight tart flavor. These also make the taco filling and provide that meatiness to the taco, that 3-4 tacos per person was a pretty good serving size for most of the family members. I think any vegetable that retains its texture after being boiled can be a used, like jackfruit or mushrooms.
The way I understand it, birria is a stew and then the meaty portion of the stew is used to fill the taco and then the taco is then grilled/cooked and eaten by dipping it into the consomme or liquid part of the stew. The stew that I made with the roselle sepals was quite soup like. Then I used the roselle sepals and carrots which were cooked in the sauce as the taco filling. And then we dipped the tacos in the soup and also drank sipped it along with the tacos. I also made the chilli oil which was mentioned in the original recipe and modified it based on what I had on hand. The combination of flavors was perfect for a cold weeknights dinner. And so so delicious!!
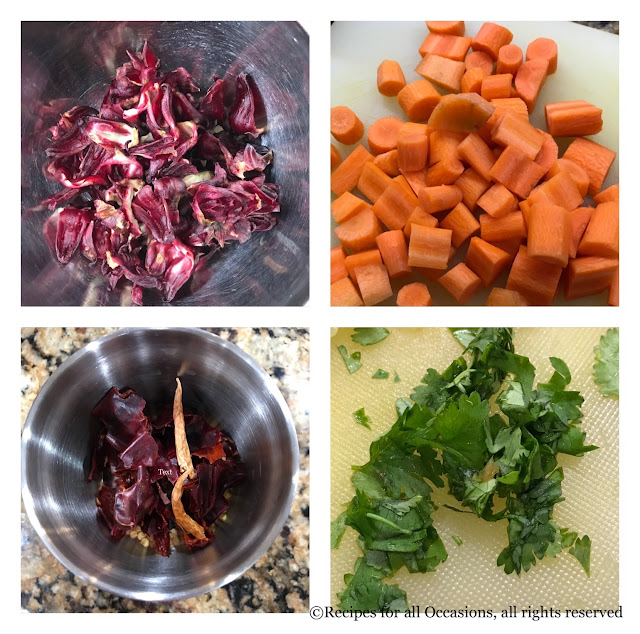
The highlight of the recipe was that I was able to use a lot of our homegrown produce. Roselle hibuscus was the star of the recipe, but it was great to be able to use homegrown carrots and cilantro as well. If you would like to know more details on growing, harvesting and preserving Roselle Hibiscus, do check out our videos on our YouTube channel, "Gardening and Cooking Made Easy".
How to grow Roselle Hibiscus
How to harvest and store Roselle Hibiscus
Ingredients
For the chilli oil
1/2 cup oil
3 guajillo chillies
2 spicy chillies, dry (I used Indian dry chillies)
1 bay leaf or 1 tsp broken bay leaf pieces
1/2 tsp black pepper
1/4 tsp clove powder
salt to taste
1/4 tsp sugar
For the birria
1.5 cups fresh roselle petals. If using dried ones, I would recommend using 1 cup
6-7 carrots, cut into small bite sized pieces, appropriate for filling in the taco
2 tbsp apple cider vinegar
1 medium red onion, cut into half
3 garlic pods, whole
1 pasilla chilli
4 guajillo chillies
10 cups of water
1 bayleaf
salt to taste
1/4 tsp sugar
For the tacos
corn tortillas
cooked roselle sepals and carrots from the birria/stew
finely cut cabbage
finely cut white or yellow onion
cilantro
chilli oil
shredded/grated cheese
Method
To make the chilli oil
Remove the stem of the chillies. In a coffee grinder or blender in which you can grind spice to a fine powder, grind the chillies and the bay leaf into a fine powder. If you want, you can also remove the seeds, however I did not as I wanted the oil to have the heat and spice from the chillies. Heat 1/2 cup of oil (I used olive oil) and once it is warm (do not heat to very high temperature to avoid spices burning), add the chilli and bay leaf powder. Stir, and then add the garlic powder, clove powder, black pepper powder, sugar and salt. Cook all the spices for a couple of mins, making sure to not overheat the oil. Turn off the heat and set aside.
To make the birria/stew
Boil 4 cups of water and pour over the roselle sepals (dried or fresh). Set aside for 15 mins. Strain and use the water to make tea or lemonade. Add 2 tbsp of apple cider vinegar to the sepals, toss them in it and set aside.
In a pressure cooker, Instant Pot or a regular deep sauce pan, addd the remaining 6 cups of water. Then to it add the onion, cut into two halves. Then remove the stem of the chillies and add those to the water along with the garlic cloves. If you don't like too much spice remove most of the seeds of the chillies. Add 1/4 cup of carrots. Then cook this mixture. If you are cooking it in the pressure cooker, cook for 1 whistle. In the instant pot, cook for 5 mins. Naturally release the pressure. If you are cooking it in the saucepan, cover and cook for 10-15 mins once it starts boiling, till the chillies are softened. Now, using a skimmer spoon, fish out the chillies, garlic and onion. Let them cool down a little and blend in the blender to a fine paste. This is your salsa or sauce that flavors the stew.
Add the paste back to the water. Then, add the rest of the carrots, the roselle sepals along with the vinegar and 1 bay leaf and cook for another 10 mins till the roselle and carrots are softened. If using a pressure cooker, cook till it reaches pressure and turn off heat. Instant Pot timing will be 2 mins. Let pressure cookers naturally release pressure.
Taste, add the salt and sugar and stir well. Then fish out the carrot pieces and roselle sepals and place into a bowl. Heat the liquid and boil it for a few mins.
To assemble the taco
Use a brush or spoon and smear the corn tortilla on both sides with the chilli oil. Then filling a tbsp of the roselle, carrot filling, cabbage, onions, cilantro and shredded cheese. On a hot pan, cook the taco on both sides till the cheese melts.
Serve with the consomme/soup part of the stew. Dip the tacos in the soup and eat.
Tips
The chillies are dry, so it is easy to just split the chillies into two and shake them to remove the seeds. Or remove the stem and shake the seeds out. I made corn tortillas with masa harina flour and the taste was amazing using fresh tortillas. If possible, I recommend it. If the taco is opening up (I do tend to overfill it), place a spoon on top of the taco as it cooks on one side. Then as you flip it over and cook on the other side, it should retain its folded taco shape (see photo above). If you are using other vegetables, then I recommend adding tomatoes along with the onions and garlic and puree those as well. Else, add lemon juice to the stew at the end of the cooking, before serving.
It has been years since I have been buying tortillas from the store. Initially, when I was a student, I used to buy whole wheat tortillas which used to be my substitute for chapatis/rotis. When I started making tacos and burritos at home, I started using the corn and flour tortillas. However, it always bothered me that these store bought tortillas had such a long shelf life and a really long list of ingredients. Half of these ingredients seemed to be chemicals that I couldn't even pronounce. If you have been following my blog, you will see that I try to make most of the food from scratch at home. This way I am able to control the content and quality of my food. So, several years ago, I decided I just couldn't buy these tortillas anymore and had to try making them at home. How hard can it be?!
I bought some masa flour, and set off to work. The main hurdle was that I didn't have a tortilla press when I first did this experiment, but I managed to make it work with other equipment (details in the method and tips below), and the result was incredible. They were very easy to make, quick to cook, smelt heavenly (none of that chemical smell of the store ones) and absolutely delicious! I will never need to buy corn tortillas again. For all of those who have toyed with this question, but thought it was too difficult to make, go ahead and take the plunge. It is easier than making bread or chapatis and so worth the effort! Your taste buds and your stomach will thank you.
Ingredients
1 cup instant corn masa flour (masa harina - white corn or yellow corn)
1/8 tsp salt or a pinch of salt
2/3 cup and a few tbsp water
1 thick plastic ziploc bag/parchment paper cut into 2 squares or 2 thick, square plastic sheets (about 8X8 inches) or parchment paper
1 tortilla press OR a heavy pan with a wide flat bottom
Method
Mix the salt in with the flour and then add water. Add a little at a time till a soft yet firm dough is formed. You don't want the dough to be too dry that it crumbles and neither do you want it to be too loose and soft. Divide the dough into 8 equal pieces and cover with a damp cloth or paper towel, so that it doesn't dry up.
Heat your pan on high heat and then keep the temperature at medium-high. Now, take a piece of dough, roll it into a ball, about 1.5 to 2 inches in diameter. If you are using a tortilla press, then line it with 2 sheets of the plastic sheet. Place the ball between the two sheets and then press it till the tortilla is about 5-6 inches in diameter. Now, if you don't have a tortilla press, then place the plastic sheets one on top of the other, on your kitchen countertop or a rolling surface and then place the ball of dough in between the sheets and then flatten it slightly with your palm. Then, take a pan or any heavy vessel which has a large base (larger than the diameter of the tortilla) and then place this pan onto the dough. Make sure to have it in a flat level (parallel to the rolling surface) and then press onto the dough to flatten it. Do this till the dough has been flattened and the tortilla is 5-6 inches in diameter. If needed, you can use a rolling pin to increase the tortilla size. Don't use a rolling pin for too long though, as it makes the tortilla stick to the plastic sheet.
Now, open up the tortilla press/remove the pan and then peel the plastic sheet off the tortilla. Then, flip the tortilla into the palm of one hand and then using your other hand peel off the other plastic sheet and then place it onto the hot pan.
Cook on one side for a couple of minutes, till the edges start to dry out and then flip it over and cook on the other side for 1.5-2 minutes. Then flip it back and cook it completely on the side that had been placed on the pan first. The tortilla will start to puff up as it gets cooked.
Tips You may need less or more water depending on how humid your surrounding is. To dampen the cloth/paper towel, wet it and then squeeze out all the water so that the towel doesn't have any water dripping from it. If the towel is too wet, it will affect the consistency of the dough. I use a cast iron pan to cook these. Masa harina is not the same as the corn flour used to make makke di roti. Masa harina is processed differently, and hence the tastes will vary. However, you can substitue with corn flour if masa harina is not available. Yellow corn masa flour will yield yellow tortilla and the white ones are with the white corn masa flour. Both are delicous.
Rava cake (semolina cake) is one of my most frequently baked cakes at home. It tastes absolutely decadent. This cake is so delicious that it does not need any icing on it. So it is always eaten plain or infused with other flavors. Given how delicious it is, I feel any frosting or icing would detract from its tastiness. In fact every time I have suggested that I try icing the cake, I have heard loud protests of how the icing would make it less tasty.
However, visually this ends up being a plain bake and the recipe gets relegated to being a cake for a regular bake and not for a special occasion. When the family requests that it be baked for special celebrations like birthdays and anniversaries, I have struggled with glamorizing this cake. How do I take a regular cake which can even be eaten at breakfast into a fancy bake for this great occasion.
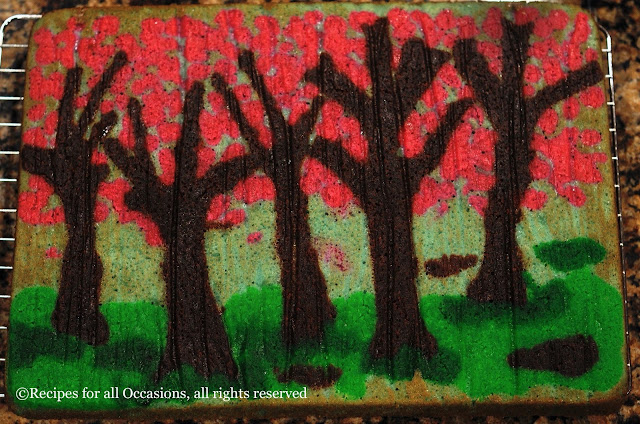
This cake tastes so good by itself, that in this case an icing would actually reduce the enjoyment of eating the cake. So that was not an option. So I tried adding fondant flowers and decorations to up the glamor, but I wasn't satisfied. Then, I decided to experiment with baking a decoration right into the cake itself.
So, I took the same basic recipe shared many years ago on my blog (see original recipe) and added steps to glamorize the cake. See the method which details the steps on how to embed the design into the cake. You can use the same method described below with other cakes too, which are made with all purpose flour too.
This is an easy method that turns a simple cake into one with a tremendous wow factor!
Ingredients 1.5 cups fine rava/semolina 1 cup milk 1 cup sugar 1 cup yogurt 1/2 cup clarified butter/ghee 1/8 tsp cardamom powder 1/2 tsp baking soda few strands of saffron (optional - don’t use if embedding a design) a pinch of salt ghee for greasing the baking tin
Method
Cut a parchment paper the same size a the bottom of your baking tin. Draw the design you wish to embed into the cake onto a parchment paper. Then grease the baking tin and place the parchment paper onto the base, such that the pencil/pen mark will be stuck to the greased side and the traced outline can be seen from the top view.
Note: the design will get reversed once the parchment paper is flipped into the tin base. When the final cake is taken out, the design will be the same as Keep that in mind when creating an asymmetric pattern. When the cake is flipped out of the
Beat the yogurt and sugar together till the sugar is dissolved. To this add the milk, salt, ghee, rava and mix this together. Keep this mixture aside overnight or at least for 5-6 hours. It tastes better when the yogurt which gets set during the hours turns a little sour.
Preheat the oven to 350F. Grease a baking tin with ghee. Add the baking soda just before you bake. Mix the baking soda well into the batter. Then take about 1/2 to 1 cup of batter in another bowl.
Depending on the design you plan to make, divide it further and using food coloring, color the batter. Then using piping bags, pipe the desired pattern onto the traced design on the parchment base, and fill it in. Then put the tin in the freezer for 15 mins so that the batter sets.
Then remove the pan from the freezer, check that the batter has set and will not flow easily. Then pour the rest of the batter into the tin covering the piped pattern evenly.
Then bake this for 20-30 mins at 350F. Use a knife or skewer and pierce the center of the cake with it. If it comes out clean then the cake is ready.
I have also piped out lettering and baked it on a separate baking sheet to decorate cakes.
Tips
If you are adding colors to the batter, use gel based colors if available as they are stronger and will color the batter with less amount of added coloring. Keep in mind that a design can get reversed when baking, so be careful when embedding lettering.
Welcome to our fifth episode of the Culinary Tour of the World. This post takes us to Angola. Angola is a country in Africa. As I was researching the cuisine for the project, I came across many exotic meat dishes. I also found that there are many fruits grown here but they are usually eaten as fresh fruits for dessert. I was able to find a few vegetarian dishes, like beans in palm oil, a hearty vegetable and bulgur soup and a couple of desserts like the passionfruit mousse and Cocada Amarela which is a coconut pudding. I also found a couple of rice recipes, but some of the unusual ingredients like peanut butter and bananas being added to the rice made me hesitate from trying it out in the fear that I may not like the combination.
As I read about local foods and watched some videos, I noticed that the cassava plant is really popular here and all of the parts of the plant are used. And another popular snack was peanuts. Roasted peanuts, sweetened peanuts, candied peanuts in sugar and candied peanuts in caramel. So, I finally decided to make snacks from Angola for this series.
Both the dishes that I chose were new to me. Pe-de-moleque is a peanut candy or brittle in caramel syrup and Bombo Frito are fried cassava roots. I had never made peanut brittle before though I have eaten it a lot in the form of "chikki". Chikki is a peanut brittle version available in India and the pe-de-moleque comes very close to the Maganlal dry fruit chikki from Lonavala, Maharashtra in India. The cassava root was also very interesting because while I have eaten tapioca (sabudana) which is made from cassava, I hadn't eaten or even seen the cassava root. So I was very excited to make both these recipes.
Both the resulting recipes were absolutely delicious. I deep fried as well as air fried the cassava. Based on the taste test, the fried version of bombo frito was the favorite, as it was crunchier but the air fried version was also delicious. Given that cassava root is also grilled in Angola, the air fried version probably comes closer to the grilled version. The pe-de-moleque was very rich in the caramel taste and just perfect. The caramel was not sticky and we thoroughly enjoyed it. I plan to use the same method and substitute the peanuts with almonds and cashews to create the Maganlal chikki.
I will eventually try out all the different vegetarian foods that I collected from the internet and books, and add them to the blog. I am really looking forward to making the passionfruit mousse once our passionfruit starts fruiting. But these two recipes are definitely going to be added to my cooking repertoire.
Here is the link to the video of the recipe
Ingredients
For the bombo frito cassava root, peeled and cut into rectangles. OR frozen, peeled and cubed cassava
water, enough to cover all the cassava pieces well
oil for deep frying
salt, to taste
pepper, to taste
if using air fryer - use 1 tsp oil
For the pe-de-moleque
1 cup sugar
1 cup peanuts
1/2 cup water
Method
For the bombo frito
If you have fresh cassava, peel it and then cut it into rectangles, like steak fries. Then bring a pot of water to boil and add these to the water. Cook it for 15-20 minute till they are partially cooked and tender but still have a bite and retain the shape. If you are using frozen, peeled cubes they will be cooked in about 10 mins after adding to the water. Drain and spread on a colander to dry out.
To deep fry
Heat oil to deep fry the cassava. Dry out the cassava with a paper towel if still a little wet. DO NOT add watery cassava to hot oil. The oil will splutter and can cause oil burns. To test if the oil is hot, add a piece of the root to the oil. If it comes up quickly, then the oil is hot. Add all the pieces to the oil and fry till you get a golden brown color. Stir occasionally so that the root is fried evenly.
To air fry
Toss the boiled cassava pieces with a tsp of oil. Then place it in the air fryer and fry it at 375F. Shake it evert 3-4 minutes for even browning and it will take about 11-14 minutes to be cooked.
Toss the chips with salt and pepper while hot.
For the pe-de-moleque
If you have roasted and peeled peanuts, skip the roasting instructions and proceed to make the caramel. If you have raw peanuts, heat them on the stove top for 5-6 minutes stirring frequently to prevent burning. Let the peanuts cool completely. Then take a few peanuts between your palms and rub them to remove the peel. Then you can scoop out the peanuts or use the technique in the video to separate the peels from the peanuts.
Prepare a tray or plate by lining it with a baking silicone mat or parchment paper, so that the brittle does not stick to the tray.
To make the caramel, add the sugar to a sauce pan and half of the water. This will wet the sugar but won't create a syrup. Now turn on the heat and let the sugar cook, without stirring it at all. Be patient and watchful. It will eventually start boiling and at a certain point suddenly being caramelizing. Now, it will caramelize the sugar very quickly. Let it boil for a few seconds as soon as it caramelizes and you can start stirring. Remove from the heat as soon as you have the color you are looking for. It can burn very quickly after caramelizing.
Now let the caramel cool down completely. If you add water to boiling hot caramel, you can get burns, so be safe. Once the caramel is cooled down, add the water and stir. Then heat up the caramel, stirring it so that any caramel lumps will dissolve.
You need to heat the caramel to about a hard ball stage which is about 270F. I used a candy thermometer to heat the syrup till it was boiling and starting to thicken at the soft ball stage of about 235F. Then, add the peanuts to the syrup and let the syrup boil. In a couple of minutes, it will start frothing. See the video. At this stage, you can pour it into the prepared pan.
Let it cool for 10-15 minutes and then you can break it into pieces. Store in a container after it cools down completely.
Tips
Ensure that the cassava is dry and does not have dripping water before adding to the oil. Be safe when working with hot oil. Oil starts to shimmer when it is hot and you can test it by adding just one piece to the oil to see if it is at the right temperature. If you add it to cold oil, it will soak up more oil and the end result will be oily.
To roast the peanuts, you can use the microwave. Start at 2 minutes and stir and check and continue with lesser time intervals (1 min and then 30 secs) till the peanuts are roasted. Or you can use a regular oven and bake the peanuts at 350F for 5-10 minutes, checking periodically and shaking the baking container for even baking.
If you add water to hot caramel, it will sizzle loudly, cause some spluttering and seize into lumps. So let the caramel cook completely.
I made this recipe based on my memory of our neighbor in Pune, from decades ago. She had come over to our house during Diwali. She had brought sweets to share and was most excited for us to try out this sweet and guess what it was made of. All of us guessed that it was kaju katli and her grin just grew bigger. Finally she revealed to us that she had made this using rava and there were no nuts. These were very similar to these pink square vadis that used to be available at the kirana stores (local grocer) in a small transparent plastic cover.
I had a very faint memory of the recipe and decided to try it based on my cooking experience. The end result was delicious. It looks like kaju katli and the texture is similar, so you can even serve this as a faux kaju katli for those who have nut allergies.
Ingredients 1 cup fine rava 1 cup milk 1/4 to 1/2 cup ghee
1 cup sugar (can increase by 1/4 cup, adjust to taste)
Method
Mix the rava and milk and let it soak for 5-6 hours at the minimum or overnight. Then add the sugar and ghee to the mixture. Put this mixture into it in a broad saucepan and cook this mixture on low heat, stirring frequently. Cook till it comes together as a dough. Once it starts getting dough like, take 1/4 tsp onto a plate, let it cool till you can touch it and try to roll it into a ball. If it is not sticky and you can roll it easily, then the mixture is ready.
While it is warm, knead this dough well so that it comes together. Then roll it out into a 1/4 inch thickness and then cut into diamonds. To ensure it doesn't stick, apply ghee to the rolling pin as well as the surface you are rolling it onto. Or you can sandwich it between two parchment paper sheets and roll it out. Let it dry and it is ready to eat. It can take a day to dry it out so that it is firm. Store in the fridge.
Tips
If there are any lumps, press on them and as it thickens, they will dissolve. If you increase the heat, the color of the mixture will change as it will brown. It will still be delicious, so you can do that as well. It just won't look like kaju katli.
Welcome to our fourth episode of the Culinary Tour of the World. This post takes us to Andorra. Andorra is a very small country, described as a tiny independent principality, in Europe. It is between France and Spain in the Pyrenees mountains. I had not heard about it till I started this project. So far, this has proven to be the a difficult one to choose a recipe from, because there are just a handful of recipes that are called out as traditional Andorran foods. Of those, the majority of them are meat dishes and include delicacies like snails. Also, I really wasn't able to find a blog which was written by a person from Andorra. As I researched vegetarian recipes, I kept coming across just 2-3 recipes which were common across travel sites, blogs and even books. One of them was Pa amb Tomaquet, which is bread rubbed with garlic and tomatoes, and another was spinach with pine nuts and raisins. There was a third once called Trinxat which is potato and cabbage cake or like hash browns which is topped with bacon. I thought I could make all these (skipping the bacon) and make a small meal. However, they were all sides and given how meat heavy the entrees were, taking the meat away would not give the same experience.
So, I asked a friend who lives in France who suggested that I look for Catalan recipes. That was a great suggestion and that took me to menu cards of Andorran restaurants. Since I couldn't find a vegetarian entree, I started looking for desserts and breads. I found a mention of a bread called Coca de Massegada which was listed as a very traditional bread but I was unable to find an authentic recipe for it. I found a list of ingredient, but there were no measurements and I did not want to experiment a lot. Finally, I settled on two choices Bunyols de vent which sounded like doughnuts made from a pate choux dough and Torrijas which is a dessert French toast which has a Catalan/Spanish influence.
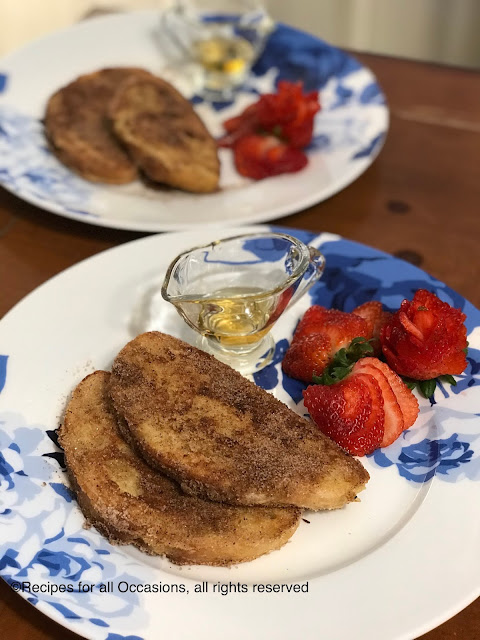
The plan was to make the Bunyols de vent, but I was inspired to make Torrijas for breakfast and the family absolutely loved it. So this is a delicious french toast, where the difference is that the bread is not soaked in an eggy batter like the traditional French toast. Instead the bread is soaked in milk and then dipped in whisked egg and pan fried. Then it is coated with cinnamon sugar and served with syrup. The milk can be boiled with fragrant spices to add more flavor. The end result is similar to churros. The outside gets crispy and the inside is soft and delicious. While this is meant to be a dessert, it is delicious as a brunch too and we have enjoyed this so much, that it has been added to the weekend brunch repertoire. This is a very simple and delicious recipe. Do give it a try!
Here is the video link to the Torrijas recipe
Ingredients
6 slices of Italian bread, stale (any type of bread which is cut into thicker slices than sandwich bread. Can also use sandwich bread bread but make sure it is a little stale and dry)
1 cup milk
4 tbsp sugar (adjust to taste)
1.5 tsp cinnamon powder
2 tbsp oil
2 eggs
1 tsp vanilla essence
Method
Mix the cinnamon and sugar together to create the cinnamon sugar.
Whisk the eggs and vanilla essence together. Warm up the milk till it is lukewarm. If you want to add more fragrant spices to the milk, boil them with the milk and then let the milk cool for a few mins till lukewarm. Add 2 tbsp of sugar to the milk. Pour the milk into a tray and lay the bread slices in the milk. Let it stay till the milk is absorbed, up to 30 mins. Heat a tbsp of oil in a pan and then dip the bread slices in the whisked egg and then place it in the pan. Fry the bread on both sides till golden brown at medium heat. Then place it in the cinnamon sugar and coat it on both sides with the cinnamon sugar. Add more oil and fry the rest of the breads.
Serve with syrup. It was delicious warm as well as cold. As a dessert, it is eaten cold per what I have been able to determine.
Tips
I add vanilla essence to the eggs so that there is no eggy smell. You can skip this or add the essence to the warm milk. Fragrant spices which can be added to the milk are cloves, cinnamon, cardamom, vanilla, and lemon rind/zest.
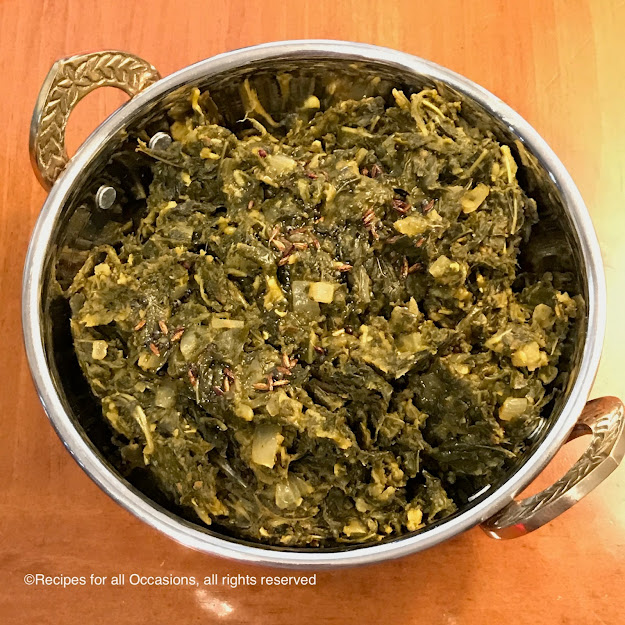
Ambadichi chi bhaaji is one of my favorite greens. The English name of the plant is called Roselle Hibiscus and in Marathi it is called Ambadi and in Telugu it is known as Gongura. It is found in Asian/Indian stores as gongura leaves usually. The leaves are very sour and are great in curries, stir fries and chutneys or dips. As a child this was a rarity as it is not an easily available vegetable. And we usually only cooked it when we grew it ourselves. It goes great with jowar bhakri/jwarichi bhakri (sorghum unleavened flat bread).
Now that I am growing this in our yard, I am excited to cook this again and love that I can cook it whenever I want to. The fruit of roselle hibiscus can also be used for making jams and jellies. I will share the recipe of the jelly when we get fruit in a couple more months.
Here is the video link to the Roselle Hibiscus curry recipe
Ingredients
2 tbsp oil
1/2 tsp mustard seeds
1/2 tsp cumin seeds
30-40 roselle hibiscus leaves (4 cup of cooked leaves)
1/2 cup yellow or orange lentils or split pigeon peas (split masoor or tur dal)
1 tbsp garlic, minced
1/4 tsp turmeric
1/2 tsp cumin powder
1/2 tsp coriander powder
dry red chilli, to taste (optional)
salt to taste
2 tbsp sugar (adjust to taste)
1/2 tbsp molasses
Seasoned oil
3 tbsp oil
1 tsp cumin seeds
1 tsp mustard seeds
chilli powder, to taste (optional)
Method
In a large pot bring water to boil. There should enough water to submerge all the leaves. Then add the leaves to the water and boil them till they are wilted and soft. This will take about 5 mins. Drain the leaves, remove the stems and chop into bite sized pieces. Boil water and add the lentils to it. Boil the lentils till they start getting transparent. Drain and keep aside.
In a saucepan, heat the oil. Add the cumin and mustard seeds. Once they crackle, add the chilli and then add the onions and garlic. Stir these and cook for a few mins. Then add the cooked lentils and stir and cook for a minute or so. Then add the turmeric. Then add the cooked, chopped leaves and stir them with the rest of the ingredients. Next add the spices and the seasonings. Add the sugar, salt, molasses, cumin powder and coriander powder. Cook these together for a few minutes. Taste and adjust the seasonings as needed.
Seasoned oil
Heat the oil and once hot, add the mustard and cumin seeds. Once they crackle turn the heat off. This is your seasoned oil. If you like you can add chilli powder and salt to it as well or dried chillies too.
To serve, pour a couple of tsps of oil over the curry and serve hot with bread or rice.
Tips
You can replace the sugar and molasses with brown sugar or jaggery.
Welcome to our third episode of the Culinary Tour of the World. This time we are headed to Algeria. Algeria is in Northern Africa. As I started researching Algerian food, I read that the cuisine is influenced by all the exchanges with different cultures and people over centuries. There is a heavy French influence (it was a French colony) and a common breakfast I observed was croissant and coffee. I saw a lot of delicious recipes including pastries. I have noted down quite a few recipes I would eventually like to try out. As I started reading more about the food and googling the traditional names, I came across several blogs and video which were mostly in French and some in what I think was Arabic. It was difficult to choose a recipe because there were so many choices!
Couscous and a stew would have been perfect but I thought I could make that any day and wanted to choose something new which I had not heard of. I almost chose a pizza recipe which is said to be over a 100 years old. I finally decided to go with a street food called Mhadjeb (singluar) or Mahdjouba (plural). In my experience, street food is usually something everyone enjoys and is very special to a place, so I thought it would be a good choice.
Mhadjeb can be best described as a flavorful savory pastry of layered semolina dough, with each layer as thin as a phyllo sheet, which is filled with a sweet and tart filling of caramelized onions and tomatoes. The recipe made me curious. I wondered how a simple filling of just onions and tomatoes would taste. Based on the description of the pastry cover, I deduced that it would be crispy and the covering would be delicious for sure.
I had some challenges with this recipe, as the recipes I found which seemed authentic were in French and Arabic. I was able to finally leverage the French I had studied in high school and with the help of google translate make enough sense of the recipes. The final result was delicious! I read that if this pastry is made without filling it is called Msemmen and is a delicious accompaniment with tea or coffee. So, one recipe with two uses. I am definitely going to make it again.
Our next country will be Andorra. This has been a particularly difficult one to find vegetarian recipes for, so if you have suggestions, please add that in the comments below.
You can find the link to all our previous episodes here and the Culinary Tour playlist will take you to all the videos.
Here is the video link to the Mhadjeb/Mahdjoba recipe.
Ingredients
For the cover
1.5 cups fine semolina or semolina flour
1/2 cup all purpose flour
1 tsp salt
1/2- 3/4 cup water (enough to knead a very soft dough)
oil
For the filling
2.5 tbsp oil
2 large or 1/2 kilo onions, finely sliced
2 large or 1/2 kilo tomatoes, pulp (see method)
1 tsp of garlic, finely minced
salt to taste
pepper to taste
Method
For the cover
Mix together the semolina, all purpose flour and salt and then add the water to make a soft dough. This dough needs to be kneaded really well. So if you have a stand mixer or food processor, knead it in the machine for about 15 mins. Else, if kneading by hand, after mixing it set it aside to autolyse for 15-20 mins and then knead by hand for 15 mins like you will knead bread. The resultant dough will be soft and sticky. Spread a little oil in a plate to coat the surface. Then divide the dough into 6-7 pieces and then roll each one into a smooth ball of dough. Place this on the oiled surface. Cover the plate with plastic wrap and let the dough rest for a minimum of 30 mins to about a couple of hours. The dough (and gluten) should be really relaxed to be able to pat the dough out into a very thin sheet.
For the filling
Grate the tomatoes to separate the pulp from the peel. Discard the tomato peel. If you wish you can deseed the tomatoes before grating. In a big pan, add the oil and the onions and garlic and cook this on medium heat till the onions are caramelized. They will start turning brown. At this stage, add the tomatoes. Then cook the mixture till it has reduced and is dry enough to form the filling. Add the salt and pepper. You can also add 1 tbsp of tomato paste along with the tomatoes. Let this cool down.
Putting it together
Apply oil over the surface which you will use to flatten out the dough. I prefer to use a baking sheet/pan so that I don't get my countertop oily. Then place a piece of dough on the center and using the palm, flatten the dough. Use your palms and finger tips to stretch the dough. Then stretch each end of the dough to cover more of the pan. Do this till the entire pan is covered. One ball of dough (of 7) can be stretched thin enough to fill a 12 X 18 inches pan. Then place a ladle full of filling in the center and spread it into a rectangle. Fold the pastry around this filling. Place the bottom third of the dough over the center to cover the filling. Then overlap it with the top third. Then fold the right and left dough flaps over the center to create a rectangular pastry packet. (See the video for a visual demonstration).
Heat a pan or griddle till it is hot and then turn the heat to a low-medium setting. Since there are several layers, we need all of them to be cooked. So cook it on both sides on a low-medium heat till both sides are well browned.
Serve is hot with a side of harissa sauce or ketchup. For the harissa sauce, I blended one roasted, peeled red bell pepper, with store bought harissa spice mix and a some oil.
Tips
Apply oil to your palms and fingertips while handling the dough, so it does not stick to your fingers. To remove the tomato peel easily, you can also submerge the tomatoes in boiling water for a minute, till the peel starts to separate. Then take it out into a bowl of ice cold water. Then you can easily peel the tomatoes and puree the pulp.
Welcome to our second episode of the Culinary Tour of the World. The second country, in an alphabetical order is Albania. It is in Europe next to Greece and along the Mediterranean Sea. While I was researching the food of Albania, I came across so many recipes that it was really difficult to pick one. So with this episode, I am presenting three great Albanian recipes.
I decided that I would choose recipes that could together make a meal and then I wouldn't have to cook anything else. I love baking bread, so I picked Pitalka. I decided a stew or soup would be a great accompaniment and then a vegetable side. I chose "Feregese Tirane" as a vegetable side. Initially, I thought that Feregese Tirane would make a good meal with the Pitalka. But every recipe that I saw, stated that without adding liver or meat to it, it wouldn't be more than a side. So, I decided to keep it as a side, which was a good decision. The soup I chose was a white bean soup - "Jani Me Fasule" which was filling and went well with the Pitalka and Feregese Tirane.
Together, these 3 made a delicious and complete meal! We loved it. I even used the Pitalka bread the next day to make some pita sandwiches with falafel and hummus. I relied heavily on Google Translate for these recipes. As I started searching with the Albanian names, I came across blogs and videos in Albanian which I couldn't understand and so I used Google Translate extensively for translating the recipes, instructions as well for the pronunciations of the dishes.
As you will see in the video, these are fairly straightforward dishes to make. They are not overwhelmed with spices and the ingredients really shine. I made an honest effort to follow Google Translate's pronunciations, and realize that I may not have pronounced the names correctly. I hope you try these out and enjoy them as much as I did.
Our next country will be Algeria and do let me know if you have recommendations for Algerian vegetarian recipes. And if you missed our first episode, here is the link to it Episode 1: Afghanistan - Ashak. You can find the link to video recipes here. And for a listing of our episodes, visit Culinary World Tour Episodes.
Here is the link to the video demonstrating the detailed method.
Ingredients
For the Pitalka
4 cups of all purpose flour
1 tsp sugar
1.5 tsp yeast
1.5 tsp salt
1/2 cup milk
3/4 - 1 cup water
For the Jane Me Fasule
1 cup of dry white/cannellini beans
water to soak the beans and cook the beans
1 cup diced onions
1 cup diced tomatoes
1 cup diced bell peppers (mixture of green and orange)
2 tbsp oil
salt to taste
1/4 tsp black pepper
pinch of red chilli flakes
For the Feregese Tirane
1 tbsp oil
2.5 cups roasted, diced bell peppers (mixture of red, yellow and green)
1 cup diced onions
1 cup diced tomatoes
2 tbsp basil
salt to taste
1/4 tsp black pepper
2 cups milk
1 tsp vinegar diluted with 1 tbsp water
2 tbsp butter
2 tbsp all purpose flour
1/4 cup yogurt
1/2 cup cottage cheese (made using the milk and vinegar. If using store bought cottage cheese, milk and vinegar are not needed)
Method
For the Pitalka
Add the yeast and sugar to the milk and set it aside for 10 mins. The yeast will start getting frothy indicating that it is active and is fresh. Add salt to the flour and mix. Then add the milk and yeast mixture to the flour. Add a little water at a time and knead the dough till you get a firm but smooth dough. It can take about 3/4 cup to 1 cup of water. If you are kneading it in a mixer, knead it for 5-7 mins till smooth. If by hand, it will take about 15-20 mins. Then place it in a bowl. Cover the bowl with plastic wrap and let the dough rise for 1 hour or till it has doubled.
Place a pizza stone in the oven and preheat the oven to 475F. If you don't have a pizza stone, that is ok.
Then deflate the dough and cut it into 6 equal parts. Shape each dough piece into a ball. Place this on a floured surface or a parchment paper, such that you can easily shape it into a disc and then place it in the oven. Let the dough ball rest got 10-15 mins. Then, using your finger tips, spread the dough out into a thin disc, about 1/4th inch in thickness. Then, let this dough disc rest for 20 mins. Cover the dough ball and disc with a towel or plastic wrap to ensure that the dough does not dry out. Then place this disc into the oven. If baking on the pizza stone, place it with the parchment or directly onto the stone. If you are not using a pizza stone, place it on a baking sheet and then place the baking sheet into the oven. It will take about 8-12 mins for the bread to become golden brown in color and it will puff up as well. The bread is ready when golden brown.
For the Jani Me Fasule
Rinse and soak the white beans/cannellini in water for 3-4 hours. Then, discard the water and add the beans and salt to a pressure cooker. Add water to cover the beans and there should be half an inch water over the beans surface. Pressure cook the beans for 30 mins. Then, add the diced onions, tomatoes and bell peppers to the cooked beans, along with the oil, black pepper and chilli flakes. Cook under pressure again for 10 mins. Once the pressure is released, check the consistency of the soup and let it boil to thicken if it is watery. Serve hot. Pour a little olive oil on top of each bowl before serving.
For the Feregese Tirane
Roast the bell peppers on the stovetop or in the oven till the skin starts to char. Then deseed and dice the bell peppers. To make the cottage cheese, heat the milk and then add the vinegar and water mixture to it. That will separate the milk into the cottage cheese and whey water. Drain the cottage cheese and add salt to it.
Heat 1 tbsp of oil in a pan, and add the onions. Cook till they start to soften and then add the tomatoes and bell peppers. Cook this mixture till the liquid from the vegetables has almost evaporated. Then, add the basil, and black pepper. Stir well.
To make the roux, heat the butter and then add the flour to it. Cook for a minute till the flour doesn't smell raw anymore. Do not brown it. Then, add the cottage cheese and yogurt to it. Mix well. Mix this into the vegetable mixture. Then ladle out individual portions into casserole dishes, or into a large baking dish. If you like, top with some cottage cheese and then bake in the oven at 350F for 20 mins. The casserole is ready to eat.
Tips
If you are roasting bell peppers in the oven, cook them at 400 F till the skin starts to char.