Welcome to my blog

I hope you will find the recipe you are looking for your occasion here.

Now video instructions are available for select recipes and can be accessed at

Gardening and Cooking Made Easy

The latest 5 recipes are displayed on the
main page. For more recipes, you can browse the archive, click on the labels in the index to the left or use the Custom search below to look for a specific recipe.


Search for more results

Custom Search
Showing posts with label green leafy vegetables. Show all posts

Sunday, September 6, 2020

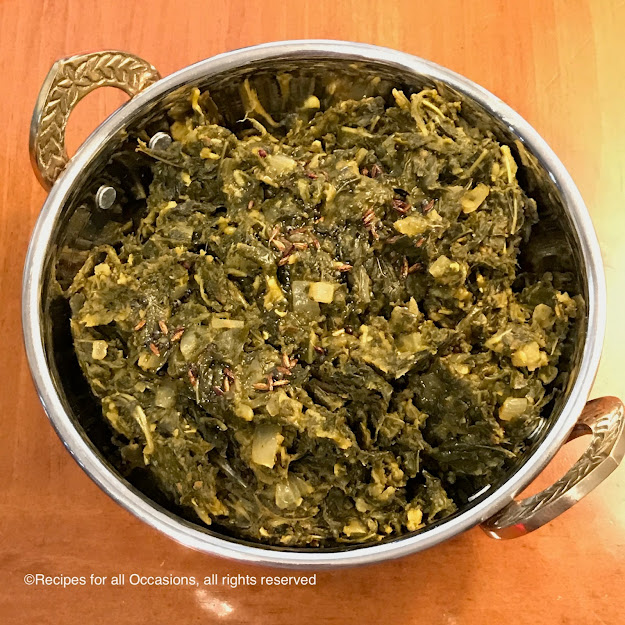
Roselle Hibiscus Curry - Ambadi chi bhaaji

Ambadichi chi bhaaji is one of my favorite greens. The English name of the plant is called Roselle Hibiscus and in Marathi it is called Ambadi and in Telugu it is known as Gongura. It is found in Asian/Indian stores as gongura leaves usually. The leaves are very sour and are great in curries, stir fries and chutneys or dips. As a child this was a rarity as it is not an easily available vegetable. And we usually only cooked it when we grew it ourselves. It goes great with jowar bhakri/jwarichi bhakri (sorghum unleavened flat bread). 

Now that I am growing this in our yard, I am excited to cook this again and love that I can cook it whenever I want to.  The fruit of roselle hibiscus can also be used for making jams and jellies. I will share the recipe of the jelly when we get fruit in a couple more months.


Here is the video link to the Roselle Hibiscus curry recipe

Ingredients 

2 tbsp oil
1/2 tsp mustard seeds
1/2 tsp cumin seeds
30-40 roselle hibiscus leaves (4 cup of cooked leaves) 
1/2 cup yellow or orange lentils or split pigeon peas (split masoor or tur dal)
1 tbsp garlic, minced
1/4 tsp turmeric
1/2 tsp cumin powder
1/2 tsp coriander powder
dry red chilli, to taste (optional)
salt to taste 
2 tbsp sugar (adjust to taste)
1/2 tbsp molasses

Seasoned oil
3 tbsp oil
1 tsp cumin seeds
1 tsp mustard seeds
chilli powder, to taste (optional)


Method

In a large pot bring water to boil. There should enough water to submerge all the leaves. Then add the leaves to the water and boil them till they are wilted and soft. This will take about 5 mins. Drain the leaves, remove the stems and chop into bite sized pieces.  Boil water and add the lentils to it. Boil the lentils till they start getting transparent. Drain and keep aside. 

In a saucepan, heat the oil. Add the cumin and mustard seeds. Once they crackle, add the chilli and then add the onions and garlic. Stir these and cook for a few mins. Then add the cooked lentils and stir and cook for a minute or so. Then add the turmeric. Then add the cooked, chopped leaves and stir them with the rest of the ingredients. Next add the spices and the seasonings. Add the sugar, salt, molasses, cumin powder and coriander powder. Cook these together for a few minutes. Taste and adjust the seasonings as needed. 

Seasoned oil
Heat the oil and once hot, add the mustard and cumin seeds. Once they crackle turn the heat off. This is your seasoned oil. If you like you can add chilli powder and salt to it as well or dried chillies too. 

To serve, pour a couple of tsps of oil over the curry and serve hot with bread or rice. 


Tips

You can replace the sugar and molasses with brown sugar or jaggery.

Thursday, December 17, 2015

Shaam Savera - Spinach and Cheese Dumplings in Gravy

Those of you who are readers of the blog, know that I love cooking and entertaining.
All my friends know that I am a foodie. Last month my friend (K.J.) had invited us to a party at her house and naturally my first question to her was "What's on the menu?". She shared the basic outline of what she had planned but didn't want to reveal the big surprise that she had made for the day. I was curious and couldn't wait for the evening. We reached her place and her husband also told me that she had spent hours in the kitchen and that I would be absolutely taken by the dish. Finally, the wait was over and it was time to eat and time for the unveiling. The food spread was elaborate and she had made a lot of dishes and then she presented the surprise dish. What a spectacular sight it was!!! Not only was the dish absolutely delicious, it was beautiful to look at. It was a curry with beautiful koftas nestled in gravy.
After the party I asked her if there was any leftover, since everyone was raving about it. There was just a little left for me to photograph. I asked her if she would be willing to share this wonderful recipe and the process involved in making it. My dear friend graciously accepted to be a guest blogger and share her recipe of this gorgeous gravy with us. Not only did she write up the ingredients and the process, but also following the format of the blog, provided a great introduction and tips. So without much ado, here is the recipe in her own words.

Thanks K.J.!!!


"When Diwali- the Festival of lights is around the corner; I start planning the menu for the upcoming party. Every year I want to try out at least one dish that I have not tried before and which seems a bit challenging for me. That gives me a chance to explore in the culinary world. I’m always on lookout for new recipes; yet I would not consider myself as an expert in cooking at all. I like recipes which are simple to follow yet give an amazing end result. This year I joined ED group on Facebook; where lovely ladies share their recipes, pictures of the amazing food that they prepare and so on. Sometime back I saw one photo shared on ED, of the curry called –“Shaam Savera” and I really liked her presentation. I thought of noting down the recipe but as usual forgot about it. And when it was time for planning for Diwali, I thought making that dish. But alas, I couldn’t find that recipe on ED. And now my mind was set on it. So I started searching online, on YouTube, everywhere. Because to be honest I didn’t even remember that name of the curry; but just that photo and description of that curry in her post was good enough to mesmerize me. I remembered three vibrant colors- green koftas/fritters cut in the middle to reveal the soft inviting white paneer balls just dipped in the red smooth gravy; which was enough to get me into drooling. And as the fate would have it; I found a step by step video of Sanjeev Kapoor explaining this very recipe. I was so ecstatic to find this recipe and I followed most of his recipe; with added twist or rather cheat sheet to make this dish to give my touch to his wonderful recipe. So here it is.


Ingredients
For the koftas

1 lb Spinach,
2 green chilies
2  tbsp garlic, finely chopped 
salt to taste,
1/4 tsp turmeric,
1 tsp cumin
¼ cup of chickpeas flour (besan)/rice flour,
1/2 lb paneer
2 pinches cardamom powder
corn Starch just enough to roll the koftas,
oil to deep/shallow fry the koftas

For the gravy:-
2 cans Tomato Sauce,
¼ cup heavy cream,
¼ cup golden raisins,
2 tbsp of poppy seeds,
cashews (optional, I didn’t use them),
1 pinch cardamom 1 pinch,
1 stick cinnamon 
salt,
honey,
1 tbsp clarified butter/ghee

Procedure
For the koftas
Boil a large potful of water. Once it starts boiling, add the spinach, put the lid on and turn off the heat. Let it get partially cooked in the hot water for about 5-7 minutes. Meanwhile prepare another pot with ice cold water, to blanch the spinach without losing its green color. Later drain the spinach from hot water and put in the cold water to stop the cooking process. Let the spinach enjoy that cold bath until you gather rest of the ingredients. Finely chop chilies and garlic. Grate the paneer finely. To that add some salt and cardamom. Now make tennis sized balls with that mixture. Now squeeze out as much water as you can from the spinach. Then finely chop the spinach. Heat some oil and once it is heated add some cumin seeds. Once they start crackling add the finely chopped chilies and garlic. Now add the spinach and keep sautéing it. Add the chickpeas flour and/or rice flour, bit of salt, turmeric and keep sautéing till the whole mixture becomes bit dry. In this process the flour gets cooked and is absorbed in the spinach as well. Let this cool down completely. Once it is cooled down make a flat disk of this spinach mixture on your palm with help of drops of oil. Now place the paneer ball on that spinach disk and roll it into an enclosed ball. So you should not be able to see any white of paneer in it. This way finish rolling all of the koftas. 

At this stage either you can deep fry the koftas as Sanjeev Kapoor has explained in his recipe; or you can shallow fry or use appe pan like I did. For that heat up the appe pan. Add a teaspoon of oil. Now sprinkle some corn starch in a plate and roll the koftas in it to get it coated uniformly. Now carefully place each kofta in the appe pan. And put a lid on it and let it get cooked on low flame. This process is time consuming. Once it is cooked from one side, flip it and remove the lid. Wait till you get nice browning done on both sides. This way koftas would be crispy form outside and yet soft and gooey from inside. Let all the koftas cool down and get started with gravy.

For the gravy
You can make any tomato based gravy that you are comfortable making it. This is my standard gravy for most of the rich Punjabi dishes I make. It goes well with paneer butter masala, paneer tikka masala and such. Soak the golden raisins and poppy seeds in some milk for at least 2-3 hours before hand. If you want to add cashews then soak those as well. Once it is soaked and become soft; blend all of it together. Now heat up ghee/clarified butter and add the cinnamon stick and a pinch full of cardamom. Once that gives nice aroma add the raisins/poppy seeds paste and sauté it for couple minutes. Now add two cans of tomato sauce. And let the gravy cook for about 5 minutes on very low flame.  At this point add salt to taste, a teaspoonful of honey and crushed kasoori methi. At the very last add the cream, stir it and turn off the heat. You can adjust the salt/honey per your taste.
For assembling this dish, get a flat dish and pour the gravy in it. Now cut each kofta in two equal parts.

And place each of kofta in the gravy. You can get creative by decorating it per your style-like drizzling it with some cream last minute or if you like add finely chopped cilantro.


Tips
Make sure that there are no lumps in paneer. You will need to mash it smooth like dough for rotis. If you can make paneer form scratch then that would be the best option. You can find how to make paneer from scratch; in this blog. And if you are like me; you would buy frozen paneer.
Make sure that paneer is at room temperature; so that it can regain its moisture. In time crunch you can microwave it for 15-20 seconds to get the rock like to soft-mushy transformation.

Another key point to remember is to add salt as the last ingredient in spinach mixture. Adding salt tends to generate moisture and we want to have dry mixture to make koftas.

For gravy you can follow Sanjeev Kapoor’s recipe with fresh tomatoes; but this gravy dish is my goto recipe which can be prepared in less than 10 minutes. "

Monday, July 9, 2012

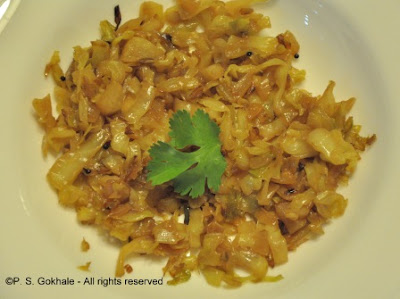
Cabbage Stir Fry

This is one of the most basic recipes.  This is a recipe that you can use with almost any vegetable to give it an Indian touch. It has minimal ingredients and spices and is a healthy and delicious recipe.  The tempered seasoning gives it the wonderful taste. You can shred the cabbage or dice it into smaller pieces and then use it.  Whenever I make this recipe, it always reminds me of a friend who used to sit patiently for a long time and cut the cabbage into really tiny pieces. I never had the patience to do that and used to generally shred the cabbage into longer strips. This time around, when I started cutting the cabbage, I remembered her and decided to cut it into smaller pieces.  I will probably revert back to longer strips the next time around just to save some time, but any kind of variety is always good.


Ingredients
1 tbsp oil
1/8 tsp mustard seeds
1/8 tsp cumin seeds
a ping of asafoetida/hing
1/8 tsp turmeric powder
1-2 green chillies, slit lengthwise, to taste
1 onion, sliced or diced (cut to match the cabbage)
1/2 cabbage, shredded into strips or diced
salt to taste
1/2 tsp sugar (optional)


Method
In a large pan, large enough to hold all the cabbage, heat the oil. To this add the mustard and cumin seeds. Once they start to crackle, add the hing and green chillies. Then add the onions and cook till the onions are soft and transluscent, add the turmeric and mix well. Then add the cabbage and mix well to coat the cabbage with the seasoning and then cover the pan with a lid and let the cabbage cook on low heat. Stir it occasionally and let it cook covered till it is has softened and looks completely cooked. Then remove the cover and add the salt and mix. At this stage, you can also add the sugar, if you want. Cook for a minute or two more. Serve hot with chapati/roti or as a side.


Tips
Sometimes you forget to stir the cabbage and it sticks to the base of the pan and it may turn a light brown shade. As long as it has not burnt and totally become black, if you mix the cabbage well and then continue to let it cook completely, the cabbage will get a nice smoky, caramelized taste.
I try to add the turmeric after adding one ingredient to the oil (like onion), so that it doesn't burn. However, if I do add turmeric directly to the oil, I add the vegetable that I am cooking immediately, to prevent the turmeric from burning. It takes just a few seconds for it to burn completely in the hot oil, so be careful.
Also, do not add water to this recipe. Even if you are tempted to add water to the cabbage thinking how can I cook it covered for so long, without water, what if it burns, resist the temptation. Cabbage contains a lot of water and if you add more, it will spoil the taste and texture of the cabbage. Just make sure to cook it on low heat, and keep an eye on it and stir often so that it doesn't burn.

Thursday, August 18, 2011

Curried Plantains/ Kelyachi Bhaji

Plantains  are relatively a new addition to my grocery list. Plantains are raw bananas and are green in color. At this stage they are starchy and not at all sweet. You cannot eat plantains raw, they need to be cooked. The taste and texture of the plantain is similar to potatoes. Also, the raw banana skin is very tightly wound around the fruit, is very fibrous and difficult to peel off. Till about a year ago, the only form of plantain that I had tasted was plantain chips. So, one day I picked up some plantain on my grocery run and decided to experiment with it. It turned out really good and my family loved it. The first time I made it, it was a little difficult to peel off the banana but the next time around I tried out a trick and the peel just came off. If that has piqued your curiosity, go ahead and read the recipe for details.


Ingredients
1 tbsp oil
1/8 tsp cumin
1/8 tsp mustard seeds
2 plantains, diced
1 tomato, diced
1/8 tsp turmeric
1 tsp corriander-cumin/dhana jeera powder
red chilli powder to taste
salt to taste


Method
See tips on how to peel the banana. Dice the bananas into small pieces. Heat the oil in a pan and add the mustard and cumin seeds. Once the mustard starts to crackle, add the tomatoes. Cook these till soft and then add the turmeric and the coriander-cumin powder. Then add the diced banana pieces and mix well. Add red chilli powder and stir well. If needed sprinkle a little water and then cover and let it cook. When cooked, add salt and mix. Serve hot as a side dish or with some hot chapatis.


Tips
There are two ways to peel the banana. One method is to use a peeler and a knife, then remove the outer green skin and keep peeling till you reach the banana. The banana is like potato and will tend to oxidize, so put the diced raw pieces  into a bowl of water. This is a laborious method and time consuming. The alternate quick method is to cook the raw banana like a potato. You can boil it in water for a few minutes, till the skin softens. Or you can also pressure cook it. Cook it for around the same time that you would a potato in the pressure cooker.  The banana will be cooked and the skin can easily be removed. If you use this method, it will take lesser time to complete the recipe as the banana is already cooked. You will not need to add any water during the preparation.

Tuesday, July 26, 2011

Scallion/Green Onion Stir Fry - "Paati Chi Bhaaji"

This long delicate green is tender onion and is called scallion or green onion. In Marathi its called "Paati cha Kanda" which literaly translates to "Leaves of Onion". Now, occasionally I have confused the word scallion with scallop, but these are nowhere in the same food category. One is a vegetable while the latter is a type of seafood. However, always remember that scallion ends with the word "onion" and that will help you remember that scallions are "green onions". This is a vegetable commonly found in Chinese style stir frys and salads, but usually is not used as a standalone agent. This is possibly one of the only preparations that I have come across where this is the star of the show. When you cook scallions, they tend to shrink and reduce significantly in volume, so you must start off with double the volume of these fresh green onions, so you end up with a sufficient quantity for your meal.


Ingredients
2 tbsp oil
1/8 tsp mustard seeds
1/8 tsp cumin/jeera seeds
1 tsp sesame seeds
1 green chilli
4 cups chopped scallions/green onions (use the green leaves as well as the onions)
1 cup besan/chickpea flour
salt to taste
1/2 tsp sugar
1/8 tsp turmeric


Method
In a bowl, mix the chickpea flour, salt and sugar together and set aside
In a large, broad pan, heat some oil. To it add the the mustard and cumin seeds. Once the mustard seeds start sputtering, add the sesame seeds and the green chilli. Once the sesame seeds are slightly golden, add the chopped white tips of the scallions. Cook till they are transparent and then add the turmeric powder. Next add the greens and stir fry for a couple of minutes. Now, sprinkle the chickpea flour mixture into the stirfry and mix well. This will ensure that most of the leaves and onions will get coated with the mixture. Now, let this cook for ten minutes or so on low to medium heat. You can stop cooking it as soon as the mixture tasted cooked, however I prefer to cook it on longer till the flour coated parts start to brown and crisp up. At this stage, turn off the heat. Serve as a side or with chapati.


Tips
Instead of green chilli, you can use 1/2 to 1 tsp chilli powder (adjust to taste). If you use the chilli powder, mix it into the chickpea flour. Always add the white part of the onion a few minutes before the green leafy part. The white part takes a little longer to cook.  

Thursday, June 16, 2011

Dill and Split Mung Stir Fry/ Shepu Chi Bhaaji

This is a nutritious and delicious recipe. It is also one of the only recipes I know which uses dill as the main ingredients and not as a spice. Dill has a strong licorice like flavor and also a strong spicy fragrance. This is a Maharashtrian delicacy. For many  people it is an an acquired taste and there are some who find that dill tastes too sharp and spicy. I hadn't ever eaten it while in India, but when my husband asked me to make "shepu chi bhaaji (dill curry)", I called up my Mom and sure enough, got the recipe from her. I tasted it and to my surprise I liked it. I make it frequently now and it's a great addition to my green vegetable list.


Ingredients
1 tbsp oil
1/8 tsp mustard seeds
1/8 tsp cumin seeds
1 garlic clove, finely chopped
1-2 dried red chillies (to taste)
a pinch of asafoetida powder/hing
1 medium red onion, diced (about half cup)
1 cup split mung/moong (yellow mung dal)
1 bunch of dill leaves (about 2 cups)
water
salt to taste


Method 
Soak the mung in water. The water should cover the mung completely. If the mung is peeled, soak for at least 15 minutes, if you are using mung with the peel, soak for about an hour. Drain the water before you begin the cooking process.


Heat the oil, add mustard and cumin seeds. Once the mustard seeds crackle, add the hing powder, red chillies and garlic. Add onions and fry them for a few mins. Add the soaked mung seeds in with about  one tablespoon of water. Stir and cover till the dal is cooked through. Stir every couple of minutes, so that the dal doesn't stick to the bottom of the pan. Next, add the dill leaves. Stir and let it cook for a couple of minutes till the dill wilts and is cooked through. Add salt to taste. Serve hot with chapati or as a side.


Tips
You can use the thin stalks of dill, and you do not have to separate the leaves which are very thin and pin like. Just cut off the thicker, fibrous stalks. The dill leaves will shrink in volume as they cook down, so be prepared for the overall volume to be around the same as the mung that you use.

Tuesday, June 7, 2011

Rainbow Chard Stir Fry

I made this in spring which now seems a long time ago, with the temperatures soaring. I had the radio switched on one morning while driving and I heard the most wonderful description of fresh green vegetables cropping up in spring. It signified the end of winter and beginning of spring. They ended the radio segment with a mouth watering commentary on a simple recipe made using greens like chard, collard greens and spinach. That five minute description of freshly harvested greens inspired me to visit the local farmer's market that very weekend. I foudn the most gorgeoud rainbow chard. The reason why it's called rainbow chard, is that the stems of the leaves are very colorful - a bright red and yellow with green leaves (the colors are so bright and pretty that I couldn't resist putting up all the different photos I took of the vegetable).

Now, this was the first time I was to prepare rainbow chard and my mother's words came back to me on the basic principles of preparing green vegetables. "Use red chillies and garlic and any green vegetable will taste wonderful". I was glad that I heeded her advice as the recipe turned out great. I now have another addition to my green vegetable list!


Ingredients
1 tbsp oil
2-3 cloves garlic, finely minced
1 bunch of rainbow chard - about 3-4 leaves. Chop the green leafy part in chiffonade style, into thin ribbons. Cut the stems into small pieces and keep them aside
2-3 dried red chillies (adjust amount to taste)
salt to taste
1 lemon for garnish


Method
Heat the oil and add the garlic. Once the garlic starts to turn a light golden, add the red chillies and the stems.  Stir well and let the stems cook for a few minutes till they look a little tender. You can cover the pan, so that the stems will cook faster. Next add the green leaf ribbons into the pan and stir. Let this cook till the leaves wilt. If the chard is tender, the leaves will cook pretty quickly. You can cover the pan if needed. Next, add salt and stir. Turn off the heat and squeeze a little lemon on top of the cooked vegetable. Serve as a side or eat with hot rotis.


Tips
Let the stems cook through paritally and become soft before adding the greens. The stems are fibrous and will take a longer time than the greens. If you add them both together, you will end up overcooking the green leafy party. The easiest method to detect if the stems and leaves are cooked to the desired level, is to taste it. If it is difficult to chew or too fibrous let it cook for a few more minutes. This preparation tastes good with a little bit of crunch rather than cooking it till mushy.

Thursday, April 14, 2011

Patra/ Alu Wadi - Taro Leaf Rolls

The entire taro plant is edible. The leaves as well as the root bulbs can be convered into delicious preparations. Taro is also known as colocasia. In Hindi it is called "arbi/arvi" and in Marathi "alu". Taro leaves are long and broad and deep green in color, while the taro root looks like a potato with a fibrous covering. Taro leaves cannot be eaten raw but taste great as rolls or in a curry.  Taro leaf rolls are called "Paatra/Patra" in Gujarati and in Marathi these are called "Alu Wadi/Vadi".  Alu wadi is a beautiful, delicious and healthy snack. It is rare that I find taro leaves in the store, so when I do, I buy a bunch. If the leaves are big enough that they can be rolled up, I make taro rolls. If not, I end up making a sweet and sour gravy called "patal bhaaji".


I recently planted taro and am eagerly waiting for the leaves to sprout. This is a low maintenance plant and the only requirement is plenty of water. The easiest way to plant it is to get some taro roots from the grocery store(with the fibrous covering, not the peeled one). After a few days, the root will start forming buds. At this point, you can transfer it to a pot/ground. Make sure that the root is watered regularly and you should see the leaves soon.


Ingredients
For the rolls
4-5 large taro leaves
1 cup besan/chick pea flour/ gram flour
1.5 tsp corn starch/flour or rice flour
2 tbsp oil
1/2 tsp baking powder
1/8 tsp turmeric powder
salt to taste
1 tbsp ginger-garlic paste
red chilli powder to taste
1.5 tsp goda masala/kala masala
2 tsp sesame seeds
pinch of asafoetida/hing
2 tsp tamarind paste
2-3 tsp jaggery
1/2 - 1 cup water

For the seasoning
1 tbsp oil
1/8 tsp mustard seeds
1/8 tsp cumin seeds
pinch of asafoetida
2-3 green chillies, slit
8-10 curry leaves (optional)


Method

Preparing the leaves
Wash and dry the leaves, by patting them with a towel. Chop the stem off and discard. Turn the leaf over and take a rolling pin and roll this over the underside of the leaf so that the stem and the veins in the leaf break. If the veins are very thick, then trim them a little by running the knife blade parallel to the leaf and scraping off the vein. This is needed so that the leaf can be rolled easily. Do this for all the leaves.

Preparing the filling for the roll
Combine the rest of the roll ingredients except water and mix together. Then, add a little water at a time to make a paste/batter. The consistency of the batter should be paste like, so it can be easily spread. It should not be too thin or runny. It should be thick enough so that you can spread it over the leaf to form a thin even layer.


To prepare the roll
Spread this gram flour mixture over the underside of a leaf to coat the entire leaf in an even layer. Then, place the next leaf on top of this layer and spread the next layer of the gram flour mixture. Do this till you have used up about 3-4 leaves. You should have a stack with alternate layer of leaves and the gram flour mixturre. Layer about 3-4 leaves on top of each other at a maximum. Then roll this stack into a tight roll.


To cook the roll
Once all the rolls are rolled up, arrange these in a shallow vessel. Steam cook them for about 15 minutes till cooked completely. This can be steam cooked using a pressure cooker, Instant Pot or a regular pot which is deep enough to hold the vessel. Once the roll is cooked through, the roll will remain tightly rolled and will not unravel. It will take on a brownish color. Once the rolls cool down, slice these rolls into 1/4 -1/2 inch thick slices.

The rolls are ready to eat at this point. However, they taste great if they are crisped up a bit. To do this you can shallow fry or even deep fry them till they are brow and crisp. I prefer to shallow fry. To shallow fry, add a couple of tsps of oil to a pan and heat it. Then add the rolls to the pan and cook them on both sides till the roll slice is nicely browned and crisp.

Add a little seasoning over the roll slices before serving. To make the seasoning, heat the oil. Add the mustard seeds. Once they crackle add the cumin seeds, hing and sesame seeds. Add the green chillies and curry leaves. Pour the seasoning on the rolls. The seasoning can be added over the steamed rolls as well as the fried ones.

These can be served as appetizers or snacks.


Tips
The leaves can sometimes cause the throat to itch upon eating, so it is important to include tamarind as an ingredient in taro leaf recipes. The acid in tamarind helps counter act this and makes sure that your preparation will be itch-free. Goda masala is a masala used in Maharashtra. It has ingredients like sesame seeds, dessicated coconut. Use dhana-jeera (corriander-cumin) powder if you don't have goda masala.