Welcome to my blog

I hope you will find the recipe you are looking for your occasion here.

Now video instructions are available for select recipes and can be accessed at

Gardening and Cooking Made Easy

The latest 5 recipes are displayed on the
main page. For more recipes, you can browse the archive, click on the labels in the index to the left or use the Custom search below to look for a specific recipe.


Search for more results

Custom Search
Showing posts with label artisan bread. Show all posts

Wednesday, September 18, 2019

Sprouted Whole Wheat Bread

I enjoy sprouting wheat and used to make sprouted wheat bread a few years ago. I had forgotten the exact recipe and decided to try my hand at another version of it. It was difficult to find much online where the wheat berries were directly used instead of the sprouted wheat flour. I found a reference to Ezekiel bread which is a mixture of wheat and lentils and then decided to try out a basic bread recipe and see where it goes. The result was surprisingly tender and moist. The bread was hearty and delicious.
Ingredients
3 cups sprouted whole wheat berries (wheat berries were soaked overnight in water and then placed in a big sieve. These sprouted over a period of 48 hours).
A little water if needed to grind berries
2 tsp instant yeast (or if you have starter dough from another batter, add a handful instead and let this ferment overnight)
1 tsp salt
1 tbsp oil
Whole wheat flour a couple of 1/4 - 1 cup, depending on the moisture in the berries


Method
Grind the whole wheat berries to make a coarse batter. Use the minimal amount of water required in your blender or food processor. I used a food processor. Add the salt, yeast and oil and then add a little flour at a time to create a soft dough. It’s ok if it is a little sticky. Keep aside for 15-20 mins and then knead again to make a smooth dough. (I added a ball of dough from another overnight no knead recipe that I had made in the earlier day instead of the yeast and let it ferment overnight.)


Shape it into a ball and place in a bowl greased with oil to prevent sticking. Let this rise till double in volume. Will take about an hour or more. Then flatten out the dough and shape into a rectangle about 5x9 inches in size. My baking tin is 9 inches long. The length should be approximately the same as your bread baking rectangular tin.
Then roll into a tight roll with the shorter end parallel to you so that you have a 9 inch rolled bread dough.
Grease the baking tin with oil or butter and place the dough in it for a second rise. Once the dough had doubled in size, almost to the edge of the tin, bake at 350F for about 1.5 hours. I baked it for 40 minutes but the bread was not completely baked, so I continued to bake it till the center measured 200F, which took another 40 minutes approximately.
This bread does take longer to bake than normal. You can tent it with foil if you think the top is getting too brown.
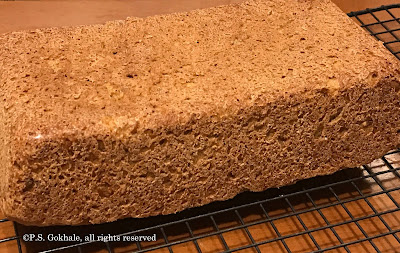
The end result has crusty edges and a moist interior, is nutty and delicious. A hearty bread which is not at all dense.

Tips
Precook the wheat and try this bread. I will be trying that version the next time I make it. 

Tuesday, December 4, 2012

Oats and Whole Wheat Bread

The last month was filled with cooking a lot of Diwali sweets and snacks. I also made cakes for a couple of birthday parties. It was a great month. We ate a lot of great food and had fun with all the different celebrations. However, in the midst of all this activity, I just didn't get time to do any leisurely baking. I had been wanting to bake bread, but I just didn't get to it. I have been wanting to make some whole wheat breads, and I finally got to bake a loaf  last weekend. This is a recipe from the book "Whole Grain Baking" and the first one that I tried from it. Considering the success of this recipe, I am looking forward to trying the other bread recipes from this book. Since, all the recipes in this book include whole grains, they should be healthy as well.


This bread recipe contains whole wheat flour as well as rolled oats. It turns out very delicious and moist. A perfect sandwich bread.


Ingredients
1 and 1/4 cups boiling water
1 cup old fashioned rolled oat (not the quick cooking ones)
2 tbps unsalted butter, cut into 3 pieces
1.5 tsps salt
1/4 cup honey
1 cup whole wheat flour
1 and 2/3 cups unbleached all purpose flour/maida
1/4 cup milk powder
2 tsps instant yeast
some oil to grease the bowl and pan
1-1/2 tsp melted butter (optional)


Method
Mix together the oats, salt, honey and butter and pour the boiling water and stir. Let the mixture cool to a lukewarm temperature. This will semi cook and soften the oats. Also, make sure that the temperature is lukewarm and you can easily dip your finger (clean) in the mixture and hold it for a minute without burning it. If it is not cool enough and you add the yeast, the yeast die.
Then add the flours, milk powder, yeast into this mixture and knead the dough. Knead well till the dough is soft and smooth. If you are doing this by hand then you will need about 10-15 minutes kneading time. Shape the dough into a ball.

To see step by step photographs of the process see the Whole Wheat Bread recipe.

Then, place this in a well oiled bowl and roll the dough in the bowl, so that the dough is lightly covered with oil. Then, cover the bowl with a plastic wrap and let the dough rise till it has doubled in size. This will take about an hour to an hour and half, depending on the ambient temperature.

Then, deflate the dough and shape it into a log which can fit in your rectangular bread pan. Now cover this lightly with a plastic wrap and let the dough rise again till it has doubled in size, which will take another hour to hour and half.

Preheat the oven to 350 and bake the bread on the center rack in the oven for about 45 minutes.  After 20 minutes have passed, check and if you see that the top has lightly browned, then take a piece of aluminium foil (large enough to cover the pan), fold it in the center to create a crease, then  open it up and create a tent on top of the baking tin. Let the bread bake for the next 25 minutes, covered with foil.

Take the bread out of the oven and set to cool for 5 minutes before removing it from the tin. If you want, you can lightly brush the entire bread with some butter. This will help retain the moisture and keep it soft and moist.  Slice it as you go.


Tips
Yeast should never be added to hot water or hot mixtures, as that will kill the yeast. If you are not sure, add the yeast to room temperature ingredients. If the temperature in the room is very cold, it will take longer for the dough to rise. You can keep the dough in the oven, with its light on to provide the warmth for the yeast, so that the bread will rise. Else, add additional time to the rising process. The key to look for is, if the dough has doubled in size. Similarly, if the room temperature is really warm (think hot summer weather), then you may need just 45 mins or an hour for the dough to complete doubling in size. For photos on how to shape the dough into a loaf after the first rise, see the Whole Wheat bread recipe.

Monday, May 14, 2012

Focaccia Bread - A No Knead Recipe

If you have been following this blog for a while or have browsed through this blog, you may have noticed that I enjoy baking. One of the things I have come to enjoy baking, over the last couple of years, is bread. I have realized as I read recipes, watch shows on tv and make different breads that every bread you bake is unique, even when you repeat the same recipe, it will always turn out a little different than the last time (maybe even better). Also, the main ingredients remain the same - i.e. flour, salt, water and yeast. Some recipes call for addition of oil, some of milk and then you can customize breads by adding in different spices. I saw an episode of America's Test Kitchen a few months ago in which they demonstrated how to make focaccia bread and I just had to try it out. The holiday season during the November-December time frame was the perfect time to try it out and oh my, the result was lip smacking, bowl licking delicious. I made two loaves (one plain and one rosemary) and both were gone in less than 24 hours. I finally got a chance to transfer my notes to the blog, so here is the recipe.

Note: This recipe is even more alluring because there is no tedious kneading involved and fancy mixers are not needed to make the job easy either. A bowl and wooden spoon suffice.


Ingredients
Starter dough (biga)
1/2 cup bread flour (the original recipe calls for unbleached all-purpose flour)
1/3 cup warm water
1/4 tsp instant yeast

Dough
2 1/2 cups bread flour
1 1/4 cups warm water
1 tsp instant yeast
2 tsp (and a little bit more) salt 
4 tbps extra-virgin olive oil
1 tbsp dried rosemary (the original recipe called for 2 tbsp of fresh rosemary) [optional]


Method
Mix together the ingredients of the biga in a big bowl, using a wooden spoon till all the ingredients are thoroughly mixed and the water has been completely absorbed. There shouldn't be any dry flour. Cover the bowl with a plastic wrap and let the biga ferment over night or for about 8 hours.


To make the dough, to the biga add flour, yeast and water, and mix thoroughly till no dry ingredients remain. Then let the dough rise for 15 minutes. After this sprinkle two teaspoons of salt over the dough and mix it in to the dough. Then let the dough rise for another 30 minutes. Keep this dough in a large bowl.

The dough will rise around the edges of the bowl. Coat a scraper or spatula with some oil and then use it to fold the dough in towards the center, while turning the bowl. Fold the dough and then turn the bowl 90 degrees, this is the first turn. Do this 7 more times for a total of 8 turns till all the dough is folded towards the center. Cover the bowl with plastic wrap  and then let the dough rise for another 30 minutes.

Again repeat the process of folding the dough and then let the dough rise for another 30 minutes. Again fold the dough and let it rise for 30 minutes. (At the end you would have a total of 3 foldings and 3 rises)

Place a pizza stone or baking stone, in the center rack and preheat the oven to 500F. Heat the stone for at least 30 minutes. This is best done after the 3rd fold when the dough is rising for the final time.

Now place the dough on a floured surface and then divide the dough into two equal parts. Shape each into a round, roughly about 5 inches in diameter, by tucking the dough under the edges.
Oil two round cake baking tins (8/9 inch), each with 2 tbsps of oil. Then sprinkle a little salt to coat the base of the tins. (Be careful not to put too much salt as you have already added salt to the dough). Next, place the dough top side down and slide around to coat the dough with the oil, then flip the dough over and coat the other side.

Cover the pans with plastic wrap and let it rest for 5 minutes. Then using fingertips, gently spread the dough to cover the entire base of the pan. If the dough resists then let it rest for a few more minutes. Then poke the dough with a fork over the entire surface. At this stage, if you want to flavor the bread, you can sprinkle the chopped rosemary leaves. Let the dough rest for another 5-10 minutes till the dough looks bubbly.


Then turn down the temperature of the oven to 450F and then bake the bread for 25-30 minutes. The bread will be golden brown and when you tap on it, you can hear a thud to indicate that it is hollow.


Tips
Make sure to use luke warm water and not hot water. The water should be about 100-110 F. The easiest way to determine this is to touch the water and if it feels warm and you can easily hold your (clean) finger in the water, then it is not too hot. If in doubt, go for a slightly lower temperature. If the water is too hot, it will kill the yeast and your dough will not rise.

In this recipe, we make the starter and let it ferment overnight and then add it to the main dough and then let the bread rise two times. The additional fermentation of starter dough adds a great taste to the dough due to the alcohol and sugars created during this process. The biga/starter can be refrigerated for upto two days.


I had to go out of the house after the stage of folding the dough the second time, so I kept this dough in the fridge. Once I came home, I let the dough come to room temperature and then let it rise and then proceeded with the recipe. Since this is a lengthy process, if you do need to go away from the dough, refrigerate it. The cold temperature slows down the rising process.

The pizza stone provides a kiln effect and helps create a crispy crust for the dough.

Although the original recipe called for all purpose flour/maida, I used bread flour as it was handy. Bread flour had a higher gluten level and will make a softer bread. However, if you don't have it, it is perfectly okay to use all purpose flour.

Wednesday, May 25, 2011

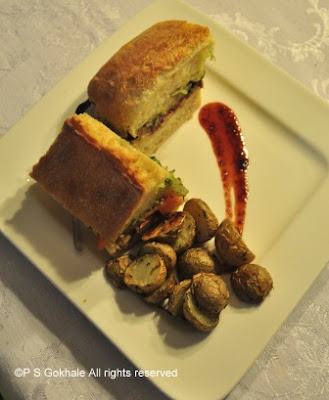
Gourmet Sandwhich - Grilled Vegetables with Pesto on Artisan Bread

Last month we visited a local bistro. They had a Tuscan style menu and one of the things we ordered was a lovely grilled panini sandwhich. It had grilled vegetables, cheese, pesto and we really enjoyed it. I was quite eager to reverse engineer it and make my very own version of it. So, after a couple of days, I made a fresh batch of pesto, made some strawberry balsamic vinegar and I was on my way. The resultant sandwhich was lipsmacking.


So, this year, when we decided to celebrate my daughter's birthday in the park, and I was trying to come up with a suitable menu, I realized these sandwhiches would be perfect as the main course. Everyone loved the sandwhiches, and I received a lot of compliments. I made around eighty sandwhiches and once you read the recipe, you will realize how easy these are to scale up. So, if you are looking that dish that will wow your guests and won't have you slaving over the stove for hours, this is it!


The following ingredients list is for one ciabatta roll and will provide about 6-8 servings on how large you cut your sandwhiches.

Ingredients
1 loaf of bread (use ciabatta, or garlic bread or rosemary bread)
1/4 cup basil pesto (click on the link to see recipe from another post)
1 tbsp strawberry balsamic vinegar
pepper jack cheese, slices - at least enough to create one layer over the bread
1 large red onion, sliced
1-2 zuccinis/italian squash,  thinly sliced lengthwise
1-2 firm tomatoes, sliced
2-3 tbsp  olive oil (use about 1.5 tbsp to grill the onions and 1.5 tbsp to grill the zuccini)
salt to taste
pepper to taste


The following ingredients list is to make 80 sandwhiches, assuming one sandwhich will be about 3 inches length wise and 2-3 inches width wise. I estimated about 2 sandwhiches per person. However, if you are planning to multiple items like pastas/salads which may be filling along with the sandwhiches, you can estimate about 1.5 sandwhich per adult.


Ingredients
10-12 bread loaves (estimate the number of loaves based on how long and wide the loaf is)
4-5 cups of pesto sauce
plenty of pepper jack cheese, I bought a cheese block and sliced about 1/2 (about 4 cups worth)
1/4 cup strawberry balsamic vinegar
10 large onions, sliced
20 zuccinis, sliced length wise
12 large tomatoes, sliced
1/4 cup olive oil (use 1/8 cup to grill the onions and 1/8 cup to grill the zuccinis)
salt to taste
pepper to taste


Method
Add half of the olive oil over the red onion slices and then grill these on a hot grill, till the onion is cooked, slightly browned. At this stage it gets a sweet tinge. Add remaining olive oil to the zuccini and then grill the zuccini. Let the water from the zuccini evaporate. Slice the bread horizontally into two large pieces. If you want, you can toast the bread in the oven for a few minutes. 


Now, we are ready to assemble the sandwhich. Spread pesto on one the top slice of the bread. Add a layer of cheese on the other bread slice and keep it in a warm oven for a minute till it melts slightly. Drizzle the strawberry balsamic vinegar over the cheese. Next add a layer of tomato slices. Season this layer with a little salt and pepper. Next add a layer of grilled onions, then season that with a little salt and peper. The next layer is the grilled zuccini which also needs to be lightly seasoned with salt and pepper. Then, add back the top layer of the bread with the pesto. Cut the sandwhich into 6-8 pieces based on how large you want the sandwhich to be. Based on the length and width of the bread, I was able to make 8 sandwhiches.


Use the same method when you want to scale up this recipe. Cook the onions and zuccini, slice the cheese and tomatoes. You can make pesto a few days earlier, it stays fresh in the fridge for a couple of weeks and also freezes really well.  Once you have prepared all the ingredients, you can then create an assembly line and assemble all the sandwhiches. Then cut them into appropriate number of pieces.


Tips 
If you do not have a grill, you can use a hot pan to cook the onions and zuccini. Zuccinis release water as they start cooking, so it will take a bit longer to cook/grill them than the onions. If you are making the sandwhiches a few hours in advance, then make sure to de-seed the tomatoes, so that the sandwhiches do not get soggy from the tomato juice. Also, add a layer of pesto on both side of the sandwhich, so that it stays moist. Also, do not toast the bread if you want it to stay moist.