Welcome to my blog

I hope you will find the recipe you are looking for your occasion here.

Now video instructions are available for select recipes and can be accessed at

Gardening and Cooking Made Easy

The latest 5 recipes are displayed on the
main page. For more recipes, you can browse the archive, click on the labels in the index to the left or use the Custom search below to look for a specific recipe.


Search for more results

Custom Search
Showing posts with label rice. Show all posts

Thursday, August 18, 2016

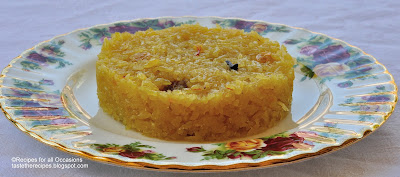
Narali bhaat - Sweet Coconut Rice

This dish is special and close to my heart as it transports me instantly to my childhood. This a sweet delicacy which was made at least once a year in the house on the occasion of Narali Purnima which coincided with Rakshabandhan. On Narali Purnima, coconut based dishes are prepared to celebrate the day. Usually this coincides with the occasion of Rakshabandhan, when sisters tie a decorative thread on their brother’s hand and getting a gift in return. Of course there is a deeper meaning to this tradition but this is a food blog, so lets get back to the rice.

The main reason why this was a rarely prepared dish was because of the effort involved in scraping fresh coconut and that used to be tiring. But now with the availability of frozen packets of fresh coconut, it has become easier to make this once elaborate dish. In fact, if you don’t have access to a frozen packet, on a day when you do have the time and energy, scrape the coconut and freeze it. Use it within the next couple of months.


Ingredients
1 cup rice (basmati preferably)
2 cups water
2 tbsp ghee/clarified butter
4-5 cloves
2 cups grated/scrapped fresh coconut
2 cups sugar
½-3/4 cup water
1 cup milk
1-2 pinch saffron
1/8 tsp green cardamom powder
1-2 tbsp raisins
2 tsp sliced almonds (optional)
1 tbsp cashews (optional)
1 tbsp ghee, after cooking


Method
Wash the rice a couple of times and keep aside. Heat ghee in the vessel/cooker that you cook your regular rice in. Once you can smell the aroma of ghee, add the cloves and let them cook till fragrant. Then add the rice and stir it in the ghee till the grains are coated with ghee. Add water and let the rice cook. Once cooked, spread it out on a plate or tray and let it cool down completely.

Heat a saucepan which is of such size that it will easily accommodate the cooked rice and coconut mixture.  To this add the grated coconut and roast it a little. Then add the water and heat till the sugar dissolves completely. Then add the milk and keep stirring and let the mixture thicken. Once it starts to thicken, add the saffron, cardamom powder, raisins and nuts (if using). Let this all cook together. Once the mixture starts to get to a nice thick syrup consistency, add the cooled rice and mix it in to the coconut sugar mixture gently. Continue to cook, till the water evaporated and a sticky rice texture is achieved. Add the ghee to this. Serve hot.


Tips
The roasting of the coconut a little helps to increase the shelf life of the cooked rice. Always store this in the fridge. Heat the saffron a little in a tsp of water or milk. The golden color of the rice is achieved using the saffron. It will be a deep golden if you use two pinches instead of one. I used two and got a lovely golden color as seen in the pictures.

This helps release the color of the saffron. Always roast the coconut a little if you plan to store it in the fridge or freezer to help increase its shelf life, else the coconut will become rancid in a couple of days.

Monday, October 29, 2012

Phirni (Firni) - A Delicious Indian Pudding

This is the first time I made this recipe and it was also the first time that all of us tasted Phirni. It was well received by everyone. My husband gave it a great review and told me that it was a keeper. It is a recipe my mom made this festive season, and when she told me how to make it, I was very enthusiastic to make it. It is a relatively easy recipe and doesn't take a lot of effort, and tastes fabulous. You do need to plan for it a few hours ahead at least, as there is some pre-preparation, soaking time needed and then you need an hour or two of cool down time, as it is to be served cold. It is an easy recipe, with high returns, that you can make for any celebratory occasion or just for everyday dessert.


Ingredients
2 tbsp ghee/clarified butter
3 cloves
1 cinnamon stick,1/2 inch
1/4 cup rice
1/2 cup sugar
4 cups milk
a pinch of saffron
1 green cardamom, peeled and powdered
almonds, for garnish
raisins, for garnish


Method
Soak the rice for 1-2 hours (at least one hour). Drain the water and grind the rice coarsely. Heat the ghee in the saucepan. Then add the cloves and cinnamon stick and fry them for a minute till they are fragrant.  Add the rice and cook it for a couple of minutes. The rice will puff up as it absorbs the ghee. Roast the rice for another minute or so. Don't let it turn brown. Then add the milk to this and boil till the mixture thickens. Make sure to stir as it cooks, so that the rice doesn't stick to the bottom and burn. Then, add the sugar. The mixture will become a little liquidy again as the sugar dissolves to form syrup. Add the saffron and cook for a few more minutes. Then add the cardamom powder. The mixture should be thick, like a porridge. At this stage you can add in almonds and raisins. Pour the phirni into the serving cups/ramekins.  Cool for at least one to two hours before serving. Serve cold. As it cools, it will set and become like a thick pudding or custard. Garnish with almonds and raisins before serving. Traditionally this is served in small earthen pots, however you can serve in  any dessert bowls.


Tips
Make sure to pour it into the serving dishes before it cools, so that it sets properly. This does need a  little bit of attention and some stirring to make sure that the rice doesn't stick to the bottom and burn. It is easier to make this in a non stick saucepan. Cook it on low heat. If you are cooking it in a steel vessel, stir more frequently (not continuously).

Wednesday, September 26, 2012

Vegetable Dum Biryani - Exotic Basmati Rice Dish with Vegetables

This is the third recipe from the first menu : a rice dish. Rice plays a prominent role in an Indian menu. Just as Naan/Roti or Chapati is necessary in an Indian meal, so is rice. If it is an elaborate rice preparation with lots of spices and vegetables or meat, then it is generally served along with a raita or yogurt. Else, you would serve plain or lightly flavored rice with a dal preparation.

Biryani is a very flavorful recipe that has its origin in the Mughal cuisine. Dum (which means pressure) Biryani traditionally is made by cooking the rice with vegetables or meat in an earthen pot, which is sealed and cooked on hot coals. It is an elaborate recipe and again a popular feature in restaurant menus. When you look at the rice section,  you will find many variations listed on a restaurant menu, which are mainly based on the ingredients that are cooked along with rice. Vegetable biryani is my favorite rice dish. I had tried to make this a few years ago, however I found the process very laborious. So, I was reduced to relying on ordering it at restaurants.

A couple of years ago my friend made a delicious vegetable biryani and she swore that it was a very easy method that she used, with lots of shortcuts. And, of course I kept requesting her to make it every chance I got. Then I spoke to another friend about the way she makes her vegetable biryani and she also said that it is a simple recipe and gave me the detailed method of making it. Finally I was convinced and decided to give it a try. So, I  married the two recipes, using the short cuts that my first friend suggested and using some of the additional exotic spices and yogurt from the second recipe and the result was absolutely delicious and also very easy to make. With this recipe I am no longer daunted by this exotic rice dish and I can't wait to make it  again.


Ingredients
for the garnish
2 large red onion, sliced into thin slices
1/4 cup cashewnuts
1/4 cup mint leaves, chopped
1/2 cup cilantro leaves, chopped

for the marinade
1/2 cauliflower, separate into florets
1-2 carrots, cut into thick slices or diced into thick pieces
1 cup peas
1/2 cup french/green beans cut into 1/2 inch long pieces
1 cup yogurt
1/2 tsp red chilli powder
1 tsp salt
1/8 tsp turmeric powder
2 green chillies
4 garlic cloves
1.5 inch ginger
3 javentri flowers (optional - see tips)
3 tbsp biryani masala
1 lemon, juiced
1/2 cup mint leaves, cut chiffonade style into thin ribbons
1/4 cup cilantro leaves, chopped finely
1/4 cup fried onion
1 tbsp oil

for the rice
2 cups basmati rice
2 bay leaves
2 javentri flowers (optional)
2  inch long cinnamon pieces
2 black cardamoms/badi elaichi
5 cloves
2 cups of vegetable broth (optional. replace with water if not available)
2 cups water
salt to taste


Method
Slice the red onions. Separate the slices out and let it dry for a couple of hours. Then deep fry the onion till golden brown and crisp. Drain on a paper towel and keep aside. Use 1/4 cup of this in the marinade and the rest as garnish. Roast the cashew nuts in a little oil till lightly brown.

Make a fine paste of the green chillies, ginger and garlic.
Take yogurt in a bowl deep enough to hold all the vegetables. Then add in the chilli, ginger and garlic paste, turmeric, chilli powder, salt, lemon juice, biryani masala, mint leaves, cilantro leaves, javentri flowers, crushed fried onion, oil and mix well. Then add the vegetables to this mixture and set this aside for at least an hour up to 8 hours (or overnight).

Wash the rice three times and discard the water. Then add in the 2 cups broth and 2 cups water. If you don't have vegetable broth, add 4 cups of water. Add the bay leaves, javentri flowers, black cardamon, cinnamon, cloves and salt to taste and cook the rice using your preferred method. Be careful to not overcook the rice. In fact you want it a little underdone as it will finish cooking with the vegetables in the oven.


Now, take a deep oven proof glass dish or an oven proof deep pot with an oven safe cover. Next, we need to layer the vegetables and rice alternately and then cook this in the oven. Start off with layering the vegetables at the base of the pan. Then garnish this with a handful of crushed onion, cashews and some mint and cilantro leaves and then spread a layer of rice on top of the vegetables. If it is a large pan, you may end up with just these two layers. If it is a narrower pan, then you may get two vegetables layers alternated with two rice layers. Keep layering till you are done. The base layer should be vegetables and the top layer should be the rice layer. Finally garnish the top with fried onions, cashews, cilantro and mint leaves.

Now, cover the pan completely with aluminium foil. There shouldn't be any vent created in the foil, so double wrap it if needed. If  the pan has a lid, then place this oven safe lid on the foil covered pan and cook it in the oven for about an hour at 350F. The vegetables will create steam as they cook in the heat and that will help complete the cooking process for the rice (creating the "dum" effect). Serve hot with raita or yogurt.


Tips
Javentri flowers are difficult to find, even in the Indian stores. I couldn't find them here and when I was visiting San Jose, I chanced upon them at an Indian store there, I bought a large packet. These have a mild nutmeg like smell and their main function is to add a nice fragrance to the rice. However considering there are several other spices that are used, it is not an essential ingredient, so don't let that stop you from making this recipe.
I prefer to cook the rice in a pressure cooker for one whistle and then I take it completely off the heat and let   it cool.  Sometimes, I just boil it in a saucepan, keeping it partially covered and take it off the heat when it is semi cooked. Initially, I  used to use a glass oven safe dish to cook the biryani, however I realized that my cooking pot is also oven safe and have started using that as it is a wider and deeper pot.
You can use frozen vegetables as well instead of using fresh vegetables. Just rinse them in water and then add to the marinade.
If you are using broth, then be careful about adding salt when rice is being cooked. Broths are already salted, even the low sodium ones.
If you can find fried onions and roasted cashews, you can directly use those and skip the step of preparing the garnish.

Thursday, July 12, 2012

Bisibele Bhath - A Rice Delicacy from Karnataka with a twist

Bisibele bhath is a speciality from Karnataka. It is a rice and dal preparation which is akin to "khichadi" another dal and rice preparation. My mom used to make this recipe when I was a child and I remember not really liking it because it had so many vegetables. She used to serve it with a lot of ghee (clarified butter) though, which used to make it finger licking delicious. Now that I am older and wiser, I understand the beauty of this dish. First, it is a one pot meal. Second, it has all the nutritional components, it has proteins from the lentils/dal, carbohydrates from rice and you can add many vegetables to it which take care of the vitamins and fiber aspect. And best of all, it is all cooked together with yummy spices in one single pressure cooker. It is a perfect dish for that very busy weekday and you can have the satisfaction of serving something healthy and good.


I make it in the fastest way possible and that is what this recipe is about. I use store bought spices. MTR brand's Bisibele Bhath masala is easily available in the Indian store and I generally have a packet of this at home. Next, I cut vegetables that I have on hand if I have time, or I open a pack of frozen mixed vegetables ( generally contains green beans, carrots, peas and corn) and use that. That makes it easy to cook and absolutely delicious too. The twist in this recipe is that I experimented with a new grain instead of rice this time. I replaced the rice entirely with quinoa and make the dish using the exact same method and I must say the result was amazing. If it had been a blind tasting, I couldn't have differentiated between the one made with rice and one made with quinoa. I am thrilled that I have been able to make this dish even healthier. The recipe and method stay exactly the same irrespective of whether you use rice or quinoa. So here goes.


Ingredients
1 tbsp ghee or oil
1/8 tsp mustard seeds
1/8 tsp cumin seeds
a pinch of asafoetida/hing
7-8 curry leaves
1-2 green or red chillies, to taste
1 onion, diced into small pieces
1 tomato, diced into small pieces
2 cups of frozen vegetables mix (washed) or you can cut fresh vegetables like potato, carrots, green bell pepper, green beans etc. into bite sized pieces
1 cup tur dal/pigeon peas
1 cup rice or quinoa
4-5  tsp bisibele bhath masala
1 tsp tamarind pulp (you can use store bought pulp or make fresh paste)
salt to taste
6 cups water


Method
Mix the dal and rice/quinoa and rinse the mixture 2-3 times with water and set aside.
In a pressure cooker, heat the oil and add the mustard and cumin seeds. Once they start to crackle, add the hing and curry leaves and chillies. Next add the onions and let them cook. Once they start to turn a little brown, add the tomatoes and let this cook till the tomatoes are cooked through. Then add the diced vegetables mix and stir. Let the vegetables fry for a minute and then add the dal and rice/quinoa mixture and mix all the ingredients well. Then add the bisibele bhath masala to this and again mix well so that all the vegetables and grains are coated with the masala. Then add the water, the tamarind paste and salt. Stir once and then close the lid on the pressure cooker and cook it based on how much time it takes to cook tur dal in your cooker. It takes about 3-4 whistles in my cooker. Serve this hot with ghee/clarified butter, accompanied with some raita and chips or papad.


Tips
Bisibele bhath when hot is runny and very soft. It thickens as it cools down.
Quinoa is rather small, so when you rinse it, it is difficult to drain the water using your fingers or a colander. So I use a tea strainer to catch the quinoa and drain the water.
To make tamarind paste from tamarind, soak a lime sized ball of tamarind in a little warm water (just enough to cover it). You can even microwave it for 20-30 seconds. Then squeeze out the pulp and use the tamarind. Cut the green chillies lengthwise, so they will be easy to spot and you can remove it later. I generally taste a little bit of the water to determine if I need to add more salt or spices when I make such rice dishes.

Tuesday, July 3, 2012

Schezwan Rice

Once you know how to make Schezwan sauce, then it is very easy to make schezwan rice or noodles. I use a variety of vegetables, generally whatever is available in the fridge to create a stir fried vegetable based in which I add cooked rice or noodles dish. Then I mix in an appropriate amount of Schezwan sauce. Schezwan rice is once of my favorite Indo-Chinese dishes. I used to eat it weekly or even more frequently when I was in college. There was a small restaurant across from my college where they used to make the most delicious Schezwan rice. It was this  memory that made me experiment with Schezwan sauce ingredients and try to develop that taste. Of course, they added ajinomoto in the restaurant, which is an ingredient that I skip. Instead I use celery in the sauce as well as the stir fry vegetable base.


Ingredients
1 cup rice, cooked
1 tbsp oil
1/2 onion, diced
1 garlic pod, minced
1 celery stick, sliced
1 carrot, diced
1/2 red bell pepper, diced
1/2 green bell pepper, diced
6-7 green beans, diced
1-3 tbsp schezwan sauce
salt to taste


Method
In a large pan (which can accomodate the cooked rice), heat the oil. Add garlic and onions. Stir fry till the onion startes to look transparent. Then add the vegetables in the order of the vegetable that takes the longest to cook to the one that takes the least amount of time. Here it would be celery, carrots, beans, and bell peppers. It does not take too long to cook each vegetable. The vegetable needs to be cooked, overcooked and soft/mushy. So each vegetable will take about a couple of minutes. Once all the vegetables have beeen cooked, add the cooked rice to it and stir well to mix the vegetables in with the rice. Then add the schezwan sauce to the rice. Add a little at a time to avoid getting it too spicy by adding too much at a time. Best way is to mix the rice and sauce well and taste as you go along. Once you have added enough sauce, adjust the salt. Serve hot.


Tips
If you have used deggi or kasmiri chilli powder in the sauce, you will be able to achieve a slight red color without adding food coloring. When you cook rice, add a little salt to it so that it is well distributed in the rice. Don't add a lot of salt, as the sauce has salt in it too. So final adjustment for the saltiness should be done at the end of the recipe. Cool the rice after cooking it. Try and separate out the grains before the rice cools down. This will help the rice grains stay separate instead of being stuck to each other. 

Tuesday, May 22, 2012

Vegetarian Burrito- An Incredibly Flexible Recipe

This is one of those easy recipes that you can pull together with ready made, store bought ingredients or make most of them a day previously and put them together when you are ready to eat. Another great feature of this recipe is that it is very flexible. You can change many of the ingredients based on what you have in the pantry and your fridge. The main components are tortillas, rice, beans and you can add different vegetable and salsas and make it as decadent or as healthy you want. You will notice that a lot of ingredients in this recipe are optional or ones that can be substituted for something else.


 Ingredients (for 1 burrito)
1 large tortilla - whole wheat/ flour/ corn
2 tbsps cooked rice
2 tbsps cooked beans - red or black beans (can use canned or read tips)
1 tbsp fresh salsa
ready made salsas- to taste (optional)
hot sauce - to taste
avacado (can be used instead of guacamole- optional)
shredded cheese - mexican blend/mozarella/cheddar
sour cream (optional)
guacamole (optional)
pinch of cumin powder
bell pepper, sliced- green, red/orange/ yellow (optional)
onion, sliced (optional)
1 tsp oil
cilantro
salt, to taste


Method
In a pan heat the tsp of oil and once hot, add the sliced onion and cook till softened and light brown. Then add the sliced bell pepper and cook till the bell pepper is cooked through. Alternately you can also cook this on the grill for a smoky flavor.

Add a little oil (optional) in a pan and then add the cooked beans to the pan with a little water (about 2 tbsp). Then add the cumin powder to it and a little salt to flavor these beans. Set them aside. It is now time to assemble the burrito.

Warm up the tortilla. In the center, add the cooked rice. Top it with beans and then add the cooked onions and bell pepper mixture. Next add the salsas that you want. These can be fresh or store bought. Then add guacamole if you have some ready or avocado. It gives a nice decandent taste to the burrito and you can easily skip the sour cream. Then add a dollop of sour cream and sprinkle cheese on it. If you like your burrito hot, then add some hot sauce into the burrito itself. Sprinkle a little cilantro. Then fold the burrito to create a neat packet. A complete meal created in a matter of minutes.


Tips
You can use canned beans, which are pre-cooked. If you want to start from scratch, then soak the dry beans overnight and then cook the beans with water in a covered pan, by boiling it till the beans are softened. Or you can cook the soacked beans in a pressure cooker. It takes about 5-10 whistles in my cooker depending on how well the beans have been soaked and is much quicker than waiting for it to cook in the pan.
The grilled pepper and onions mixture is called Fajita and you can even grill these.  The grilled smoky flavor really flavors the burrito. This addition is optional.
Guacamole or just plain avacado adds a buttery rich taste and is a great substitution to the sour cream. The plus point is that avocado has healthy fat, rich in omega 3. You can also whip up some yogurt and use it instead of sour cream.
When you cook rice, add a little salt to flavor the rice and then you can mix in chooped cilantro into the warm rice which will impart a nice herby flavor to the rice. You can also squeeze some lime on it for additional flavor.
You can also use chapatis instead of tortillas.

Saturday, June 4, 2011

Lemon Rice - Tangy and Spicy

Rice is an integral part of every meal in India and there are many recipes to spice up the rice and make it more interesting. Right from the rich biryani preparations to the every day lemon rice, tamarind rice and tomato rice. These are just a few examples of the vast number of rice dishes that can be found in India. As one travels through India and moves south, one will notice that the prevalance of rice increases.  I really enjoy the tangy preparations of rice like lemon and tamarind rice. It was only after I tasted the lemon rice made by a friend that I realised that if the lemon juice is cooked prior to adding the rice, the end product is significantly better. So thanks to her, I now know how to make this recipe so that the end result has an authentic taste.


Ingredients
1/8 tsp mustard
pinch of hing/asafoetida
1/8 tsp turmeric
1 tsp urad dal
1 tsp chana dal
5-7 curry leaves
2-3 tbsp peanuts
1-2 green chillies to taste, slit lengthwise (if you don't have green chillies, use dried red chillies - this is what I used in this recipe)
1/4 cup lemon juice
salt to taste
1 cup rice, cooked


Method
Heat the oil and add the mustard seeds. Once the mustard seeds starts to crackle, add the hing, urad dal, chana dal. Cook the dals till lightly browned and then add the curry leaves, green chillies and peanuts. Stir and cook for a minute and then add the lemon juice. Add a little salt and cook this mixture till the lemon juice starts to boil and then turn off the heat. Add a little lemon mixture to the rice and mix well. Add more as needed till the rice gets the right amount of tanginess. Adjust the salt as needed.


Tips
You can cook the lemon mixture and store it in the fridge for upto two weeks, without it getting spoilt. This is a wonderful way to spice up leftover rice and make a quick meal. Add more lemon mix to the rice if you want a sour and tangy taste. Lemon rice is a preparation that will stay fresh for about a day or so without refrigeration and is a common food packed during travel. To cook the rice in the pressure cooker use twice the amount of water compared to the rice and cook for 1 whistle or if using the Instant Pot use the rice mode, or 5 minutes manual, high pressure mode and let the pressure fall naturally.

Sunday, May 8, 2011

Puffed Rice Sweet Balls - Kurmura/Murmura Ladoo

This is one of the simplest recipes which takes me right back to childhood. I remember these puffed rice sweet balls that I used to love as a little girl. My mom made these often and it was a delicious treat that I used to look forward to. Now that I have a little girl, I thought this would be the perfect recipe to make with her. And was I right! Both of us had a marvelous time measuring out the ingredients and mixing them together. She enjoyed eating these treats as I rolled them out. This is a recipe that can make any day seem special. You can use this recipe to spend a nice time mixing things, getting messy, tasting as you eat and just having a lot of great fun. I hope you and your kids enjoy this recipe, just as much I did as a child and now do as a mom. Dedicated to my dear mom on Mother's day. Happy Mother's Day to all you wonderful moms out there.


Ingredients
1 tsp ghee/ clarified butter
1 cup jaggery, grated or cut fine
3 cups puffed rice/kurmura/murmura
2 tbsp dal/dalia (roasted chana/gram dal)
3 tbsp peanuts, unsalted


Method
Heat the ghee in a pan, then add the jaggery and let it melt. Once, the jaggery starts becoming frothy, turn off the heat. Add the puffed rice (kurmura), peanuts and dal and mix it all together. Let it cool so that it's easy to handle. Then take a fistfull of this mixture and roll it into balls. (Caution: The mixuture gets very hot, so make sure you let it cool a but before rolling it into balls.) The mixture cools down rapidly and you may not be able to roll all of it into balls. If you are unable to roll it into balls before it cools down completely, then eat the sweet puffed rice as is.


Tips
Coat your hands with a little bit of ghee so that the puffed rice mixture doesn't stick to your hand. The mixture will not roll into balls once it cools down completely.