Welcome to my blog

I hope you will find the recipe you are looking for your occasion here.

Now video instructions are available for select recipes and can be accessed at

Gardening and Cooking Made Easy

The latest 5 recipes are displayed on the
main page. For more recipes, you can browse the archive, click on the labels in the index to the left or use the Custom search below to look for a specific recipe.


Search for more results

Custom Search
Showing posts with label gluten free. Show all posts

Thursday, September 12, 2019

A Hybrid of Gyoza/Potsticker/Springroll - gluten free

Every year I make ukadiche modak (steamed rice flour covered modak) at least once and most of the times I end up with left over rice flour dough. I usually save this extra dough by covering it with plastic wrap and keeping it in an airtight container. Most of the times I make some more sweet stuffing and then use the leftover dough to make more modaks. However, this time I didn't want to indulge in more sweets and wanted to use the dough for something else. We had eaten gyozas a couple of weeks earlier and I thought why not make something similar using this dough. The filling I made was similar to the springroll filling and the resultant hybrid gyoza-springroll was crispy and delicious. I plan to use this recipe often instead of using rice flour dough only for modaks.


Ingredients
1 cup rice flour
1 cup water
1/8 tsp salt
1 tsp ghee
1 small onion or 1/2 onion finely chopped
1 carrot finely grated
1/4 cabbage finely shredded
5-6 green beans, finely diced
3-4 garlic cloved, finely minced
1/2 inch ginger, finely grated
1 green chili, finely diced (optional)
2 tbsp oil
1 tsp vinegar
soy sauce to taste
salt to taste
chilli sauce to taste


Method
For the dough
To make the rice dough, bring the water to a boil in a deep saucepan, add ghee and salt.  Once the water is boiling, add the rice flour, stir and turn off heat. Cover this and keep aside for 10 mins. Then knead the dough while still warm but can be handled without getting burnt,  till it is glossy and shiny.
Your dough is ready. Cover with a towel and keep aside.

For the filling
Heat oil and add the onion, green chili (if using), ginger and garlic and cook till onion is translucent. Then turn up the heat and add all the other vegetables one at a time starting with the green beans, carrot and then cabbage. Stir fry till the veggies are cooked but still crunchy. Add the vinegar, salt, soy sauce and chili sauce. Taste and adjust seasoning. Turn off heat and let this cool down.

To make the gyoza
Take a ball of dough, about a fistful, and shape into a smooth ball. Flatten it make a disc and then using your fingers, thin this disk as much as possible to create a flat round thin disc. The dough should be thin enough that it doesn't break.

Then put 1-1.5 tbsp of filling on one side of the center leaving enough space around the edges,  to fold the disc onto itself in a semi circle and seal the edges. You can pinch the edges down to make a design. You can also shape this into a modak shaped dumpling.

To cook, heat a broad saucepan (ceramic or nonstick will help prevent sticking), and add 1 tbsp of oil to the pan. Once it heats up, place the gyozas on the pan and let one side cook till the side starts to brown a little and releases from the pan easily. Then flip it over. Add 1/4 cup of water to the pan and cover the lid immediately. Let this steam on medium heat till all the water evaporates (3-4 mins). The water will splutter, so be careful during this step. Then, remove the lid and let the gyoza brown. Flip and make sure both sides are golden brown. Serve hot with a sauce of your choice (gyoza, or springroll sauce).


Tips
Use a food processor, if available,  to knead the dough this so that your fingers don't burn.
Friday, July 20, 2018

Vegan, Gluten Free, Sugar Free Chocolate Cake

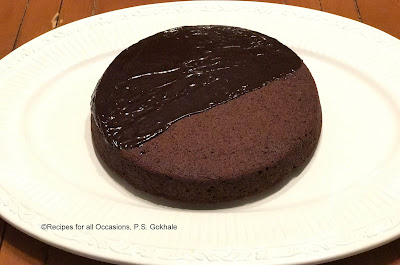
I recently made two cakes to share at a potluck where several folks had allergies or diet restrictions. The first cake was a banana ragi cake (which will be shared in a separate post) and this chocolate cake.
This cake is very versatile and ingredients can be swapped as provided in the ingredients list below to make it free of a specific allergen or all of them.
This cake is vegan, gluten free, nuts free and sugar free. It is delicious. The ragi and buckwheat with chocolate do give the cake a slightly earthy smell, however you can use wholewheat flour for a cake that only smells of chocolate, if you do not need it to be gluten free.

Ingredients
Cake
1 1/2 cup buckwheat flour or nachni satva (ragi malt) or ragi flour (finger millet) or wholewheat flour (if there is no need to be gluten free)
3/4 to 1 cup date paste- adjust based on sweetness of dates. (12 large mejdool dates, cooked with water in the microwave and puréed). If you do not have dates, then you can use 1 cup sugar.
1/4 cup unsweetened cocoa powder
1/2 tsp salt
1 tsp baking soda
1 tsp vanilla essence
1 tbsp vinegar (white or apple cider)
1/3 cup olive oil (not extra virgin) or any oil that you use for cooking
1 cup cold water
Icing
1 cup chocolate chips (dark chocolate if you want it to be dairy free)
6 tbsp water
Method
Cake
Butter a baking pan (8/9 inch round) and pre heat the oven to 350 F.
Mix dry ingredients together thoroughly. Whisk them or sieve if necessary. The baking soda must be well dispersed through.
Mix wet ingredients together and whisk them together till well mixed.
Make a well in the center of the dry ingredients and pour the wet ingredients mixture into the dry ingredients and whisk together till completely mixed. You will see the baking soda starting to react with the vinegar.
Immediately pour into the baking pan and bake at 350 for about 30 min. Use a toothpick or a knife to check if completely cooked. Pierce the cake in the center and if the toothpick/knife comes out clean, the cake is completely baked.

Icing
Mix the chocolate chips and water together and microwave for 30 seconds intervals (about 1-2 mins) till all the chocolate chips melt and then whisk it well till it looks shiny. Then pour it over your cake.


Tips
Work with the batter quickly. The baking soda and vinegar reaction makes the cake spongy. So put it in the over immediately after mixing the wet and dry ingredients. If you want the cake to be sweeter, then drizzle the cake with honey or maple syrup after it has been baked.

Sev Khamani

This is usually made with chana dal batter and is delicious.  I had made a mixed dal batter earlier in the week and had been making different things from it- idli, dosa, pizza base. So, I decided to use it to make sev khamani and it turned out great. No one realized that they were eating the same batter that had been used to make dosa the previous night! And it is a protein rich, delicious item which can be served stand alone and will make a complete meal. Or you can serve it as an item on a chaat menu. This is also a gluten free dish.


Ingredients
1 cup each of idli rice, tur dal, urad dal, mung dal, chana dal - soak for a few hours and grind it to make a thick batter (idli consistency)
Ferment overnight.

For the khamani
3 cups of the fermented batter
1/4 tsp turmeric
Salt to taste
For seasoning
3 tbsp oil
1/4 tsp mustard
1/4 tsp jeera
1/8 tsp hing
6-7 large garlic cloves, finely minced
2 tsps sugar, adjust to taste
Juice of 1 lime, adjust to taste
Thin besan sev (one used for bhel)


Method
Grease a bowl with some oil and pour the batter in. Add the salt and turmeric and stir well. Then steam cook it for 20 mins, till it sets (like dhokla or idli). Remove the bowl, let it cool a bit and the break up the cooked batter with the help of a spatula. If it is warm it will be soft and clumpy and won't separate into small pieces but that's ok.
In a large saucepan, heat up the oil and and the mustard and jeera seeds. Once you hear them crackle, add the hing and the garlic. Sauté the garlic for a minute or two and then add the cooked batter pieces and mix well with the seasoning. Now cook this on a low medium heat till the mixture starts to dry up a little and starts separating into smaller pieces instead of being stuck together in large clumps. Since the batter is already cooked, this just provides the texture. Before turning off the heat, add the sugar and lime juice and mix well and turn off the heat. The taste should be sweet and sour and garlicky.
And as it cools down the batter will stiffen and provide the right shev khamani texture.
Now pour this into your serving platter and sprinkle the besan sev liberally on it. Garnish with cilantro. If available add pomegranate seeds as a garnish.


Tips
You can make a different combination of dals and try the recipe.

Sunday, February 26, 2017

Dark Chocolate

I love chocolates and all kinds of chocolate desserts. My favorite these days is a piece of really good quality dark chocolate. Just a small piece is enough as long as it is good quality. In my quest to try and make everything at home, I decided to try my hand at making chocolate at home. I first tried my hand at making milk chocolate using my Mom's recipe and it was a resounding success. The kids loved it. After that success, I decided to buy a packet of good quality cocoa butter and try out my hand at dark chocolate. I scoured the web for recipes and methods. My first try was with equal proportion of cocoa butter and cocoa powder and cold maple syrup. It tasted great but did not set well and remained soft even after keeping it in the fridge for a while.

So I went back to research the factors on which the texture of the chocolate depended. The main variables seem to be the proportion of cocoa powder to cocoa butter, and the temperature during the process of making chocolate and how quickly it is set. So with a better understanding of these factors, the tempering process (which makes the chocolate set in a crystalline pattern which provides the much needed snap), and the seeding process (by which the crystalline structure begins development), I decided to give it another go and this time the results were much better. The chocolate set beautifully and got the correct texture.  I also used chocolate molds and this gave the chocolate a gourmet look. The taste was also rich and I needed only 3 ingredients.

After this successful experiment, I plan on using a thermometer to better manage the tempering process and also trying different flavors. And of course I will post updated recipes with details to make it easier and foolproof for you to get the perfect dark chocolate.


Ingredients
1/4 cup raw cocoa butter
2 tbsp cocoa powder, dutch processed, unsweetened
4-5 tsp maple syrup


Method
Sieve the cocoa powder to remove any lumps and set aside. Finely chop or grate the cocoa butter. Fill a small saucepan with about an inch of water. Heat it up till you can see bubbles on the surface and then reduce the heat to low. Place a glass or ceramic bowl, which is heat proof and can be used in the oven or microwave, on the saucepan. The bowl should be large enough to completely cover the saucepan opening. This set up is called a double boiler and is used to provide indirect heat to the chocolate so that it doesn't overheat. Add the cocoa butter to the bowl and once you see it start to melt, warm up the maple syrup for 15 seconds in the microwave. It should be at room temperature or lukewarm. Once the cocoa butter is completely melted, add the maple syrup and stir, so that it is well mixed and a homogenous liquid.

Take the bowl off the saucepan and wipe the base of the bowl which has a layer of the condensed water. Turn off the heat and move the saucepan off the stove top. Now add the cocoa powder and stir well till you get a beautifully dark glistening liquid which takes about a 20 seconds to a minute. Pour this into the chocolate mold and then keep it in the freezer for 10-20 minutes till completely set. Remove the chocolate from the mold by following the instructions on the mold package. Store in fridge.


Tips
Make sure that not even a drop of water falls into the mixture during the process, as this will cause the chocolate to seize and then the chocolate won't set and will become a mess. Use a glass or ceramic bowl rather than a steel bowl as it seems to help maintain the heat better. If you do not have a chocolate mold, you can use cup cake liners as molds to shape the chocolate. Else you can pour it in a pan and let it set as a chocolate slab and break it into pieces.

Monday, October 10, 2016

Jowar Bhakri - Bhakri made from Sorghum Flour

Jowar or Sorghum is a gluten free grain and is delicious. While growing up my mom made bhakris (tortillas) using jowar flour and we used to eat it with pithla and phodni. It was absolutely delicious! My mom has great bhakri making skills and kneads the dough as she goes along while making the bhakris.  She makes an individual dough ball, pats out the bhakri without it breaking and then cooks it. It puffs up beautifully and is a delicious treat.


I have been trying to make the perfect bhakri for almost the past decade and have finally succeeded. One reason I was told that it was difficult to make the bhakri here was that the flour available here is not fresh and since it is already gluten free, it is difficult for it to stay together as it is patted out.  I tried making bhakris using the technique I had seen my mom use for the the longest time but the bhakris were never that great.

I finally created this technique which is an absolute foolproof way to make bhakris. Each one will always turn out perfectly round and puff up while cooking and be soft and delicious. There is no longer reason to blame the flour or lack of practice or lament about the wonderful bhakris we once ate. Follow this easy foolproof method and make bhakris a part of your daily repertoire.


Ingredients
2 cups water
2 cups sorghum or jowar flour
1/2 tsp salt


Method
Bring the water to a rolling boil. Add salt to the water. Add the flour to the water and turn off the heat. Take the pan off the heat and stir the flour in and cover the pan with a lid for a couple of minutes. Once the mixture is a little cooler and easier to touch, knead it into a smooth dough. Cover it with a damp towel as you make the bhakris, so that the dough doesn't dry.


Line a tortilla press with cling wrap or a plastic ziploc bag cutouts so that each surface is lined with the plastic. Now take a fistfull of dough and roll it into a smooth ball.  Place it on the tortilla press so that it is on top of the plastic covering the lower surface of the press. Then making sure that the upper surface of the tortilla press is also covered with plastic wrap, press it down onto the dough ball, flattening it into a round circle.


Heat a pan/tava/cast iron flat pan. When hot, place the flattened bhakri/tortilla onto the pan and let it cook on one side. Once it is cooked, you will be able to flip it over. While cooking, it sticks to the pan and if you try to flip it, you will break it. So wait for it to separate from the pan and flip it over and cook the other side. Then flip it again pressing the tortilla gently till it starts puffing up. Cook it so that it has some brown spots on both sides of the tortilla. Serve it hot with a gravy, pithla, jhunka or some butter.


Tips
If the dough seems to be cracking or getting dry, add a few drops of water and knead again till smooth. Make sure to keep all uncooked dough covered with a damp towel. If you don't have a tortilla  press, you can use a flat cutting board and then use a heavy flat bottomed pan/cooker to flatten the dough ball into a tortilla. Make sure to place the dough ball between two plastic sheets so that the tortilla doesn't stick to either surface.

Wednesday, March 5, 2014

Caramelized Sweet Potatoes - No Sugar Added

Sweet potatoes is a root vegetable which is loaded with nutrients. It is very popular in India as a food to be eaten the days when one is fasting. Growing up I ate several versions of this. Boiled with milk, boiled with sugar sprinkled on it, and also cooked in ghee, with sugar. The one cooked in ghee was my  favorite version of this until I came across this recipe. This has got to be the best recipe that I have come across for cooking sweet potatoes. Before this, I hadn't realized how sweet, sweet potatoes really are. This is a recipe from my Cook's Illustrated book, that I came across when I was trying to select sides to go with a meal I was making, when entertaining a few friends. It was a festive occasion and I wanted to make an elaborate meal with new dishes. This is an easy, recipe. The cooking time is lengthy, but the preparation time is very short and there is really very little you have to do when the potatoes are cooking.

I made this the first time around, but ever since then, my husband has always made them and he will always get sweet potatoes every time he goes grocery shopping. It is so delicious and sweet, that you could also eat it as a dessert sometime. And it is completely sugar free!! Can you believe it? If not read on and do give it a try. This is my favorite sweet potato recipe and it may become your favorite recipe too!


Ingredients
4 large sweet potatoes
1 tbsp oil
salt to taste
pepper to taste


Method
Wash the sweet potatoes thoroughly, scrubbing them well to remove any dirt. You can leave the skin on or peel them. Cut these into 1/2 inch thick disks, discard the ends. Drizzle the oil on it, sprinkle some salt and pepper on it and toss these well together, to coat all the slices.

Line a baking sheet with foil. Spray oil on the foil. Line the potato slices in one layer on the foil. Then take another piece of foil and cover the baking sheet with this foil, crimping it on the sides with your fingers, so that it is nicely fitted around the sheet and forms a seal.
Now place this baking tray on the center rack of your cold oven. Do not pre-heat the oven. Once the potatoes are in the oven, set the temperature to 425F and let these potatoes cook for 30  minutes. Then remove the tray from the oven. Remove the foil covering the potatoes and then place the tray back into the oven for 10-20 minutes. Keep a check on the potatoes after 10 minutes and once you see the bottom of the slices caramelizing, remove it from the oven. Then flip all the potato slices and cook these for another 10-20 minutes till the slices have caramelized on the other side.

Serve warm, though these taste great even when cold.


Tips
You can scale this recipe up or down easily. Just make sure to scale the oil accordingly. You need a quantity of oil that is just enough to coat the slices.

Make sure to clean the potatoes really well if you plan to keep the skin on. Spraying the foil is important to make sure the potatoes do not stick to the base as they caramelize.
Once the caramelizing process starts, it is important to keep a check on the potatoes, as they can burn easily. Hence the range of 10-20 minutes is given. I have sometimes seen caramelizing occur in 10-12 minutes and sometimes at 18 minutes depending on the number of potato slices being cooked.

The original recipe called for the potatoes to be peeled and the oven to be cold at the start of the cooking process. However, through the months that we have made this, we have been successful at getting a great end result even with leaving the skins on and putting the potatoes in the oven after it had preheated to 425F. We have even cooked it with covering it with the foil and the result was still delicious. So, overall I think this is a very forgiving recipe and an easy one to make.

Tuesday, December 24, 2013

Chicken Tikka Masala

I am fairly new to the art of cooking chicken, though I have been eating it all my life. I finally decided to take the plunge and start cooking it at home. The main  motivation was to be able to control the quality of the meat that was being used. Another was being able to control the spice and taste levels of the chicken being served. I have tried Indian style chicken dishes in many restaurants but find most of them lacking in spice and flavor. There are just a couple of places that cook chicken curries well, but they don't come close to the taste of the food that I ate when growing up. The results have been great so far and my family has been very happy being taste testers, as I cook up new dishes.

When I decided to take the plunge and start cooking chicken, I had no clue about how to buy the chicken, whether it needed to be cleaned and how I could check if the chicken had been cooked completely. So, I looked to family, friends, and the internet for help. After reading up on it for a while, and taking advice from several people who cooked chicken very frequently, I finally was able to cook my first piece of baked chicken breast. Once, I had the basics down, I was able to move onto experimenting with marinating and making tandoori chicken and finally start cooking chicken gravies.

I have always loved eating chicken tikka masala and butter chicken in restaurants and decided to make chicken tikka masala as my first curried chicken recipe. It turned out great. In fact, we finished the entire dish in one meal, with no leftovers.

Note: For my tips on how to buy chicken, see the Tips section below.


Ingredients
1 skinless, boneless chicken breast (the one I used was about 10 oz/ half pound)
1 onion, cut into thick slices (to be used to bake the chicken)

marinade for the chicken
1/2 tsp salt
1/2 tsp cumin/jeera powder
1/2 tsp corriander/dhania powder
1/2 tsp cayenne pepper/red chilli powder
1 cup yogurt
1/2 inch ginger, grated
3 cloves of garlic, miced/grated
2 tbsp oil
1 tsp garam masala
2 tsp lemon juice

for the gravy/curry
2 tbsp oil
1 onion, finely diced
1 tsp ginger paste or 1/2 inch ginger, grated
2 cloves of garlic, minced/grated
2 tsp garam masala
1 tbsp tomato paste
1, 14 oz can of tomatoes, approximately 4-5 tomatoes, diced
1 tsp butter
1/4 cup yogurt, whisked well till smooth
salt to taste
1 tsp sugar
1/2 - 1 cup water


Method
Mix the salt, corriander powder, cumin powder and cayenne pepper together and make a spice rub.
Cut the chicken into strips of similar size, so they cook evenly and take around the same time to cook. Pat each chicken piece dry and sprinkle some of the rub on both sides of the chicken piece and place in a glass container. Keep this in the fridge and marinade the chicken pieces in the spice rub for about 1-2 hours.
Next, whisk together the yogurt, ginger, garlic, oil and garam masala. Pour this mix over the chicken pieces and coat the chicken pieces in this yogurt mixture. Keep the container back in the fridge and let it marinade for an additional 3-4 hours.


Preheat the oven to 400 F. Take a baking tray with sides and line it with foil. Slice the onion into thick slices and layer them at the base of the foil covered tray, creating a bed of onions. Layer the yogurt coated chicken pieces in a single layer on top of this onion bed.  Discard the excess yogurt. Bake the chicken in the oven for about an hour or till the temperature registers 165 F.  When you bake the chicken, the moisture from the yogurt keeps it moist and succulent. Alternately, you can also skewer the chicken pieces and broil the chicken for about 20-30 minutes. Check the chicken temperature which should be 165F. This will give it the authentic chicken tikka texture, however the meat does get a little dry.


Start cooking the gravy when you start cooking the chicken. Heat the oil and add the diced onion to it. Cook this till it is golden brown in color. Next, add the tomato paste, garam masala, ginger and garlic paste. Cook for a couple of minutes till the ginger and garlic are well cooked. Then, add the tomatoes and cook them for a few minutes till the tomatoes are cooked down. Add a little water to the gravy and let it cook for a couple of minutes. Then add the yogurt mixture to the gravy and cook it for a couple of minutes. Turn off the heat and once the gravy cools down a bit, puree it. Pour it back into the pan and then let it boil. If the gravy is too thick, add a little water to thin it down. Add salt, sugar and butter and let it simmer.

Once the chicken is cooked, let it rest for a few minutes. Then, cut the chicken strip into bite sized pieces (about 1/2- 1 inch) and then add it to the hot gravy. Do not simmer the chicken in the gravy.

Serve hot with warm rotis or white rice, along with a side of sliced onions, and lemon slices.


Tips: If you do not have tomato paste at home, you can use tomato ketchup. If you are using fresh tomatoes, blanch them and peel the skins. To blanch them, boil some water. Add the tomatoes one at a time to the boiling water and let it remain in there, till the skin of the tomato starts to break up. At this point, remove the tomato and put it into cold, ice water. Once the tomato is cool to touch, you can easily peel the skin out and then use the tomato.
Lining the pan with foil, makes it easy to clean up after the chicken is cooked. To measure the temperature of the chicken, insert a meat thermometer, into the thickest part of the chicken.

Chicken buying tips: If you are beginner like me, and not comfortable with cutting up the chicken, then the easiest method is to go to the meat department of the grocery store and speak to the butcher. Generally, someone there will help you select the meat, even cut it for you and give you advice on how to store the chicken. I was told that if you do not intend to use the chicken in the next 2-3 days, then to freeze it for up to 5 days. After 5 days the chicken can get freezer burns and is no longer good to use.

Make sure to clean your hands, the cutting board and the countertop well after handling the chicken to avoid cross contamination with other food. A plastic cutting board is easier to clean. Use a separate cutting board to cut the vegetables. Do not reuse the cutting board or knife used to cut the chicken without cleaning it thoroughly with soap and hot water.

Wednesday, May 1, 2013

Butternut Squash Soup

I have been unable to update the blog during the past couple of months. However, it was for a very good reason. I participated in my first Art fair where I presented jewelry designed and created by me. So, I spent most of my nights and weekends working on these jewelry  pieces. It was a great experience and it felt good that so many people appreciated my work. I have also been working on my first video post, but that still needs a bit of work, before I can publish it. So, that is something else that I am looking forward to. With those updates I will go onto the recipe.

This is a wonderful, velvety soup. Butternut squash is a kind of pumpkin that can be found in the grocery stores almost through the year. I use it to make a pasta sauce, as well as, stir fry it. It also makes a great side dish. It makes the most delicious soup. The sweet taste of the squash is balanced using the onions. This is a great winter soup and since it is a thick soup, it can also be a light meal. 


Ingredients
1 butternut squash
1 small red onion or 2 shallots, diced
1 tbsp butter or oil
2-3 cups of water/vegetable broth
salt to taste


Method
The butternut squash has a very tough exterior skin and it is difficult to slice it through or to peel it. So be careful when you are handling the squash. Cut the squash along the length of the squash. Remove the strands and the seeds at the center of the squash. Apply a little oil to the squash (inside and out) and then bake the two pieces, cut side down, in the oven at 350 F. Alternately, make a few more pieces and pressure cook the squash. It takes about 30-40 mins for the squash to get cooked and softened in the oven and about 15 mins in the pressure cooker. Then, take the squash out and once it cools, scoop out the squash with a spoon. Discard the skin/peel. 

In a saucepan, heat the butter and add the diced onions. Once the onion is cooked and softened, add the scooped out squash. Cook the butternut squash for a couple of minutes and then add the water or broth. Add salt. Let it boil for a minute and then puree the mixture, till you get a fine velvety consistency.  This is a thick soup and it will taste watered down if it is made too thin. Garnish with some cream and pumpkin seeds. Serve hot.


Tips
The easiest way to remove the strands and seed is to use a spoon with sharp edges and scoop it out. If the soup is watery, boil it for a few mins. You can also dissolve a little cornflour in water and then add the paste into the soup to thicken it if it is too thin. If it is too thick, then add some additional water.

Tuesday, February 5, 2013

Green Peas Gravy - A Rich Peas Preparation for Special Occasions

This is a recipe made using fresh green peas. I remember the good old days, when I used to spend, what seemed like hours, shelling peas with my mom. When the peas were tender and sweet, most of them used to end up going into my mouth rather than the bowl. And it always seemed unfair that the heap of shells used to be much larger than the small mound of peas in the bowl. Ah the good old days. I haven't done this for several years now because all I can find in the way of fresh peas in the local grocery stores in the US are snap peas or snow peas. These are so tender, that the peas are barely formed and they are meant to be eaten, shell and all. The frozen peas, which I use instead, are a great convenience and make it much easier to make any dish with peas. However, these are generally sweet and not best suited for spicy curry preparations. But one must make do with what one can find and try to make the best of it.
I am always on the look out for fresh peas, shelled or un-shelled and am hopefully that I will run across this sometime soon.


This is my Mom's recipe and a fantastic one. It needs time and preparation before you can start the cooking process, and the cooking process is lengthy as well, but the end result is finger licking delicious. If made with fresh peas and fresh coconut,  a lot of manual labor is involved, in terms of shelling peas and grating the coconut. That was probably the reason that my Mom made it as a treat and it has been my most favorite peas preparation to date. It tastes amazing with puris or hot chapatis and I too save it for celebratory occasions when I have time to make it right. The last time I made it was a few months ago when I had invited my friends over for lunch and it was a great hit. I hope you make it and it becomes one of your favorites too.


Ingredients
1.5 tbsp oil
1 large or 2 medium red onions, diced finely
1 cup fresh coconut, grated
1 tbsp ginger garlic paste
1-2 green chillies to taste
1/8 tsp jeera/cumin seeds
2 tsp garam masala
1 tsp dhania jeera/ corriander cumin powder
1/8 tsp turmeric
2 cups frozen peas, washed
salt to taste
2 tbsp to 1/4 cup water to grind ingredients
1- 2 cups water for the gravy


Method
Grind together the coconut, green chilli, cumin seeds and some salt. Add water to the mixture depending on your blender. Add as little as possible to get a smooth paste.
In a pan, heat oil and add the onion to it. Fry the onion till well cooked. Then add the coconut paste as well as ginger and garlic. Fry this mixture, stirring the ingredients often so they don't burn, till it is well browned. The ingredients need to be so well cooked and fried, that you can see the oil start to separate out.  Do this on low heat. If this is done on high heat, the ingredients at the base of the pan will start to burn while the ones at the top will remain under cooked. Then, add the turmeric powder, garam masala and dhania jeera powder and fry this for a couple of minutes. Finally, add the peas and stir to cover them well with the spices. Frozen peas don't need a lot of time to cook through. Finally, add enough water to form a semi thick gravy. Add salt to taste and let the gravy boil for a few minutes. Serve hot with puris or chapati.


Tips
Since you cook the recipe on low heat, it takes about 20-30 minutes for the ingredients to brown. Avoid the temptation of turning up the heat. Cook it on a day when you have the luxury to spend a lot of time to prepare this dish.
You can also use fresh peas instead of frozen peas. If you use fresh peas directly, then it will take longer for the peas to get cooked through as they boil. To speed you the process, you can also boil the peas in a separate pot while your onion mixture gets cooked. Add a tsp of salt to the water. Use enough water to cover the peas. Cook till soft. Then, put them in a bowl of cold water to stop the cooking process. Drain and keep aside. You can use these instead of the frozen peas.

Saturday, January 5, 2013

Navratan Korma - A Royal Vegetable Dish

I wish all the readers of my blog a very Happy New Year. I hope 2013 brings you good health, happiness and great food. Since food tastes good only when the cook is happy, I hope each day of yours is filled with great joy which in turn will lead to tastier food.


I have been wondering what recipe I should start the new year with and I couldn't make up my mind. Should I start with a starter and follow through with a complete meal or shall I start with a decadent sweet? Well inspiration just struck and I sat down to pen down this wonderful recipe. This is a medley of vegetables, in a rich, flavorful sauce which is also a little sweet. The dish is called "Navratan Korma". "Navratan" means nine gems and "Korma" means a medley. So literally it is a dish which has at least 9 starring ingredients, mainly vegetables, fruit or dry fruit and paneer. It is cooked in a rich cashew based sauce traditionally with cream added to finish it off. I wanted to lighten the recipe. Also, as I was planning to serve this to many people, I did not want to use any nuts in case of allergies. It was a great success and I must say that I received the best compliments from my friend's nine year old who not only ate all the vegetables, but asked for seconds and told her Mom that this was one of the best vegetable curry she had ever tasted.


Ingredients
1 large red onion, finely diced
1 tbsp + 1tsp butter
3-4 canned whole tomatoes (puree it)
1 tsp corriander/dhania powder
red chilli powder to taste
1/8 tsp turmeric powder
2 tsp corriander-cumin powder (dhania jeera powder)
1 tbsp garam masala
2 tsp ginger garlic paste
1 green chilli, sliced into 2 pieces
1 potato, diced
1/2 red bell pepper, diced
1 carrot, diced
1/2 cup peas
1/4 cauliflower, florets separated into medium size pieces
1/2 cup  green beans, diced
6-7 baby corns, diced into 1 inch pieces (I used canned baby corn)
1/2 cup paneer, diced into 1/2 inch pieces
3-4 sliced of pineapple (I used the ones which are canned, but not in syrup)
1/4 cup raisins
1/4 cup low fat milk
3/4 cup cream
salt to taste
1 cup water


Method
Heat 1 tsp butter in a flat pan, sprinkle some salt and shallow fry the paneer pieces till they are lightly browned on all sides. Keep aside.


Heat the butter in a pan which will be able to accommodate all the vegetables. Add the red onion and saute it till it is softened and translucent. Then add the ginger garlic paste, and the green chilli and fry this till the raw smell goes away. Next, add the tomato puree and cook this mixture for a few minutes. Stir and do not let this brown. Then add the turmeric, garam masala, dhania jeera powder and dhania powder. Stir and fry these spices for 2-3 minutes. Then add 1/2 cup water. Then, add the potatoes, green beans, carrots, cauliflower and red bell pepper and boil this for a few minutes, till the vegetables a partially cooked through. Then, add the rest of the vegetables, the corn, pineapple, and the peas. And finally add the paneer. Cook all of the ingredients together till the all the vegetables, especially the potatoes and cauliflower are cooked through. Then, in a small bowl, mix the milk and cream together and slowly add this mixture to the gravy. Add salt and raisins and boil for a couple of minutes. Serve hot, with some naan or tandoori roti. You can garnish this with some grapes.


Tips
Feel free to choose any combination of vegetables. You can use fewer than 9 ingredients as well. If you do not want the sweet tinge, then don't add the pineapple and raisins. If you want a richer gravy, then soak 1/4 cup of raw cashews for a couple of hours and make a paste of these cashews.  Add this paste along with the cream instead of milk. You can also add yogurt instead of cream. Make sure to whisk it till it is smooth.
I used canned baby corn and pineapple. If you use the fresh version, then remember the cooking time will increase and you should either add it in along with the potatoes (specially the corn) or may be semi-cook these in the microwave for a minute before adding to the gravy.
If you don't have canned tomatoes, then you can use fresh tomatoes. To peel them, boil water, then add the tomatoes to the boiling water. As soon as you see the skin is starting to tear up, remove these and put them in a bowl of cold water (ice water is preferred). It will be very easy to remove the skins then.