Welcome to my blog

I hope you will find the recipe you are looking for your occasion here.

Now video instructions are available for select recipes and can be accessed at

Gardening and Cooking Made Easy

The latest 5 recipes are displayed on the
main page. For more recipes, you can browse the archive, click on the labels in the index to the left or use the Custom search below to look for a specific recipe.


Search for more results

Custom Search
Showing posts with label paneer. Show all posts

Monday, June 26, 2017

Paneer - Pressure Cooker Version

Paneer is a fresh cheese made by splitting milk into milk solids and whey water. This is the same method used to make Ricotta cheese and essentially they are the same. The main difference is that the store bought paneer is usually packed tightly and is in the form of a nicely shaped brick and can be grated or cut like any other cheese. This can be easily cut into pieces and these pieces can be fried without them melting. Store bought ricotta cheese has water content in it and melts easily. So, the water content of the final paneer that you make at home depends largely on how you plan to use it.

When the water is drained completely, it can be kneaded and shaped into a compact shape which can be cut into cubes. These can then be directly added or pan fried and then added to gravies/curries and these will not melt. If however water content remains in the paneer and it is molded into cubes, these will eventually melt when you cook them and will not hold up as cubes in the curry.

I had thus far always made paneer by boiling milk in an open saucepan and once it started to get to a boil, I used to add lemon juice or diluted vinegar to it to split the milk into paneer and whey. This method is detailed here. I decided to try making paneer in the cooker. I used diluted white vinegar as the acidic agent mixed in with the milk.  And it was just perfect.

Milk doesn't spill over when heated in the Instant Pot and anyway by the time the milk comes to a boil, it is already split and so there is no chance of boiling over even in a stove top pressure cooker.  In fact when I heated just milk under pressure in my Instant Pot, it was just perfect when I opened it up, even though there was no agent to split it up. It had not risen up in the inner pot and there had been no spewing over the top. Of course I had filled it only half way.


Ingredients
whole milk (see method for quantities)
vinegar - 1/4 cup diluted with 3/4 cup water ( I use white vinegar)


Method

Instant Pot (IP)
If using an IP, again, do not fill it more than 1/2 of the inner pot capacity. I use about 5 cups of milk. To this add the vinegar solution and close the lid. Close the vent and cook it in manual mode for 1 minutes on High Pressure. [I had earlier used the timing of 3 minutes but when I remade it, I set the timer to 1 minute and found that the paneer and whey had separated completely even with this lower timing. The paneer was softer too.]

Let the pressure release naturally and then open the lid. Or NPR for 10 minutes and then release the rest of the pressure by switching to vent. The paneer and whey will be separated.


Pressure cooker
If using a pressure cooker, make sure not to fill the cooker with more milk than 1/2 of the capacity of the cooker (this includes the volume of the added vinegar). It is preferable to keep it to 1/3rd at max to prevent any spraying from the top when the pressure is released (via the whistle mechanism). Add the vinegar water to this. You can also add lemon juice or yogurt (yogurt and lemon juice may not be as tart and could be ineffective if enough quantity is not added). I find vinegar to be the most reliable acidic agent. Heat it on medium high heat till it reaches pressure, then let it cook for a minute or two and  take it off the heat, let the pressure settle and open up to find the paneer and whey separated.

Molding the paneer
Drain the paneer using a linen cloth, rinse it with cold water, and then drain the water. Rinsing it in cold water helps to lessen the effect of vinegar and washed away any taste of the vinegar. Keep some weight on the paneer to drain all the water. Then knead it as it is usually granular to give it a smooth texture which will make it look like store bought paneer. If you know you are going to  use it to make savory dishes, you can add salt to the paneer at the kneading stage so that it is not bland. If you plan to use it to make sweets, do not add salt.
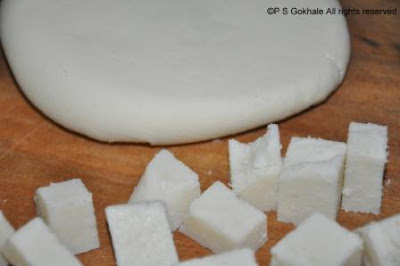
Then pat the kneaded paneer into a flat disc/flat rectangle and put it in the fridge for a couple of hours or more to firm up. You can also wrap it up in cling wrap.

Your paneer is ready. It can now be cut up into cubes or grated like cheese.

Tips
The whey water should be clear and has a greenish tinge. That is an indication that all the milk solids have separated out. If not, heat it up, and add a little more of the acidic agent to the milk. Make sure to use more quantity of yogurt or lemon juice (if using these as these are not as acidic or tart as vinegar. Do not dilute these).

I got about 180 gms/6.4 oz of paneer from 5.5 cups (approx 1/3 gallon) of whole milk (cow's).
You can use lower fat content milk to make paneer as well, but as the fat content reduces, the quantity of paneer extracted will reduce and the texture will also change and can be a slightly rubbery compared to the one extracted from whole milk. You can also use half and half to boost the fat content of the paneer.

Paneer is made the same way as Ricotta Cheese. When all the water is drained, then the paneer cubes will remain as cubes in gravies or curries. Before draining the water, you have ricotta cheese and this will melt. If water content remains in the molded paneer cubes, the paneer will disintegrate and melt into the gravy.

The longer you cook the milk solids in the whey water the tougher they get, so if you release the pressure after natural pressure release for a few minutes, you will get paneer with a softer texture.

Thursday, December 17, 2015

Shaam Savera - Spinach and Cheese Dumplings in Gravy

Those of you who are readers of the blog, know that I love cooking and entertaining.
All my friends know that I am a foodie. Last month my friend (K.J.) had invited us to a party at her house and naturally my first question to her was "What's on the menu?". She shared the basic outline of what she had planned but didn't want to reveal the big surprise that she had made for the day. I was curious and couldn't wait for the evening. We reached her place and her husband also told me that she had spent hours in the kitchen and that I would be absolutely taken by the dish. Finally, the wait was over and it was time to eat and time for the unveiling. The food spread was elaborate and she had made a lot of dishes and then she presented the surprise dish. What a spectacular sight it was!!! Not only was the dish absolutely delicious, it was beautiful to look at. It was a curry with beautiful koftas nestled in gravy.
After the party I asked her if there was any leftover, since everyone was raving about it. There was just a little left for me to photograph. I asked her if she would be willing to share this wonderful recipe and the process involved in making it. My dear friend graciously accepted to be a guest blogger and share her recipe of this gorgeous gravy with us. Not only did she write up the ingredients and the process, but also following the format of the blog, provided a great introduction and tips. So without much ado, here is the recipe in her own words.

Thanks K.J.!!!


"When Diwali- the Festival of lights is around the corner; I start planning the menu for the upcoming party. Every year I want to try out at least one dish that I have not tried before and which seems a bit challenging for me. That gives me a chance to explore in the culinary world. I’m always on lookout for new recipes; yet I would not consider myself as an expert in cooking at all. I like recipes which are simple to follow yet give an amazing end result. This year I joined ED group on Facebook; where lovely ladies share their recipes, pictures of the amazing food that they prepare and so on. Sometime back I saw one photo shared on ED, of the curry called –“Shaam Savera” and I really liked her presentation. I thought of noting down the recipe but as usual forgot about it. And when it was time for planning for Diwali, I thought making that dish. But alas, I couldn’t find that recipe on ED. And now my mind was set on it. So I started searching online, on YouTube, everywhere. Because to be honest I didn’t even remember that name of the curry; but just that photo and description of that curry in her post was good enough to mesmerize me. I remembered three vibrant colors- green koftas/fritters cut in the middle to reveal the soft inviting white paneer balls just dipped in the red smooth gravy; which was enough to get me into drooling. And as the fate would have it; I found a step by step video of Sanjeev Kapoor explaining this very recipe. I was so ecstatic to find this recipe and I followed most of his recipe; with added twist or rather cheat sheet to make this dish to give my touch to his wonderful recipe. So here it is.


Ingredients
For the koftas

1 lb Spinach,
2 green chilies
2  tbsp garlic, finely chopped 
salt to taste,
1/4 tsp turmeric,
1 tsp cumin
¼ cup of chickpeas flour (besan)/rice flour,
1/2 lb paneer
2 pinches cardamom powder
corn Starch just enough to roll the koftas,
oil to deep/shallow fry the koftas

For the gravy:-
2 cans Tomato Sauce,
¼ cup heavy cream,
¼ cup golden raisins,
2 tbsp of poppy seeds,
cashews (optional, I didn’t use them),
1 pinch cardamom 1 pinch,
1 stick cinnamon 
salt,
honey,
1 tbsp clarified butter/ghee

Procedure
For the koftas
Boil a large potful of water. Once it starts boiling, add the spinach, put the lid on and turn off the heat. Let it get partially cooked in the hot water for about 5-7 minutes. Meanwhile prepare another pot with ice cold water, to blanch the spinach without losing its green color. Later drain the spinach from hot water and put in the cold water to stop the cooking process. Let the spinach enjoy that cold bath until you gather rest of the ingredients. Finely chop chilies and garlic. Grate the paneer finely. To that add some salt and cardamom. Now make tennis sized balls with that mixture. Now squeeze out as much water as you can from the spinach. Then finely chop the spinach. Heat some oil and once it is heated add some cumin seeds. Once they start crackling add the finely chopped chilies and garlic. Now add the spinach and keep sautéing it. Add the chickpeas flour and/or rice flour, bit of salt, turmeric and keep sautéing till the whole mixture becomes bit dry. In this process the flour gets cooked and is absorbed in the spinach as well. Let this cool down completely. Once it is cooled down make a flat disk of this spinach mixture on your palm with help of drops of oil. Now place the paneer ball on that spinach disk and roll it into an enclosed ball. So you should not be able to see any white of paneer in it. This way finish rolling all of the koftas. 

At this stage either you can deep fry the koftas as Sanjeev Kapoor has explained in his recipe; or you can shallow fry or use appe pan like I did. For that heat up the appe pan. Add a teaspoon of oil. Now sprinkle some corn starch in a plate and roll the koftas in it to get it coated uniformly. Now carefully place each kofta in the appe pan. And put a lid on it and let it get cooked on low flame. This process is time consuming. Once it is cooked from one side, flip it and remove the lid. Wait till you get nice browning done on both sides. This way koftas would be crispy form outside and yet soft and gooey from inside. Let all the koftas cool down and get started with gravy.

For the gravy
You can make any tomato based gravy that you are comfortable making it. This is my standard gravy for most of the rich Punjabi dishes I make. It goes well with paneer butter masala, paneer tikka masala and such. Soak the golden raisins and poppy seeds in some milk for at least 2-3 hours before hand. If you want to add cashews then soak those as well. Once it is soaked and become soft; blend all of it together. Now heat up ghee/clarified butter and add the cinnamon stick and a pinch full of cardamom. Once that gives nice aroma add the raisins/poppy seeds paste and sauté it for couple minutes. Now add two cans of tomato sauce. And let the gravy cook for about 5 minutes on very low flame.  At this point add salt to taste, a teaspoonful of honey and crushed kasoori methi. At the very last add the cream, stir it and turn off the heat. You can adjust the salt/honey per your taste.
For assembling this dish, get a flat dish and pour the gravy in it. Now cut each kofta in two equal parts.

And place each of kofta in the gravy. You can get creative by decorating it per your style-like drizzling it with some cream last minute or if you like add finely chopped cilantro.


Tips
Make sure that there are no lumps in paneer. You will need to mash it smooth like dough for rotis. If you can make paneer form scratch then that would be the best option. You can find how to make paneer from scratch; in this blog. And if you are like me; you would buy frozen paneer.
Make sure that paneer is at room temperature; so that it can regain its moisture. In time crunch you can microwave it for 15-20 seconds to get the rock like to soft-mushy transformation.

Another key point to remember is to add salt as the last ingredient in spinach mixture. Adding salt tends to generate moisture and we want to have dry mixture to make koftas.

For gravy you can follow Sanjeev Kapoor’s recipe with fresh tomatoes; but this gravy dish is my goto recipe which can be prepared in less than 10 minutes. "

Saturday, January 5, 2013

Navratan Korma - A Royal Vegetable Dish

I wish all the readers of my blog a very Happy New Year. I hope 2013 brings you good health, happiness and great food. Since food tastes good only when the cook is happy, I hope each day of yours is filled with great joy which in turn will lead to tastier food.


I have been wondering what recipe I should start the new year with and I couldn't make up my mind. Should I start with a starter and follow through with a complete meal or shall I start with a decadent sweet? Well inspiration just struck and I sat down to pen down this wonderful recipe. This is a medley of vegetables, in a rich, flavorful sauce which is also a little sweet. The dish is called "Navratan Korma". "Navratan" means nine gems and "Korma" means a medley. So literally it is a dish which has at least 9 starring ingredients, mainly vegetables, fruit or dry fruit and paneer. It is cooked in a rich cashew based sauce traditionally with cream added to finish it off. I wanted to lighten the recipe. Also, as I was planning to serve this to many people, I did not want to use any nuts in case of allergies. It was a great success and I must say that I received the best compliments from my friend's nine year old who not only ate all the vegetables, but asked for seconds and told her Mom that this was one of the best vegetable curry she had ever tasted.


Ingredients
1 large red onion, finely diced
1 tbsp + 1tsp butter
3-4 canned whole tomatoes (puree it)
1 tsp corriander/dhania powder
red chilli powder to taste
1/8 tsp turmeric powder
2 tsp corriander-cumin powder (dhania jeera powder)
1 tbsp garam masala
2 tsp ginger garlic paste
1 green chilli, sliced into 2 pieces
1 potato, diced
1/2 red bell pepper, diced
1 carrot, diced
1/2 cup peas
1/4 cauliflower, florets separated into medium size pieces
1/2 cup  green beans, diced
6-7 baby corns, diced into 1 inch pieces (I used canned baby corn)
1/2 cup paneer, diced into 1/2 inch pieces
3-4 sliced of pineapple (I used the ones which are canned, but not in syrup)
1/4 cup raisins
1/4 cup low fat milk
3/4 cup cream
salt to taste
1 cup water


Method
Heat 1 tsp butter in a flat pan, sprinkle some salt and shallow fry the paneer pieces till they are lightly browned on all sides. Keep aside.


Heat the butter in a pan which will be able to accommodate all the vegetables. Add the red onion and saute it till it is softened and translucent. Then add the ginger garlic paste, and the green chilli and fry this till the raw smell goes away. Next, add the tomato puree and cook this mixture for a few minutes. Stir and do not let this brown. Then add the turmeric, garam masala, dhania jeera powder and dhania powder. Stir and fry these spices for 2-3 minutes. Then add 1/2 cup water. Then, add the potatoes, green beans, carrots, cauliflower and red bell pepper and boil this for a few minutes, till the vegetables a partially cooked through. Then, add the rest of the vegetables, the corn, pineapple, and the peas. And finally add the paneer. Cook all of the ingredients together till the all the vegetables, especially the potatoes and cauliflower are cooked through. Then, in a small bowl, mix the milk and cream together and slowly add this mixture to the gravy. Add salt and raisins and boil for a couple of minutes. Serve hot, with some naan or tandoori roti. You can garnish this with some grapes.


Tips
Feel free to choose any combination of vegetables. You can use fewer than 9 ingredients as well. If you do not want the sweet tinge, then don't add the pineapple and raisins. If you want a richer gravy, then soak 1/4 cup of raw cashews for a couple of hours and make a paste of these cashews.  Add this paste along with the cream instead of milk. You can also add yogurt instead of cream. Make sure to whisk it till it is smooth.
I used canned baby corn and pineapple. If you use the fresh version, then remember the cooking time will increase and you should either add it in along with the potatoes (specially the corn) or may be semi-cook these in the microwave for a minute before adding to the gravy.
If you don't have canned tomatoes, then you can use fresh tomatoes. To peel them, boil water, then add the tomatoes to the boiling water. As soon as you see the skin is starting to tear up, remove these and put them in a bowl of cold water (ice water is preferred). It will be very easy to remove the skins then.

Tuesday, October 23, 2012

Paneer Khurchan - Spiced Cottage Cheese

Paneer khurchan is a relatively new find for me. I have been eating various curries and dishes (spicy and sweet) made from paneer for years, ever since I can remember. However, I hadn't heard of this dish till about a couple of years ago. My husband was reminiscing about his good old college days and he mentioned that occasionally whenever his friend and he went out to dinner, this was a dish they always used to order. Then he asked me, if it was something that I could make. Of course, never having eaten sit, I thought I would give it a shot based on his description. I am not sure if the final result is exactly what he ate, but it turned out really good. It has become one of my go to recipes when I invite guests. It is easy to make and very tasty.


Ingredients
1 green bell pepper (medium), sliced into strips
1 red/yellow/orange (or a mix of colors) bell pepper, sliced into strips
1 tomato, sliced into strips
a 3X3X1 inch slab of paneer (if using ready made). If you make it at home then paneer resulting from about 1-1.5 litre of milk. Approximately 1.5 to 2 cups.
3 cloves of garlic, ground
1 medium red onion, sliced into strips
1 tbsp oil
1/8 tsp cumin seeds
1/4 cup tomato puree (or puree 2 tomatoes)
1/2 - 1 tsp red chilli powder, to taste
salt to taste


Method
Heat the oil in a flat pan. Then add the cumin seeds. Once they start to crackle, add the onions and garlic. Fry it for a minute and then add the bell pepper slices. Stir fry for another minute and then add the tomato strips. Once the vegetables are partially cooked (about 2-3 minutes), add the tomato puree, chilli powder and the paneer. If using ready made paneer, cut it into small pieces and add it. If the paneer is freshly made, just add it without shaping and cutting it. Add salt.
Cook on low to medium heat. The paneer will start sticking to the base of the pan. Scrape it off and keep stirring it. Eventually the paneer will start melting and get scrambled. Cook till the paneer and vegetables are cooked through completely. You will get a nice buttery  fragrance as the paneer browns slightly. Do not let it burn. Make sure to brown the paneer a little. Do not stop the cooking process as soon as the paneer has melted and gotten scrambled. The browning adds a lot of flavor to the dish. Serve hot with roti or naan.


Tips
If you are using fresh paneer, you need not squeeze out all the whey water from the paneer. You can just drain it and then add the paneer to the vegetables. The water will evaporate as the paneer cooks down. Make sure to turn down the heat once the paneer reaches the scrambled stage as it can burn easily as it starts to brown and get stuck to the base of the pan. The recipe to make paneer at home can be found here.
You can grind up the leftovers and use it as stuffing for parathas the next day. 

Sunday, September 16, 2012

Shahi Paneer - Cottage Cheese in a Delicious, Rich, Sauce

Shahi paneer is a very delicious curry/gravy preparation. The curry is a rich sauce, made with cashewnuts. "Shahi" means royal and it is truly a dish fit to be served to a king. It is a very popular dish and generally found at most Indian restaurant. The gravy is milder than a brown/red curry preparation and has a slight sweetness due to the use of cashwenuts. It has a light orange color and the authentic preparation is generally colored using saffron, though most of the versions that you find in restaurants are colored a deep orange with food color.

It is a dish that will always be a hit with your guests. Serve it hot with naan or tandoori roti.


Ingredients
2 cups cubed paneer
2 tbps oil
1 tsp ghee or butter
5 black peppercorns
1 2 inch cinnamon stick
3 cloves
2 bay leaves
1 large red onion, cubed (else use 2 medium red onions)
1/4 cup raw cashwenuts
1/2 cup water
3 garlic cloves
1 inch ginger
2 green chillies, to taste
1/4 cup yogurt
1/4 cup cream
1 pinch saffron
1/2 tsp garam masala
salt to taste
3 green cardamoms


Method
Boil the onion in some water till it is cooked and pink, then drain the water. Alternately, you can microwave it for about 2 mins, till the onion is softened. Then puree it in a food processor or mixer. Then make a paste of the cashewnuts. Add about 1/2 cup of water to grind the cashews.
Whisk the yogurt so that it is smooth.
In a non-stick pan, add the ghee then shallow fry the cubed paneer pieces till the paneer pieces are lightly browned. Grind the cardamom seeds to a fine powder.

In a deep pan, heat the oil and to this add the cinnamon, bay leaves, cloves, and peppercorns. Cook for a couple of minutes till the spices are fragrant and  then add the chillies and the onion puree. Cook for a few minutes. Meanwhile make paste of ginger and garlic and add it to the pan and cook the mixture for a few minutes. The raw smell should disappear, but the don't over cook the gravy. The color of the gravy should remain pinkish white. Cook on low heat, so that you don't burn the gravy or down brown it.   Next add the whisked yogurt to the cooked onion gravy and cook for a couple of minutes till it gets incorporated into the gravy. Next add the cream and a pinch of saffron to the gravy. Cook it all together for a minute and then add the garam masala and cook for another minute. Then, add the cooked paneer pieces and cook it all together for a minute or so.

Sprinkle the cardamom powder over the curry before serving.


Tips
Soak the cashews for a few hours. Then it will be easier to grind them into a fine paste. It is important that your gravy doesn't smell like raw onion or garlic, else it will not taste good. If you don't have a non stick pan to cook the paneer, then add a little more ghee to the pan so that the paneer pieces don't stick to the pan and disintegrate. You can skip this step entirely, if you prefer to have your paneer in its original softer form. You can use readymade paneer or make paneer at home. The recipe can be found here.

Saturday, June 25, 2011

Rasgulla - A Cottage Cheese Dessert

Rasgulla or Rosogolla is possibly the most well known Bengali dessert. These are made from cottage cheese also known as paneer. Fresh paneer is kneaded into small balls and then cooked in syrup. The result is light dumplings which have a slightly sponge like texture. These absorb the syrup and are generally not overly sweet. In comparison to "gulab jamun", these are definitely much lighter and spongier in texture and not as sweet.


As a child, I refused to try this sweet. I tasted it for the first time when I was in the 7th grade and was delightfully surprised by the light, not too sweet, refreshing taste. In the last few years, I have only eaten the canned version found in the Indian store and those leave you with a tinny after taste. So, when my cousin requested that I make this when he visited me, I was more than happy to oblige. Oh and they turned out so good, that I haven't been able to eat the tinned ones ever since. I used my paneer recipe and then experimented with the method from my friend's blog. My conclusion was that the recipe is not too difficult and the returns on effort are truly worth it. Now, one of my friends is expecting her first child and has been craving this sweet for a while. I wish I were in the same city as hers to prepare it for her, but as that is not possible, giving her the recipe is the next best thing I can do. This one's for you M!


Ingredients
Freshly prepared paneer made from Whole milk - Refer to the paneer recipe post for the method of preparation and ingredients
2 cups of sugar
5 cups of water


Method
After you have rinsed out the milk solids separated from the whey water and drained out excess water, you will then knead the paneer to bring all these milk solids together. At this stage, knead the paneer for a couple of minutes. At the end of the kneading process, the paneer should come together into a soft dough. At this stage you are ready to roll the paneer into small balls. Use a light hand to roll out the balls. Remember these balls will puff upto almost double the size upon cooking, so roll them out into balls about an inch in diameter. This will ensure that the rasgulla is not too big and can be eaten easily. 


Once all the balls are rolled out, dissolve the sugar in water to create a simple syrup. Use a deep vessel which can be covered with a lid. Heat the syrup till it starts boiling and then add these paneer balls into the syrup gently, one at a time. Now at this stage, if your paneer is not well kneaded or the balls have become too dry, they may start cracking or disintegrating. So add one or two balls and observe them for a minute before proceeding with the rest.  Then add the remaining balls to the syrup annd cook these in the open pan for 5 minutes. Then cover with a lid that has a vent. Use a lid with a vent, else the syrup may boil over (you need to release the steam generated while the paneer is being cooked). If you have a pressure cooker, remove the whistle from the lid and then use the pressure cooker to cook the paneer balls. Cook these covered for about 5-7 minutes (this is when they will double in size). Then, take off the lid. At this stage the paneer balls would have doubled in size. Then add about 1/4 cup of water and cook it uncovered for a five more minutes. Your paneer has now been converted into the delicacy that is "rasgulla". Rasgullas as accompanied by the syrup, so do not scoop them out of the syrup. Let them cool down in the syrup. Do not cover the pot before the rasgullas cool down. Keep it in the fridge for at least an hour before serving. Serve cold as dessert.


Tips
Squeeze out excess water, and it is ok to drain the water completely. Then as you start kneading the paneer, add a tsp or so of water at a time to get it together into a dough. A little moisture is needed to give the paneer it's dough like texture upon kneading. If while kneading it, it feels too crumbly, then add a tsp of water and knead. You know you have kneaded enough when the paneer gets a playdough or clay like texture. Hands will get slightly greasy upon kneading the paneer. Do not use low fat or skimmed milk. Fat content is needed, else you will not be able to form the paneer balls. Cover the rolled out paneer balls with a damp cloth (not wet), especially during summer and if you live in a dry climate. This will prevent the paneer balls from developing cracks.  

Saturday, May 14, 2011

Paneer Paratha - Wheat Tortillas stuffed with Paneer

The term "paratha" is a generic term used to described flat bread rolled out from wheat dough. These may be stuffed with vegetables, or seasoning can be added to the dough itself while rolling it. Where parathas are concerned, the sky is the limit. You can be as adventurous as you want and try out different kinds of stuffings, be it sweet or savory. There are two parathas that I have blogged about so far which are of the type where the additional ingredients have been added to the dough itself - Daikon/Muli Paratha and Thepla/Methi Paratha. This paratha is a "stuffed" type or paratha. The general principles remain the same across all stuffed parathas viz. knead the dough, make the stuffing separately, then fill the stuffing into a ball of dough and roll it out. Then cook the rolled out paratha with a little bit of oil.


Parathas are a perfect "travel food" - easy to pack and they stay fresh without refrigeration at least for a day or so. If the stuffing has a longer shelf life, then the parathas will last longer. Paneer paratha is possibly one of the yummiest parathas that one can ever eat. Serve with some butter and it's a complete meal. You can use homemade paneer or store bought paneer for this recipe.


I could go on and on about how great parathas are but I think I will end here and move on to the recipe.


Ingredients
For the stuffing
1 tsp oil
1 cup grated paneer
1/4 cup onion, finely chopped (this needs to be very fine so that the pieces will not poke through the dough while rolling out the paratha)
red chilli powder to taste
salt to taste
1 tsp garam masala
1/8 tsp aamchur powder/dry mango powder)
1tbsp cilantro/ corriander leaves (optional)


For the dough
1 cup whole wheat flour
1/4 tsp salt
2 tbsp oil
oil to cook the parathas
water to knead the dough


Method
For the stuffing
Heat 1 tsp oil in a pan and add the onions. Once they turn translucent, add the garam masala, red chilli powder and amchur powder. Stir and then add the grated paneer and cilantro leaves. Turn off the heat and let the paneer cook for a couple of minutes in the remnant heat. Remove the paneer mixture into a bowl and keep aside.


For the dough
Take the wheat flour in a bowl, create a small well in the center. Add the salt and oil into the well. Then add a little water at a time into the well and start incorporating the flour into the water and mix. Add enough water so that the flour comes together. Do not add too much water else the dough will become soupy. Add just enough to form a soft dough which can be rolled out. Knead it well till it's smooth and keep aside.


To make the paratha
Take a fistful of dough, enough to make a ball about 2 inches in diameter. Roll this out into a flat disc. Then place 1 tbsp of the paneer mixture on to the center of this disc. Then gather up the sides so that they come together and gather them up so that the mixture is enclosed inside. Make sure the gathered sides are all brought together and then flatten the disc. Add some flour onto your rolling board if necessary and roll out the disc gently to form a paratha. This should be about 3 mm in thickness and about 5-6 inches in diameter. It is of course vary based on the amount of dough you start off with and the amount of filling. Do not roll it out too thin, else the dough cover may tend to tear. The photos should provide you with a good idea on how to interpret the instructions.


Add a little oil to a flat pan. Cook the paratha on one side for a min and the flip it over. Add some more oil around the paratha and let this side cook completely till the dough looks cooked and you can see light brown marks on the covering. Then flip it back and let the first side cook completely. Press the paratha gently with a flat spatula while it's cooking. This helps the paratha puff up and cook well.


Serve with some butter, pickle and yoghurt or raita.


Tips
If you cook the paneer for too long after adding it to the pan, it will dry out and will become hard and brittle. It is best to always let dough rest for 15-30 minutes, whenever you make tortillas, roti or chapatis. This helps the rolled out dough to puff up and cook evenly. Do not fret if you are not able to create a circle. The end result will still be tasty and that's what matters.

Monday, September 20, 2010

Paneer - Basic Recipes

I used to think that making paneer would be a tedious and time consuming process and was resigned to using the store bought one. However, I always missed the fresh taste of paneer that I remembered from childhood. So finally, I decided to try it out and the result was so good that I always make paneer at home. It is definitely not a long, cumbersome process. You need to keep an eye on your milk, so it doesn't boil over, but thats about the extent of attention that it needs. Make it a day ahead of when you want to use it and it will be well set by the next day. That way you can make those perfect cubes that you get in restaurant dishes.


Ingredients
1/2 gallon milk
1/4 cup white vinegar
3/4 cup water
linen cloth to tie the paneer in
salt (optional)


Method
Heat the milk in a thick bottomed pan. Mix together the vinegar and water. Once you see small bubbles forming on the top, add the vinegar-water mixture and stir it around. The milk solids will separate from the water and you will get whey and curd. Using the linen cloth and a colander, drain out the whey water and keep that aside. The milk solids/curd is the paneer. Squeeze out the remaining whey water from the paneer and then rinse the paneer, so that the vinegar remnants are washed out. If you want to use the paneer in a vegetable, then add a little salt to the milk solids at this stage and then knead the paneer thoroughly. It will come together after a couple of minutes and will become soft and dough like. Then tie this in the linen cloth, making sure that the cloth is tightly wrapped around it. Place a heavy pan on top to flatten it out. You can also shape it a bit and then tie it up. Once its cooled down, keep in the fridge for a few hours. Once its set, you can use it in your paneer preparation.


Tips
Use a pan with a thick bottom, else the milk at the bottom may get burnt. You can use whey water to make bread or chapati dough. If you use a lower fat or fat free milk, the resultant paneer will be very crumbly. Adding salt to the paneer when kneading it will make it flavorful and it will not taste bland when you add it to your paneer vegetable dish.If you plan to make a sweet dish using the paneer, do not add salt to the paneer. You can freeze the paneer for a few weeks.