Welcome to my blog

I hope you will find the recipe you are looking for your occasion here.

Now video instructions are available for select recipes and can be accessed at

Gardening and Cooking Made Easy

The latest 5 recipes are displayed on the
main page. For more recipes, you can browse the archive, click on the labels in the index to the left or use the Custom search below to look for a specific recipe.


Search for more results

Custom Search
Showing posts with label grill. Show all posts

Tuesday, July 10, 2012

Grilled Vegetables

Last week, the weather cooled down slightly. The summer sun is so hot that we took advantage of this temporary cool down. We grilled some corn and vegetables and spent the afternoon in the backyard. It rained for a couple of hours in the morning while we went to the grocery store and picked up fresh and beautiful vegetables. We came home, my husband set up the grill, while I made a quick marinade and prepared the vegetables.  I generally make a tandoori style marinade, however this time I decided to keep it simple, given the warm weather. And the result was excellent. The best part was that I didn't marinate the vegetables for more than 30-40 mins while the grill was being set up and it didn't mask the natural flavors and sweetness of the vegetables. It was so delicious that we definitely ate a lot of vegetables that afternoon. I can't wait for the next cool down.


Ingredients
1 small yellow onion, finely diced (almost minced)
2 cloves garlic, minced
2 tbsp oil
1 red bell pepper, diced
1 green bell pepper, diced
1 yellow bell pepper, diced
1 zuccini, sliced
1 red onion, diced
small button mushrooms, whole (1-1.5 inches in diameter)
salt to taste
pepper to taste
lime


Method
I tried to dice and slice the vegetables into similar size large pieces about 1.5 to 2 inch cubes so that they could easily be skewered. In a large bowl, mix together the minced onion, garlic and oil. Then add some salt and pepper and the vegetables and mix them all so that they are coated with the onion and garlic mixture. Adjust the salt and pepper, mix again and let this sit for about 30 minutes. Then thread the vegetables onto the skewers. Once all the skewers are prepared, cook them on the grill for about 20 minutes. Keep rotating the vegetables so that they don't get burnt. Grill till they are cooked through and slightly charred. Take the remainder of the minced onion and garlic mixture from the marinade, place it on a piece of aluminium foil and let it cook on the grill as well. Cook this till the onion is soft.  Squeeze lime juice onto the vegetables and then top them with the grilled minced onion and garlic mixture. The result is lip smackingly delicious. 


Tips
If you make small pieces, the vegetables will fall off the skewer as they cook. So make sure that the peices are large enough. If the weather is not conducive to grilling outside, you can also broil the vegetables or even bake them at about 350-375 F.
Wednesday, May 25, 2011

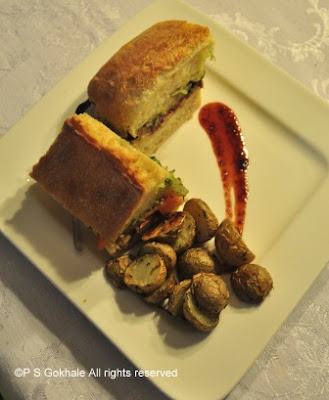
Gourmet Sandwhich - Grilled Vegetables with Pesto on Artisan Bread

Last month we visited a local bistro. They had a Tuscan style menu and one of the things we ordered was a lovely grilled panini sandwhich. It had grilled vegetables, cheese, pesto and we really enjoyed it. I was quite eager to reverse engineer it and make my very own version of it. So, after a couple of days, I made a fresh batch of pesto, made some strawberry balsamic vinegar and I was on my way. The resultant sandwhich was lipsmacking.


So, this year, when we decided to celebrate my daughter's birthday in the park, and I was trying to come up with a suitable menu, I realized these sandwhiches would be perfect as the main course. Everyone loved the sandwhiches, and I received a lot of compliments. I made around eighty sandwhiches and once you read the recipe, you will realize how easy these are to scale up. So, if you are looking that dish that will wow your guests and won't have you slaving over the stove for hours, this is it!


The following ingredients list is for one ciabatta roll and will provide about 6-8 servings on how large you cut your sandwhiches.

Ingredients
1 loaf of bread (use ciabatta, or garlic bread or rosemary bread)
1/4 cup basil pesto (click on the link to see recipe from another post)
1 tbsp strawberry balsamic vinegar
pepper jack cheese, slices - at least enough to create one layer over the bread
1 large red onion, sliced
1-2 zuccinis/italian squash,  thinly sliced lengthwise
1-2 firm tomatoes, sliced
2-3 tbsp  olive oil (use about 1.5 tbsp to grill the onions and 1.5 tbsp to grill the zuccini)
salt to taste
pepper to taste


The following ingredients list is to make 80 sandwhiches, assuming one sandwhich will be about 3 inches length wise and 2-3 inches width wise. I estimated about 2 sandwhiches per person. However, if you are planning to multiple items like pastas/salads which may be filling along with the sandwhiches, you can estimate about 1.5 sandwhich per adult.


Ingredients
10-12 bread loaves (estimate the number of loaves based on how long and wide the loaf is)
4-5 cups of pesto sauce
plenty of pepper jack cheese, I bought a cheese block and sliced about 1/2 (about 4 cups worth)
1/4 cup strawberry balsamic vinegar
10 large onions, sliced
20 zuccinis, sliced length wise
12 large tomatoes, sliced
1/4 cup olive oil (use 1/8 cup to grill the onions and 1/8 cup to grill the zuccinis)
salt to taste
pepper to taste


Method
Add half of the olive oil over the red onion slices and then grill these on a hot grill, till the onion is cooked, slightly browned. At this stage it gets a sweet tinge. Add remaining olive oil to the zuccini and then grill the zuccini. Let the water from the zuccini evaporate. Slice the bread horizontally into two large pieces. If you want, you can toast the bread in the oven for a few minutes. 


Now, we are ready to assemble the sandwhich. Spread pesto on one the top slice of the bread. Add a layer of cheese on the other bread slice and keep it in a warm oven for a minute till it melts slightly. Drizzle the strawberry balsamic vinegar over the cheese. Next add a layer of tomato slices. Season this layer with a little salt and pepper. Next add a layer of grilled onions, then season that with a little salt and peper. The next layer is the grilled zuccini which also needs to be lightly seasoned with salt and pepper. Then, add back the top layer of the bread with the pesto. Cut the sandwhich into 6-8 pieces based on how large you want the sandwhich to be. Based on the length and width of the bread, I was able to make 8 sandwhiches.


Use the same method when you want to scale up this recipe. Cook the onions and zuccini, slice the cheese and tomatoes. You can make pesto a few days earlier, it stays fresh in the fridge for a couple of weeks and also freezes really well.  Once you have prepared all the ingredients, you can then create an assembly line and assemble all the sandwhiches. Then cut them into appropriate number of pieces.


Tips 
If you do not have a grill, you can use a hot pan to cook the onions and zuccini. Zuccinis release water as they start cooking, so it will take a bit longer to cook/grill them than the onions. If you are making the sandwhiches a few hours in advance, then make sure to de-seed the tomatoes, so that the sandwhiches do not get soggy from the tomato juice. Also, add a layer of pesto on both side of the sandwhich, so that it stays moist. Also, do not toast the bread if you want it to stay moist.

Sunday, July 25, 2010

Grilled Artichoke

This is a beautiful vegetable. It resembles a flower and belongs to the sunflower family. I used to pass this vegetable by, every time I visited the grocery store. But the only way I had used it was via its canned form-the canned artichoke hearts. I finally saw this on the menu of a restaurant that is famous for its cheesecakes and decided to try it. Ever since that day, I have picked it up in the grocery section instead of passing it by. It's an extremely healthy vegetable, high in Vitamin C. Though many methods list a tedious way to cook it, the following method is a no fuss way to cook it, so that it can be enjoyed often.


Ingredients
1 Artichoke
2 tbsp white vinegar
salt to taste
1 tbsp olive oil or vegetable oil
1 large pot of water (enough to submerge the artichoke completely)
Dressing of your choice to serve with the artichoke


Method
Take the pot of water and add the vinegar to it. Start to heat this mixture. To prepare the artichoke, cut off about 1 inch of the top of the artichoke. Remove the stem and peel it. Add the artichoke and stem to the water prior to boiling. Artichoke will tend to float but we want it to be completely submerged in water, so that it cooks properly. To achieve this, cover the artichoke with a small strainer or sieve and place a small weight (heavy plate/small vessel, etc.) on the strainer. Let the water come to boil and let it boil for about 20-30 minutes. To check if it is completely cooked, insert a knife into the base where the stem was attached. If it goes in without any resistance, then it is completely cooked. Remove the artichoke and the stem.

Artichoke, being from the sunflower family, has a center thistle surrounded by the green leaves. This resembles small needles and is not edible. It must be removed. To do this, cut the artichoke into two halves lengthwise (not along circumference). You will see the thistle at the base just above the artichoke heart. Use a spoon to scoop this out. Make sure that you remove all the needles. Now, use a brush and cover the artichoke and stem with a layer of oil and sprinkle salt. Grill the halves or you can broil it. Remove it when it has a nice grilled/charred look.


How to Eat this
Serve the grilled artichoke with your favorite dressing. Italian and ranch go well with artichoke. Peel off each leaf, dip in the dressing, and scrape off the pulp from the leaf using your bottom teeth. The bigger outer leaves are very fibrous and may not have a lot of pulp. As you work your way towards the center, the leaves become more tender and the amount of pulp increases. The bulk of the artichoke is the heart and the stem, which are citrusy and delicious.


Tips
The artichoke will start oxidizing and will turn brown as soon as you cut it. It's necessary to get it into the acidic water as soon as possible. The color of the artichoke will tend to change a little after it is boiled. It will turn brownish green. You can eat the artichoke after boiling as well without grilling.

Thursday, July 9, 2009

Grilled Paneer Skewers

This is always a hit at our house. A great appetizer and a main course dish with a side of rice.


Ingredients:
For the marinade
2 teaspoons - ginger garlic paste
1 teaspoon - corriander powder
to taste - red chilli powder
1/2 cup - yogurt
1/8 teaspoon - turmeric powder
to taste - salt
For the skewers
Paneer cut into cubes. Cut vegetables you want to grill into cubes similar in shape to the paneer.
Suggested veggies - Onions, bell pepper (red, yellow, orange, green). You can also use potatoes. However I would suggest that you cook the potato till it is 3/4th done and then cut into the cubes.

Method
Mix all the marinade ingredients. To this add the vegetables and the paneer to the marinade. Let it marinate for a couple of hours. The more time the better it will taste.
Soak the skewers in water for an hour. Arrange the vegetables and paneer on the skewer and proceed to grill. It takes about 5-7 minutes on each side. Keep moving the skewer to get an even golden color. Take care to not burn the paneer.
Tips
Spray some oil on the grill before arranging the skewers on the grill to avoid sticking and breaking of the paneer. Serve as an appetizer or serve with a side of rice pilaf and raita.