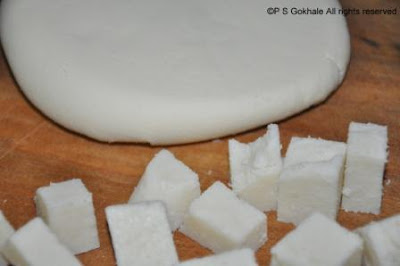
Paneer is a fresh cheese made by splitting milk into milk solids and whey water. This is the same method used to make Ricotta cheese and essentially they are the same. The main difference is that the store bought paneer is usually packed tightly and is in the form of a nicely shaped brick and can be grated or cut like any other cheese. This can be easily cut into pieces and these pieces can be fried without them melting. Store bought ricotta cheese has water content in it and melts easily. So, the water content of the final paneer that you make at home depends largely on how you plan to use it.
When the water is drained completely, it can be kneaded and shaped into a compact shape which can be cut into cubes. These can then be directly added or pan fried and then added to gravies/curries and these will not melt. If however water content remains in the paneer and it is molded into cubes, these will eventually melt when you cook them and will not hold up as cubes in the curry.
I had thus far always made paneer by boiling milk in an open saucepan and once it started to get to a boil, I used to add lemon juice or diluted vinegar to it to split the milk into paneer and whey. This method is detailed here. I decided to try making paneer in the cooker. I used diluted white vinegar as the acidic agent mixed in with the milk. And it was just perfect.
Milk doesn't spill over when heated in the Instant Pot and anyway by the time the milk comes to a boil, it is already split and so there is no chance of boiling over even in a stove top pressure cooker. In fact when I heated just milk under pressure in my Instant Pot, it was just perfect when I opened it up, even though there was no agent to split it up. It had not risen up in the inner pot and there had been no spewing over the top. Of course I had filled it only half way.

Ingredients
whole milk (see method for quantities)
vinegar - 1/4 cup diluted with 3/4 cup water ( I use white vinegar)

Method
Instant Pot (IP)
If using an IP, again, do not fill it more than 1/2 of the inner pot capacity. I use about 5 cups of milk. To this add the vinegar solution and close the lid. Close the vent and cook it in manual mode for 1 minutes on High Pressure. [I had earlier used the timing of 3 minutes but when I remade it, I set the timer to 1 minute and found that the paneer and whey had separated completely even with this lower timing. The paneer was softer too.]
Let the pressure release naturally and then open the lid. Or NPR for 10 minutes and then release the rest of the pressure by switching to vent. The paneer and whey will be separated.


Pressure cooker
If using a pressure cooker, make sure not to fill the cooker with more milk than 1/2 of the capacity of the cooker (this includes the volume of the added vinegar). It is preferable to keep it to 1/3rd at max to prevent any spraying from the top when the pressure is released (via the whistle mechanism). Add the vinegar water to this. You can also add lemon juice or yogurt (yogurt and lemon juice may not be as tart and could be ineffective if enough quantity is not added). I find vinegar to be the most reliable acidic agent. Heat it on medium high heat till it reaches pressure, then let it cook for a minute or two and take it off the heat, let the pressure settle and open up to find the paneer and whey separated.
Molding the paneer
Drain the paneer using a linen cloth, rinse it with cold water, and then drain the water. Rinsing it in cold water helps to lessen the effect of vinegar and washed away any taste of the vinegar. Keep some weight on the paneer to drain all the water. Then knead it as it is usually granular to give it a smooth texture which will make it look like store bought paneer. If you know you are going to use it to make savory dishes, you can add salt to the paneer at the kneading stage so that it is not bland. If you plan to use it to make sweets, do not add salt.
Then pat the kneaded paneer into a flat disc/flat rectangle and put it in the fridge for a couple of hours or more to firm up. You can also wrap it up in cling wrap.
Your paneer is ready. It can now be cut up into cubes or grated like cheese.
Tips
The whey water should be clear and has a greenish tinge. That is an indication that all the milk solids have separated out. If not, heat it up, and add a little more of the acidic agent to the milk. Make sure to use more quantity of yogurt or lemon juice (if using these as these are not as acidic or tart as vinegar. Do not dilute these).
I got about 180 gms/6.4 oz of paneer from 5.5 cups (approx 1/3 gallon) of whole milk (cow's).
You can use lower fat content milk to make paneer as well, but as the fat content reduces, the quantity of paneer extracted will reduce and the texture will also change and can be a slightly rubbery compared to the one extracted from whole milk. You can also use half and half to boost the fat content of the paneer.
Paneer is made the same way as Ricotta Cheese. When all the water is drained, then the paneer cubes will remain as cubes in gravies or curries. Before draining the water, you have ricotta cheese and this will melt. If water content remains in the molded paneer cubes, the paneer will disintegrate and melt into the gravy.
The longer you cook the milk solids in the whey water the tougher they get, so if you release the pressure after natural pressure release for a few minutes, you will get paneer with a softer texture.
When the water is drained completely, it can be kneaded and shaped into a compact shape which can be cut into cubes. These can then be directly added or pan fried and then added to gravies/curries and these will not melt. If however water content remains in the paneer and it is molded into cubes, these will eventually melt when you cook them and will not hold up as cubes in the curry.
I had thus far always made paneer by boiling milk in an open saucepan and once it started to get to a boil, I used to add lemon juice or diluted vinegar to it to split the milk into paneer and whey. This method is detailed here. I decided to try making paneer in the cooker. I used diluted white vinegar as the acidic agent mixed in with the milk. And it was just perfect.
Milk doesn't spill over when heated in the Instant Pot and anyway by the time the milk comes to a boil, it is already split and so there is no chance of boiling over even in a stove top pressure cooker. In fact when I heated just milk under pressure in my Instant Pot, it was just perfect when I opened it up, even though there was no agent to split it up. It had not risen up in the inner pot and there had been no spewing over the top. Of course I had filled it only half way.
Ingredients
whole milk (see method for quantities)
vinegar - 1/4 cup diluted with 3/4 cup water ( I use white vinegar)
Method
Instant Pot (IP)
If using an IP, again, do not fill it more than 1/2 of the inner pot capacity. I use about 5 cups of milk. To this add the vinegar solution and close the lid. Close the vent and cook it in manual mode for 1 minutes on High Pressure. [I had earlier used the timing of 3 minutes but when I remade it, I set the timer to 1 minute and found that the paneer and whey had separated completely even with this lower timing. The paneer was softer too.]
Let the pressure release naturally and then open the lid. Or NPR for 10 minutes and then release the rest of the pressure by switching to vent. The paneer and whey will be separated.
Pressure cooker
If using a pressure cooker, make sure not to fill the cooker with more milk than 1/2 of the capacity of the cooker (this includes the volume of the added vinegar). It is preferable to keep it to 1/3rd at max to prevent any spraying from the top when the pressure is released (via the whistle mechanism). Add the vinegar water to this. You can also add lemon juice or yogurt (yogurt and lemon juice may not be as tart and could be ineffective if enough quantity is not added). I find vinegar to be the most reliable acidic agent. Heat it on medium high heat till it reaches pressure, then let it cook for a minute or two and take it off the heat, let the pressure settle and open up to find the paneer and whey separated.
Molding the paneer
Drain the paneer using a linen cloth, rinse it with cold water, and then drain the water. Rinsing it in cold water helps to lessen the effect of vinegar and washed away any taste of the vinegar. Keep some weight on the paneer to drain all the water. Then knead it as it is usually granular to give it a smooth texture which will make it look like store bought paneer. If you know you are going to use it to make savory dishes, you can add salt to the paneer at the kneading stage so that it is not bland. If you plan to use it to make sweets, do not add salt.
Then pat the kneaded paneer into a flat disc/flat rectangle and put it in the fridge for a couple of hours or more to firm up. You can also wrap it up in cling wrap.
Your paneer is ready. It can now be cut up into cubes or grated like cheese.
Tips
The whey water should be clear and has a greenish tinge. That is an indication that all the milk solids have separated out. If not, heat it up, and add a little more of the acidic agent to the milk. Make sure to use more quantity of yogurt or lemon juice (if using these as these are not as acidic or tart as vinegar. Do not dilute these).
I got about 180 gms/6.4 oz of paneer from 5.5 cups (approx 1/3 gallon) of whole milk (cow's).
You can use lower fat content milk to make paneer as well, but as the fat content reduces, the quantity of paneer extracted will reduce and the texture will also change and can be a slightly rubbery compared to the one extracted from whole milk. You can also use half and half to boost the fat content of the paneer.
Paneer is made the same way as Ricotta Cheese. When all the water is drained, then the paneer cubes will remain as cubes in gravies or curries. Before draining the water, you have ricotta cheese and this will melt. If water content remains in the molded paneer cubes, the paneer will disintegrate and melt into the gravy.
The longer you cook the milk solids in the whey water the tougher they get, so if you release the pressure after natural pressure release for a few minutes, you will get paneer with a softer texture.


 to make the batter or a processor from India. However, I recently discovered that my
  does a fantastic job. So, if you are having similar challenges and don't want to get a very expensive specialized gadget just for this job, go for a high wattage blender. Another very important step is to make sure that the batter is fermented. This makes the batter light and the crispy. See the tips below for tricks to make sure that the batter ferments during the cold winter season.
 (split and washed, so it doesn't have the black peel/skin)
 (this is parboiled rice. I have tried parboiled rice from a local store before, but the end result was a very sticky batter. So I went back to using rice marked as "Idli/Idly" rice from the Indian store. If you cannot find idli rice, use regular rice)