Welcome to my blog

I hope you will find the recipe you are looking for your occasion here.

Now video instructions are available for select recipes and can be accessed at

Gardening and Cooking Made Easy

The latest 5 recipes are displayed on the
main page. For more recipes, you can browse the archive, click on the labels in the index to the left or use the Custom search below to look for a specific recipe.


Search for more results

Custom Search
Showing posts with label baking. Show all posts

Wednesday, September 18, 2019

Molasses Bread - Cheesecake Factory style

This is a beautiful brown bread that comes very close to the bread that is served in the Cheesecake Factory. Warm bread slathered with butter is delicious and just melts in the mouth. In my opinion, this version of home baked bread is tastier than that served at the restaurant. 
I was able to make 5 decent sized loaves of bread and they lasted a few weeks. I stored each by covering tightly with plastic wrap and then foil and then freezing it. 


Ingredients
2 1/4 cups All purpose Flour or bread flour. I used all purpose flour
1 2/3 cups White whole wheat flour -I used roti flour (ashirwad aata). You can also use regular whole wheat flour
1 Tablespoon sugar
1 1/2 Teaspoons Salt
2 1/4 tsp of Instant Yeast
1/4 Cup Honey
1/4 Cup blackstrap Molasses/regular molasses
1 1/4 Cup Warm Water
2 Tablespoons unsalted butter at room temperature
1 Egg lightly beaten with a tsp of water to make egg wash
1/4 cup of Oats

Method
In the bowl of a stand mixer fitted with a dough hook add the flours, yeast, sugar, and salt. Mix until combined. Slowly add the honey, molasses and water. Mix until the dough forms. Add the softened butter and keep mixing until the dough forms. Knead till the dough separates from bowl.  You may need to add a little bit flour if it is still too sticky. Then knead the dough with hand till the dough is soft and smooth.
Grease a bowl large enough to hold double the volume of bread dough with some oil and place the ball of dough and cover with plastic wrap. Let the dough double in size about 45-90 mins depending on ambient temperature. It will take longer on colder days.
Remove dough from bowl and divide into 5 equal parts and shape into logs. Place these on a well greased trays (I needed two cookie trays) and let rise till double in size. Cover loosely with plastic wrap.
Preheat oven to 350 F. Brush the tops and the sides of the bread logs with the egg wash and sprinkle with the oats.
Place the trays in the oven and bake for 25-30 minutes of until ready. The easiest way to determine if the bread is well baked is to test the internal temperature. If it is 200F or more the bread is baked. Else you can also tap on the bottom and if it has a hollow sound it is baked.
The use of blackstrap molasses gives the bread a deep brown color. This bread has a slightly sweet taste and is delicious.


Tips
If kneading by hand, use the banging of the dough onto the kneading surface and then stretching with your palm strokes technique of kneading bread dough till a soft dough is formed.

Sprouted Whole Wheat Bread

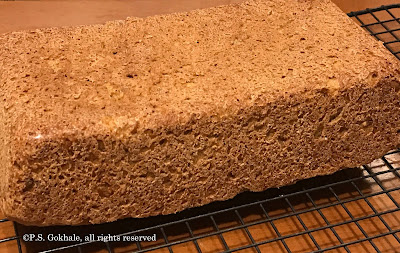
I enjoy sprouting wheat and used to make sprouted wheat bread a few years ago. I had forgotten the exact recipe and decided to try my hand at another version of it. It was difficult to find much online where the wheat berries were directly used instead of the sprouted wheat flour. I found a reference to Ezekiel bread which is a mixture of wheat and lentils and then decided to try out a basic bread recipe and see where it goes. The result was surprisingly tender and moist. The bread was hearty and delicious.
Ingredients
3 cups sprouted whole wheat berries (wheat berries were soaked overnight in water and then placed in a big sieve. These sprouted over a period of 48 hours).
A little water if needed to grind berries
2 tsp instant yeast (or if you have starter dough from another batter, add a handful instead and let this ferment overnight)
1 tsp salt
1 tbsp oil
Whole wheat flour a couple of 1/4 - 1 cup, depending on the moisture in the berries


Method
Grind the whole wheat berries to make a coarse batter. Use the minimal amount of water required in your blender or food processor. I used a food processor. Add the salt, yeast and oil and then add a little flour at a time to create a soft dough. It’s ok if it is a little sticky. Keep aside for 15-20 mins and then knead again to make a smooth dough. (I added a ball of dough from another overnight no knead recipe that I had made in the earlier day instead of the yeast and let it ferment overnight.)


Shape it into a ball and place in a bowl greased with oil to prevent sticking. Let this rise till double in volume. Will take about an hour or more. Then flatten out the dough and shape into a rectangle about 5x9 inches in size. My baking tin is 9 inches long. The length should be approximately the same as your bread baking rectangular tin.
Then roll into a tight roll with the shorter end parallel to you so that you have a 9 inch rolled bread dough.
Grease the baking tin with oil or butter and place the dough in it for a second rise. Once the dough had doubled in size, almost to the edge of the tin, bake at 350F for about 1.5 hours. I baked it for 40 minutes but the bread was not completely baked, so I continued to bake it till the center measured 200F, which took another 40 minutes approximately.
This bread does take longer to bake than normal. You can tent it with foil if you think the top is getting too brown.
The end result has crusty edges and a moist interior, is nutty and delicious. A hearty bread which is not at all dense.

Tips
Precook the wheat and try this bread. I will be trying that version the next time I make it. 

Sunday, December 29, 2013

Apple Crumble - A delicious fruit dessert

This is a delicious fruit dessert. It is warm and perfect for a cold winter night. Add in a scoop of vanilla ice cream and it is the perfect dessert to satisfy your sweet tooth. Now, there are several recipes of apple crumble out there, however, when I wanted to make this, I turned to a recipe from America's Test Kitchen Cooking School Cookbook. I wanted a recipe which would taste great and have a crunchy crumble and knew that I could rely on this recipe. I needed to make it nut free, and the original recipe called for almonds, so I made a few substitutions and it turned out delicious. Best of all it could be eaten by everyone and I didn't have to worry about those with allergies.


Ingredients
For the crust
1 cup all purpose flour
1/4 cup sugar + 1 tbsp sugar
1/4 cup brown sugar, packed
1/8 tsp salt
7 tbsp butter, cut into cubes at room temperature
1/2 cup traditional rolled oats
2 tsp vanilla essence

For the filling
8 medium sized apples, peeled, cored and diced into 1/2 inch pieces
1/2 tsp cornstarch
4 tsp lemon juice
2/3 cup sugar
1/8 tsp salt
1/8 tsp nutmeg powder
1/8 tsp cinnamon powder


Method
Preheat the oven to a temperature of 350F. Place one rack in the middle of the oven and another baking rack at the lowest level in the oven.

In a large mixing bowl, mix together the lemon juice and cornstarch. Add in the apple pieces, sugar, salt, cinnamon and nutmeg powder. Toss all this together till the apple pieces are well coated. Pour this into a 8 inch square baking tin and cover it tightly with aluminium foil. Keep aside

Keep 1 tbsp of sugar aside. In a food processor, mix together the all purpose flour, salt, both sugars, and vanilla essence. Then add the butter pieces and 1/4 cup of rolled oats. Pulse it all together till the mixture comes together into lumps. Use a spatula to scrape the bowl down. Add the remainder of the 1/4 cup of rolled oats and pulse a couple of times till it is blended into the the mixture, but not completely powdered down.

Place this on a baking tray lined with parchment paper or a silicon mat. Shape it in a square similar to the size of the baking tin containing the apple crumble. It will be about 1/2 inch in thickness. Place this baking tray with the topping  mixture onto the middle rack and the baking tin containing the apple mixture on the lower rack in the oven.

Bake these for 20 minutes. Turn the baking tray once by 180 degrees, so that the crust gets cooked evenly. The crust will be lightly browned at this time.

Remove both the baking tray and tin from the oven. 
Increase the temperature of the oven to 375F.
Remove the foil covering the baking tin and then by lifting the mat/paper slide the crust onto the apple mixture. Sprinkle 1 tbsp of sugar on the top of the crust. Place this tin back into the oven on the lower rack and bake it for 25 minutes till the crust is browned and the apple mixture is bubbling.

Serve warm with a scoop of vanilla bean ice cream.


Tips
If you do not have 8 apples, you can also substitute some pears instead. 
You can use a spatula to break the crust and place it piece by piece onto the apple mixture, till the mixture is covered completely.

Monday, January 2, 2012

Nankhatai - Delicious Eggless Indian Shortbread Cookies

A very Happy New Year to all my blog readers. I hope you had  great first of January and are charged up to start the new year with good food. I thought what was better than to start the new year with a recipe of delicious Indian shortbread cookies, called Nankhatai. These are rather rustic and delicious and moreover eggless and extremely easy to prepare.


These heavenly cookies are rather hard to find. When I was growing up, one could never find them in regular grocery stores. These had to be bought from bakeries (which used to filled with the divine aroma of cookies and cakes). And then there were some door to door vendors who used to cart them in a big tin box on a bicycle and sell them. Of course, the easiest way to access them was when Mom baked them at home, but that not very frequent. And now, I find it is even more difficult to find these. So, when I really want to eat some, I need to order them online from Indian bakeries in other states. I finally decided to make them at home. My husband was quite insistent that these be the original, rustic cookies/biscuits without any nuts or additions and so, I kept it very simple. These turned out absolutely great.  The best part was that my toddler daughter was also involved throughout the making of this recipe and she thoroughly enjoyed it and then ate the cookies with relish.


Ingredients
1 cup maida/ all purpose flour
1/2 cup unsalted butter
1/2 cup powdered sugar
1/8 tsp cardamom powder
1/8 tsp salt
1/4 tsp baking powder


 Method
Sieve together the all purpose flour, salt, cardamom powder and baking powder and keep aside. Whip the butter till it is fluffy. Then add the powdered sugar to it and blend it well together. Then add the all purpose flour mixture, a little at a time till it is completely incorporated into the butter. At this stage, the mixture will come together in a dough like consistency. Knead it to form a smooth dough and then cover it with plastic wrap and keep aside for about 20-30 minutes. Then make small balls of dough, about 1.5-2 inches in diameter. Keep these on a cookie or baking sheet lined with parchment paper or grease the sheet with a little oil. Keep at least an inch between the dough balls, so that there is enough space for the cookies to spread out as they bake.


Preheat the oven to 300F. Bake these for about 20-25 minutes, till lightly browned. Let them cool on a cooling rack. Store in an airtight box.


Tips
You can substitute whole wheat flour (either pastry or the ones used to make rotis) for the all purpose flour. Keep the butter out of the fridge at room temperature for about an hour before you start baking, so that the butter and sugar whip well together. If you use salted butter, then skip the salt. Use powdered sugar, not icing sugar. You can blend regular sugar in the mixer and powder it very fine.