Welcome to my blog

I hope you will find the recipe you are looking for your occasion here.

Now video instructions are available for select recipes and can be accessed at

Gardening and Cooking Made Easy

The latest 5 recipes are displayed on the
main page. For more recipes, you can browse the archive, click on the labels in the index to the left or use the Custom search below to look for a specific recipe.


Search for more results

Custom Search

Friday, July 20, 2012

Palmiers or Elephant Ears (Puff Pastry Cookies)

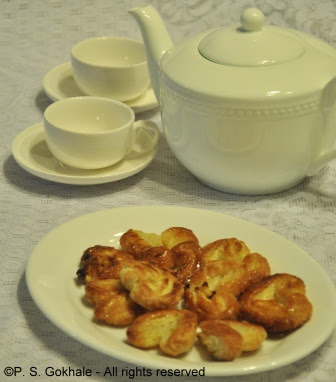
When  I was a growing up, as a treat, my Mom used to get me a packet of these special heart shaped cookies. I think they were called Little Hearts. Last year I happened to spot a packet of heart shaped cookies in the local store. They had a a lovely glaze, and they reminded me of those childhood cookies, though they were much larger in size. So, I decided to try them out and bought a packet. I am so glad that I did because these turned out to be almost the same. Of course, I never saw them in the store again and I also hadn't written down the name of the cookie that I could search for it. Then, a few months later, I caught a cooking show online and saw that it was called Palmiers or Elephant ears and was rather easy to make. I furiously noted down the recipe. I finally made it a couple of weeks ago. I remembered that I had a packet of frozen puff pastry sheets in the freezer and needed to use them up. I didn't have a lot of time and wanted to make something easy, and as I was browsing through my recipe book, I came across the palmiers recipe. It took less than an hour including the baking time to cook these wonderfully delicious cookies and all of us enjoyed it thoroughly with some coffee.


Ingredients
1 cup sugar
1/8 tsp salt
1 sheet puff pastry, defrosted per package instructions


Method
Preheat the oven to 400 F. Line a cooking sheet with parchment paper.

Mix the sugar and salt well. Spread out half a cup of the sugar and salt mix, onto the surface on which you will roll out the pastry sheet. Spread it out into an even layer of about 13 by 13 inch square. Then spread the pastry sheet on this layer of sugar. Then spread the remaining half cup of sugar and salt mixture onto the top of the pastry sheet so that the pastry is between two layers of the sugar and salt mix.

Now roll the pastry sheet out so that it is approximately 13 by 13 inches in size. This will embed the sugar onto the top and the bottom side of the pastry sheet. Now, fold the sides square of the square towards the center so that they meet exactly midway. Repeat this step and again fold the sides of the folds created in the first step towards the center, so they meet midway. Then fold one half over the other half. Finally, it will look like there are 6 layers of the pastry sheet on top of each other formed into a roll.

Then cut the dough roll into thin pieces about half a centimeter in width. Place the slices cut side up onto the cookie sheet. Bake this in the oven for 7 - 10  minutes on one side till caramelized. Then flip the cookies over and bake the cookies on the other side for 4-5 more minutes till cookies are caramelized on the other side as well. As these cookies bake, the folds will open and puff up and the cookies will get the heart shape. Cool these on a cooling/baking rack.


Tips
There will be some sugar left after you roll out the pastry dough, you can sprinkle this on top of the cookies before baking for additional sweetness. You can also mix in cinnamon into the sugar, salt mixture for a different flavor. Store these after they are completely cool in an airtight container. The crisp cookies last for a couple weeks and do not have to be refrigerated.

Tuesday, July 17, 2012

Pineapple Cake with Whipped Cream icing

I enjoy baking and icing cakes. I have been trying out a variety of  cakes off late. One of my friends suggested that the next time I bake a cake, I should make a pineapple cake. Well, it was her birthday recently and I got an opportunity to try it out. I decided to make it for her. I was able to work the pineapple into the cake batter and infuse a good amount of pineapple flavor into the cake, by adding chopped pieces into the layers of the cake. I was very happy with the result. I iced it with a lightly sweetened whipped cream icing. Absolutely delicious!


Ingredients
Cake
1and 1/4 cups, plus 2 tbsp of all purpose flour (maida)
1 tsp baking powder
1/8 tsp salt
1/2 cup butter - room temperature
1 cup sugar
2 eggs
1 tsp vanilla essence
1/2 cup pineapple juice (unsweetened)
1/4 cup pineapple pieces, canned and chopped finely

Icing
2 cups  heavy whipping cream
4 tsps powdered sugar
1/2 tsp vanilla essence

Filling
1/4 cup pineapple pieces, canned and chopped finely
whipped cream icing (see above)


Method
Pineapple Cake
Grease a baking dish with some butter and dust with some all purpose flour. Preheat the oven to 350F.

Sieve all the dry ingredients together and keep aside. Sieve these ingredients a couple of times. In another bowl, whisk together the butter and sugar. Beat it till the butter is fluffy. Add one egg at a time to this and beat each egg into the mixture till it is nice and fluffy. Add the vanilla essence. Add one third of the dry ingredients to the batter and fold it in. Then add half of the pineapple juice and mix. Alternate between the pineapple juice and the dry ingredients till they are all incorporated into the batter. Then add the pineapple pieces to the batter and fold it in carefully. Do not over mix and deflate the batter.

Bake the cake at 350 F for about 30 minutes. Use a knife and insert it into the center of the cake. If it comes out clean then the cake is ready. If not, bake for a few more minutes.
Take if out and let the pan cool on a wire rack for 10-15 mins. Then invert the pan onto the cooling rack and slide the cake out. Let the cake cool if you wish to ice it.


Icing
In a mixing bowl, mix the heavy cream, essence and sugar and using a hand mixer or whisk, whisk it till the cream has thickened and when you lift the whisk, the cream stays in peaks.


Assembly
Slice the cake into two pieces horizontally. Ice the lower layer with a layer of whipped cream. Next spread out an even layer of the pineapple pieces on top of the whipped cream layer. Then place the next cake layer of the cake on top. The whipped cream and pineapple pieces are sandwhiched between the two cake layers. Then cover the cake with the whipped cream icing. Decorate with maraschino cherries and pineapple pieces.


Tips 
Raw pieces of pineapple are quite tough and hence use canned pineapple in this recipe.
While making the batter, ff the eggs are separated and the whites beaten separately before being added to the batter, the cake will be lighter. You can add the yolks right after the butter and sugar. But fold in the egg whites after all the dry ingredients are incorporated into the batter.
Wrap the cake in foil and then some plastic wrap before you freeze it. The cake will stay in the freezer from a couple of weeks to a month. The cake should be completely cooled down before icing it. If need be, refrigerate the cake or freeze it for an hour before you ice it.

Thursday, July 12, 2012

Bisibele Bhath - A Rice Delicacy from Karnataka with a twist

Bisibele bhath is a speciality from Karnataka. It is a rice and dal preparation which is akin to "khichadi" another dal and rice preparation. My mom used to make this recipe when I was a child and I remember not really liking it because it had so many vegetables. She used to serve it with a lot of ghee (clarified butter) though, which used to make it finger licking delicious. Now that I am older and wiser, I understand the beauty of this dish. First, it is a one pot meal. Second, it has all the nutritional components, it has proteins from the lentils/dal, carbohydrates from rice and you can add many vegetables to it which take care of the vitamins and fiber aspect. And best of all, it is all cooked together with yummy spices in one single pressure cooker. It is a perfect dish for that very busy weekday and you can have the satisfaction of serving something healthy and good.


I make it in the fastest way possible and that is what this recipe is about. I use store bought spices. MTR brand's Bisibele Bhath masala is easily available in the Indian store and I generally have a packet of this at home. Next, I cut vegetables that I have on hand if I have time, or I open a pack of frozen mixed vegetables ( generally contains green beans, carrots, peas and corn) and use that. That makes it easy to cook and absolutely delicious too. The twist in this recipe is that I experimented with a new grain instead of rice this time. I replaced the rice entirely with quinoa and make the dish using the exact same method and I must say the result was amazing. If it had been a blind tasting, I couldn't have differentiated between the one made with rice and one made with quinoa. I am thrilled that I have been able to make this dish even healthier. The recipe and method stay exactly the same irrespective of whether you use rice or quinoa. So here goes.


Ingredients
1 tbsp ghee or oil
1/8 tsp mustard seeds
1/8 tsp cumin seeds
a pinch of asafoetida/hing
7-8 curry leaves
1-2 green or red chillies, to taste
1 onion, diced into small pieces
1 tomato, diced into small pieces
2 cups of frozen vegetables mix (washed) or you can cut fresh vegetables like potato, carrots, green bell pepper, green beans etc. into bite sized pieces
1 cup tur dal/pigeon peas
1 cup rice or quinoa
4-5  tsp bisibele bhath masala
1 tsp tamarind pulp (you can use store bought pulp or make fresh paste)
salt to taste
6 cups water


Method
Mix the dal and rice/quinoa and rinse the mixture 2-3 times with water and set aside.
In a pressure cooker, heat the oil and add the mustard and cumin seeds. Once they start to crackle, add the hing and curry leaves and chillies. Next add the onions and let them cook. Once they start to turn a little brown, add the tomatoes and let this cook till the tomatoes are cooked through. Then add the diced vegetables mix and stir. Let the vegetables fry for a minute and then add the dal and rice/quinoa mixture and mix all the ingredients well. Then add the bisibele bhath masala to this and again mix well so that all the vegetables and grains are coated with the masala. Then add the water, the tamarind paste and salt. Stir once and then close the lid on the pressure cooker and cook it based on how much time it takes to cook tur dal in your cooker. It takes about 3-4 whistles in my cooker. Serve this hot with ghee/clarified butter, accompanied with some raita and chips or papad.


Tips
Bisibele bhath when hot is runny and very soft. It thickens as it cools down.
Quinoa is rather small, so when you rinse it, it is difficult to drain the water using your fingers or a colander. So I use a tea strainer to catch the quinoa and drain the water.
To make tamarind paste from tamarind, soak a lime sized ball of tamarind in a little warm water (just enough to cover it). You can even microwave it for 20-30 seconds. Then squeeze out the pulp and use the tamarind. Cut the green chillies lengthwise, so they will be easy to spot and you can remove it later. I generally taste a little bit of the water to determine if I need to add more salt or spices when I make such rice dishes.

Tuesday, July 10, 2012

Grilled Vegetables

Last week, the weather cooled down slightly. The summer sun is so hot that we took advantage of this temporary cool down. We grilled some corn and vegetables and spent the afternoon in the backyard. It rained for a couple of hours in the morning while we went to the grocery store and picked up fresh and beautiful vegetables. We came home, my husband set up the grill, while I made a quick marinade and prepared the vegetables.  I generally make a tandoori style marinade, however this time I decided to keep it simple, given the warm weather. And the result was excellent. The best part was that I didn't marinate the vegetables for more than 30-40 mins while the grill was being set up and it didn't mask the natural flavors and sweetness of the vegetables. It was so delicious that we definitely ate a lot of vegetables that afternoon. I can't wait for the next cool down.


Ingredients
1 small yellow onion, finely diced (almost minced)
2 cloves garlic, minced
2 tbsp oil
1 red bell pepper, diced
1 green bell pepper, diced
1 yellow bell pepper, diced
1 zuccini, sliced
1 red onion, diced
small button mushrooms, whole (1-1.5 inches in diameter)
salt to taste
pepper to taste
lime


Method
I tried to dice and slice the vegetables into similar size large pieces about 1.5 to 2 inch cubes so that they could easily be skewered. In a large bowl, mix together the minced onion, garlic and oil. Then add some salt and pepper and the vegetables and mix them all so that they are coated with the onion and garlic mixture. Adjust the salt and pepper, mix again and let this sit for about 30 minutes. Then thread the vegetables onto the skewers. Once all the skewers are prepared, cook them on the grill for about 20 minutes. Keep rotating the vegetables so that they don't get burnt. Grill till they are cooked through and slightly charred. Take the remainder of the minced onion and garlic mixture from the marinade, place it on a piece of aluminium foil and let it cook on the grill as well. Cook this till the onion is soft.  Squeeze lime juice onto the vegetables and then top them with the grilled minced onion and garlic mixture. The result is lip smackingly delicious. 


Tips
If you make small pieces, the vegetables will fall off the skewer as they cook. So make sure that the peices are large enough. If the weather is not conducive to grilling outside, you can also broil the vegetables or even bake them at about 350-375 F.

Monday, July 9, 2012

Cabbage Stir Fry

This is one of the most basic recipes.  This is a recipe that you can use with almost any vegetable to give it an Indian touch. It has minimal ingredients and spices and is a healthy and delicious recipe.  The tempered seasoning gives it the wonderful taste. You can shred the cabbage or dice it into smaller pieces and then use it.  Whenever I make this recipe, it always reminds me of a friend who used to sit patiently for a long time and cut the cabbage into really tiny pieces. I never had the patience to do that and used to generally shred the cabbage into longer strips. This time around, when I started cutting the cabbage, I remembered her and decided to cut it into smaller pieces.  I will probably revert back to longer strips the next time around just to save some time, but any kind of variety is always good.


Ingredients
1 tbsp oil
1/8 tsp mustard seeds
1/8 tsp cumin seeds
a ping of asafoetida/hing
1/8 tsp turmeric powder
1-2 green chillies, slit lengthwise, to taste
1 onion, sliced or diced (cut to match the cabbage)
1/2 cabbage, shredded into strips or diced
salt to taste
1/2 tsp sugar (optional)


Method
In a large pan, large enough to hold all the cabbage, heat the oil. To this add the mustard and cumin seeds. Once they start to crackle, add the hing and green chillies. Then add the onions and cook till the onions are soft and transluscent, add the turmeric and mix well. Then add the cabbage and mix well to coat the cabbage with the seasoning and then cover the pan with a lid and let the cabbage cook on low heat. Stir it occasionally and let it cook covered till it is has softened and looks completely cooked. Then remove the cover and add the salt and mix. At this stage, you can also add the sugar, if you want. Cook for a minute or two more. Serve hot with chapati/roti or as a side.


Tips
Sometimes you forget to stir the cabbage and it sticks to the base of the pan and it may turn a light brown shade. As long as it has not burnt and totally become black, if you mix the cabbage well and then continue to let it cook completely, the cabbage will get a nice smoky, caramelized taste.
I try to add the turmeric after adding one ingredient to the oil (like onion), so that it doesn't burn. However, if I do add turmeric directly to the oil, I add the vegetable that I am cooking immediately, to prevent the turmeric from burning. It takes just a few seconds for it to burn completely in the hot oil, so be careful.
Also, do not add water to this recipe. Even if you are tempted to add water to the cabbage thinking how can I cook it covered for so long, without water, what if it burns, resist the temptation. Cabbage contains a lot of water and if you add more, it will spoil the taste and texture of the cabbage. Just make sure to cook it on low heat, and keep an eye on it and stir often so that it doesn't burn.

Tuesday, July 3, 2012

Schezwan Rice

Once you know how to make Schezwan sauce, then it is very easy to make schezwan rice or noodles. I use a variety of vegetables, generally whatever is available in the fridge to create a stir fried vegetable based in which I add cooked rice or noodles dish. Then I mix in an appropriate amount of Schezwan sauce. Schezwan rice is once of my favorite Indo-Chinese dishes. I used to eat it weekly or even more frequently when I was in college. There was a small restaurant across from my college where they used to make the most delicious Schezwan rice. It was this  memory that made me experiment with Schezwan sauce ingredients and try to develop that taste. Of course, they added ajinomoto in the restaurant, which is an ingredient that I skip. Instead I use celery in the sauce as well as the stir fry vegetable base.


Ingredients
1 cup rice, cooked
1 tbsp oil
1/2 onion, diced
1 garlic pod, minced
1 celery stick, sliced
1 carrot, diced
1/2 red bell pepper, diced
1/2 green bell pepper, diced
6-7 green beans, diced
1-3 tbsp schezwan sauce
salt to taste


Method
In a large pan (which can accomodate the cooked rice), heat the oil. Add garlic and onions. Stir fry till the onion startes to look transparent. Then add the vegetables in the order of the vegetable that takes the longest to cook to the one that takes the least amount of time. Here it would be celery, carrots, beans, and bell peppers. It does not take too long to cook each vegetable. The vegetable needs to be cooked, overcooked and soft/mushy. So each vegetable will take about a couple of minutes. Once all the vegetables have beeen cooked, add the cooked rice to it and stir well to mix the vegetables in with the rice. Then add the schezwan sauce to the rice. Add a little at a time to avoid getting it too spicy by adding too much at a time. Best way is to mix the rice and sauce well and taste as you go along. Once you have added enough sauce, adjust the salt. Serve hot.


Tips
If you have used deggi or kasmiri chilli powder in the sauce, you will be able to achieve a slight red color without adding food coloring. When you cook rice, add a little salt to it so that it is well distributed in the rice. Don't add a lot of salt, as the sauce has salt in it too. So final adjustment for the saltiness should be done at the end of the recipe. Cool the rice after cooking it. Try and separate out the grains before the rice cools down. This will help the rice grains stay separate instead of being stuck to each other. 

Sunday, July 1, 2012

Schezwan Sauce

Let me start off by saying that this probably has nothing to do with the Sichuan cuisine of China, but is an Indian interpretation of spicy sauce used to make many Indo-Chinese dishes (Indianized version of Chinese food). It is a sauce used to make Shezwan vegetable stir fries as well as rice or noodles. Once you have the sauce prepared then just mix it into your fried rice/noodles/vegetables preparation and lo and behold a simple stir fry gets transformed into something spicy and delicious. As always, I have made this sauce without ajinomoto/MSG, however you can add this in if you want. It is listed as an optional ingredient.  I feel it is the use of celery in this sauce which gives it a unique taste.


Ingredients
1/4 cup onion, finely chopped
1 tbsp garlic
1 tbsp ginger
3 tbps crushed red chillies or 8 whole dry red chillies
1/4 cup celery, finely chopped
2 tbsp oil
2 tbsp ketchup
1 tsp vinegar
1/8 tsp black pepper
1 tsp red chilli powder (preferable something like kashmiri chilli powder/deggi mirch)
1 tsp dry parsely
salt to taste
a pinch of ajinomoto/msg (optional)
couple of drops red food coloring (optional)
water to soak chillies


Method
Soak whole red chillies or crushed red chillies in water and boil it for a few minutes. Cool it and strain. If using whole chillies then pulse through the mixer or food processor and mince them.
Heat oil in a small saucepan. Add the garlic, ginger, onions and stir fry for a couple of minutes till the onion is cooked and soft. Then add the celery, the chillies, ketchup, vinegar, black pepper, red chilli powder and parsley. Stir and cook the ingredients for a  minute. Pulse this mixture through the mixer till a coarse paste is formed. Once the paste has been cooked, it is ready to be added to rice or noodles. Add a little bit at a time, mix and taste the rice/noodles. The paste is very spicy and if you add a large amount at a time then it make the entire dish very spicy. Store the extra paste in a glass bottle in the fridge.


Tips
Add a couple of drops of red food coloring once the paste is cool. This will help provide the red color to the rice which is generally seen when you order shezwan rice or noodles in the restaurants. Also, if you want to get the restaurant style taste you may want to add ajinomoto or msg to the paste. If you add this then make sure to taste the paste before adding more salt. However, the paste can be a little salty. When you add it to rice or noodles, then taste the preparation before adding additional salt. Since the paste has so many spices and acidic ingredients, it is better to store it in a glass jar. You can store this paste for a couple of weeks in the fridge.