Welcome to my blog

I hope you will find the recipe you are looking for your occasion here.

Now video instructions are available for select recipes and can be accessed at

Gardening and Cooking Made Easy

The latest 5 recipes are displayed on the
main page. For more recipes, you can browse the archive, click on the labels in the index to the left or use the Custom search below to look for a specific recipe.


Search for more results

Custom Search
Showing posts with label milk. Show all posts

Friday, August 8, 2014

Mango Cake

One of the best things about summer (other than the summer vacation) while growing up, was the abundance of mangoes and getting to eat mango and all the different dishes made from raw and ripe mangoes. I must confess, it is my favorite fruit. Of course, the best varieties that I have tasted have been in India and of all the ones available there while growing up, the "Alphonso" was my absolute favorite. The memory of walking into a room filled with the smell of ripe mangoes is still one of my happy memories.

The varieties that I have come across in the stores here are generally from the Phillipines or Mexico and I have found that they are more fibrous. The one that I like most among the ones that are easily available here, is the Ataulfo mango. Now, while this is found in the local store all through the year, the best taste is only found during summer, which is when the mango is in season.

I have made and different kind of dishes made with mangoes, but had never eaten a mango cake, which was infused with flavors of mango within the cake. So, I decided to experiment and the result was delicious. In fact, the first time I made it, it was gone before I could take a singe picture. I managed to sneak in one picture the second time I made it. I have also used it as a base in a mango mousse cake. It is absolutely mouth watering. Hope you like it as much as I did, when you make it.


Ingredients
1 and 1/4 cups, plus 2 tbsp of all purpose flour (maida)
1 tsp baking powder
1/8 tsp salt
1/2 cup butter - room temperature
1 cup sugar
2 eggs
1 tsp vanilla essence
1/4 cup mango pulp ( it is generally sweetened. it can be found in a store which carries Indian products)
1/4 cup milk
1/4 cup mango pieces, diced


Method
Grease a baking dish with some butter and dust with some all purpose flour. Preheat the oven to 350F.

Sieve all the dry ingredients together and keep aside. Sieve these ingredients a couple of times. In another bowl, whisk together the butter and sugar. Beat it till the butter is fluffy. Add one egg at a time to this and beat each egg into the mixture till it is nice and fluffy. Add the vanilla essence. Add one third of the dry ingredients to the batter and fold it in. Mix the mango pulp and milk together. Then add half of this mixture to the batter. Alternate between the milk and mango mixture and the dry ingredients till they are all incorporated into the batter. Then add the mango pieces to the batter and fold it in carefully. Do not over mix and deflate the batter.

Bake the cake at 350 F for about 30 minutes. Use a knife and insert it into the center of the cake. If it comes out clean then the cake is ready. If not, bake for a few more minutes.
Take if out and let the pan cool on a wire rack for 10-15 mins. Then invert the pan onto the cooling rack and slide the cake out. Let the cake cool if you wish to ice it.


Tips
To prevent the mango pieces from sinking to the bottom of the pan, dust a little flour on the pieces and coat them before folding them into the batter. Make sure to grease the pan completely and generously, so that the cake doesn't stick. You can also add a parchment paper to the base of the mold and grease it before pouring the batter if you want to be certain that the cake will come out easily. 

Monday, October 29, 2012

Phirni (Firni) - A Delicious Indian Pudding

This is the first time I made this recipe and it was also the first time that all of us tasted Phirni. It was well received by everyone. My husband gave it a great review and told me that it was a keeper. It is a recipe my mom made this festive season, and when she told me how to make it, I was very enthusiastic to make it. It is a relatively easy recipe and doesn't take a lot of effort, and tastes fabulous. You do need to plan for it a few hours ahead at least, as there is some pre-preparation, soaking time needed and then you need an hour or two of cool down time, as it is to be served cold. It is an easy recipe, with high returns, that you can make for any celebratory occasion or just for everyday dessert.


Ingredients
2 tbsp ghee/clarified butter
3 cloves
1 cinnamon stick,1/2 inch
1/4 cup rice
1/2 cup sugar
4 cups milk
a pinch of saffron
1 green cardamom, peeled and powdered
almonds, for garnish
raisins, for garnish


Method
Soak the rice for 1-2 hours (at least one hour). Drain the water and grind the rice coarsely. Heat the ghee in the saucepan. Then add the cloves and cinnamon stick and fry them for a minute till they are fragrant.  Add the rice and cook it for a couple of minutes. The rice will puff up as it absorbs the ghee. Roast the rice for another minute or so. Don't let it turn brown. Then add the milk to this and boil till the mixture thickens. Make sure to stir as it cooks, so that the rice doesn't stick to the bottom and burn. Then, add the sugar. The mixture will become a little liquidy again as the sugar dissolves to form syrup. Add the saffron and cook for a few more minutes. Then add the cardamom powder. The mixture should be thick, like a porridge. At this stage you can add in almonds and raisins. Pour the phirni into the serving cups/ramekins.  Cool for at least one to two hours before serving. Serve cold. As it cools, it will set and become like a thick pudding or custard. Garnish with almonds and raisins before serving. Traditionally this is served in small earthen pots, however you can serve in  any dessert bowls.


Tips
Make sure to pour it into the serving dishes before it cools, so that it sets properly. This does need a  little bit of attention and some stirring to make sure that the rice doesn't stick to the bottom and burn. It is easier to make this in a non stick saucepan. Cook it on low heat. If you are cooking it in a steel vessel, stir more frequently (not continuously).

Saturday, November 5, 2011

Kesar Pedha/Peda

My last post was about "Mava/Khoya". So, it was natural to follow it up with the easiest and one of the most traditional Indian sweets - "Pedha".  Pedha is possibly the easiest Indian sweet that you can make if you have mava at home (whether home made or store bought). It is a great mithai to make for potlucks too, being very easy to scale up. Cooking time is around ten minutes or so and you can serve them as soon as the rolled out pedha cools down to room temperature.


There are many kinds of pedhas and the easiest one is kesar pedha or pedha with saffron. Of course, there are also the more complicated ones that take a lot of cooking time and are more effort intensive like the kandi pedha(Dharwadi pedha). Pedhas are a staple at any traditional Indian function.


Ingredients
2 cups mava
3/4 - 1 cup powdered sugar
1 tsp cardamom/elaichi powder
10-15 flakes of saffron
1 tsp milk
1 tsp ghee


Method
Grate or cruble the mava into small pieces and measure 2 cups.  Warm the milk a little and add the saffron strands to it, mix and keep aside. In a pan, add some ghee and the mava and cook on low heat. Stir so that it doesnt stick to the bottom of the pan. You will need to cook for about 7-10 minutes and you will start getting the aroma of mava being roasted. At this stage the color of the mava will start to turn a very light brown (almost beige). Then add the cardamom powder and the saffron milk and mix well. Let it all cook together, till the milk evaporates and then take it off the heat. When the mixture cools down where it is warm to touch, add the powdered sugar and mix thoroughly.


Then, apply a little ghee to your hands and take small amount of this mixture and roll it into a ball and flatten it to form a disc. The disc should be around an inch in diameter. Your pedha is ready. Let the warm pedhas cool down and serve at room temperature.


 These will last without refrigeration for a couple of days. For longer term storage, store in the fridge. You can store it in the fridge for two-three weeks.


Tips
I added on 3/4 cup of sugar when I made pedhas, but if you want it to be sweeter, add more to taste.
An extremely easy method to make pedhas is to reduce condensed milk and roll pedhas from it when the mixture solidifies. However, the major drawback of this method is that you are not at liberty to choose the amount of sugar that gets added to the pedha. Condensed milk tends to be very sweet and hence your pedhas will also turn out very sweet.
Upon creating the flattened pedha disc, you can add a slice of almond or pistachio on top of the pedha to decorate it.

Saturday, June 25, 2011

Rasgulla - A Cottage Cheese Dessert

Rasgulla or Rosogolla is possibly the most well known Bengali dessert. These are made from cottage cheese also known as paneer. Fresh paneer is kneaded into small balls and then cooked in syrup. The result is light dumplings which have a slightly sponge like texture. These absorb the syrup and are generally not overly sweet. In comparison to "gulab jamun", these are definitely much lighter and spongier in texture and not as sweet.


As a child, I refused to try this sweet. I tasted it for the first time when I was in the 7th grade and was delightfully surprised by the light, not too sweet, refreshing taste. In the last few years, I have only eaten the canned version found in the Indian store and those leave you with a tinny after taste. So, when my cousin requested that I make this when he visited me, I was more than happy to oblige. Oh and they turned out so good, that I haven't been able to eat the tinned ones ever since. I used my paneer recipe and then experimented with the method from my friend's blog. My conclusion was that the recipe is not too difficult and the returns on effort are truly worth it. Now, one of my friends is expecting her first child and has been craving this sweet for a while. I wish I were in the same city as hers to prepare it for her, but as that is not possible, giving her the recipe is the next best thing I can do. This one's for you M!


Ingredients
Freshly prepared paneer made from Whole milk - Refer to the paneer recipe post for the method of preparation and ingredients
2 cups of sugar
5 cups of water


Method
After you have rinsed out the milk solids separated from the whey water and drained out excess water, you will then knead the paneer to bring all these milk solids together. At this stage, knead the paneer for a couple of minutes. At the end of the kneading process, the paneer should come together into a soft dough. At this stage you are ready to roll the paneer into small balls. Use a light hand to roll out the balls. Remember these balls will puff upto almost double the size upon cooking, so roll them out into balls about an inch in diameter. This will ensure that the rasgulla is not too big and can be eaten easily. 


Once all the balls are rolled out, dissolve the sugar in water to create a simple syrup. Use a deep vessel which can be covered with a lid. Heat the syrup till it starts boiling and then add these paneer balls into the syrup gently, one at a time. Now at this stage, if your paneer is not well kneaded or the balls have become too dry, they may start cracking or disintegrating. So add one or two balls and observe them for a minute before proceeding with the rest.  Then add the remaining balls to the syrup annd cook these in the open pan for 5 minutes. Then cover with a lid that has a vent. Use a lid with a vent, else the syrup may boil over (you need to release the steam generated while the paneer is being cooked). If you have a pressure cooker, remove the whistle from the lid and then use the pressure cooker to cook the paneer balls. Cook these covered for about 5-7 minutes (this is when they will double in size). Then, take off the lid. At this stage the paneer balls would have doubled in size. Then add about 1/4 cup of water and cook it uncovered for a five more minutes. Your paneer has now been converted into the delicacy that is "rasgulla". Rasgullas as accompanied by the syrup, so do not scoop them out of the syrup. Let them cool down in the syrup. Do not cover the pot before the rasgullas cool down. Keep it in the fridge for at least an hour before serving. Serve cold as dessert.


Tips
Squeeze out excess water, and it is ok to drain the water completely. Then as you start kneading the paneer, add a tsp or so of water at a time to get it together into a dough. A little moisture is needed to give the paneer it's dough like texture upon kneading. If while kneading it, it feels too crumbly, then add a tsp of water and knead. You know you have kneaded enough when the paneer gets a playdough or clay like texture. Hands will get slightly greasy upon kneading the paneer. Do not use low fat or skimmed milk. Fat content is needed, else you will not be able to form the paneer balls. Cover the rolled out paneer balls with a damp cloth (not wet), especially during summer and if you live in a dry climate. This will prevent the paneer balls from developing cracks.  

Monday, September 20, 2010

Paneer - Basic Recipes

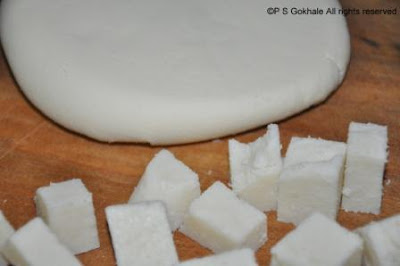
I used to think that making paneer would be a tedious and time consuming process and was resigned to using the store bought one. However, I always missed the fresh taste of paneer that I remembered from childhood. So finally, I decided to try it out and the result was so good that I always make paneer at home. It is definitely not a long, cumbersome process. You need to keep an eye on your milk, so it doesn't boil over, but thats about the extent of attention that it needs. Make it a day ahead of when you want to use it and it will be well set by the next day. That way you can make those perfect cubes that you get in restaurant dishes.


Ingredients
1/2 gallon milk
1/4 cup white vinegar
3/4 cup water
linen cloth to tie the paneer in
salt (optional)


Method
Heat the milk in a thick bottomed pan. Mix together the vinegar and water. Once you see small bubbles forming on the top, add the vinegar-water mixture and stir it around. The milk solids will separate from the water and you will get whey and curd. Using the linen cloth and a colander, drain out the whey water and keep that aside. The milk solids/curd is the paneer. Squeeze out the remaining whey water from the paneer and then rinse the paneer, so that the vinegar remnants are washed out. If you want to use the paneer in a vegetable, then add a little salt to the milk solids at this stage and then knead the paneer thoroughly. It will come together after a couple of minutes and will become soft and dough like. Then tie this in the linen cloth, making sure that the cloth is tightly wrapped around it. Place a heavy pan on top to flatten it out. You can also shape it a bit and then tie it up. Once its cooled down, keep in the fridge for a few hours. Once its set, you can use it in your paneer preparation.


Tips
Use a pan with a thick bottom, else the milk at the bottom may get burnt. You can use whey water to make bread or chapati dough. If you use a lower fat or fat free milk, the resultant paneer will be very crumbly. Adding salt to the paneer when kneading it will make it flavorful and it will not taste bland when you add it to your paneer vegetable dish.If you plan to make a sweet dish using the paneer, do not add salt to the paneer. You can freeze the paneer for a few weeks.