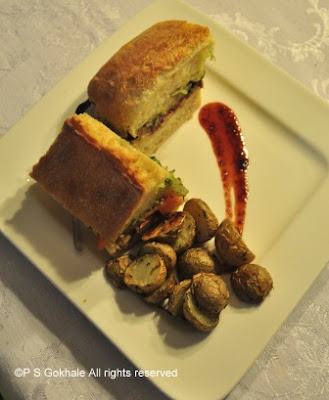
It has been a while since I have updated the blog, however the experimentation is going strong and I have been able to create delicious, repeatable recipes. I have been wanting to work with sourdough for a while and I had even gotten some starter from a friend a few years ago, but didn't really end up using it. I love baking breads and instant yeast ones have always been my go to. So, with the COVID-19 situation, and lack of yeast and flour in the stores and tonnes of sourdough posts online, I thought I would give it a serious try again. I kept procrastinating though to start my starter and when a friend offered to share her sourdough starter, I took her up on the offer.


For baking the bread
4 tbsp oil to bake the bread
1 tbsp oil for marination
vegetables, sliced or shaped for placing on dough (sliced onions, garlic, cherry tomatoes, thin slices of beet root, thin slices of eggplant, chives, scallions, beet root leaves, spinach etc)
rosemary or other herbs


So the way I view it, sourdough is very much like a biga and when it is fed it is more active and the resultant dough rises faster than when using an unfed starter. Also, the rise time is very variable depending on the amount of starter used, whether it is fed or not etc. But given that you don't have to activate the yeast, as long as you are patient to wait for the first and second rises till the dough doubles, you will be successful with sourdough.
This focaccia recipe is based on my previously documented recipe. That is a yeast based recipe and I converted that to a sourdough based recipe. Just I doubled the quantity to make a large loaf in my rectangular 11X14 cake tin. So you can make 2 smaller loaves or halve it to make a smaller bread. To store it, let it cool down completely and then wrap in cling wrap and then foil. This can then be frozen or stored in the fridge for a longer time.
Ingredients
For the bread dough
For the bread dough
1 and 2/3 cups of sourdough starter
2 cups water
4 tbsp oil
5 cup all purpose flour
3 tsp salt
For baking the bread
4 tbsp oil to bake the bread
1 tbsp oil for marination
vegetables, sliced or shaped for placing on dough (sliced onions, garlic, cherry tomatoes, thin slices of beet root, thin slices of eggplant, chives, scallions, beet root leaves, spinach etc)
rosemary or other herbs
Method
Mix together the starter, water and oil and stir. Then add the flour and stir it in. This can be done with a wooden/steel spoon. It will become a very sticky and soft dough. Keep aside for 20 mins. Then sprinkle the salt over the dough and mix it well, into the dough. Then let the dough rise for 30 mins.
The dough will rise. Coat a scraper or spatula with some oil and then use it to fold the dough in towards the center, while turning the bowl. Fold the dough and then turn the bowl 90 degrees, this is the first turn. Do this 7 more times for a total of 8 turns till all the dough is folded towards the center. Cover the bowl with plastic wrap and then let the dough rise for another 30 minutes. Again repeat the process of folding the dough and then let the dough rise for another 30 minutes. Again fold the dough and let it rise for 30 minutes. (At the end you would have a total of 3 foldings and 3 rises)
Now prepare a 11X13 rectangular pan by pouring 2 tbsp oil and swirling it around the pan to coat it. At this point in time, you can split the dough into two small equal parts and use two baking tins to bake two individual breads. Place the dough into the tin and then using your fingertips stretch it to cover the pan. If it cannot be stretched and springs back, then let it rest for 10-15 mins and stretch again to fill the pan.
At this point you can bake it but if you want the sourdough taste and added depth of flavor, refrigerate this pan overnight or for 8-12 hours for the sourdough taste to develop.
Next day or when baking the bread, remove the pan from the fridge and let it sit at room temperature for 30-60 mins. At this point the bread dough will be bubbly and will have risen to at least double the volume.
Toss the vegetables that you want to decorate with in some oil and keep aside. Preheat the oven to 425 F.
Dimple the bread by poking it lightly with your finger tips, being careful to not deflate the bread too much. Then drizzle the remaining 2 tbsp oil over the bread. Some of it will pool in the dimples created on the dough.
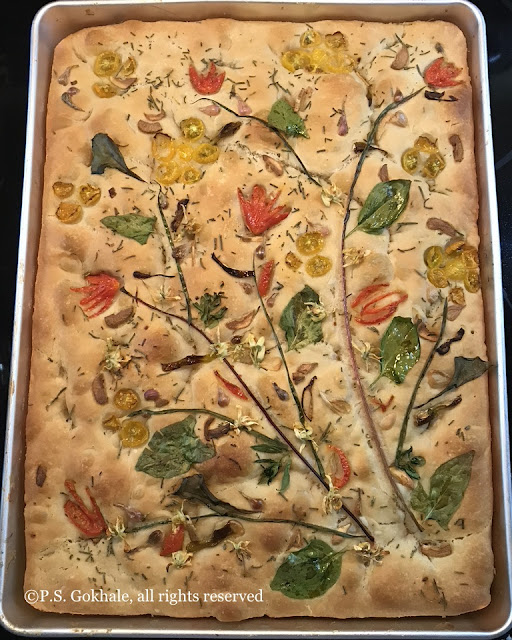
Then sprinkle herbs (I use rosemary a lot while making focaccia), arrange the vegetables that you want to flavor it with or you can take it a step further and decorate the bread with the vegetables. (This is optional.)
Bake it for about 40 mins till it is a golden brown. The bread is ready when it registers 200 F on a cooking thermometer. Let it cool for 5-10 minutes in the pan and then remove it and let it cool on a rack.
Another indication of whether the bread is ready is when you tap on it, you can hear a thud to indicate its hollow and baked. Since this is a big bread and in the pan, it will be difficult to use this method but you can use it if baking two smaller breads.
Serve it warm with soup or cheese. Or you can make delicious sandwhiches with it. Or just enjoy it plain.

Tips
At this point you can bake it but if you want the sourdough taste and added depth of flavor, refrigerate this pan overnight or for 8-12 hours for the sourdough taste to develop.
Next day or when baking the bread, remove the pan from the fridge and let it sit at room temperature for 30-60 mins. At this point the bread dough will be bubbly and will have risen to at least double the volume.
Toss the vegetables that you want to decorate with in some oil and keep aside. Preheat the oven to 425 F.
Dimple the bread by poking it lightly with your finger tips, being careful to not deflate the bread too much. Then drizzle the remaining 2 tbsp oil over the bread. Some of it will pool in the dimples created on the dough.
Then sprinkle herbs (I use rosemary a lot while making focaccia), arrange the vegetables that you want to flavor it with or you can take it a step further and decorate the bread with the vegetables. (This is optional.)
Bake it for about 40 mins till it is a golden brown. The bread is ready when it registers 200 F on a cooking thermometer. Let it cool for 5-10 minutes in the pan and then remove it and let it cool on a rack.
Another indication of whether the bread is ready is when you tap on it, you can hear a thud to indicate its hollow and baked. Since this is a big bread and in the pan, it will be difficult to use this method but you can use it if baking two smaller breads.
Serve it warm with soup or cheese. Or you can make delicious sandwhiches with it. Or just enjoy it plain.
To store bread, wrap it in cling wrap and then in foil. Frozen bread can last for 4-6 months. Ensure that it is well wrapped so it does not pick up smells from the fridge or freezer. If you have a pizza stone, place it in the oven when pre-heating it. To reheat, heat it in the oven.If the vegetables start to burn, you can tent the pan with a foil after 20-25 mins. Also, you can add vegetables that may burn during the last 15 mins of baking time.