Welcome to my blog

I hope you will find the recipe you are looking for your occasion here.

Now video instructions are available for select recipes and can be accessed at

Gardening and Cooking Made Easy

The latest 5 recipes are displayed on the
main page. For more recipes, you can browse the archive, click on the labels in the index to the left or use the Custom search below to look for a specific recipe.


Search for more results

Custom Search

Saturday, June 6, 2020

Sweet Red Bean Bread

This is a delicious bread filled with a sweet red bean filling. It is inspired by the Japanese anpan bread but is not a traditional recipe. This has been shaped as a star.  You can get really creative and shape it in any shape, like how we shaped it into a pretty bun earlier. This is a really great breakfast recipe but we often enjoy it as dessert as well. And it pairs really well with milk or coffee.


You can find a detailed tutorial on how to make the bread at the youtube link below.


Video, detailed Instructions for the sweet red bean bread

Ingredients
For the filling
3/4 cup uncooked red beans (we need only 1 cup of cooked beans)
4 cups of water
3/4-1 cup of sugar

For the dough
2 cups all purpose flour
1/4 cup potato flour (optional)
1/2 cup milk
1/2 cup water (minus 1 tbsp)
3 tbsp sugar
2 tsp yeast
1 tsp salt
3 tbsp butter
1 tsp vanilla essence
1 egg - well beaten to be used for the egg wash


Method
Soak the red beans in 2 cups of water for at least an hour. Then discard the water and add the beans to the pressure cooker (or instant pot). Add 2 cups of water and then pressure cook the beans till completely cooked. I cooked it in the instant pot for 30 mins on the beans/chilli mode and then let the pressure release naturally.

3/4 cups of beans cook to make 2 cups of cooked beans. I blended one cup of cooked beans and added 3/4 cup of sugar and made a puree. Then cook the bean paste in a pan to thicken it. Let it cool down.

While the beans are cooking, make the dough. First add the milk, 1/2 the water, sugar and yeast to the bowl of a stand mixer, and set aside for 10 mins to activate the yeast. The mixture will get frothy.  Sift the flours together, so that there are no lumps. Then add the salt, vanilla essence and butter to the frothy liquid. Turn the mixer on and using the dough hook, add the flour. Then slowly add the rest of the water, a little at a time till till a soft dough is formed. Then knead for  about 7-10 mins. Scrape the bowl down as needed.

Shape the bread into a ball and transfer to a lightly oiled bowl. Cover it with plastic wrap and let it rise for about an hour till it is doubled.

Divide the dough into 4 equal parts and shape into balls and let them rest for 10 mins. Divide the bean filling into 3 equal parts.

Now roll one dough piece into a circle with a 10 inch diameter. Place this on a baking sheet lined with parchment paper. Then, apply the egg wash. Dot the surface with the filling and use your finger tips to spread it. Then, repeat this process 2 more times. Once the final circle of dough is placed, then it is time to shape the dough

Place a small bowl/cookie cutter/measuring cup with about a diameter of 1.5-2 inches in the center of the dough. Then make 16 equal part of the dough. The bowl in the center will prevent the dough from getting cut through. At the end of this there will be small circle in the center where the bread is joined together and 16 strands. Take two strands, and twist them outwards twice (opposite in direction to each other) and then pinch the ends together to form a sharp point. You will have 8 star petals and the bread will look like a star or a flower.

Cover it lightly with plastic wrap and let it rise for 45 mins to an hour till it is risen and puffy. Then, apply the final layer of egg wash.

Preheat the oven to 400F and then bake the bread for 15-20 mins. The bread is ready when the internal temperature reaches 200F, which takes about 20 mins. You can also tap the bread to check for the hollow sound.

Cool the bread for 10 mins on a cooling rack and then it is ready to eat. You can also bake it the previous night for breakfast. Heat it in  the oven at 350 F till it is warmed through, about 10 mins and then serve warm. It tastes great with milk.


Tips
The potato flour helps retain moisture and keeps the bread moist after baking. You can skip this ingredient. Use room temperature water and milk so that you do not accidentally kill the yeast. Resting the  dough relaxes it makes it easy to roll out. If you try to spread the filling with a spatula, you may stretch or tear the dough and it is easier to gently spread it using the finger tips. When shaping the dough, pinch the edges well, so that they don't unravel when the dough proves the second time. Instead of a star, you can shape it into any other shape and then let the dough undero a second rise. 

Tuesday, May 26, 2020

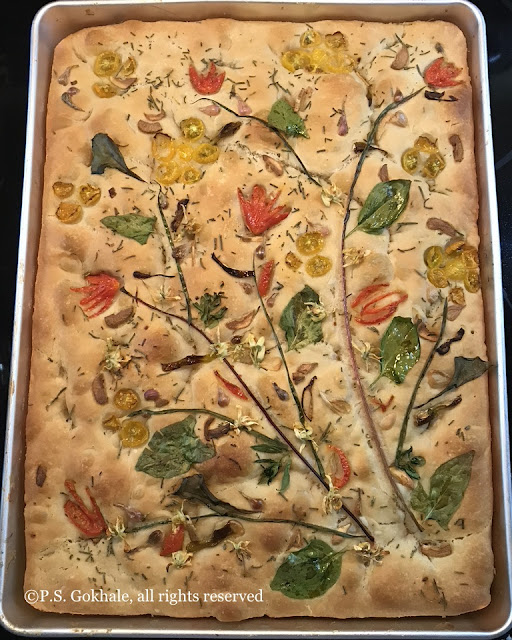
Sourdough Focaccia Bread

It has been a while since I have updated the blog, however the experimentation is going strong and I have been able to create delicious, repeatable recipes. I have been wanting to work with sourdough for a while and I had even gotten some starter from a friend a few years ago, but didn't really end up using it. I love baking breads and instant yeast ones have always been my go to.  So, with the COVID-19 situation, and lack of yeast and flour in the stores and tonnes of sourdough posts online, I thought I would give it a serious try again. I kept procrastinating though to start my starter and when a friend offered to share her sourdough starter, I took her up on the offer.

So the way I view it, sourdough is very much like a biga and when it is fed it is more active and the resultant dough rises faster than when using an unfed starter. Also, the rise time is very variable depending on the amount of starter used, whether it is fed or not etc. But given that you don't have to activate the yeast, as long as you are patient to wait for the first and second rises till the dough doubles, you will be successful with sourdough. 

This focaccia recipe is based on my previously documented recipe.  That is a yeast based recipe and I converted that to a sourdough based recipe. Just I doubled the quantity to make a large loaf in my rectangular 11X14 cake tin. So you can make 2 smaller loaves or halve it to make a smaller bread. To store it, let it cool down completely and then wrap in cling wrap and then foil. This can then be frozen or stored in the fridge for a longer time.


Ingredients
For the bread dough
1 and 2/3 cups of sourdough starter
2 cups water
4 tbsp oil 
5 cup all purpose flour
3 tsp salt

For baking the bread
4 tbsp oil to bake the bread
1 tbsp oil for marination
vegetables, sliced or shaped for placing on dough (sliced onions, garlic, cherry tomatoes, thin slices of beet root, thin slices of eggplant, chives, scallions, beet root leaves, spinach etc)
rosemary or other herbs


Method
Mix together the starter, water and oil and stir. Then add the flour and stir it in. This can be done with a wooden/steel spoon. It will become a very sticky and soft dough. Keep aside for 20 mins. Then sprinkle the salt over the dough and mix it well, into the dough.  Then let the dough rise for 30 mins.

The dough will rise. Coat a scraper or spatula with some oil and then use it to fold the dough in towards the center, while turning the bowl. Fold the dough and then turn the bowl 90 degrees, this is the first turn. Do this 7 more times for a total of 8 turns till all the dough is folded towards the center. Cover the bowl with plastic wrap  and then let the dough rise for another 30 minutes. Again repeat the process of folding the dough and then let the dough rise for another 30 minutes. Again fold the dough and let it rise for 30 minutes. (At the end you would have a total of 3 foldings and 3 rises)

Now prepare a 11X13 rectangular pan by pouring 2 tbsp oil and swirling it around the pan to coat it.  At this point in time, you can split the dough into two small equal parts and use two baking tins to bake two individual breads. Place the dough into the tin and then using your fingertips stretch it to cover the pan. If it cannot be stretched and springs back, then let it rest for 10-15 mins and stretch again to fill the pan.

At this point you can bake it but if you want the sourdough taste and added depth of flavor, refrigerate this pan overnight or for 8-12 hours for the sourdough taste to develop.

Next day or when baking the bread, remove the pan from the fridge and let it sit at room temperature for 30-60 mins. At this point the bread dough will be bubbly and will have risen to at least double the volume.

Toss the vegetables that you want to decorate with in some oil and keep aside. Preheat the oven to 425 F.

Dimple the bread by poking it lightly with your finger tips, being careful to not deflate the bread too much. Then drizzle the remaining 2 tbsp oil over the bread. Some of it will pool in the dimples created on the dough.

Then sprinkle herbs (I use rosemary a lot while making focaccia), arrange the vegetables that you want to flavor it with or you can take it a step further and decorate the bread with the vegetables. (This is optional.)

Bake it for about 40 mins till it is a golden brown. The bread is ready when it registers 200 F on a cooking thermometer. Let it cool for 5-10 minutes in the pan and then remove it and let it cool on a rack.

Another indication of whether the bread is ready is when you tap on it, you can hear a thud to indicate its hollow and baked. Since this is a big bread and in the pan, it will be difficult to use this method but you can use it if baking two smaller breads.

Serve it warm with soup or cheese. Or you can make delicious sandwhiches with it.  Or just enjoy it plain.


Tips
To store bread, wrap it in cling wrap and then in foil. Frozen bread can last for 4-6 months. Ensure that it is well wrapped so it does not pick up smells from the fridge or freezer. If you have a pizza stone, place it in the oven when pre-heating it. To reheat, heat it in the oven.If the vegetables start to burn, you can tent the pan with a foil after 20-25 mins. Also, you can add vegetables that may burn during the last 15 mins of baking time.

Friday, September 27, 2019

Khasta Kachori

I was never fond of kachoris while growing up and hadn't tried making them at home. However, after a request from a family member, I decided to make it at home. These kachoris turned out delicious. I saw a few videos on youtube and understood that the key to a pastry/khasta texture and bite is to fry the kachori on really low heat. 

Also, I have realized the kachoris taste delicious with stuffing like aloo sabji or choley instead of just chutney. So next time you make or buy kachoris, try it out with some stuffing.


Ingredients:
The cover
4 cups all purpose flour
3 tsp salt
8 tsp ghee
water to knead a soft dough

The filling
4 heaped tsp coriander seeds
3 heaped tsp fennel seeds
1 heaped tsp cumin seeds
2 tbsp oil
¼ tsp Asafoetida / Hing
1 inch ginger, grated
2-3 green chillies, finely chopped
1 tbsp kasoori methi, crushed between palms
1 tsp red chili powder
2 tsp - garam masala
1/2 cup besan/chickpea flour
1 cup - Moong dal (soaked and coarse ground)
1 tsp black salt

salt to taste
1 tsp sugar
1 tbsp - amchoor /raw mango powder

oil for deep frying


Method 
For the cover
Add the salt and ghee to the all purpose flour and rub the ghee in. The ghee should be very well mixed with the flour. The test to check if the quantity of ghee is enough is to clench some flour in your fist and when you open your fist, it should retain its shape and not fall apart. Then add water to the flour and make a soft dough. Knead till soft and pliable and then keep aside to rest. Cover it with a towl or platic wrap. Taste the dough, and make sure it has a slight salty taste and not bland. Else after frying, the cover will taste very bland.

For the filling
Soak the mung dal till soft (2 hours) Mix together the coriander, fennel and cumin seeds and coarsely grind it. Heat oil in pan and add the hing and then add the ground seed mixture. Stir fry till fragrant and then add the ginger and green chillies, then add the garam masala, kasuri methi, red chilli power, black salt and black pepper. Then add the besan and mix well and cook till the besan starts to smell fragrant. Then add the the mung dal and cook till a dry mixture is formed. If you feel it is too dry, you can add some more oil. However, since this is going to be deep fried, I didn't add anymore. Add salt, sugar, and amchoor powder. Mix well and taste, adjust seasoning if needed. The dough should be slightly salty, since it will get less salty after frying.

Assembly and frying
Take a fistfull of dough and roll it out into a thick 2.5"-3" puri. It should be not be thin. Then add a 2-3 tsp of filling in the center. Gather the edges and bring it together and bring the dough together and pinch it well to seal well. If there is any extra dough, remove it. Flatten into a disc using your palm and roll it lightly to form a thick disc, about 3" diameter. Make sure that the cover is not too thin while you do that.
Heat oil in a deep frying pan. The oil should be luke warm and not too hot. Keep the heat on low/low flame. Then add the kachoris. It should take a couple of minutes for the kachori to start to puff up and start coming to the surface of the oil. Do not be tempted to increase the heat. Once they are puffed up, you can increase the heat slightly, and then fry them till golden brown on both sides.

Serve warm with chutney or potato curry or chole.


Tips
Soak the mung dal in hot water. The mung dal will be ready to be ground in 30-40 mins. This recipe will make about 20 good sized kachoris. Each batch of kachoris takes about 15-20 mins to fry.


Wednesday, September 18, 2019

Homemade Cultured Butter, from Cream

I remember that there was always homemade butter in the fridge growing up. But I always used to prefer the store bought salted uncultured butter as a child. Now that cultured butter is not easily accessible, I really miss it a lot. Especially when I eat the Marathi flatbread called Thalipeeth. It was another dish I really wasn't fond of, but enjoy a lot as a grown up. It is interesting how tastes that remind us of childhood become important to us as adults.

One of the main reasons why butter is made at home in India is because the milk is not homogenized and so the cream floats to the top. This is scooped out over a period of a week or so. A teaspoon of yogurt starter is added on the first day, so that the cream does not spoil and the added cream continues to get cultured as it is collected. Finally, the butter is churned and separated into buttermilk and butter.

I have been buying non-homogenized cream top milk off late and decided to do the same. You can also add culture to store bought cream and make cultured butter. This will be much faster than waiting for 7-10 days to collect enough cream to make a decent quantity of butter.


Ingredients
Cream, store bought or collected over a period of 1-2 weeks
1 tsp of homemade or greek yogurt (greek yogurt has a higher concentration of the bacteria which culture the milk product. This can also be used as a yogurt starter to make yogurt at home)


Method
Add a tsp of yogurt (as a culture starter) to the cream. If you are collecting cream daily, keep stirring the next day's cream into the same container. If you are adding a tsp of yogurt starter to a cream container from the store, then warm the cream, let it cool down till lukewarm and then add the culture. Then keep this aside for a few hours or overnight to set into a yogurt/cultured cream.

Once your cultured cream is ready, make sure it is very cold and then stir it or place in a jar which  you can shake. Add a couple of icecubes and then churn till the butter separates. Doing this manually by using a churner or shaking a jar takes a lot of time and is laborious. You can instead pour the cream in a blender and then turn on the blender till the cream separates into butter and water. The watery part is buttermilk.

Add cold water to the separated cream and then scoop out the butter solids. Addition of cold water makes the butter milk dilute, so you can pour the buttermilk out and then add water a couple of times to the butter to remove any remnants of butter milk. This diluted buttermilk is a great nutrient to plants which like acidic soil, like curry leaf.


Tips
To store, add water to a container and then place the butter in this. Change this water daily to keep the butter fresh. You can now melt this butter to make homemade ghee.

Wheat Halwa, Lapsi, Kadah Prasad

I lovingly remember the wheat halwa or as she called it "lapsi", that my mom used to make for us when I was a young child and I remember relishing it. She used to make this especially if we were hurt because of the simple and nourishing ingredients. I also recently got to know that the same is also offered as "kadah prasad" in gurudwaras. 
I hadn’t made it because it felt too much of a guilty indulgence given the amount of ghee and sugar/jaggery that are needed. However, I finally caved into my craving and made it. My mom used to make it using jaggery, but I didn't have the time to grate jaggery, so I added blackstrap molasses to the sugar to get a similar taste. The fragrance and the taste catapulted me back to childhood. A delicious and satiating dessert.


Ingredients
1/2 cup wheat flour
1/2 cup ghee
1/2 cup minus 1tbsp sugar
1 tbsp blackstrap molasses
1.5 cups water


Method
Heat ghee and wheat flour together and roast the flour till golden brown and fragrant. In another saucepan, add the sugar, water and molasses and stir and warm till sugar is dissolved.
Now slowly add the water solution to the browned flour and stir it in, taking care to protect yourself from any spluttering of the ingredients that occurs.
Stir well till thickened and you can see the ghee staring to separate. At this point the halwa will easily move away from the edges of the pan and will freely move in the pan. The halwa is ready. Enjoy warm.

Tips
When water is added to the fried wheat flour, it will splutter, so make sure you are far away from the pan and if possible hold a cover over the pan so that it doesn't spoil the cooking surface.

Molasses Bread - Cheesecake Factory style

This is a beautiful brown bread that comes very close to the bread that is served in the Cheesecake Factory. Warm bread slathered with butter is delicious and just melts in the mouth. In my opinion, this version of home baked bread is tastier than that served at the restaurant. 
I was able to make 5 decent sized loaves of bread and they lasted a few weeks. I stored each by covering tightly with plastic wrap and then foil and then freezing it. 


Ingredients
2 1/4 cups All purpose Flour or bread flour. I used all purpose flour
1 2/3 cups White whole wheat flour -I used roti flour (ashirwad aata). You can also use regular whole wheat flour
1 Tablespoon sugar
1 1/2 Teaspoons Salt
2 1/4 tsp of Instant Yeast
1/4 Cup Honey
1/4 Cup blackstrap Molasses/regular molasses
1 1/4 Cup Warm Water
2 Tablespoons unsalted butter at room temperature
1 Egg lightly beaten with a tsp of water to make egg wash
1/4 cup of Oats

Method
In the bowl of a stand mixer fitted with a dough hook add the flours, yeast, sugar, and salt. Mix until combined. Slowly add the honey, molasses and water. Mix until the dough forms. Add the softened butter and keep mixing until the dough forms. Knead till the dough separates from bowl.  You may need to add a little bit flour if it is still too sticky. Then knead the dough with hand till the dough is soft and smooth.
Grease a bowl large enough to hold double the volume of bread dough with some oil and place the ball of dough and cover with plastic wrap. Let the dough double in size about 45-90 mins depending on ambient temperature. It will take longer on colder days.
Remove dough from bowl and divide into 5 equal parts and shape into logs. Place these on a well greased trays (I needed two cookie trays) and let rise till double in size. Cover loosely with plastic wrap.
Preheat oven to 350 F. Brush the tops and the sides of the bread logs with the egg wash and sprinkle with the oats.
Place the trays in the oven and bake for 25-30 minutes of until ready. The easiest way to determine if the bread is well baked is to test the internal temperature. If it is 200F or more the bread is baked. Else you can also tap on the bottom and if it has a hollow sound it is baked.
The use of blackstrap molasses gives the bread a deep brown color. This bread has a slightly sweet taste and is delicious.


Tips
If kneading by hand, use the banging of the dough onto the kneading surface and then stretching with your palm strokes technique of kneading bread dough till a soft dough is formed.