Welcome to my blog

I hope you will find the recipe you are looking for your occasion here.

Now video instructions are available for select recipes and can be accessed at

Gardening and Cooking Made Easy

The latest 5 recipes are displayed on the
main page. For more recipes, you can browse the archive, click on the labels in the index to the left or use the Custom search below to look for a specific recipe.


Search for more results

Custom Search

Thursday, November 15, 2018

Mysore Pak

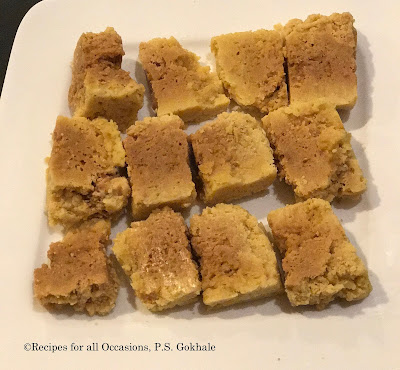
I hadn't made this before because everyone said it was too tricky and laborious, but finally decided to give it a try and it turned out great. I was very happy to see the perforations/lattice as well as the color gradations in the Mysore pak.


Ingredients
1 cup sugar
1/2-3/4 cup water, enough to cover the sugar
1 cup besan/chickpea flour
1 cup ghee
1 cup sunflower oil


Method
Grease a deep tin and set it aside. I used a 8x4 bread baking tin.

Pour the sugar into a broad pan and the water, stir them together and heat. Heat this on low- medium heat (3-4 setting on electric stove). Also, in a sauce pan, mix the ghee and oil together and start hearing this mixture at the same low-medium heat setting.

As the sugar syrup is cooked, sieve the besan to remove all lumps. Check the syrup and once it gets sticky but before reaching the single thread consistency, add 1/3rd besan and mix well till lumps are dissolved. Do this in a couple of batches till the besan is completely mixed into the syrup. If they are any lumps, use a sieve or strainer to push the lumps out by pouring the lumpy syrup through it.
Now keep stirring this mixture. After a couple of minutes, you will see bubbles in this mixture as you stir it.  At this stage you are ready to add the ghee oil mixture that is being heated.

Add one ladle at a time and stir it into the besan syrup mixture. Continue this till you reach the stage where the ghee oil mixture is no longer absorbed into the besan. When you are nearing this stage, you will notice that as you add the ghee oil mix into the besan syrup mixture, it starts to froth. Add the last ladle of ghee oil after you see that it is not really getting absorbed and let the froth form. Then pour this mixture into the tin to create a tall slab. My tin was much bigger and so I filled it just halfway (see pic for reference). Gently level the top to make sure not to destroy the lattice structure formed by the frothing. Now let it set for 5 minute and then make the cuts in the Mysore pak to form rectangles. Make sure to cut t through and completely. I didn't cut it entirely and once it was cool it was difficult to separate and cut it out. Now let it cool for a couple of hours, and remove the Mysore pak slices from the pan.


Tips
All the ghee oil mixture didn't get used up. About 1/2 to 3/4 cup remained. Make sure to add the besan before the single thread, so that it doesn't become too dry. The reason to go for a tall thick slab is so that the central part continues to cook at the part of the
Mysore pak exposed to the air and at the bottom of the tin start to cool first. This is needed to create the different shades/color striations in the mithai.

Monday, September 10, 2018

Zwetschgenkuchen- Austrian Plum Cake

I came across this recipe on Milk Street, by Chris Kimball. This is how I made it. The only change I made was to use two eggs instead of 1 large egg and 1 egg yolk. It was absolutely scrumptious and very rich. And we enjoyed it for the entire week.


Ingredients
1 cup all purpose flour
3/4 tsp baking powder
1/2 cup sugar
2 tbsp sugar for sprinkling on top
1/2 tsp salt
1/2 cup salted butter- softened at room temperature and cut into pieces
2 medium eggs (original recipe calls for 1 large egg and 1 large egg yolk)
1.5 tsp vanilla essence
5-6 pluots (you can also use plums), cut into 1/8th slices. Discard pits


Method


Preheat the oven to 325F. Grease and dust a springform pan with flour. You can use a regular pan, but since the fruit it on top, you will have to be very careful when removing it from the pan and will have to flip it over again to make sure the fruit is on top.

Whisk the dry ingredients together - flour, baking powder, sugar and salt- till well combined. You can even sieve them a couple of times. Then add the butter one piece at a time and mix till the mixture starts to look sandy. Add the eggs and vanilla essence and mix the batter till it becomes a pale yellow and fluffy.
This is a very thick batter and will not flow. Using a spatula, spoon it out into the prepared pan and spread it evenly. Then arrange the pluot/plum slices in two concentric circles. Then sprinkle the 2 tbsp of sugar on top of the fruit and bake for 1 hr 15 mins. Check after one hour has passed and when the toothpick comes out clean, the cake is baked.
Let it cool in the pan for 30 mins on a wire rack and then remove the springform base from the pan.


Tips
If you have a stand mixer, use the paddle attachment.

Guava Jam

I had once found guava jam in the local store and having been deprived of this fruit for many many years, bought a small and expensive jar of jam. The jam wasn't that great, no real guava fragrance or taste. Fast forward a few years, we now have a guava tree and got our first crop of pink guavas. I decided to convert some of the fruit into jam and what a difference! The color is beautiful and it is so fragrant. This is a simple recipe and will perfectly preserve the fruit for us to enjoy it long after the fruiting season ends.


Ingredients 
10 guavas, cut the fruit into tiny pieces. Then push these through a sieve to make pulp and strain the seeds. you can grate it but it will be difficult to remove the seeds
Once you have the guava pulp, weigh it. Then weigh an equal amount of sugar.
Water- to make syrup - 1:1 in volume to sugar 
A pinch of salt- I sprinkled this over the pulp.


Method 
Mix together the sugar and water and heat it. Cook the syrup till it thickens, beyond the two thread stage, and just before the soft ball stage. Then add the guava pulp. Stir and mix well. It will become more fluid. Now cook this mixture till it thickens. To determine if you have the correct consistency, put a spoon of jam onto a plate and pull a finger or the spoon through it. If the pattern stays intact and the jam doesn't flow to fill the path of the finger, then you have the desired consistency.
Take it off the heat and cool completely before storing in a jar. This will take a 5-6 hours.  Refrigerate this jam. Use dry spoons when removing the jam from the jar to extend shelf life. It will be good in the fridge for a few months.


Tips
If the guavas are not ripe and soft, then boil them till they become soft before making the pulp.

Friday, August 24, 2018

Mung Dal Halwa- instant version

I had been wanting to make mug halwa and as it happened, I can across the version of making halwa using dry dal instead of the presoaked one. Well, we had just had dinner and I felt like eating some dessert and decided to make it as it promised to be quick, and it was. And the family liked it so much that I doubled the ingredients and made it again. I made some changed when I doubled the recipe, so I will give both variations below.


Ingredients 
Without milk- half quantity
1/2 cup moong dal, coarsely powdered
1/2 cup jaggery finely cut.
1/4 cup sugar (It wasn't sweet enough with only jaggery, so I added 1/4 cup of sugar after the halwa was cooked. It melted and made the halwa a little fluid, so I cooked it further till I got the appropriate consistency)
3 tbsp ghee - roasted the mung flour in 2 tbsp of ghee and added 1 tbsp after halwa was cooked
1.5 cups water at room temperature
nuts roasted in ghee for garnish - optional

With milk- half, after doubling mung quantity
1 cup moong dal, coarsely powdered
3/4 cup sugar
6 tbsp ghee - roasted the mung flour in 4 tbsp of ghee and added 2 tbsp after halwa was cooked
1 cup water
1 cup milk warmed for 30 seconds in microwave
nuts roasted in ghee for garnish - optional


Method
Measure out the dal, and then pluse it in the blender till coarsely ground. Heat ghee and dal in a pan and roast it on medium low heat till the color deepens and the dal smells fragrant.  It will take a good 10-15 minutes. Roast dal on low heat if possible, as once it starts to change color it will burn easily. Keep on stirring. Next add sugar or jaggery and stir and let it start to melt for a minute or so . Now add water or the water and milk mixture and stir well. The dal will cook in the liquid and initially look like kheer. It will thicken slowly as the dal absorbs the water. Cook it and keep stirring
Till alll the water is absorbed and thicken it to the texture you prefer. It can be soft or a little dry. Add additional ghee and mix and turn off the heat. Garnish with nuts if using. You can also add cardamom powder. Serve warm.

Tips
I used hot water and warm milk when I made it the second time. It caused the halwa to splatter everywhere and was dangerous. Use room temperature water and milk to avoid this splattering. Adding some ghee during the roasting and topping off with more ghee after cooking allows you to cook the halwa in minimal ghee. You can always use more ghee. 

Friday, July 20, 2018

Vegan, Gluten Free, Sugar Free Chocolate Cake

I recently made two cakes to share at a potluck where several folks had allergies or diet restrictions. The first cake was a banana ragi cake (which will be shared in a separate post) and this chocolate cake.
This cake is very versatile and ingredients can be swapped as provided in the ingredients list below to make it free of a specific allergen or all of them.
This cake is vegan, gluten free, nuts free and sugar free. It is delicious. The ragi and buckwheat with chocolate do give the cake a slightly earthy smell, however you can use wholewheat flour for a cake that only smells of chocolate, if you do not need it to be gluten free.

Ingredients
Cake
1 1/2 cup buckwheat flour or nachni satva (ragi malt) or ragi flour (finger millet) or wholewheat flour (if there is no need to be gluten free)
3/4 to 1 cup date paste- adjust based on sweetness of dates. (12 large mejdool dates, cooked with water in the microwave and puréed). If you do not have dates, then you can use 1 cup sugar.
1/4 cup unsweetened cocoa powder
1/2 tsp salt
1 tsp baking soda
1 tsp vanilla essence
1 tbsp vinegar (white or apple cider)
1/3 cup olive oil (not extra virgin) or any oil that you use for cooking
1 cup cold water
Icing
1 cup chocolate chips (dark chocolate if you want it to be dairy free)
6 tbsp water
Method
Cake
Butter a baking pan (8/9 inch round) and pre heat the oven to 350 F.
Mix dry ingredients together thoroughly. Whisk them or sieve if necessary. The baking soda must be well dispersed through.
Mix wet ingredients together and whisk them together till well mixed.
Make a well in the center of the dry ingredients and pour the wet ingredients mixture into the dry ingredients and whisk together till completely mixed. You will see the baking soda starting to react with the vinegar.
Immediately pour into the baking pan and bake at 350 for about 30 min. Use a toothpick or a knife to check if completely cooked. Pierce the cake in the center and if the toothpick/knife comes out clean, the cake is completely baked.

Icing
Mix the chocolate chips and water together and microwave for 30 seconds intervals (about 1-2 mins) till all the chocolate chips melt and then whisk it well till it looks shiny. Then pour it over your cake.


Tips
Work with the batter quickly. The baking soda and vinegar reaction makes the cake spongy. So put it in the over immediately after mixing the wet and dry ingredients. If you want the cake to be sweeter, then drizzle the cake with honey or maple syrup after it has been baked.

Tomato Saar - Tomato Soup, the Maharashtrian way

Tomato soup seasoned with cumin in ghee tempering is called tomato saar in marathi. This is a favorite at home. To make it creamier I add coconut milk to the tomato soup and it elevates the taste. I am sure there are many versions of tomato saar, and we love this version of tomato saar.

Ingredients 
1 tsp ghee 
5-6 tomatoes, coarsely chopped
1/2 onion, coarsely choppes
2 cloves of garlic
1/4 inch of ginger
1 cup water 
1/2 cup coconut milk
Salt to taste
1-2 tsps of sugar (depending on how tart the tomatoes are)
For the tadka
1 tbsp ghee 
1 tsp cumin seeds
1-2 pinches of asafoetida/hing 
10 curry leaves
1-2 green chilies

Method
Heat a tsp of ghee in a pressure cooker and then add the ginger garlic and onions. Stir fry for two mins till the onion is slightly transparent. Add the tomatoes, fry for a minute and then add the water and pressure cook for 1-2 whistles or 5-7 mins in the electric cooker.
Once the pressure releases, add the coconut milk and purée this mixture. Pour it back into your cooker. Taste and then add the salt and sugar. In a small pan, heat ghee and then add the cumin seeds. Once they crackle, add the hing, chilies and curry leaves. Let these fry for a min or two and then pour this tadka into the prepared soup. Bring it to a boil. At this time you can adjust the consistency by adding water or letting it boil till it is thicker, based on your preference.

Tips
You can vary the amount of coconut milk or skip it if you want.

Easy Gluten Free, Vegan, Sugar Free Banana Bread

I recently made two cakes to share at a potluck where several folks had allergies or diet restrictions. This cake is vegan, gluten free, nuts free, and sugar free. It is possibly the easiest cake recipe that you have come across. It is delicious however and a great way to get kids to eat finger millet/ragi. You can substitute ragi with buckwheat or whole wheat flour. You can also use the batter to make banana pan cakes.

Ingredients
5 over ripe bananas (the riper the better - the skin should be starting to blacken)
1 banana cut into thin slices for garnishing (optional)
1 1/2 cup ragi flour/buckwheat flour
1/2 cup olive oil (not extra virgin) or use any other oil that you use for cooking
1/2 tsp cardamom powder 
1/2 tsp baking soda
2 tsp baking powder


Method
Butter a baking pan and preheat the oven to 350 F. 
Put all the ingredients except the baking soda and powder and puree in a blender. 
Then to this puree add the baking powder and soda and pulse a few times till it is mixed well.
Pour this into the prepared pan and bake at 350 for about 50 min. Check with toothpick or knife if completely cooked. Pierce the center of the cake and if it is completely cooked, the toothpick or knife will come out clean.

Tips
The cake is not very sweet and you can add sugar or date puree if you want it sweeter. Taste the batter. Else, drizzle the cake with honey or maple syrup after it has been baked.

Hariyali Chicken

I ate this after almost 30 years. I have been craving these flavors for almost 3 decades and finally found the recipe which my taste buds remembered. A recipe was shared on a food group that I am part of and I thought I would give it a try.  I made some modifications to suit my needs and it turned out to be delicious. This recipe is a keeper!


Ingredients
1 chicken breast
4 green chilies
10 mint leaves
fist full of cilantro
2 tsp oil
salt to taste
1/2 tsp jeera powder
1/2 tsp dhania powde
1/2 tsp minced garlic
1/4 cup of greek fat free yogurt 
lemon juice (optional. if the yogurt is tart, the juice is not necessary) 


Method
Cooked the cilantro and mint leaves in 2 tsp of oil and puréed them. Then added 1/2 tsp each of jeera, dhania, garlic and 1/4 cup of Greek fat free yogurt. This is the marinade. Taste this and then add salt. I didn't add turmeric. Made cuts into the breast so that the marinade goes through and marinated the breast for 24 hours in the fridge.
(There was enough marinade to also marinate paneer and vegetables in separate containers)
In a pan, added a tsp of oil and heated the pan. Meanwhile cut the breast into bite sized pieces. And then added the chicken pieces to the pan along with the marinade. Turned the pieces to cook them externally and then covered the pan for a few minutes. Cook till the chicken pieces look cooked (also check temperature with a thermometer for 165F) and turned off the heat immediately. Since it is chicken breast, turn off the heat as soon as the chicken is cooked. If you crisp it up or brown it like it would in a grill, it will become tough. Turned out tender and juicy.


Tips
You can also grill this. If so, then use chicken thighs as they will not dry out as quickly as the chicken breast.

Gluten Free Pizza Base, using lentils and beans

I had soaked various dals and rice and had fermented the batter. I make idlis with this batter often and remembered a chana and mung dal pizza post shared by Mr Sikand on a food group and decided to use the same principle to make this mixed dal pizza base.


Ingredients 
1 cup each of idli rice, tur dal, urad dal, mung dal, chana dal - soak for a few hours and grind it to make a thick batter (idli consistency)Ferment overnight.
1 cup of batter makes one crust, for thinner crispier crust, 1/2 cup batter will work well. 
This is for a 9x5 bread loaf pan 1 tsp ginger chilli paste (optional. I added the ginger to aid in digestion of the dals)
salt to taste
1/4 tsp Eno/fruit salt- optional - if batter is not well fermented use Eno.1 tbsp water (dissolve the Eno in the water before adding to batter and mixing so that it spreads evenly) 
butter to grease the pan
ready made pizza sauce or Marinara sauce
shredded cheese


Method 
Mix together the batter, ginger chilli paste and salt. Grease the pan well with butter. Pour the batter in the pan and bake at 350F for about 20 mins. Test with a toothpick or skewer and if it comes out clean, it is baked. At this stage I removed it from the pan and flipped it over and browned the top side which had remained cream during the cooking. I browned one crust in the oven and another crust on the tava. The tava was much faster. Now spread the marinara/pizza sauce and top with shredded cheese and put it back in the oven and bake till the cheese has melted. 


Tips
We loved the taste and I will be making it often and I will try out different toppings. I think it will taste great if I make a sauce with Indian seasonings. I didn't need to use the Eno as the batter was well ferment and rose well as it baked. 

Sev Khamani

This is usually made with chana dal batter and is delicious.  I had made a mixed dal batter earlier in the week and had been making different things from it- idli, dosa, pizza base. So, I decided to use it to make sev khamani and it turned out great. No one realized that they were eating the same batter that had been used to make dosa the previous night! And it is a protein rich, delicious item which can be served stand alone and will make a complete meal. Or you can serve it as an item on a chaat menu. This is also a gluten free dish.


Ingredients
1 cup each of idli rice, tur dal, urad dal, mung dal, chana dal - soak for a few hours and grind it to make a thick batter (idli consistency)
Ferment overnight.

For the khamani
3 cups of the fermented batter
1/4 tsp turmeric
Salt to taste
For seasoning
3 tbsp oil
1/4 tsp mustard
1/4 tsp jeera
1/8 tsp hing
6-7 large garlic cloves, finely minced
2 tsps sugar, adjust to taste
Juice of 1 lime, adjust to taste
Thin besan sev (one used for bhel)


Method
Grease a bowl with some oil and pour the batter in. Add the salt and turmeric and stir well. Then steam cook it for 20 mins, till it sets (like dhokla or idli). Remove the bowl, let it cool a bit and the break up the cooked batter with the help of a spatula. If it is warm it will be soft and clumpy and won't separate into small pieces but that's ok.
In a large saucepan, heat up the oil and and the mustard and jeera seeds. Once you hear them crackle, add the hing and the garlic. Sauté the garlic for a minute or two and then add the cooked batter pieces and mix well with the seasoning. Now cook this on a low medium heat till the mixture starts to dry up a little and starts separating into smaller pieces instead of being stuck together in large clumps. Since the batter is already cooked, this just provides the texture. Before turning off the heat, add the sugar and lime juice and mix well and turn off the heat. The taste should be sweet and sour and garlicky.
And as it cools down the batter will stiffen and provide the right shev khamani texture.
Now pour this into your serving platter and sprinkle the besan sev liberally on it. Garnish with cilantro. If available add pomegranate seeds as a garnish.


Tips
You can make a different combination of dals and try the recipe.

Thursday, July 12, 2018

Upside Down Fresh Fig Cake

We have had a great fig harvest his year. Other han enjoying the figs straight off the tree, I have been using them in various desserts. I made a fig crostata (recipe on the blog), fig icecream, fig danish braid.  Then I thought an upside down cake would be delightful. The result of the experiment was delicious!! 


Ingredients 
10 ripe fresh figs, cut into eighths or small pieces
1 tbsp butter
1 tbsp sugar
1 and 1/4 cups all purpose flour
1 tsp baking powder
1/8 tsp salt
1/2 cup butter
1 cup sugar
2 eggs
1 tsp vanilla essence
1/2 cup milk


Method
Butter a baking pan and cover the base with parchment paper.
Preheat the often to 350F.

In a saucepan, heat the butter. Once it melts, add the figs and sugar and give it a stir. Cover with a lid and let it cook for a couple of mins and then stir again. Cook covered for 5-10 mins, stirring frequently, till the figs release their juices and soften and start to caramelize.

Pour this into the baking pan and spread in a layer on the parchment paper.

Sift or whisk the flour, salt and baking powder so they are mixed well and the baking powder is evenly distributed.
Whisk together the butter and sugar. Once the mixture stars looking fluffy like icing, add one egg at a time and mix these in. Then, add the vanilla essence. Next fold one third of the flour into the batter, followed by half the milk. Alternate between the flour and milk incorporated into the batter using the folding motion.
This is a thick batter. Now pour or scoop this over the fig layer. Use a flat spatula to spread it out. Then bang the pan on the counter a couple of times to remove any large air bubbles. 

Bake for about 30 mins (check at 20 mins). Use  a toothpick or knife to check for doneness. Pierce the cake in the center. If the knife/toothpick is clean, the cake is done. 

Let the cake cool for a few mins in the pan and then invert it onto cooling rack. Peel off the parchment paper.  The cake doesn't need to be inverted again as the fig layer comes on top of the cake. Cut after the cake cools.


Tips
Let the figs caramelize. When you start cooking them it may seem that there isn't much moisture of they are not getting sweet, so cook with the lid on and let them stew in their juices. Figs become very sweet once they release their sugar which converts into a delicious syrup. Do not add more sugar unless you are using figs which are under ripe.
If you do not have fresh figs, you can use dried figs too. Soak them for a few hours to rehydrate. Once they are plump cut them into small pieces and follow the recipe. 

Monday, April 23, 2018

Mahim Halwa/ Ice Halwa

This is a halwa I had eaten eons ago as a kid when I visited Mumbai. We didn't indulge in this sweet a lot because the ones that are store bought are made using hydrogenated oil and were thought to be too unhealthy. I was searching for this recipe because a sweet that a friend shared reminded me of it. I came across many recipes but they all used semolina/rava as the main ingredient. The original version is made using corn starch. I wanted to make it as close to the store bought version but use clarified butter or ghee instead of hydrogenated oil. I liked the video demonstration of the technique on Bhavna's kitchen channel. It is a fairly straightforward recipe and the only thing that makes it challenging is the continuous stirring that it essential to getting the right texture.


Ingredients
1/4 cup corn starch
1/4 cup plus 2 tsp ghee (you can increase the ghee amount to 1/2 cup if you want)
1 cup water or milk 
1 cup sugar
1 tsp rose water (optional)
1/2 tsp cardamom powder
15-20 strands of saffron crushed
1 tbsp finely sliced almonds and pistachio (optional)


Method
Make sure to prepare the surface on which you will roll the halwa ready. You can use a silicone mat and a sheet of parchment or a couple sheets of parchment (approx 2 ft in length). If using aluminum foil or  the back surface of a baking sheet, make sure to grease it with ghee before you start the cooking process. I do not use plastic sheets as the mixture is hot and I do not want any plastic leaching into the halwa.

In an open flat saucepan (helps with faster evaporation) mix together the corn starch,1/4 cup ghee, water/milk and sugar. Stir it and keep it aside for 20-30 mins and let the ingredients soak. Then stir the mixture well to dissolve most of the sugar and ensure that there are no lumps of cornstarch. Then put it on low medium heat and stir this mixture continuously. In the beginning while it is still very fluid, you do not need to stir it constantly but as soon as the mixture starts to heat up, keep stirring constantly to avoid lumps. This is a little laborious but well worth it in the end. Keep the heat at medium low and keep stirring and press down any lumps that start to form( about 20-30 mins) till it comes together like a dough. Now turn off the heat and add the remaining 2 tsps of ghee and knead it with your spatula and bring the mixture together and then mix in the rose water, if using. 


Now it is important to work fast. Pour this dough onto a silpat/parchment/prepared aluminum foil. Place another parchment paper on top of the dough sandwiching the dough between the two. Then roll out the dough as thin as possible. Peel the paper intermittently and check how thin it is. It should be transparent. That's when you know it is at the right thinness. Then sprinkle the cardamom, saffron and nuts over the rolled dough, place the parchment paper again and lightly roll over the sprinkled spice and nut mixture embedding it into the halwa. Now peel the paper and let it dry. 


When it is semi dry, cut the rolled sheet into squares. It can take from a couple of hours to a few hours or overnight for the halwa to dry and get the perfect texture, depending on the weather, humidity, and rolled dough thickness. Separate into squares when completely dry. Alternate wax paper or parchment paper sheets cut to the same dimensions as the halwa, between each halwa slice. Your halwa is ready to serve. Store in the fridge.


Tips
If you use rose water when the heat is still on, the fragrance will disintegrate and you may not get that rose fragrance. You can also make colorful halwa by adding a few drops of color to the mixture when you soak the ingredients together.