Welcome to my blog

I hope you will find the recipe you are looking for your occasion here.

Now video instructions are available for select recipes and can be accessed at

Gardening and Cooking Made Easy

The latest 5 recipes are displayed on the
main page. For more recipes, you can browse the archive, click on the labels in the index to the left or use the Custom search below to look for a specific recipe.


Search for more results

Custom Search
Showing posts with label chicken. Show all posts

Friday, April 9, 2021

Restaurant Style Butter Chicken

This is the best home cooked butter chicken I have ever tasted!! Butter chicken was one of the first chicken dishes that I ever ate and it is one of my favorite chicken preparations!! It is one of the most popular chicken dishes available at Indian restaurants. I always wanted to make it at home and have it be just like the authentic restaurant version which I remember eating in India. I tried out many recipes and finally, found this one. My brother had shared this recipe with me and he was so appreciative of the taste that I just had to give it a try. Oh! It was so delicious and relatively simple, so it has now become my go to butter chicken recipe. I also use the same gravy to make paneer makhani (butter paneer). I hope you love this version as much as I do. This recipe makes a large quantity of gravy and you can increase the amount of chicken to add to the gravy. You can also halve or make a smaller portion by using 1/3rd of the ingredients. 


Here is the link to the video recipe where you can see the detailed method of making it. 


Ingredients
For the chicken
2 lbs chicken thigh meat (can also use chicken breast)
1.5 tbsp garlic paste
1.5 tbsp ginger paste
2 tbsp Kashmiri chilli powder
2 tsp salt
2 tbsp oil +2 tsp

For the gravy
1 tbsp 
6 tbsp butter
3 lb tomatoes  (1.5 kg, about 13 mid sized), roughly chopped into eigths
10 oz onion ( 300 gm, 3/4 of a large onion), roughly diced into inch sized pieces
3 tbsp garlic paste
5 oz cashew nuts or pumpkin seeds1(50 gm)
3 tbsp white vinegar
1.5 tsp garam masala
4 tbsp sugar
3 tbsp Kashmiri chilli powder
salt to taste
1/4 cup heavy cream
1 tbsp fenugreek leaves/kasuri methi


Method
Cut the chicken into inch long strips.  In a bowl, mix together the ginger, garlic pastes, oil, chilli powder and salt. Then add all the chicken strips into the bowl and toss around to coat the chicken properly.  Cover the bowl and place in the fridge as it marinates. Marinate for at least 20 mins and upto overnight. 

In a deep saucepan, heat 1 tbsp oil and 4 tbsp butter.  Once the butter melts add the onions. And then add the garlic paste. Cook this till onions are cooked and translucent. Do not brown. Then add all the tomato pieces. Cook for a few minutes till the tomatoes start to release the juices and start getting cooked. Next add the cashews or pumpkin seeds and stir them in and cook for a minute. Then add the vinegar, garam masala, sugar, chilli powder, some salt. Remember that there was salt added to the chicken, so add only a tsp of salt. You can adjust to taste after the cooked chicken is added to the gravy.  Boil the gravy for a few minutes till it is fragrant, and turn off the heat. Let it cool and then puree in a blender. 

Now, cook the chicken. Heat 2 tsp oil in a pan and once the oil is hot and shimmering, add the chicken pieces. Cook on one side for a minutes and then flip them and cook on the other side for another minute or two. We are cooking the chicken partially and then will finish cooking it in the gravy. If you want to eat the chicken pieces as a tikka, make sure to cook the chicken well till it has reached the minimum temperature of 165F or higher.  Cook all the chicken pieces. 

In a deep saucepan, heat 2 tbsp of butter. Strain the gravy through a sieve and add it to the melted butter. Once the gravy heats up, add the chicken pieces and let it boil till the chicken is cooked through. To check, use a thermometer and check the temperature of a few pieces of chicken. It should be 165F or higher.  For a visual check, cut a piece of chicken. It should cut easily and the inside should not have any pink or raw looking meat. Cooked meat turns a white color.

Then crush the fenugreek leaves between your palms, and add to the gravy. Finally add the cream and stir it in. Taste and adjust the salt. Your butter chicken is ready. Serve it hot with rice or naan. 

This makes a very large serving of chicken which can easily serve 8 people or more. You can halve the recipe for a smaller proportion.


Tips
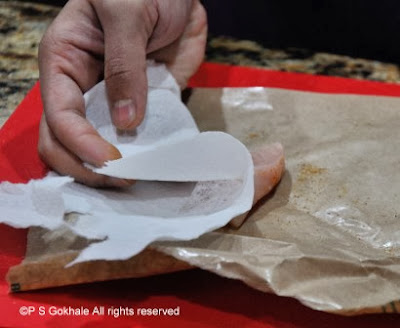
If the chicken is frozen, I thaw it out overnight in the fridge. Clean it by patting it with a paper towel and then cut the partially frozen chicken. It is much easier to cut. Keep the chicken in the fridge during marination as well. Never leave raw chicken on the countertop as it can lead to salmonella growing on it.  You can use pumpkin seeds instead of cashew nuts to make this nut free. You can increase the amount of butter to 8 tbsp while cooking the gravy. 

Friday, June 12, 2020

Lemon Garlic Chicken

This is a delicious and quick recipe, which is perfect for a busy weekday or weeknight meal. It requires a few ingredients and takes just about 20 minutes to make including the cooking time. The lemon and garlic are the main flavoring ingredients and they enhance the dish. A light meal which can be paired with a side salad or steamed vegetables, to make a complete meal. Our family (the meat eater wing) love this recipe and it has become a favorite.

This is one meal where I don't have to ask the kids to finish their food. It gets eaten really quickly. So without further ado, here is how you make it.


Also here is the link to the youtube video with detailed instructions. These will help those cooks who  who may be new to cooking chicken and have questions about handling chicken and determining when is it cooked completely (without making it rubbery), like I did several years ago.


Ingredients
For the chicken
1 pound of chicken (2 chicken breasts)
1/4 cup of all purpose flour
1/2 tsp black pepper powder
1 tsp salt
1 tbsp oil

For the sauce
1 heaped tsp all purpose flour
2 large garlic cloves (about 1 tsp grated garlic)
1.5 cups broth (chicken or vegetable) - can also use water if you don't have broth
1.5 tsp butter
2 tsp lemon juice/ half of a large lemon
lemon zest


Method
If frozen, thaw the chicken breasts. Then slice the chicken into two pieces, horizontally along the surface of the chicken. You will have 4 thinner slices of chicken after this. Pound the thicker part of the chicken if needed, so that the chicken breast is uniform in thickness and cooks uniformly.

In a plate, mix the all purpose flour, black pepper powder and salt so that the flour is evenly seasoned. Heat the oil in a skillet and once it is hot, dredge each piece of the chicken in the seasoned flour and place in the hot skillet. Discard the remaining all purpose flour mixture.

Cook the chicken on each side for 2-4 mins till the chicken is browned. To check if the chicken is cooked, use an instant meat thermometer and insert it into the thickest part of the chicken breast. If the temperature is greater than 165F (74 C), the chicken is cooked. Remove it onto a plate and prepare the sauce.

Add 1 tsp of all purpose flour to the hot skillet, and half of the butter and roast it for a minute. Scrape any of the browned chicken bits. Next, add the garlic and cook it for a min. Then add the broth to mix, and mix well. Then add the lemon juice and lemon zest. Let the sauce cook and thicken and then finish the sauce with the rest of the butter which will give it a nice sheen. Add the cooked chicken breasts back to the pan and let them heat through. Garnish with lemon slices and serve hot.


Tips
Thaw the chicken in the fridge. Do not keep it out on the counter to thaw. Best way is to thaw it overnight. You can skip the butter if you want this to be a lighter meal. I have used very little oil and butter and you can also choose to increase the quantities to make it a richer sauce.  Using a thermometer ensures that the chicken is well cooked and also prevents over cooking of the chicken breast. This is an easy way to ensure that the chicken breast does not become chewy or rubbery.
If you line the cutting surface with parchment paper, it makes cleanup quick and easy. Make sure to wash your hands and clean any surface which has been in contact with raw chicken to prevent cross contamination.

Friday, July 20, 2018

Hariyali Chicken

I ate this after almost 30 years. I have been craving these flavors for almost 3 decades and finally found the recipe which my taste buds remembered. A recipe was shared on a food group that I am part of and I thought I would give it a try.  I made some modifications to suit my needs and it turned out to be delicious. This recipe is a keeper!


Ingredients
1 chicken breast
4 green chilies
10 mint leaves
fist full of cilantro
2 tsp oil
salt to taste
1/2 tsp jeera powder
1/2 tsp dhania powde
1/2 tsp minced garlic
1/4 cup of greek fat free yogurt 
lemon juice (optional. if the yogurt is tart, the juice is not necessary) 


Method
Cooked the cilantro and mint leaves in 2 tsp of oil and puréed them. Then added 1/2 tsp each of jeera, dhania, garlic and 1/4 cup of Greek fat free yogurt. This is the marinade. Taste this and then add salt. I didn't add turmeric. Made cuts into the breast so that the marinade goes through and marinated the breast for 24 hours in the fridge.
(There was enough marinade to also marinate paneer and vegetables in separate containers)
In a pan, added a tsp of oil and heated the pan. Meanwhile cut the breast into bite sized pieces. And then added the chicken pieces to the pan along with the marinade. Turned the pieces to cook them externally and then covered the pan for a few minutes. Cook till the chicken pieces look cooked (also check temperature with a thermometer for 165F) and turned off the heat immediately. Since it is chicken breast, turn off the heat as soon as the chicken is cooked. If you crisp it up or brown it like it would in a grill, it will become tough. Turned out tender and juicy.


Tips
You can also grill this. If so, then use chicken thighs as they will not dry out as quickly as the chicken breast.

Tuesday, December 24, 2013

Chicken Tikka Masala

I am fairly new to the art of cooking chicken, though I have been eating it all my life. I finally decided to take the plunge and start cooking it at home. The main  motivation was to be able to control the quality of the meat that was being used. Another was being able to control the spice and taste levels of the chicken being served. I have tried Indian style chicken dishes in many restaurants but find most of them lacking in spice and flavor. There are just a couple of places that cook chicken curries well, but they don't come close to the taste of the food that I ate when growing up. The results have been great so far and my family has been very happy being taste testers, as I cook up new dishes.

When I decided to take the plunge and start cooking chicken, I had no clue about how to buy the chicken, whether it needed to be cleaned and how I could check if the chicken had been cooked completely. So, I looked to family, friends, and the internet for help. After reading up on it for a while, and taking advice from several people who cooked chicken very frequently, I finally was able to cook my first piece of baked chicken breast. Once, I had the basics down, I was able to move onto experimenting with marinating and making tandoori chicken and finally start cooking chicken gravies.

I have always loved eating chicken tikka masala and butter chicken in restaurants and decided to make chicken tikka masala as my first curried chicken recipe. It turned out great. In fact, we finished the entire dish in one meal, with no leftovers.

Note: For my tips on how to buy chicken, see the Tips section below.


Ingredients
1 skinless, boneless chicken breast (the one I used was about 10 oz/ half pound)
1 onion, cut into thick slices (to be used to bake the chicken)

marinade for the chicken
1/2 tsp salt
1/2 tsp cumin/jeera powder
1/2 tsp corriander/dhania powder
1/2 tsp cayenne pepper/red chilli powder
1 cup yogurt
1/2 inch ginger, grated
3 cloves of garlic, miced/grated
2 tbsp oil
1 tsp garam masala
2 tsp lemon juice

for the gravy/curry
2 tbsp oil
1 onion, finely diced
1 tsp ginger paste or 1/2 inch ginger, grated
2 cloves of garlic, minced/grated
2 tsp garam masala
1 tbsp tomato paste
1, 14 oz can of tomatoes, approximately 4-5 tomatoes, diced
1 tsp butter
1/4 cup yogurt, whisked well till smooth
salt to taste
1 tsp sugar
1/2 - 1 cup water


Method
Mix the salt, corriander powder, cumin powder and cayenne pepper together and make a spice rub.
Cut the chicken into strips of similar size, so they cook evenly and take around the same time to cook. Pat each chicken piece dry and sprinkle some of the rub on both sides of the chicken piece and place in a glass container. Keep this in the fridge and marinade the chicken pieces in the spice rub for about 1-2 hours.
Next, whisk together the yogurt, ginger, garlic, oil and garam masala. Pour this mix over the chicken pieces and coat the chicken pieces in this yogurt mixture. Keep the container back in the fridge and let it marinade for an additional 3-4 hours.


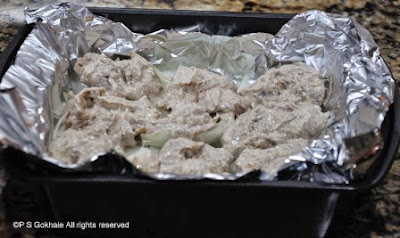
Preheat the oven to 400 F. Take a baking tray with sides and line it with foil. Slice the onion into thick slices and layer them at the base of the foil covered tray, creating a bed of onions. Layer the yogurt coated chicken pieces in a single layer on top of this onion bed.  Discard the excess yogurt. Bake the chicken in the oven for about an hour or till the temperature registers 165 F.  When you bake the chicken, the moisture from the yogurt keeps it moist and succulent. Alternately, you can also skewer the chicken pieces and broil the chicken for about 20-30 minutes. Check the chicken temperature which should be 165F. This will give it the authentic chicken tikka texture, however the meat does get a little dry.


Start cooking the gravy when you start cooking the chicken. Heat the oil and add the diced onion to it. Cook this till it is golden brown in color. Next, add the tomato paste, garam masala, ginger and garlic paste. Cook for a couple of minutes till the ginger and garlic are well cooked. Then, add the tomatoes and cook them for a few minutes till the tomatoes are cooked down. Add a little water to the gravy and let it cook for a couple of minutes. Then add the yogurt mixture to the gravy and cook it for a couple of minutes. Turn off the heat and once the gravy cools down a bit, puree it. Pour it back into the pan and then let it boil. If the gravy is too thick, add a little water to thin it down. Add salt, sugar and butter and let it simmer.

Once the chicken is cooked, let it rest for a few minutes. Then, cut the chicken strip into bite sized pieces (about 1/2- 1 inch) and then add it to the hot gravy. Do not simmer the chicken in the gravy.

Serve hot with warm rotis or white rice, along with a side of sliced onions, and lemon slices.


Tips: If you do not have tomato paste at home, you can use tomato ketchup. If you are using fresh tomatoes, blanch them and peel the skins. To blanch them, boil some water. Add the tomatoes one at a time to the boiling water and let it remain in there, till the skin of the tomato starts to break up. At this point, remove the tomato and put it into cold, ice water. Once the tomato is cool to touch, you can easily peel the skin out and then use the tomato.
Lining the pan with foil, makes it easy to clean up after the chicken is cooked. To measure the temperature of the chicken, insert a meat thermometer, into the thickest part of the chicken.

Chicken buying tips: If you are beginner like me, and not comfortable with cutting up the chicken, then the easiest method is to go to the meat department of the grocery store and speak to the butcher. Generally, someone there will help you select the meat, even cut it for you and give you advice on how to store the chicken. I was told that if you do not intend to use the chicken in the next 2-3 days, then to freeze it for up to 5 days. After 5 days the chicken can get freezer burns and is no longer good to use.

Make sure to clean your hands, the cutting board and the countertop well after handling the chicken to avoid cross contamination with other food. A plastic cutting board is easier to clean. Use a separate cutting board to cut the vegetables. Do not reuse the cutting board or knife used to cut the chicken without cleaning it thoroughly with soap and hot water.