Welcome to my blog

I hope you will find the recipe you are looking for your occasion here.

Now video instructions are available for select recipes and can be accessed at

Gardening and Cooking Made Easy

The latest 5 recipes are displayed on the
main page. For more recipes, you can browse the archive, click on the labels in the index to the left or use the Custom search below to look for a specific recipe.


Search for more results

Custom Search

Friday, October 28, 2011

Kaju Katli - Kaju Barfi - Cashewnut Marzipan

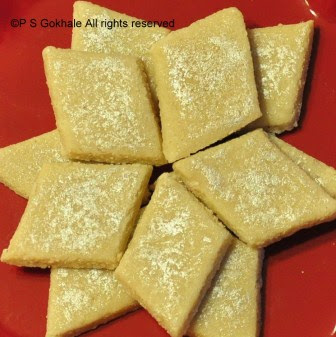
This is possibly the best known sweet or "mithai" in India. Most people from all corners of India know of this sweet and might have eaten it as well. Whenever, someone visits from India, they will invariably get a request for this wonderful delicacy. This is also one of the most expensive sweets. It is garnished with silver foil, which is reserved to garnish the best sweets. This sweet can be stored for a long duration as well. It is one of the sweets that can easily be found in Indian stores outside India as well. Now, generally most recipes call for a syrup to be made, which is a lenghty process. But do read on, because the best part about this particular recipe version is that it is the easiest method to make this sweet. Of course, it's one of my Mom's recipes. The method is so easy, that if you use this, this will be the easiest mithai you can make. Whip it  up for a special occasion, and you are sure to impress the fussiest guest.


Ingredients
raw cashewnuts
powdered sugar
(see the method below for the proportions)


Method
Start with the amount of cashews that you want to use. I would suggest using about 2 cups of cashews, if you plan to make it in a small quantity. Soak these in water for at least 4-5 hours, overnight would be best. Then drain the water and process the cashews to make a fine paste of the cashews. Measure the cashew paste. Then, measure an equal quantity of powdered sugar. Mix the two together and then start heating this mixture. Stir it and let it cook. Keep the temperature at a very low level while cooking to avoid any browning. Make sure to keep stirring the mixture so that it doesn't stick to the base of the pan and brown. As the mixture starts thickening, it will get more difficult to stir it around as it gets heavy and sticky. However, it is crucial that at this stage you stir it and do not let it stick to the base and brown. At this stage, test the consistency of the mixture. Take a small drop (it will be hot so be careful) and roll it between your fingers. If you can mould it into a ball (it will be like molten wax) and it retains its shape, then you can take it off the heat.


Let the mixture cool to a temperature where you can handle it. At this stage, knead the mixture into a ball like a dough ball. Then roll it out into a sheet which is about  half a centimeter in thickness. Then cut the dough into diamond shaped pieces (about 1.5 inches across). Keep these on a greased sheet (grease it with ghee/clarified butter). Kaju katli is ready when the diamond pieces have cooled down completely. Garnish with silver foil if available.


You can store it in an airtight container for a couple of weeks. It lasts in the refrigerator for upto a month.


Tips
The cashew paste must be very fine and there shouldn't be any grainy texture. Measure the sugar after you process the cashews. Both must be of equal measure. Use a large pan so that the evaporation rate is faster and that will make the cooking process faster. Use a non stick pan so that the mixture will not stick while cooking. The color should not change. It will be a grey, beige color mixture. Also, as the sugar melts, the mixture will start getting sticky and as the the cooking process comes closer to completion, it will get more difficult to stir it around. If you are cooking a large quantity, then it is advisable to take turns with someone else to stir it. Grease your hands with some ghee/clarified butter before you knead the cashew mixture to keep it from sticking to your hands.

I used a pound of cashews and that resulted in a very large quantity of kaju katli (over a 100 pieces).

Sunday, October 16, 2011

Recipes for the festive season - Diwali Recipes

With Diwali right around the corner, I thought it would be a good idea to list out all the recipes that I have posted so far that you can make for the festive season. Many of these are ones that you make ahead and some of them can be made the day of. Here is a listing of sweet and savory recipes for the festive season. I also realized that I haven't posted a lot of savory recipes, so will be posting some through this week.

Sweets that can be made about a week in advance and which will stay for a couple of weeks.
Note: Make sure to keep anything made from milk in the fridge.
Gajar Halwa/ Carrot Pudding (keep refrigerated)
Modak-Sweet Baked Dumpling (do not refrigerate)
Dudhi/Doodhi Halwa- Squash Pudding (keep refrigerated)
Chirote/ Chiroti (do not refrigerate)
Shrikhand, Sweet Yogurt (keep refrigerated)
Nariyal Barfi - Coconut Burfi/Coconut Fudge (keep refrigerated)
Shakkar Pare/Shankar Pali/Sweet Fries (do not refrigerate)
Besan Laddoo/Laadoo - A Sweet made from Chickpea Flour (do not refrigerate)
Dharwadi Pedha/ Kandi Pedha - A Delicacy made from Milk (keep refrigerated)
Sweet Puffed Rice Balls - Kurmura/Murmura Ladoo (do not refrigerate)
Rasgulla/Rosogulla - A Cottage Cheese/Paneer Dessert (keep refrigerated)
Kaju Katli/Kaju Barfi/Cashew Mithai/Cashew Marzipan
Gujia/Karanji/Nevri/KarjiKayi - Indian Empanadas

Sweets that taste best when eaten fresh
Note: These will last a few days in the fridge
Modak, Sweet Steamed Dumpling (store in fridge)
Puran Poli (store in fridge)
Puran - Sweet Yellow Lentils (store in fridge)

Savory Recipes

Chiwda - Savory Dish made with Pressed Rice

Tuesday, October 11, 2011

Tabouleh/Tabouli - A Parsley and Bulgur Wheat Salad.

Tabouleh is a wonderful salad. It is mainly made of bulgur wheat and parsley. This is the only dish I have come across where parsley plays the role of a main ingredient. Now, the very first time I heard the description, I thought that the parsley would over power the rest of the ingredients and it maybe on the more astringent side. Unfortunately I let my preconcieved notions get the better of me and I didn't order the dish. I actually came across it when I ordered a "Mediterranean Platter" at a local Mediterranean/Greek restaurant. Of course, I tasted all the different components on the platter like the falafel, dolmas, hummus and a wonderful green salad. And I loved the salad!! So, I asked our server what it was and to my surprise she said it was tabouleh. Ever since then it has become a regular feature on my plate whenever we visit the restaurant.


Now, in the variations of taboleh/tabouli that I have eaten, I have noticed that the bulgur wheat proportion is significantly less compared to that of the parsley. Some versions have tomatoes that have been added and some had small pieces of cucumber or onions or a combination thereof. The dressing always seems to be simple and lemon based and the parsley is the dominant ingredient. However, when I made it, I decided to increase the quantity of the bulgur wheat so that I could serve this as a complete meal and wouldn't need to cook too many additional dishes. So, you can scale back on the proportion of the bulgur wheat if you want to keep it on the light side or add more if you want to make a hearty meal out of it.


Ingredients
1 cup bulgur wheat
2 cups water
2 cups of parsley, chopped finely
1/2 onion, chopped finely
1/2 cucumber, peeled and finely diced (optional)
2 green onion stems including the onion portion, finely diced (optional)
salt to taste
1 large lemon or 2 small lemons, juiced
2 tbsp extra virgin olive oil
black pepper, to taste


Method
Heat  the water till it is at a rolling boil and pour over the bulgur wheat. Make sure the the wheat is submerged and then cover and keep aside for about 15-20 minutes. The wheat should be cooked through and fluffy. If there is excess water, drain it and keep aside. Make sure that the onions, green onions and cucumber are finely diced and all about the same size pieces. Discard the stems of parsely and finely chop the leaves. Mix all the vegetables and the cooked bulgur wheat together. Season this with some salt and mix well. Then in a bowl, whisk together the lemon juice and oil to form an emulsion. Add black pepper and additional salt as needed to this. Pour some of the dressing over the mixed salad and toss all the ingredients together. Taste and add more dressing as needed. It is important to taste,  and not pour all the dressing into the salad so that you don't end up adding too much and over-dressing it. It is best to make it at least an hour before serving and let it sit in the fridge for about an hour so that the ingredients will get time to mix well. If serving fresh, you may need additional dressing on hand.


Tips
Bulgur wheat is pre-cooked wheat, hence it is not necessary to cook it for a long time. You may
even have instructions on the packet to soak it in cold water for about 1-2 hours. Drain and let the excess moisture from the wheat drain away, else the dressing will become diluted and not coat the ingredients well. You can cut back the bulgur wheat to half to quantity to make it a lighter salad.
You can use tender stems of parsley, but discard anything that is mature and fibrous.

Wednesday, October 5, 2011

Batata Vada/Wada (Fried Potato Fritter)

"Batata vadas" are fried spicy potato fritters. It is one of the most common street foods in Maharashtra. Sandwhich one in a bun, add chutneys and voila, it is now a very Indian "burger". I have so many fond memories related to batata vadas. One that stands out is one rainy afternoon when my Dad and I had gone on a short hike on the outskirts of the city. There was a bracing wind, and a slight drizzle which soon turned into a downpour. Fortunately, we took found a small restaurant and took refuge there. Then, my dad ordered a plate of batata vadas with some hot tea. It was just fabulous! While the restaurant was pretty run down, the vadas were hot and tasty and the hot tea,the perfect drink for two drenched souls. Now, whenever it rains, I always wish that someone would hand me some vadas and tea. Well, I finally fried some when it rained the last time and they were lip smacking. So, next time it is dull, grey and pouring cats and dogs, whip up a batch and enjoy.


Ingredients
For the stuffing
1/2 onion, finely diced
2 large potatoes, boiled and mashed
salt to taste
2 garlic pods
1/2 inch ginger
2 chillies
1/4 cup cilantro, chopped
1/2 tsp sugar
1/2 lemon
2 tsp oil
1/8 tsp mustard seeds
1/8 tsp cumin seeds
a pinch of asafoetida/hing
pinch of turmeric

For the cover
1 cup besan/gram flour
1 tsp chilli powder
1 tsp oil, warm
1/4 tsp baking soda
salt to taste
1/8 tsp turmeric
water

oil to fry the vadas - there should be about 2-3 inches of oil, so that the entire potato fritter can be fried easily.


Method
Grind the green chillies, ginger and garlic into a paste. Mix it into the mashed potatoes. Mix in the onions and cilantro. Then add the sugar and salt to the mixture. In a small pan, hehe at the oil and add mustard and cumins seeds. Once they crackle, add the hing and turmeric. Turn off the heat and pour this onto the mixture. Mix well. Then squeeze some lemon juice into this mixture.

Roll out the potato mixture into small balls, about 1.5 - 2 inches in diameter. Keep aside.


In a mixing bowl, mix together the besan, chilli powder, salt and baking soda. Add some oil which has been warmed and then add some water. Add a little water at a time and mix to form a batter. The consistency of the batter should be thick so that when you dunk the potato balls the batter should coat it evenly.


Heat the oil. Then, dunk a potato ball into the batter and gently drop it into the oil. (be very careful not to splash any oil on you). Add about 3-4 vadas only at a time. Do not over crowd your frying pan. Fry the vadas till the cover is brown. Serve with spicy mint chutney and tamarind chutney.


Tips
If you add more water to the cover batter by mistake, add a little more flour and adjust the salt and chilli levels to taste. To check if the oil is hot enough, drop a little batter into the oil and if the droplets come up immediately, then the oil is hot and ready to fry the vadas.

Tuesday, September 27, 2011

Beetroot Raita/Koshimbir (Dip)

This is a very easy side dish and a wonderful use of beetroot. The ingredients are simple but very nutritious and the taste absolutely delicious. Maharashtrians make many "koshimbirs/raitas" or dips. All of these are side salads which include include chopped vegetables and are generally dressed with yogurt sauce or even some tempered oil. Groundnut features as a prominent ingredient in many of these sides. Beetroot is a beautiful vegetable. It is rich in iron and has a bright red color. It is used as an ingredient in many natural dyes as well. And when it is mixed with yogurt, the dish gets a beautiful pink color and is as appealing to the eye as to the stomach.


Ingredients
1 beetroot
2 tsp groundnut/peanut powder  (take peanuts and grind them to a coarse powder)
salt to taste
chilli powder  to taste (optional)
1/2 tsp sugar
1 cup yogurt
water, as needed

For the tempering (optional)
1 tbsp oil
a pinch of mustard seeds
a pinch of cumin seeds
pinch of asafoetida powder/hing
1 green chilli, slit through the center (optional)


Method
Cook the beetroot. I usually pressure cook it in my cooker and then peel it.  If you don't have a pressure cooker, you can also steam cook it till it is softened. The beetroot should be cooked through but not mushy, so take care not to over cook it. Let it cool, then peel it and cut it into bite sized pieces. Then mix in the groundnut powder, yogurt, sugar and salt. Mix well. If the yogurt is thick, then add a  little water to thin it out a bit. It should be sauce like in consistency. At this stage you can add some chilli powder if you want and can serve it without the tempering. The tempering adds a little spice to it. So, if you wish to add tempered oil, then heat the oil and add the cumin and mustard seeds. Once you hear them crackle, add the asafoetida powder and the green chilli and turn off the heat. Let the chilli cook in the remnant heat and then pour this over the beetroot and yogurt mixture. Mix well. Serve as a side.


Tips
It is much easier to peel a cooked beetroot.  You can easily convert this to a dip by grating the beetroot instead of using diced pieces. You can also use ghee for the tempering instead of oil. To make the peanut powder, take about a cup of shelled peanuts and then pulse it in your blender, till you get a coarse powder. Stop at the stage while it is still in a powder form. If you process it more, you will end up with peanut butter.