Welcome to my blog

I hope you will find the recipe you are looking for your occasion here.

Now video instructions are available for select recipes and can be accessed at

Gardening and Cooking Made Easy

The latest 5 recipes are displayed on the
main page. For more recipes, you can browse the archive, click on the labels in the index to the left or use the Custom search below to look for a specific recipe.


Search for more results

Custom Search
Showing posts with label instant pot. Show all posts

Thursday, June 15, 2017

A Fabulous Hack - Use your pressure cooker to roast all kinds of flours!

If you use roasted/toasted flours or semolina to make things like rouxs, sheera, rava, laddoos etc, then you will love this hack. One of the most tedious steps in making dishes which need well roasted or browned flour (like laddoos, sheera, upma, etc) is the step of roasting the flour.  While roasting it in an open pan on the stove top, it needs to be done at medium low heat and stirred often. It becomes imperative to stir it continuously as it starts to cook and brown. And as it starts to turn golden brown, if  you get distracted even for a few seconds, the result is burnt flour. For larger quantities, it takes a long time to get to the aromatic toasted stage. However, this is one of those tedious steps that must be done and cannot be omitted. In fact the taste of raw flour in a sweet like mysore pak or besan laddoo can render it inedible.

Well, I decided to use my pressure cooker and see if I could make this process efficient. The first time I tried it out, I used a cup of semolina/rava and then tried the same with 1 cup chickpea flour/besan. And it worked amazingly well for both. I then proceeded to roast a pound of semolina flour using my Instant Pot which has a higher volume capacity. It is now stored in an airtight container, ready to use when needed.

I haven't used this to roast grain yet, but I am sure this can be extended to roast grains too for powders like "thalipeeth or chakali bhajani"

Note: The dessert pictured here is besan laddoo. It needs well roasted chickpea/besan flour. Even a bit of uncooked flour will make it taste terrible. These laddoos were made with the flour roasted using the method below. It usually takes me over an hour and a half,  to make these and I was able to make these from getting the ingredients out, roasting the flour, letting the flour cool, adding the rest of the ingredients and rolling it into balls in 25 minutes.


Ingredients
Flour that you want to roast/toast

Method
Place the flour in a bowl that is pressure cooker safe (I usually use a stainless steel bowl). Now, close this with a tight lid as we want to ensure that water from condensation does not fall into the flour. Since we are going to cook this under pressure, the cooker will have water which will start to condense around the  bowl. If you don't have a lid, cover it tightly with foil.

Pressure cooker
Add 1 cup water, place the container into the cooker and close lid. Turn it on the high heat setting.  (between 8-9 on my electric stove top). The pressure cooker will come to full pressure in about 2-3 minutes. After that cook it for 5 minutes at this high temperature. You will get numerous whistles. The time I counted the whistles I got about 37 whistles. Since you have added a cup of water, there is enough there to prevent all the water from evaporating.
Take it off the heat. Now place a large pan which can contain the amount of flour that is being cooked onto your stovetop and start heating it. Then using a long wooden spoon, release the pressure by pushing the whistle up gently. Do not knock the whistle off, be careful with this step.

Remove the covered bowl, wipe it down making sure that water doesn't get into the bowl. Open up the lid and pour the hot flour into the pan that is being heated. Turn the heat under the pan to high, and stir the flour and roast till you start getting the roasted aroma. At this stage you can turn the heat off or continue till you brown it to the shade you desire. Finally, check that the flour is well roasted to suit your taste by actually tasting it a little. See Tips below for the timings I observed.

Instant Pot
Add one cup of water to the inner pot of the Instant Pot. Place the trivet and then place this bowl containing the flour. Cook it on manual mode, vent closed for 10 minutes.  Let it be on natural pressure release for 5 minutes. Before you release the pressure, place a large pan which can contain the amount of flour that is being cooked onto your stovetop and start heating it.  Then release the pressure by turning knob to vent. (see manual for directions)

Remove the covered bowl, wipe it down making sure that water doesn't get into the bowl. Open up the lid and pour the hot flour into the pan that is being heated. Turn the heat under the pan to high, and stir the flour and roast till you start getting the roasted aroma. At this stage you can turn the heat off or continue till you brown it to the shade you desire. Finally, check that the flour is well roasted to suit your taste by actually tasting it a little. See Tips below for the timings I observed.

Photos of 1 cup chickpea/besan flour roasting steps - done in pressure cooker.

1. Before placing in cooker

2. Covered with a lid (added parchment too as the seal was not airtight)

3. After cooking in the cooker
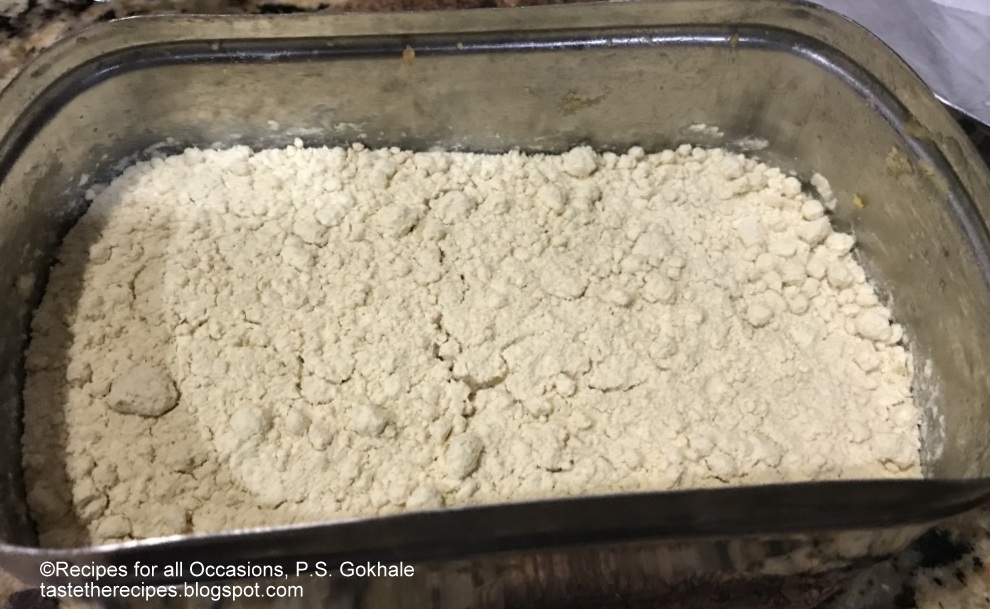
4. After roasting in the heated pan

5. Added ghee to the roasted flour and then added sugar to make laddoos pictured above


Photos of 1 pound of semolina/rava roasting steps - done in the Instant Pot (IP)

1. Before placing in IP


2. Covered tightly with foil

3. After cooking in IP


4. In the pan


5. After roasting in the heated pan


Tips
For 1 cup of chickpea/besan flour it took 1 min and 41 seconds for the roasted aroma and it started to brown at 2 mins 10 seconds. I took it off the heat and stirred it and it was a good shade of brown by the 3rd min. Then I poured it into a cool bowl to stop it from cooking further in the pan's retained heat.

For 1 lb of semolina/rava it took 3 minutes for the roasted aroma and it started to brown at 3 mins 10 seconds. It was lightly browned by the 5th minute. I took it off the heat and poured it into a cool bowl to stop it from cooking further in the pan's retained heat.

You can add ghee to the pan before pouring the flour into the pan which I did for the besan flour as I was going to use it to make besan laddoos.


Friday, June 2, 2017

Papaya Halwa/ Papaya Pudding

The first and only time I had papaya halwa was when I was probably 5 or 6 years old. And I still remember the beautiful golden color of the preparation. In fact, some of my food memories are so strong that I try to recreate the recipe by remembering the various flavors that I experienced while eating it. Well, for this recipe I didn't have to take that effort, but just picked up the phone and called mom. That took us down memory lane. My mom reminded me that we had planted several, almost six or eight papaya trees in the garden. And we used to get a lot of fruit.  There was a school nearby and young kids used to pick papayas from the trees on their way home and at other times a group of monkeys used to come and pick the delicious produce. Of course the most delicious ones would be the ones pecked by the birds. There was plenty of fruit for everyone. My mom used to make another preparation using raw papayas which she grated and it was a cumin flavored spicy version. That is a recipe for another post, but lets get on with this one.

For papaya halwa, you need a semi-ripe papaya. It should be a firm papaya, with light golden color on the skin and when it is cut open, it should be yellow in color and not white. A raw papaya with green skin and white flesh will not work. Neither will a completely soft, sweet papaya which is ready to cut and eat work. It must be semi-ripe. So choose carefully. The result has a gorgeous golden color and a delicious taste and it can be cooked to a firmer texture and cut into pieces or left soft and eaten with a spoon. I made this in the pressure cooker and hence was able to cook it in minimal ghee and sugar. A  more traditional method of cooking in the open pan will require a little more ghee.


Ingredients
1 semi-ripe papaya,  yellow in color but extremely firm, grated (measure this). I had 4 cups of grated papaya
2 cups (Half the volume of the grated raw papaya), fresh or frozen finely grated coconut
3-4 tbsp (1/4 cup)  cup ghee/clarified butter (you will need at least 1/2 cup if cooked via traditional method)
1/8 tsp cardamom
1/8 cup raisins - soak this in a little water (optional - I did not add)
sliced almonds/ cashews (optional - I did not add)
1/4-1/2 cup of water
2 cups sugar (to taste, if needed add more)


Method
Peel and deseed and clean the center of the papaya. Then grate it and measure the grated papaya. Then measure out fresh grated coconut. It should be half in volume compared to the papaya.

Instant Pot
In the Instant Pot liner, add 1/4 cup water and 1 tbsp of ghee. Then add half the grated papaya to cover the entire base of the cooker. Then spread a tbsp of ghee on top of this layer. Then add the rest of the grated papay in a layer and spread a tbsp of ghee on top of this layer. Add another 1/4 cup of water. Then add the grated coconut on top of the papaya layer. Then close the lid with vent sealed. Cook on manual mode for 8 mins. Then let it stay in warm mode for 2-3 minutes and then release the pressure. Check if the papaya is cooked. If not, cook it for a couple minutes more till the papaya is softened. If needed, add a little more water to build up pressure. 

Once the papaya is softened, stir the mixtures a little to displace the layer touching the base (so that it doesn't burn) and then add the sugar in a layer on top of the papaya coconut mixture. Again close the lid and cook it on manual mode for 2-3 minutes. Let it stay in warm mode for 5 minutes and then release the pressure and open the cooker. Add the cardamom powder and if using add the slices of almonds and raisins. Mix it well and then switch to saute mode. Cook, stirring occasionally till the water has evaporated and it has reached a pudding like consistency. It will take a few minutes. Add a tbsp of ghee at the end and mix it well to give a rich taste. 

Stovetop Pressure Cooker
You can use the same method in the stove top pressure cooker. Make sure to keep an eye on the time and the whistles to make sure that the papaya doesn't burn. Serve warm or cold.

Traditional method

Add ghee to a large saucepan, which can hold all the ingredients. You will need to add at least 1/2 cup of ghee instead of 1/4 tbsp to make sure that the papaya doesn't get stuck. Add the papaya to the ghee and cook it, covering the pan to trap the steam and stir occasionally till the papaya is softened. Then add the grated coconut and the sugar. Stir it and mix well. The sugar will melt and form a syrup. Keep stirring the mixture till it starts to thicken. Add the cardamom powder, raisins and almonds and stir. Cook till you have the desired consistency.  This method may also need a little more sugar. Taste it and adjust the amount of sugar.  


Tips

If you want, you can cook it further and thicken it. Then you can pour it into a greased plate, let it cool and cut it into pieces. The semi-raw papaya doesn't have a very high water content, so when cooking it in the pressure cooker or Instant Pot make sure to add adequate liquid to build up the pressure. 


Friday, May 19, 2017

Dal Makhani, dhaba style

Dal makhani is a rich lentil preparation. There are many recipes out there made with whole masoor as well as whole urad dal. Here is the recipe to make dal makhani using whole masoor - Dal Makhani recipe. The following recipe is a creamier version which is made using whole black urad dal.

There are many roadside small restaurants that produce delicious food called "dhaba". We used to always get an order of dal makhani with naan from there. And I remember the cook adding an entire slab of butter to just our portion of the dal that he was finishing before packing it off.  Of course it had a delicious creamy and smoky flavor. This version is a creamy version using a much lower fat alternative. The technique to provide it a smoky flavor that is usually found in the "dhaba" version is also provided. This technique can be used to add a smoky flavor to dal fry or any other curry preparation as well.

I have provided multiple methods starting with a traditional method to make it sauteeing onions and tomatoes before adding the dal. Also included are almost hand free methods which can me made in the stove top pressure cooker or the Instant Pot or an equivalent electric cooker.


Ingredients
2 cups whole urad dal
4 cups water + little more
1 tsp cumin/jeera
1 tbsp ghee
1-2 green chillies, optional, to taste
1 large onion, finely sliced, approximately 3/4 cup
1 tomato, deseeded and finely chopped, 1/3 cup
1 tbsp garlic, finely chopped or grated
1 tbsp ginger, finely chopped or grated
1 tsp kasuri methi
1/2 tsp turmeric
1/8 tsp hing powder
salt to taste
red chilli powder, to taste
1 cup milk
1 piece of charcoal, optional
1/8 tsp of ghee or oil, optional

Method
Wash the urad dal thoroughly and soak it in water for at least an hour.

Traditional recipe

In a pressure cooker, add the ghee and jeera. Once the jeera starts crackling, add the hing, green chilli, ginger, garlic and onion. Cook till the onion is lightly browned and then add the tomatoes and cook this till softened and starting to brown. Add the turmeric, chilli powder, kasuri methi and cook for a minute. Then add the soaked urad dal and water. Add salt, stir and close the lid of the cooker and cook for 8-10 whistles. Then let the pressure drop as it cools down. Once the pressure has dropped, open the lid and add the milk and bring it back up to a boil. Then follow the instructions below to give it the dhaba flavor provided in the "Adding the dhaba flavor" section.


Minimal intervention/work method

Traditional Pressure Cooker
In your pressure add the ghee and 2tbsp of water, so the base of the cooker is covered with either ghee or water to create a layer. Sprinkle cumin seeds on the ghee. Then mix the ginger and garlic with the sliced onions and spread this out in a single even layer in the cooker. Sprinkle the hing powder on this and add the green chilli as well to this layer. Cook this on high for 3 whistles. Release the pressure from the cooker. Open it, and you will find that the lower layer of the onion has been caramelized. Mix this well and then add the tomatoes in a heap or layer on top of the onions. Then add the spices, so that they are on top of a layer of tomatoes or onions and not touching the bottom of the vessel. This is to ensure that the spices don't burn. Add the turmeric, red chilli powder if using, kasuri methi and put the lid back on. Cook this on high heat till you get two whistles. Release the pressure. The tomato will be cooked and will have released water. Now turn on the heat, and keeping the cooker open, cook for 2-3 minutes stirring a few times till the water evaporates and you get a nicely browned gravy. Now, turn off the heat. Spread this gravy into an even layer. Drain the urad dal water, and discard the water. Add the soaked and drained urad dal to the cooker. Then pour in the four cups of water. Close the lid of the cooker and cook it on high heat for about 10 minutes (you will get 8-10 whistles). Let the pressure settle naturally, don't release it manually. Open the cooker and the dal will be creamy and soft. If you want it to be softer in consistency, add a little more water and pressure cook for 5 more minutes. After opening the cooker, once the cooker naturally depressurizes, add the milk and stir it well and heat the dal till it starts to boil, keeping the lid of the cooker open.  Then turn off heat. Do not pressure cook after adding the milk.

Instant Pot
In your Instant Pot liner pot, add the ghee and 1-2 tbsp of water, so the base of the cooker is covered with either ghee or water to create a layer. Sprinkle cumin seeds on the ghee. Then mix the ginger and garlic with the sliced onions and spread this out in a single even layer in the cooker. Sprinkle the hing powder on this and add the green chilli as well to this layer. Cook this in the Instant Pot for 5 minutes on manual mode. Release the pressure from the cooker. Open it, and you will find that the lower layer of the onion has been caramelized. Mix this well and then add the tomatoes in a heap or layer on top of the onions. Then add the spices, so that they are on top of a layer of tomatoes or onions and not touching the bottom of the vessel. This is to ensure that the spices don't burn. Add the turmeric, red chilli powder if using, kasuri methi and put the lid back on. Cook this for 3 minutes on manual mode. Release pressure. The tomato will be cooked and will have released water. Now turn on the saute mode in the Instant Pot and cook 2-3 minutes stirring a few times till the water evaporates and you get a nicely browned gravy. Now, turn off the saute mode. Spread this gravy into an even layer. Drain the urad dal water, and discard the water. Add the soaked and drained urad dal to the cooker. Then pour in the four cups of water. Close the lid of the cooker and put it in beans mode which defaults to 30 minutes. You can also cook it in manual mode for 15 minutes. Let the pressure settle, don't release it. Open the cooker and the dal will be creamy and soft. If you want it to be softer in consistency, add a little more water and pressure cook for 5 minutes more in the manual mode After opening the cooker, once the cooker naturally depressurizes, add the milk and stir it well and heat the dal on saute mode, till it starts to boil and  then turn off heat.


Adding the dhaba flavor
Now to give it the dhaba flavor. Place a small steel bowl in the center of the dal. Using a pair of tongs, hold the charcoal and smoke it on the burner flame or on a candle (this takes longer but if you have an electric stove, this is your option). Once it starts to smoke, place it in the steel bowl afloat the dal and sprinkle a few drops of ghee or oil on it. Then place a lid to cover the pot and entrap the smoke inside. Keep it for 2-5 minutes depending on the intensity of the smoky flavor that you are looking for.  Serve hot with rice.


Tips
If you don't have whole urad, you can also use split black urad dal or even masoor dal. Don't use the one where the black peel has been taken off the dal. 

Thursday, April 20, 2017

Bottle Gourd/ Dudhi Halwa/ Lauki Halwa - Instant Pot version

I got my Instant Pot a couple of years ago and use it on a daily basis, but these days I have started using it to save time, reduce the amount of fat in the recipe and to do a lot of precooking which takes a lot of time the traditional way. I am starting a separate section of recipes that can be cooked in the pressure cooker to reduce the amount of time needed to spend on the recipe. I will keep updating the techniques as I experiment and find more shortcuts.

One of the recipes that takes a lot of time on the stove top is bottle gourd/dudhi/lauki halwa. Since this is a very water vegetable, it takes a  lot of sauteing to get it cooked and the water evaporated. This method also requires more ghee to sautee it to get a nice cooked flavor before you can add milk to it. If the ghee is less or if the lauki is not well cooked, the halwa may not turn out that tasty. The 30-40 minutes traditional cooking (on low heat to avoid burning) and monitoring is reduced to about 15 minutes hands free process when using the pressure cooker. 

For reference: Here is link to the traditional Dudhi halwa recipe.

Ingredients
2 dudhi/lauki/bottle gourd (had about 3.75 cups), peeled and grated 
1/2 cup liquid from the dudhi/lauki
4 tbsp (1/4 cup)  cup ghee/clarified butter
1.5 cups whole milk
1/8 tsp cardamom
1/8 cup raisins - soak this in a little water
sliced almonds/ cashews 
1 cup sugar (to taste)
Ricotta cheese/ khava - optional


Method
Peel and grate the lauki/dudhi. Keep it aside for 10 mins. It will release a lot of water. Place this grated gourd in a large sieve and drain the grated dudhi and press it to make it a little dry. It doesn't need to be squeezed dry. The intent is to reduce the liquid so that there will be less to evaporate later. Save the liquid. 
In the Instant Pot liner, add 1/4 cup of the saved dudhi liquid and 1/4 tbsp of ghee. Then add a layer of half of the grated dudhi. Then spread a tbsp of ghee on top of this layer. Then add the rest of the grated dudhi in a layer and spread a tbsp of ghee on top of this layer. Add another 1/4 cup of liquid and then close the lid with vent sealed. Cook on manual mode for 5 mins. Then let it stay in warm mode for 2-3 minutes and then release the pressure. Stir it well. The layer touching the bottom may be lightly browned. It will also release some liquid. At this stage if the dudhi is not cooked (it may need more time if it is old) then put it back on manual for a couple more minutes.

Now, switch to the saute mode and let the water evaporate, stirring occasionally so that it doesn't get caught at the bottom and start browning. Then add the milk and stir and cook the dudhi in it, till it evaporates. The milk curdles a bit and the solids are left behind to give a rich mava/khoya flavor. Add mava/khoya if using at this stage. If using ricotta cheese, add it before adding the milk and cook it a little. Then add the sugar. It will melt making the mixture liquid again. Again cook this till the water evaporates. 
Add the last tbsp ghee to give it a rich flavor. Then add the cardamom, raisin and almonds and stir. The halwa is cooked. I prefer to let it cook further so that it caramelizes as I like this flavor better. To do that keep cooking it till it starts to get golden brown. Serve warm or cold.


Tips
You need not squeeze out the liquid, but if you don't then it takes much longer to cook the water out before adding the milk.