Welcome to my blog

I hope you will find the recipe you are looking for your occasion here.

Now video instructions are available for select recipes and can be accessed at

Gardening and Cooking Made Easy

The latest 5 recipes are displayed on the
main page. For more recipes, you can browse the archive, click on the labels in the index to the left or use the Custom search below to look for a specific recipe.


Search for more results

Custom Search

Wednesday, August 31, 2011

Baati - Baked Whole Wheat Dumplings

The first time I ate authentic dal baati was in Indore, about eleven years ago. I was visiting family and there were two occasions when I was able to savor this delicacy. The baatis were authentically cooked in an earthen stove. Then, they were dunked in ghee and served with hot delicious dal. I can never forget that experience. The taste of the baatis being roasted and baked in an authentic kiln can just not be replicated in a modern kitchen. After I got married, I was pleasantly surprised to find that my husband liked this dish and even knew how to make it. Eventually, we started making it quite often. While one can't get the rustic taste, only possible using an earthern stove, the ones baked in the oven are also equally delicious. This is supposed to be a delicacy, however, I make this so often, that I am not sure I can realy classify it as a delicacy in our house anymore! I must mention that once you make this, you will realise it is much easier than toiling for hours on an elaborate menu. However, your guests will be very impressed with this dish. It is so easy that you may get hooked and make this a regular feature on your menu as well.


Ingredients
2 cups whole wheat flour
1/4 cup besan/chickpea flour
1 cup yogurt
1/2 tsp salt
2 tbsp ghee
1/4 tsp baking soda
water to knead


Method
Mix together all the dry ingredients. Then create a well in the center of the flour mixture. Into this add the ghee and yogurt. Then mix this. If the yogurt is watery, then you may not need to add any additional water to knead it all together into a soft dough. It shouldn't be too loose, nor too dry and hard. Knead the dough well and let it rest for 15-30 mins. Cover the dough with a damp cloth so it doesn't dry out.


Preheat the oven to 350F. Then roll out the dough into small balls about 1-1.5 inches in diameter. Place these on a baking sheet with enough space between them to allow for expansion. Bake in the oven for about 20-40 mins, till well browned. The baati will expand and break open and develop cracks as it cooks. The end result shouldn't be hard. When warm, pour a little ghee so that it gets absorbed through the cracks in the baati. Serve with hot dal and additional ghee.


Tips
Instead of adding ghee to the flour, you can add the milk solids that are left behind when you make ghee at home. This is a wonderful use of these solids, especially if you have used salted butter. If the milk solids are salted, then reduce the amount of additional salt that you add to the flour. Traditionally the baatis are soaked in ghee before being crushed and then hot dal is ladled onto this and is eaten hot.
To simulate an eathern kiln, use a pizza stone. Preheat it and then place the baatis onto this to be baked. 

Friday, August 19, 2011

Mushroom Soup

When I was younger, I didn't like mushrooms. Then sometime during my teens, I tasted them on top of a pizza and started liking them. Then, I tried the mushroom soup that my Mom made and I loved it. I still remember the last time I ate the one made by Mom. It was nine years ago and I still associate it with warmth, love and comfort.  So, this is a recipe I turn to during the cold months or when I want something that will fill my tummy and soul with warmth. Mushrooms are high in proteins, so it is a very nutritious soup as well. I usually make a leaner version by skipping the cream, but addition of cream towards the end of the cooking process is a must for special occasions.


Ingredients
15-20 button mushrooms, sliced
1 tbsp butter or olive oil
1/2 onion, diced
2 garlic cloves, chopped
salt to taste
some cream or milk to finish off the soup, to taste
1-2 cups of water


Method
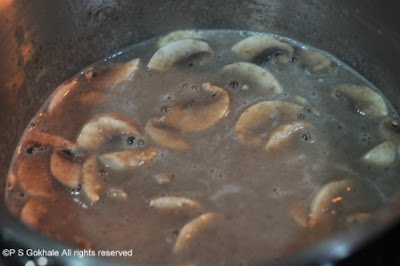
Heat butter or olive oil in a pan. Add the garlic and onion to it and sautee. Cook the onion till it is transluscent. Keep aside some mushroom slices and add the rest to the pan and cook till the mushrooms are softened. Then, puree this, adding water as needed. The soup should not be too watery. Then add the milk or cream to the pureed soup and heat. Add, the remaining mushroom slices. Add salt and stir. Turn off  the heat once it starts simmering and the mushroom pieces become tender. Serve hot. Pair it with a slice of bread for a complete and quick meal.


Tips
I have always heard everyone say that you should not wash mushrooms, but just wipe them off with a damp towel. However, I wash the mushrooms and immediately wipe them before cutting. I have not noticed any issues with doing that. If the stem of the mushroom feels too stocky, just use the cap.

Thursday, August 18, 2011

Curried Plantains/ Kelyachi Bhaji

Plantains  are relatively a new addition to my grocery list. Plantains are raw bananas and are green in color. At this stage they are starchy and not at all sweet. You cannot eat plantains raw, they need to be cooked. The taste and texture of the plantain is similar to potatoes. Also, the raw banana skin is very tightly wound around the fruit, is very fibrous and difficult to peel off. Till about a year ago, the only form of plantain that I had tasted was plantain chips. So, one day I picked up some plantain on my grocery run and decided to experiment with it. It turned out really good and my family loved it. The first time I made it, it was a little difficult to peel off the banana but the next time around I tried out a trick and the peel just came off. If that has piqued your curiosity, go ahead and read the recipe for details.


Ingredients
1 tbsp oil
1/8 tsp cumin
1/8 tsp mustard seeds
2 plantains, diced
1 tomato, diced
1/8 tsp turmeric
1 tsp corriander-cumin/dhana jeera powder
red chilli powder to taste
salt to taste


Method
See tips on how to peel the banana. Dice the bananas into small pieces. Heat the oil in a pan and add the mustard and cumin seeds. Once the mustard starts to crackle, add the tomatoes. Cook these till soft and then add the turmeric and the coriander-cumin powder. Then add the diced banana pieces and mix well. Add red chilli powder and stir well. If needed sprinkle a little water and then cover and let it cook. When cooked, add salt and mix. Serve hot as a side dish or with some hot chapatis.


Tips
There are two ways to peel the banana. One method is to use a peeler and a knife, then remove the outer green skin and keep peeling till you reach the banana. The banana is like potato and will tend to oxidize, so put the diced raw pieces  into a bowl of water. This is a laborious method and time consuming. The alternate quick method is to cook the raw banana like a potato. You can boil it in water for a few minutes, till the skin softens. Or you can also pressure cook it. Cook it for around the same time that you would a potato in the pressure cooker.  The banana will be cooked and the skin can easily be removed. If you use this method, it will take lesser time to complete the recipe as the banana is already cooked. You will not need to add any water during the preparation.

Wednesday, August 10, 2011

Caramel Custard or Flan

Caramel custard, as I have known it most of my life or flan, as I have come to know it in the last few years, is possibly my favorite dessert. I still remember the first time I ate it in Delhi eons ago. It was absolutely delicious. I wasn't a big fan of sweets while growing up but this was one of those desserts that I never turned down. I am absolutely fascinated by the beautiful shades of golden and the rich brown top layer. Of course the best part of the dish is the sweet, deep golden brown caramel flowing over the top. I must absolutely have a big serving of the caramel over my caramel custard.


I know that it is easily available in grocery stores next to the puddings or can easily be whipped up from an instant mix. However, there is nothing like the authentic thing sans the additives and preservatives. Give me home made anytime!! It is also a quick recipe, so it is a perfect dessert for a weekday. I made this dessert recently and the entire family enjoyed it. I am already waiting for the next time! Can't wait to make it again.


Ingredients
2.5 cups milk
1/2 cup sugar
3 eggs
3 egg yolks
1 tsp vanilla essence

For the caramel sauce
1/2 cup sugar
1/4 cup water


Method
To make the caramel
Add sugar to a pan and then add the water. Do not stir or mix the sugar, (such that it dissolves into the water). Heat the pan, till the sugar starts to dissolve and it will then caramelize. At this stage, you can swirl the pan, but do not stir with a spoon. Once, it had turned a deep golden brown, turn off the heat and then pour it into the base of your mould.


Whisk together the eggs, egg yolks and sugar. Mix this till the miuxture is frothy and light yellow.
Heat up the milk till you can see bubbles on the surface and then turn off the heat. Once it has cooled down to a luke warm temperature, pour  it slowly into the sugar and egg mixture. It is very important that you keep stirring the egg mix as you slowly add the milk in. This will ensure that the eggs do not get scrambled. The resultant mixture will become custardy. Add the vanilla essence and mix. Pour the mixture a sieve. Then pour this into the mould over the caramel sauce.  Now, place it in a pressure cooker (without placing the weight on the cooker) or a steamer, steam cook it for 15-20 minutes. At the 15 minute stage, open the lid and check if it has set. It will be wiggly and look soft in the center.  If not cook for a few more minutes. See tips for how to cook it in the oven.

Cool on a cooling rack and then keep it in the fridge for at least an hour befor unmoulding. To remove from the  mould, run a knife around the sides and then place a plate on the mould. Then turn the plate and mould (together) upside down.


Tips
Do not let the caramel cool down before pouring it into the mould. It will get sticky and you will not be able to pour it out.
You can also use a water bath to cook the caramel custard in the oven. Place the mould in which the caramel is to be set into another oven proof vessel which is deep enough to hold water. You should be able to add enough water, such that the water level comes to halfway up the sides of the mould. Use hot boiling water and then place the pan in the oven to be cooked. Preheat the oven to 350F and cook it at this temperature for five minutes and then turn down the temperature to 325F and cook for 30-40 minutes till the caramel is set and the center seems firm but wobbly.

Monday, August 8, 2011

Fig and Blackberry Crostata

A couple of weekends ago, I had invited a few friends over for brunch. I wanted to make this a special occasion. Sometimes, it feels good to turn an ordinary day into something special by inviting friends over and cooking something special. Of course, I started planning the menu as soon as the invitations were sent and finally decided on waffles with mixed berry syrup, hash browns and home made bread along with assortments of jams and preserves. But, I was still missing that something which would make the menu all the more special. So, I finally asked my husband for suggestions. He reminded me about a crostata that I had made earlier and I decided to make it. A crostata, I believe is a type of Italian pie and it seemed the perfect addition to the menu.


I had just bought some fresh figs and decided to make a fig and blackberry filling. The recipe is from the "Baking with Julia" book, and I made some modifications based on the fruits I had on hand.  The end result was delicious. The pie made sixteen medium servings and we enjoyed the pie for dessert  over the next couple of days as well.


Ingredients
For the crust
2 eggs
1 tsp vanilla extract
3/4 cup almonds
1/2 cup sesame seeds
1/2 cup sugar
2 cups all purpose flour
1/4 tsp cinnamon
1/4 tsp salt
1/8 tsp lemon zest
8 ounces/2 sticks/ 16 tbps butter, cut into small cubes, and chilled


For the filling
16 ripe fresh figs, cut into quarters
12 ounces (1.5 cups) blackberries
1/2 cup sugar
1/4 cup brown sugar
1.5 tbsp all purpose flour
1/2 tsp lemon zest
1 tbsp unsalted butter


For the egg wash and topping
1 egg
1 tbsp water
1-2 tbsp granulated sugar


Method
To make the crostata crust
Lightly toast the almonds. Then toast the sesame seeds. Cool both before using further. Grind together the almonds, sesame seeds and 1 tbsp of sugar. The resulting mixture should be powdered and not overly processed to the stage where the oils are released. In a bowl, add the vanilla extract to the eggs and whisk them together. In another bowl, mix together the almond and sesame powder, flour, remaining sugar, cinnamon, salt and the lemon zest. Then add the butter a little at a time and mix till the mixture becomes crumbly. There maybe some pieces of butter still remaining. Do not overmix the dough. Add the eggs and them mix till the dough comes together. At this stage, take it out onto a floured surface and knead gently a couple of times to bring all the ingredients together. Any pie crust should not be overworked as it will impact the flakiness of the crust. Then cut the dough into two unequal pieces. Wrap each piece up in plastic wrap and chill for at least one hour.


To make the filling
Mix together half of the figs and blackberries, both sugars, butter, flour and lemon zest and heat it over low heat. Cook till the mixture reaches  a boil and starts to thicken. Stir occasionally. Turn off the heat and add the remaining fruit to the cooked mixture and set aside.


To assemble the crostata
Remove the smaller piece of the crust dough and roll it out to get about a 10 inch diameter. Use a well floured surface covered with parchment paper to roll it out. Then cut this into half inch strips. Slip the parchment paper onto a plate/baking tray and refrigerate. Then roll out the larger piece of dough to about an 11 inch circle or to cover the entire pie dish or tart pan, with a bit of dough as overhang. Now, using your rolling pin, roll the rolled out circle onto the pin and transfer gently to the pie dish. Then using your fingers gently press down the dough evenly into the bottom and up the sides of the pie dish. Trim the dough that is over the sides leaving about 1/8th of an inch. You can shape the side of the pie if you want. If using a tart pan, press it well into the ridges of the pan and then remove the excess dough that comes up the sides.


Next, make the egg wash, by beating together one egg with one tbsp of water.

Next, pour the cooled fruit filling into the pie dish and make sure that it is spread in an even layer. Then brush the sides of the pie shell with the egg wash. Remove the strips from the fridge and arrange these onto the top of the pie in the form of a lattice. Use half the strips in a vertical direction and the remaining to form the horizontal strips. Based on the length of the strips, place them onto the edges or the center of the pie dish. Place on horizontal strip and then the vertical strip. Do this till all the strips are used up. Based on the number of strips you have cut, decide how far apart you will need to place them to cover the entire top surface. Now chill the assembled crostata in the fridge for at least half an hour.


While the pie chills, preheat the oven to 350F. Remove the crostata from the fridge and brush the top lattice with egg wash. Then sprinkle some sugar on top of the strips. Bake for about 45 mins to an hour till the crostata is golden brown and the filling is bubbling. Transfer to a cooling rack and then you can move the crostata out of the pie dish upon cooling. You can also serve it from the pie dish. Serve at room temperature. 


Tips
Plan to start the process of making the dough a few hours before you plan to bake it. Serve it the day you cook it. It keeps well in the fridge for a couple of days. Reheat in the microwave or in the oven before serving. You can toast the almonds and sesame seeds in the microwave. Heat it for a minute at a time till you can get the toasted smell. I lined the pie dish with parchment paper before assembling the pie, for easy removal. You can also use a pan with a removable bottom to make this. Use a spatula to easily remove the strips and place them onto the pie. You can chill this overnight and then bake this a couple of hours before you plan to serve it. You can refrigerate the egg wash. Cover it with a lid or plastic wrap and refrigerate. Keep the pie dish on a larger baking sheet before putting it in the oven. This way if the filling bubbles over, it will not fall onto the heating elements in the oven.
Store leftovers in the fridge and reheat in a 350F oven till brought up to room temperature before serving.

Sunday, August 7, 2011

Ghee (Tup) - Clarified Butter/Brown Butter

A lot of Indian recipes call for the use of "ghee". As I experiment with and explore new cuisines, I have come to the realization that many other cuisines use this ingredient as well. A great example is brown butter sauce. The french call it "Beurre noisette", which is nothing but ghee without separating out the milk solids. Ghee is pure fat, and is made from butter. I remember my childhood days, when Mom used to collect the top creamy layer from milk everyday and keep it aside. Eventually, she used to process this to make butter.  This homemade butter is possibly the purest and tastiest form of butter. White like snow, soft, and very, well buttery. She then used to heat the butter to transform this into homemade "ghee". The house used to be filled with the aroma of this wonderful ghee and I used to wait to eat the solids that used to collect at the bottom of the cooking pan. It used to be a special treat that I used to eagerly look forward to.


A dollop of ghee added to something as simple as hot steaming rice or dal or even applied on a hot chapati enhances the taste. Add ghee to a curry or spicy dal preparation and take it to a new level. It is recommended that delicacies, whether sweet or spicy, be cooked in ghee to make the dish all the more special. Ghee is an integral part of the Indian cuisine, and is so easy to make at home. Since, in the US, milk is homogenized, it is not easily possible to separate out the cream from the milk. So, we skip the collection of cream process and start directly with butter as the main ingredient. The overall preparation time is roughly ten minutes or less for about a pound of butter. Hope this very easy method inspires you to make ghee at home.


Ingredients
1/2 - 1 pound of butter (1-2 cups)


Method
In a deep cooking pan melt the butter. As it melts, it will begin to foam and you can get melted butter smell. Keep an eye on the butter and stir it around occasionally. It will start changing color and turning slightly golden as it comes to a boil. At this stage, it will begin to foam again. Check if the butter has turned golden in color. If so, turn off the heat and remove it from the stove. You will also get tthe smell of ghee at this stage. After the foam subsides, you will be left with golden clean liquid and brown milk solids at the bottom of the pan. Gently pour the liquid through a fine metal sieve (plastic will melt) or a fine cheesecloth. The liquid is "clarified butter" or "ghee". Put the lid on the storage container once the ghee has cooled down completely. Keep it moisture free and it should last without refrigeration.


 Tips
The pan should be deep enough so that the butter doesn't overflow as it boils and foams.
If you have used unsalted butter, you can add a spoon of sugar and enjoy the milk solids.You can also use salted butter, if you cannot find unsalted butter. The salt sinks into the milk solids and you can easily separate the ghee from the salty solids once the solids settle to the bottom of the pan. Once the ghee starts to foam the second time around, it is really vital that you pay attention and remove the ghee from the heat, as soon as it turns a golden brown. It is at this time, where you can easily end up burning the ghee. To use the ghee as brown butter, do not separate solids and the liquid after the ghee is formed. Mix if up and serve as brown butter or beurre noisette.
In cooler months, ghee will tend to solidify, so you can heat it before use or serving.