Welcome to my blog

I hope you will find the recipe you are looking for your occasion here.

Now video instructions are available for select recipes and can be accessed at

Gardening and Cooking Made Easy

The latest 5 recipes are displayed on the
main page. For more recipes, you can browse the archive, click on the labels in the index to the left or use the Custom search below to look for a specific recipe.


Search for more results

Custom Search

Friday, July 20, 2018

Sev Khamani

This is usually made with chana dal batter and is delicious.  I had made a mixed dal batter earlier in the week and had been making different things from it- idli, dosa, pizza base. So, I decided to use it to make sev khamani and it turned out great. No one realized that they were eating the same batter that had been used to make dosa the previous night! And it is a protein rich, delicious item which can be served stand alone and will make a complete meal. Or you can serve it as an item on a chaat menu. This is also a gluten free dish.


Ingredients
1 cup each of idli rice, tur dal, urad dal, mung dal, chana dal - soak for a few hours and grind it to make a thick batter (idli consistency)
Ferment overnight.

For the khamani
3 cups of the fermented batter
1/4 tsp turmeric
Salt to taste
For seasoning
3 tbsp oil
1/4 tsp mustard
1/4 tsp jeera
1/8 tsp hing
6-7 large garlic cloves, finely minced
2 tsps sugar, adjust to taste
Juice of 1 lime, adjust to taste
Thin besan sev (one used for bhel)


Method
Grease a bowl with some oil and pour the batter in. Add the salt and turmeric and stir well. Then steam cook it for 20 mins, till it sets (like dhokla or idli). Remove the bowl, let it cool a bit and the break up the cooked batter with the help of a spatula. If it is warm it will be soft and clumpy and won't separate into small pieces but that's ok.
In a large saucepan, heat up the oil and and the mustard and jeera seeds. Once you hear them crackle, add the hing and the garlic. Sauté the garlic for a minute or two and then add the cooked batter pieces and mix well with the seasoning. Now cook this on a low medium heat till the mixture starts to dry up a little and starts separating into smaller pieces instead of being stuck together in large clumps. Since the batter is already cooked, this just provides the texture. Before turning off the heat, add the sugar and lime juice and mix well and turn off the heat. The taste should be sweet and sour and garlicky.
And as it cools down the batter will stiffen and provide the right shev khamani texture.
Now pour this into your serving platter and sprinkle the besan sev liberally on it. Garnish with cilantro. If available add pomegranate seeds as a garnish.


Tips
You can make a different combination of dals and try the recipe.

Thursday, July 12, 2018

Upside Down Fresh Fig Cake

We have had a great fig harvest his year. Other han enjoying the figs straight off the tree, I have been using them in various desserts. I made a fig crostata (recipe on the blog), fig icecream, fig danish braid.  Then I thought an upside down cake would be delightful. The result of the experiment was delicious!! 


Ingredients 
10 ripe fresh figs, cut into eighths or small pieces
1 tbsp butter
1 tbsp sugar
1 and 1/4 cups all purpose flour
1 tsp baking powder
1/8 tsp salt
1/2 cup butter
1 cup sugar
2 eggs
1 tsp vanilla essence
1/2 cup milk


Method
Butter a baking pan and cover the base with parchment paper.
Preheat the often to 350F.

In a saucepan, heat the butter. Once it melts, add the figs and sugar and give it a stir. Cover with a lid and let it cook for a couple of mins and then stir again. Cook covered for 5-10 mins, stirring frequently, till the figs release their juices and soften and start to caramelize.

Pour this into the baking pan and spread in a layer on the parchment paper.

Sift or whisk the flour, salt and baking powder so they are mixed well and the baking powder is evenly distributed.
Whisk together the butter and sugar. Once the mixture stars looking fluffy like icing, add one egg at a time and mix these in. Then, add the vanilla essence. Next fold one third of the flour into the batter, followed by half the milk. Alternate between the flour and milk incorporated into the batter using the folding motion.
This is a thick batter. Now pour or scoop this over the fig layer. Use a flat spatula to spread it out. Then bang the pan on the counter a couple of times to remove any large air bubbles. 

Bake for about 30 mins (check at 20 mins). Use  a toothpick or knife to check for doneness. Pierce the cake in the center. If the knife/toothpick is clean, the cake is done. 

Let the cake cool for a few mins in the pan and then invert it onto cooling rack. Peel off the parchment paper.  The cake doesn't need to be inverted again as the fig layer comes on top of the cake. Cut after the cake cools.


Tips
Let the figs caramelize. When you start cooking them it may seem that there isn't much moisture of they are not getting sweet, so cook with the lid on and let them stew in their juices. Figs become very sweet once they release their sugar which converts into a delicious syrup. Do not add more sugar unless you are using figs which are under ripe.
If you do not have fresh figs, you can use dried figs too. Soak them for a few hours to rehydrate. Once they are plump cut them into small pieces and follow the recipe. 

Monday, April 23, 2018

Mahim Halwa/ Ice Halwa

This is a halwa I had eaten eons ago as a kid when I visited Mumbai. We didn't indulge in this sweet a lot because the ones that are store bought are made using hydrogenated oil and were thought to be too unhealthy. I was searching for this recipe because a sweet that a friend shared reminded me of it. I came across many recipes but they all used semolina/rava as the main ingredient. The original version is made using corn starch. I wanted to make it as close to the store bought version but use clarified butter or ghee instead of hydrogenated oil. I liked the video demonstration of the technique on Bhavna's kitchen channel. It is a fairly straightforward recipe and the only thing that makes it challenging is the continuous stirring that it essential to getting the right texture.


Ingredients
1/4 cup corn starch
1/4 cup plus 2 tsp ghee (you can increase the ghee amount to 1/2 cup if you want)
1 cup water or milk 
1 cup sugar
1 tsp rose water (optional)
1/2 tsp cardamom powder
15-20 strands of saffron crushed
1 tbsp finely sliced almonds and pistachio (optional)


Method
Make sure to prepare the surface on which you will roll the halwa ready. You can use a silicone mat and a sheet of parchment or a couple sheets of parchment (approx 2 ft in length). If using aluminum foil or  the back surface of a baking sheet, make sure to grease it with ghee before you start the cooking process. I do not use plastic sheets as the mixture is hot and I do not want any plastic leaching into the halwa.

In an open flat saucepan (helps with faster evaporation) mix together the corn starch,1/4 cup ghee, water/milk and sugar. Stir it and keep it aside for 20-30 mins and let the ingredients soak. Then stir the mixture well to dissolve most of the sugar and ensure that there are no lumps of cornstarch. Then put it on low medium heat and stir this mixture continuously. In the beginning while it is still very fluid, you do not need to stir it constantly but as soon as the mixture starts to heat up, keep stirring constantly to avoid lumps. This is a little laborious but well worth it in the end. Keep the heat at medium low and keep stirring and press down any lumps that start to form( about 20-30 mins) till it comes together like a dough. Now turn off the heat and add the remaining 2 tsps of ghee and knead it with your spatula and bring the mixture together and then mix in the rose water, if using. 


Now it is important to work fast. Pour this dough onto a silpat/parchment/prepared aluminum foil. Place another parchment paper on top of the dough sandwiching the dough between the two. Then roll out the dough as thin as possible. Peel the paper intermittently and check how thin it is. It should be transparent. That's when you know it is at the right thinness. Then sprinkle the cardamom, saffron and nuts over the rolled dough, place the parchment paper again and lightly roll over the sprinkled spice and nut mixture embedding it into the halwa. Now peel the paper and let it dry. 


When it is semi dry, cut the rolled sheet into squares. It can take from a couple of hours to a few hours or overnight for the halwa to dry and get the perfect texture, depending on the weather, humidity, and rolled dough thickness. Separate into squares when completely dry. Alternate wax paper or parchment paper sheets cut to the same dimensions as the halwa, between each halwa slice. Your halwa is ready to serve. Store in the fridge.


Tips
If you use rose water when the heat is still on, the fragrance will disintegrate and you may not get that rose fragrance. You can also make colorful halwa by adding a few drops of color to the mixture when you soak the ingredients together.

Sunday, April 15, 2018

Sutarpheni/ Sutarfeni - Take Two - The Professional Version

I had made this a few days ago and the version made with just all purpose flour, water and ghee was a big hit at home. However it didn't look the same as the store bought version which is usually white and has very fine strands. I was however not completely happy with the result. I wanted to figure out how to make the same version as the professionals in the sweet shops make. I had to figure out a way of stopping the threads from collapsing into each other as they became thinner and another was to find a way to be able to cook the sutarpheni and keep it a white color instead of a golden brown. Also I had to use a finer instrument than a fork to separate the threads out.

So I made a couple of adjustments to the original recipe, eliminated some steps which didn't seem essential to the thread making process and was able to make the perfect sutarpheni, just like the store bought one. This version was as laborious as the first one but the end result was so perfect, I was completely thrilled. So here is the recipe for the professional version. 


Ingredients 
1 cup all purpose flour
Water to knead dough and for syrup
3/4 cup ghee to soak dough
2 tbsp corn flour
1/2 cup oil
1/4 tsp salt
Oil for frying
1 cup sugar
sliced almonds and pistachios for garnish (optional)
rose water (optional)


Method
Add the salt to the flour and using minimal water, knead the all purpose flour into dough. It should be a tight dough. Cover the bowl and let it rest for at least 1 hour upto 3 hours. The dough will soften.

In a plate/tray which has an edge, pour the ghee and oil. Add cornflour to it and whisk up the mixture with your fingers or a fork for a minute or two till it is well mixed. 
Then divide this dough into 3-4 pieces, each a large fistful. Roll each piece into a ball, flatten it and make a neat hole in the center of it (like a doughnut) and place each ball into the tray. The ghee, oil and corn flour mixture will rise up into the center hole and prevent it from closing up. Make sure to place these in an order. Now start with the first dough ball. Stretch the center hole as long as you can (the dough shouldn't tear) and place it back in the plate. Do the same with all the pieces. Make sure you maintain the order. Then let them rest for a minute or two. Then start with the first dough piece and stretch the center out further. If it becomes a very long loop, wrap it over itself (like you would wrap a thread). Do this with each piece. Repeat this process or elongating and wrapping till you start seeing fine threads in your dough ball (see video below). Keep winding the threads onto themselves as you keep elongating it. It took me about 1.5 hours of wrapping to get really thin threads.

Heat the oil in a frying pan. Once hot (test the oil temperature by adding little dough and if it comes up immediately, it is hot) place one of the dough ball which should look like a thread ball into the ghee. Use a sharp skewer to tease the dough strands away from each other. Fry at a medium high temperature and fry it till the bubbles start to subside. It will take a a minute or two. Then flip it over and fry for another 30 seconds to a minute. It will feel soft as you turn it. 

Remove it and drain completely. At this stage you can store it for later use.


To make the syrup
Cover the sugar with just enough water to submerge the sugar. Now bring it to a boil and boil it for a couple minutes and make a simple syrup. Once cool, pour this syrup over the sutarpheni or dunk the sutarpheni in the syrup. You can add rose water to the syrup. 
You can also sprinkle powdered sugar on the sutarpheni when hot and let it melt.

Garnish with slices pistachios and almonds. 


Tips
Addition of the cornflour helps in keeping the threads separate and prevents them from collapsing into each other, as the other dough balls are being processed. It is easier to control the oil temperature and things fry at a slower pace in oil than in ghee. Hence the color of the sutarpheni can remain white even when it is completely cooked.

Friday, April 13, 2018

Sutarpheni/Sutarfeni - A Delicacy

This is another delicacy that I had never made before. It is fine strands of dough wrapped in a circle that is deep fried and then covered by syrup. You may have seen recipes using the shredded phyllo dough. I wanted to know how to make it from flour directly instead of the store bought phyllo dough. If you have been reading the blog, you know I enjoy trying out traditional recipes using the original method. So without wasting time, I called up my Mom and asked her if she knew how to make it. She had an old marathi recipe book which provided the traditional method of making them. I noted it down, discussed it with mom and decided to tackle it immediately. The end result was fantastic.  The only difference from the store bought version was the color and hence the texture was also little better and crispier instead of the chewy texture that the store bought one tends to have. I didn't want to risk leaving any part of the sutarpheni uncooked, so I fried it till t was a folder brown color. 

I am ecstatic that I was able to reproduce this delicacy at home, that too from scratch. Even though it is laborious, the process is so much fun that I plan to make it frequently. I enjoyed taking photos of this dish and this post has a lot of pictures.


Ingredients
1 cup all purpose flour
Water to knead dough and for syrup
1/2-1 cup ghee to soak dough
1/4 tsp salt
Ghee for frying
1 cup sugar
Sliced almonds and pistachios for garnish (optional)
Rose water (optional)


Method
Using minimal water, knead the all purpose flour into dough. It should be a hard and tight dough. Cover the bowl and let it rest for at least 3 hours. The dough will soften a little. Then using a pestle, pound the dough and add a little water at a time. Then knead it again. During the last step of the process, dissolve the salt in a tsp of water and add this water to the dough. Pound it and knead it well. Make sure to add enough water and pound it till the dough is very soft, smooth and extremely pliable. 

In a plate which has an edge, pour half cup of ghee (to begin with) and whisk it up with your fingers for a minute or two. You may need to add more ghee as you process the dough.
Then divide this dough into 5-6 pieces. Roll each piece into a ball, flatten it and make a neat hole in the center of it (like a doughnut) and place each ball into the ghee. The ghee will rise up into the center hole and prevent it from closing up. Make sure to place these in an order. Now start with the first dough ball. Stretch the center hole as long as
you can (the dough shouldn't tear) and place it back in the plate. Do the same with all the pieces. Make sure you maintain the order. Then let them rest for a minute or two. Then start with the first dough piece and stretch the center out further. If it becomes a very long loop, wrap it over itself (like you would wrap a thread). Do this with each piece. Repeat this process or elongating and wrapping till you start seeing fine threads in your dough ball. Keep winding the threads onto themselves as you keep elongating it. It took me about 1.5 hours of wrapping to get really thin threads.

Heat the ghee in a frying pan. Once hot, place one of the dough ball which should look like a thread ball into the ghee. Using two forks, work
Quickly to tease the dough strands away from each other. Fry it till it starts to turn golden. Once it starts to turn golden the color turns brown very fast, so be quick in removing it from the ghee. Fry all the dough thread balls. Let the ghee drain and cool them. At this stage you can store them for later use.


To make the syrup
Cover the sugar with just enough water to submerge the sugar. Now bring it to a boil and boil it for a couple minutes and make a simple syrup. Once cool, pour this syrup over the sutarpheni or dunk the sutarpheni in the syrup. You can add rose water to the syrup. 
You can also sprinkle powdered sugar on the sutarpheni when hot and let it melt.

Garnish with slices pistachios and almonds. 


Tips
Fry the dough immediately after the last round of wrapping. Letting it rest after that for more than a couple of Minutes will lead to the strands merging into each other and you will
not be able to tease out the threads easily. 

Tuesday, April 10, 2018

Mande - A Delicacy from Belgaum

I had eaten this delicacy called Mande once when I was a child. It was store bought and I remember it was absolutely delicious, but I didn't know what it was called and hence couldn't request for it to be bought again. Also, I never came across it in a store again. So that was the end of that till I ate this again recently. A friend came back after visiting Belgaum and brought the delicacies found there for us to taste. As soon as I saw it, I knew what I was looking at and it still tasted as delicious as I remembered it from childhood. Of course, a taste was not enough and considering that I was thousands of miles from Belgaum, the only option was to figure out how to make it myself.  I was so motivated that for the next few days my focus in every free minute was to research how to make it. I didn't really find any elaborate recipes or videos or techniques. Came across many puran poli videos which also seem to be called mande (a new learning for me) but not much in regards to this version of Mande.

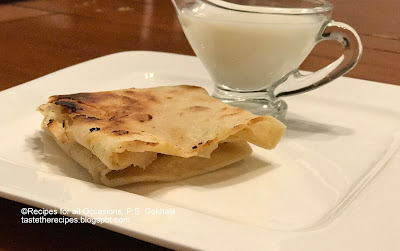
This version of Mande is a large very thin flaky poli/chapati which is filled with a slightly sweet mixture and the stuffing is so thin and fine, that the poli seems to be made of sweetened dough rather than filled with stuffing. After several discussions with Mom, I decided to try it out based on the data I had gathered. Oh! The result was perfect and delicious and so flaky. Of course, all of it was eaten as soon as it was cooked and I could just save one till I took some photos before it was also devoured. One of my favorite preparations that is difficult to make, but so worth it.  If you are a proficient puran poli maker, this will prove to be a little bit easier but definitely a preparation that I would rate as difficult. But if you can make this you will be so happy with the result that you will want to keep making and eating this till you run out of ingredients.


Ingredients
1 cup fine semolina/rava
1.5 cups all purpose flour/maida
1/2-1 cup water
1 cup powdered sugar (not icing sugar)
1/4 cup poppy seeds (white)/khus khus (do not use black poppy seeds), roasted and powdered
1/8 tsp cardamom/elaichi powder
1/4 cup clarified butter/ghee
1/2 tsp salt
1/4-1/2 cup rice flour, to roll the mande
oil/ghee to roast the mande


Method

For the dough
Mix the rava and 1 cup of maida together. Add salt. Then add a little water at a time and knead the dough. The dough should be very hard, kneaded with  minimal water. Cover it and keep it aside for 30 mins. Then add a few drops of water at a time and using a pestle, pound it and knead it till the dough becomes very soft and pliable.

For the stuffing
Whisk the ghee till it is fluffy, then add in the poppy seed powder, sugar, cardamom powder and the remaining 1/2 cup all purpose flour. knead this all together. It should all come together as a very soft pliable dough. The consistency should be similar to the dough made for the covering. If the dough is dry, add some more ghee, till it comes together as becomes a soft ball

To make the mande
The mande need to be flaky and soft and so need to be cooked on a low indirect heat. So they cannot be cooked directly in a pan or tava. So place a thick walled pan or an earthen pot which has a dome shaped base upside down on your gas. You can also use an old cooker which is not flat bottomed. I placed a cast iron tava on my flat cook top and placed an old dome shaped steel pan upside down on it as my cooking surface and let it heat up as I rolled out the mande.

Make 2 equal sized balls of the dough covering. Make a ball of the same size of the stuffing. Now flatten each ball into similar shaped round discs of approximately the same radius and thickness. sandwich the stuffing disc into the two covering dough discs and pinch the seams to close the stuffing in it. Now taking care, start rolling the made into a flat thin disc (poli/roti/tortilla/chapati). Roll from the center to the edges making sure that the stuffing also gets rolled out along with it and spreads to all the parts of the disc. Dust the rolling surface with rice flour to keep the disc from sticking to the rolling surface or the rolling pin. Roll the disc as thin as you can. If proficient you can take a small rolled out disc and use your hands to stretch it paper thin into a circle.

It should be translucent and you should be able to see through it. Now place it onto the hot upside down pan and cook it till you start seeing small bubbles. Then flip it over and cook it till light brown spots appear. Flip it again till the partially cooked surface gets completely cooked. Apply a little oil or ghee while roasting. The cooking process takes time as it is indirect heat, so be patient.

Once cooked, fold it up a couple of times to make a neat rectangle. Serve with milk. It tastes great when warm as well as when it is at room temperature.


Tips
If you do not have powdered sugar, use your mixer/blender to powder normal sugar. Sift it before use. If you have made puran poli, the dough should be soft like the puran poli dough.