Welcome to my blog

I hope you will find the recipe you are looking for your occasion here.

Now video instructions are available for select recipes and can be accessed at

Gardening and Cooking Made Easy

The latest 5 recipes are displayed on the
main page. For more recipes, you can browse the archive, click on the labels in the index to the left or use the Custom search below to look for a specific recipe.


Search for more results

Custom Search

Tuesday, August 23, 2016

Ginger and Garlic Noodles

This is a beautiful and very flavorful version of the traditional chowmein. In this preparation, I have added lots of vegetables and these lend a hand in making the noodles even more flavorful. When I was a kid, I never liked ginger in my noodles and always protested when I detected ginger when my Mom made chowmein for me. But now I realize that garlic and ginger together give this a deeper flavor.

Recently when I made it for my kids and their friends, they loved it and polished off their plates. That was probably the best compliment I could ever get on how good these tasted. 


Ingredients
2 tbsp oil
2 tbsp finely grated ginger
2 tbsp finely minced garlic
1 tsp garlic red chilli paste
1 tbsp soy sauce
2 tsp vinegar
1-2 chillies (optional)
1 onion, finely sliced
15 green beans, finely sliced
1 green bell pepper, finely sliced
2 carrots, grated/finely sliced
¼ cabbage, shredded finely
10 scallions/green onions, finely sliced (separate the white onion part and the leaves)
salt to taste
one packet of chowmein, boiled per directions on the packet


Method
In a large pan or wok, heat up the oil. Once hot, add ginger and garlic and let it cook. Once slightly browned, add in the chillies, if using and then add the garlic red chilli paste. Let it cook for a couple of mins and then add the onions and the white part of the scallions. Fry the onions till cooked, then add the soy sauce and vinegar. Next add the green beans, stir fry and let it cook for a couple of minutes till adding the next vegetable. Add the bell pepper, then carrots and then the cabbage. Add half of the green scallion leaves. Cook the vegetables till they are cooked but still crispy. Don’t overcook these. Season the vegetables with a little salt and then add the noodles. Toss the noodles in till well mixed with the vegetables. Garnish with the remaining scallion greens. Serve hot. 


Tips
Add a little oil and salt to the water in which the noodles are boiled to prevent them from sticking. Also, after cooking, drain the water and toss the noodles in a teaspoon of oil. This will prevent them from sticking as they cool down.Taste the noodles and then adjust the salt when you finish off the dish. Since soy sauce is also salty, it is important to taste the noodles before adding more salt.
To make the garlic red chilli paste, soak 4-5 red chillies for a couple of hours. Then add 4-5 cloves of garlic to it and then grind these together. This can be stored in the fridge for a week to 10 days. You can also use sambal oelek paste which is a red chilli paste in vinegar instead of the garlic red chilli paste.

Sunday, August 21, 2016

Mixed Vegetable Kurma - Coconut Based Curry

This is a delicious, vegetable rich curry with a coconut base which forms the gravy. I ate this for the first time in a South Indian style restaurant with Uttapam (thick rice pancakes). I absolutely loved it. I  then started making it at home whenever I would have grated coconut on hand. I believe this has its origins in Karnataka. It is very different from the mixed vegetable kurma which is found in North Indian style restaurants where the gravy base is onions and tomatoes.

This pairs very well with phulkas, uttapams and is worth being on a feast menu when served with puris. If is also a great gravy accompaniment with simple pulao. I love this preparation and hope you enjoy it too.


Ingredients
1 onion, finely chopped
2 carrots, cut into small cubes
15 green beans, finely diced
1 potato, cut into small cubes
¼ cauliflower, cut into small florets
½ cup peas
2 tbsp oil
¼ tsp cumin seeds/jeera
2 bay leaves/tej patta
salt to taste
water to form the gravy

For the gravy masala paste
1/2 onion, chopped
1 cup fresh coconut
4-5 garlic cloves
1 inch ginger
1-2 green chillies (to taste)
¼ cup cilantro/coriander leaves loosely filled (approximately leaves yielding from 10-15 stems)
½ tsp turmeric
½ tsp tamarind paste (soak tamarind in warm water and once it is softened, remove seeds and any fibers and extract the pulp from the tamarind)
1 tsp garam masala (optional)
water to grind the ingredients together to form a thick paste


Method
Blend all the ingredients listed under the fresh coconut masala paste into a fine thick paste. Cut all the vegetables into approximately similar sized pieces. To reduce the overall cooking time, you can steam cook these or cook these in the microwave till partially cooked. Do not overcook them. It is not necessary to semi-cook the vegetables. It will just take a little longer for the kurma to cook if raw vegetables are added. If using frozen peas, just thaw them. Do not cook them with other vegetables as thawed peas cook really quickly.

Heat a pan. Add oil and then cumin seeds and bay leaves. Once the cumin seeds crackle, add the coconut paste and cook it till the raw smell of onion and garlic goes away and it starts to brown slightly. Next add the cut vegetables – the carrots, beans, peas, potato and cauliflower. Stir to coat these in the coconut masala and let these cook for a few minutes. Then add about ½-1 cup of water to create a gravy, based on your preference. Add salt to taste. Let the vegetables boil till completely cooked.

Serve hot with chapati, puri or uttapam.


Tips
Do not use cold or frozen coconut directly when making the masala paste. Thaw it and warm it a little. If it is very cold, the oil will separate out during the grinding process. Also, use warm water to grind the masala. You can also add 10-12 cashews (not roasted, raw) to the paste to give it a richer taste.

Thursday, August 18, 2016

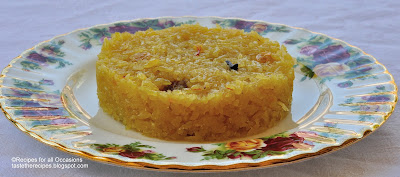
Narali bhaat - Sweet Coconut Rice

This dish is special and close to my heart as it transports me instantly to my childhood. This a sweet delicacy which was made at least once a year in the house on the occasion of Narali Purnima which coincided with Rakshabandhan. On Narali Purnima, coconut based dishes are prepared to celebrate the day. Usually this coincides with the occasion of Rakshabandhan, when sisters tie a decorative thread on their brother’s hand and getting a gift in return. Of course there is a deeper meaning to this tradition but this is a food blog, so lets get back to the rice.

The main reason why this was a rarely prepared dish was because of the effort involved in scraping fresh coconut and that used to be tiring. But now with the availability of frozen packets of fresh coconut, it has become easier to make this once elaborate dish. In fact, if you don’t have access to a frozen packet, on a day when you do have the time and energy, scrape the coconut and freeze it. Use it within the next couple of months.


Ingredients
1 cup rice (basmati preferably)
2 cups water
2 tbsp ghee/clarified butter
4-5 cloves
2 cups grated/scrapped fresh coconut
2 cups sugar
½-3/4 cup water
1 cup milk
1-2 pinch saffron
1/8 tsp green cardamom powder
1-2 tbsp raisins
2 tsp sliced almonds (optional)
1 tbsp cashews (optional)
1 tbsp ghee, after cooking


Method
Wash the rice a couple of times and keep aside. Heat ghee in the vessel/cooker that you cook your regular rice in. Once you can smell the aroma of ghee, add the cloves and let them cook till fragrant. Then add the rice and stir it in the ghee till the grains are coated with ghee. Add water and let the rice cook. Once cooked, spread it out on a plate or tray and let it cool down completely.

Heat a saucepan which is of such size that it will easily accommodate the cooked rice and coconut mixture.  To this add the grated coconut and roast it a little. Then add the water and heat till the sugar dissolves completely. Then add the milk and keep stirring and let the mixture thicken. Once it starts to thicken, add the saffron, cardamom powder, raisins and nuts (if using). Let this all cook together. Once the mixture starts to get to a nice thick syrup consistency, add the cooled rice and mix it in to the coconut sugar mixture gently. Continue to cook, till the water evaporated and a sticky rice texture is achieved. Add the ghee to this. Serve hot.


Tips
The roasting of the coconut a little helps to increase the shelf life of the cooked rice. Always store this in the fridge. Heat the saffron a little in a tsp of water or milk. The golden color of the rice is achieved using the saffron. It will be a deep golden if you use two pinches instead of one. I used two and got a lovely golden color as seen in the pictures.

This helps release the color of the saffron. Always roast the coconut a little if you plan to store it in the fridge or freezer to help increase its shelf life, else the coconut will become rancid in a couple of days.

Wednesday, August 17, 2016

Dal Bafla

Dal Bafla is a wonderful dish that is similar to Dal Baati. The very first time I ate it was in Indore at my Aunt's house. The baflas were cooked in a traditional kiln and served submerged in a bowl of ghee with piping hot dal. Absolutely delicious! I ate this over 15 years ago, but still remember the experience vividly. At that time I didn't realize that Dal Bafla and Dal Baati were two individual dishes. I have heard both names often over the years, but only knew how to make Dal Baati so far.

To make baatis, I usually add baking soda and yogurt to soften them up a little. If you skip that then they turn out really hard. The best part about the bafla is that it is soft from inside and crisp from outside, so it is very easy to eat it. It is soft because it is boiled first and then baked.

It was just recently that I came across the recipe on a food group. I had to try it out immediately to see what the differences between the baati and bafla are. The dal I made along with this was also different than what I make for baatis. Once  you have bafla or baati ready, you can use any dal preparation with it.  I have included the dal recipe that I made along with the bafla as well. It is a very delicious preparation that you can also use with rice or rotis.

I am sure you will love this variation once you eat it.


Ingredients
For Bafla
3 cups of wheat flour (used the same flour that I use for chapatis)
½ cup semolina/rava
½ cup oil
salt to taste (approx. 1 tsp in the dough and 1 tsp to add in the water)
1 tsp turmeric
1 tbsp oil
ghee

For Dal
2 cups cooked chana dal
¼ cup cooked tur dal
1.5 onions, finely chopped
3 tomatoes, finely chopped
1 tbsp garlic paste
1 tbsp grated ginger
1/2 tsp red chili powder
1 tsp coriander powder
1 tsp cumin powder
5-10 curry leaves
2 tbsp oil
pinch of hing
½ tsp mustard seeds
½ tsp cumin seeds
salt to taste
cilantro/coriander leaves for garnish


Method 
For the bafla
Mix together the semolina, flour and salt till the ingredients are well mixed. Then added oil and rub it into the flour. Add water, a little at a time till it comes together as a dough. Knead it a little. It is on the drier and hard side. Let it rest for 10-15 mins. (The dough was very hard and tended to crack when rolling the baflas. I think I could have added another tablespoon of water to have smoother baflas.)
Take about a fistful of dough and make round balls and then press slightly to flatten them a little.


In a deep pot, added water, turmeric, oil and salt and let it come to a rolling boil. Then add the dough balls to this water. They will sink. Stir them around occasionally as they cook, till they become lighter and float a little. Cook on medium heat. It takes about 10-15 mins.
To eat, crush the baflas in a bowl, add ghee to these and then pour dal over the baflas. Enjoy hot!

Keep a pizza stone in the oven and preheat the oven to 350F while the baflas cook in water. Remove baflas, dry them with a cloth and put it on the hot pizza stone and let them cook for about 20-25 mins, turning them over a couple of times till they are crisp on the outside. Retain the water that the baflas have been cooked in to use in the dal.


Once baked, remove them from the oven and keep warm in a casserole till ready to heat. The traditional way is to immerse the warm bafla in ghee after creating a little crack in it so that the ghee is able to permeate the bafla. I didn’t do this as I wanted to control the amount of ghee that was in each serving.


For the dal
Heat oil in a saucepan, add mustard and cumin seeds. Then add the hing, and curry leaves. Then add onions, ginger and garlic. Cook the onions well and then add the chopped tomatoes. Once these are cooked, add the cumin, coriander and chili powders and mix well. Then add the cooked tur and chana dals. Mix well, then add salt and the water saved from cooking the baflas till the desired consistency of the dal is achieved. Boil this till well cooked. Garnish with cilantro.

Tips
If you don't have a pizza stone, use a baking sheet to bake these. If you don't want the yellowish tinge to the bafla, don't add the turmeric to the boiling water.

Monday, August 15, 2016

Peach Upside Down Cake

It has been a long time since my last blog update. I am hoping that I will be able to update the blog more frequently now. Hope you will all enjoy this recipe as much as I enjoyed making it.
Summer is a wonderful season with respect to all the varieties of fruits that the grocery stored are inundated with. Boxes are brimful with peaches and I relish this delicious and juicy fruits.  I love including these as toppings on waffles or making peach preserve. I wanted to bake a cake recently and while staring at my fridge contents, I thought why not make a peach cake.

I scoured various sites on the internet and the multiple cooking books I have, including reviewing my pineapple upside down cake recipe. It took me about four days to finally decide on a recipe I wanted to follow. It was for an apple upside down cake from Cook's Illustrated that I modified to make the delicious and very spongy and soft peach upside down cake.


Ingredients
For the upside down topping
5 ripe peaches, cut into slices about 1/2 inch in thickness
3 tbsp unsalted butter, cut into small cubes
1/2 cup packed light brown sugar
1 teaspoon lemon juice

For the cake
1 cup all purpose flour/maida
1 tsp baking powder
1/2 tsp salt
1/2 cup granulated sugar
1/4 cup packed light brown sugar
2 eggs
6 tbsp butter, melted and cooled
1/2 cup sour cream
1 tsp vanilla essence


Method
Grease a baking pan and then line it with parchment paper. Grease the parchment paper and dust it with flour. Preheat the oven to 350F.

For the topping
Melt butter in a pan and then half of the peach slices to it. Cook these in the butter till they start to soften and then add the rest of the peach slices, sugar and lemon juice and stir till the sugar dissolves and the peach slices are coated in the sugar. These will be quite a bit of syrup that gets created as the peach releases juices. Transfer these to the cake pan and arrange them to form a layer.


To make the cake batter
Whisk or sieve the dry ingredients including the flour, baking powder, and salt. In another bowl, whisk the sugar, brown sugar and eggs till it is well whipped and the eggs lighten a little in color. Then whisk in the melted butter slowly till it is complete incorporated. Add the sour cream and vanilla essence till completely combined. Fold flour into this mixture till combined and then pour this batter over the layer of peaches in the baking tin. This is a thick batter and is better to spoon it and spread it with the back of the spoon as your layer it over the peaches.

Bake it in the pre-heated oven for about 30-40 mins, till the cake is completely cooked. To test if the cake is cooked, insert a knife or toothpick into the center of the cake and remove it. If it comes out clean, it is cooked.

Place the tin on a cooling rack and let it cool till you can easily touch it. Then run a knife around the edge of the pan, if the cake has not completely come away from the sides, to loosen it. Invert the pan over a baking rack and then remove the pan. If you want, you can let the excess syrup drip off at this stage. I didn't do this. I then inverted it back onto a another baking rack and let it cool completely. This let the excess syrup get absorbed into the cake making it very  moist. Transfer to a platter and serve after it cools down completely.


Tips
To melt the butter, cut it into cubes, put it in a microwave safe bowl and microwave it in 20 second intervals till butter is almost melted and then stir to melt completely in the residual heat. Else, it can be melted in a small saucepan on the stove top. Sour cream can be substituted with full fat yogurt or green yogurt. I used an 11 inch tin with 2 inch sides and you can see that the cake layer turned out thin. It would be a thicker cake if a 9 inch pan is used. Make sure that it is deep enough to hold the topping as well as the cake with at least 2 inch sides.