Welcome to my blog

I hope you will find the recipe you are looking for your occasion here.

Now video instructions are available for select recipes and can be accessed at

Gardening and Cooking Made Easy

The latest 5 recipes are displayed on the
main page. For more recipes, you can browse the archive, click on the labels in the index to the left or use the Custom search below to look for a specific recipe.


Search for more results

Custom Search
Showing posts with label soup. Show all posts

Sunday, August 16, 2020

Culinary Tour of the World: Episode 2: Albania - Pitalka, Jani Me Fasule, Feregese Tirane

Welcome to our second episode of the Culinary Tour of the World. The second country, in an alphabetical order is Albania. It is in Europe next to Greece and along the Mediterranean Sea. While I was researching the food of Albania, I came across so many recipes that it was really difficult to pick one.  So with this episode, I am presenting three great Albanian recipes. 

I decided that I would choose recipes that could together make a meal and then I wouldn't have to cook anything else. I love baking bread, so I picked Pitalka. I decided a stew or soup would be a great accompaniment and then a vegetable side. I chose "Feregese Tirane" as a vegetable side. Initially, I thought that Feregese Tirane would make a good meal with the Pitalka. But every recipe that I saw, stated that without adding liver or meat to it, it wouldn't be more than a side.  So, I decided to keep it as a side, which was a good decision. The soup I chose was a white bean soup - "Jani Me Fasule" which was filling and went well with the Pitalka and Feregese Tirane. 

Together, these 3 made a delicious and complete meal! We loved it. I even used the Pitalka bread the next day to make some pita sandwiches with falafel and hummus.  I relied heavily on Google Translate for these recipes. As I started searching with the Albanian names, I came across blogs and videos in Albanian which I couldn't understand and so I used Google Translate extensively for translating the recipes, instructions as well for the pronunciations of the dishes. 


As you will see in the video, these are fairly straightforward dishes to make. They are not overwhelmed with spices and the ingredients really shine.  I made an honest effort to follow Google Translate's pronunciations, and realize that I may not have pronounced the names correctly. I hope you try these out and enjoy them as much as I did. 

Our next country will be Algeria and do let me know if you have recommendations for Algerian vegetarian recipes.  And if you missed our first episode, here is the link to it Episode 1: Afghanistan - Ashak. You can find the link to video recipes here. And for a listing of our episodes, visit Culinary World Tour Episodes.

Here is the link to the video demonstrating the detailed method.

Ingredients

For the Pitalka

4 cups of all purpose flour
1 tsp sugar
1.5 tsp  yeast
1.5 tsp salt
1/2 cup milk
3/4 - 1 cup water

For the Jane Me Fasule

1 cup of dry white/cannellini beans
water to soak the beans and cook the beans
1 cup diced onions
1 cup diced tomatoes
1 cup diced bell peppers (mixture of green and orange)
2 tbsp oil
salt to taste
1/4 tsp black pepper
pinch of red chilli flakes

For the Feregese Tirane

1 tbsp oil
2.5 cups roasted, diced bell peppers (mixture of red, yellow and green)
1 cup diced onions
1 cup diced tomatoes
2 tbsp basil
salt to taste
1/4 tsp black pepper
2 cups milk
1 tsp vinegar diluted with 1 tbsp water
2 tbsp butter
2 tbsp all purpose flour
1/4 cup yogurt
1/2 cup cottage cheese (made using the milk and vinegar. If using store bought cottage cheese, milk and vinegar are not needed)


Method

For the Pitalka

Add the yeast and sugar to the milk and set it aside for 10 mins. The yeast will start getting frothy indicating that it is active and is fresh. Add salt to the flour and mix. Then add the milk and yeast mixture to the flour. Add a little water at a time and knead the dough till you get a firm but smooth dough. It can take about 3/4 cup to 1 cup of water. If you are kneading it in a mixer, knead it for 5-7 mins till smooth. If by hand, it will take about 15-20 mins. Then place it in a bowl. Cover the bowl with plastic wrap and let the dough rise for 1 hour or till it has doubled. 

Place a pizza stone in the oven and preheat the oven to 475F.  If you don't have a pizza stone, that is ok. 

Then deflate the dough and cut it into 6 equal parts. Shape each dough piece into a ball. Place this on a floured surface or a parchment paper, such that you can easily shape it into a disc and then place it in the oven. Let the dough ball rest got 10-15 mins. Then, using your finger tips, spread the dough out into a thin disc, about 1/4th inch in thickness. Then, let this dough disc rest for 20 mins. Cover the dough ball and disc with a towel or plastic wrap to ensure that the dough does not dry out. Then place this disc into the oven. If baking on the pizza stone, place it with the parchment or directly onto the stone. If you are not using a pizza stone, place it on a baking sheet and then place the baking sheet into the oven. It will take about 8-12 mins for the bread to become golden brown in color and it will puff up as well. The bread is ready when golden brown.

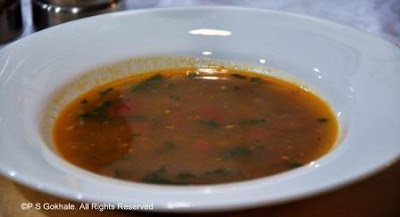
For the Jani Me Fasule

Rinse and soak the white beans/cannellini in water for 3-4 hours. Then, discard the water and add the beans and salt to a pressure cooker. Add water to cover the beans and there should be half an inch water over the beans surface. Pressure cook the beans for 30 mins. Then, add the diced onions, tomatoes and bell peppers to the cooked beans, along with the oil, black pepper and chilli flakes. Cook under pressure again for 10 mins. Once the pressure is released, check the consistency of the soup and let it boil to thicken if it is watery. Serve hot. Pour a little olive oil on top of each bowl before serving. 

For the Feregese Tirane

Roast the bell peppers on the stovetop or in the oven till the skin starts to char. Then deseed and dice the bell peppers. To make the cottage cheese, heat the milk and then add the vinegar and water mixture to it. That will separate the milk into the cottage cheese and whey water. Drain the cottage cheese and add salt to it. 

Heat 1 tbsp of oil in a pan, and add the onions. Cook till they start to soften and then add the tomatoes and bell peppers. Cook this mixture till the liquid from the vegetables has almost evaporated. Then, add the basil, and black pepper. Stir well. 

To make the roux, heat the butter and then add the flour to it. Cook for a minute till the flour doesn't smell raw anymore. Do not brown it. Then, add the cottage cheese and yogurt to it. Mix well. Mix this into the vegetable mixture. Then ladle out individual portions into casserole dishes, or into a large baking dish. If you like, top with some cottage cheese and then bake in the oven at 350F for 20 mins. The casserole is ready to eat.  


Tips

If you are roasting bell peppers in the oven, cook them at 400 F till the skin starts to char. 

Friday, July 20, 2018

Tomato Saar - Tomato Soup, the Maharashtrian way

Tomato soup seasoned with cumin in ghee tempering is called tomato saar in marathi. This is a favorite at home. To make it creamier I add coconut milk to the tomato soup and it elevates the taste. I am sure there are many versions of tomato saar, and we love this version of tomato saar.

Ingredients 
1 tsp ghee 
5-6 tomatoes, coarsely chopped
1/2 onion, coarsely choppes
2 cloves of garlic
1/4 inch of ginger
1 cup water 
1/2 cup coconut milk
Salt to taste
1-2 tsps of sugar (depending on how tart the tomatoes are)
For the tadka
1 tbsp ghee 
1 tsp cumin seeds
1-2 pinches of asafoetida/hing 
10 curry leaves
1-2 green chilies

Method
Heat a tsp of ghee in a pressure cooker and then add the ginger garlic and onions. Stir fry for two mins till the onion is slightly transparent. Add the tomatoes, fry for a minute and then add the water and pressure cook for 1-2 whistles or 5-7 mins in the electric cooker.
Once the pressure releases, add the coconut milk and purée this mixture. Pour it back into your cooker. Taste and then add the salt and sugar. In a small pan, heat ghee and then add the cumin seeds. Once they crackle, add the hing, chilies and curry leaves. Let these fry for a min or two and then pour this tadka into the prepared soup. Bring it to a boil. At this time you can adjust the consistency by adding water or letting it boil till it is thicker, based on your preference.

Tips
You can vary the amount of coconut milk or skip it if you want.

Tuesday, October 22, 2013

Multi-seed Crackerbread

This is a wonderful cracker bread to be server prior to dinner as an appetizer or as a snack with some drinks or tea. I visit an Italian restaurant nearby and one of the things that I enjoy most is the bread basket that the bring out once  you are seated. The bread basket comes with sourdough bread and multiseed crackebread which is sprinkled with Parmesan cheese, which is lightly browned. The crackerbread is absolutely delicious. I have searched in the bakery section of may stores, but unfortunately have never come across it. So, it made me very excited when I came across a multiseed cracker bread recipe in a King Arthur Flour cook book. This recipe came very close to the one I enjoy in the restaurant. The main difference is that the one in the restaurant is made of all purpose flour while this is made with whole grain flour. This is definitely the healthier version and was enjoyed by everyone at the last dinner party we had. Serve it with butter and it makes a perfect accompaniment to warm soup.


Ingredients
1 cup whole wheat flour
1 cup unbleached all purpose flour
1/2 cup ragi flour
1/2 cup whole yellow cornmeal
2 tsp salt
2 tbsp olive oil
1 cup water
1/2 cup assorted seeds - like white sesame, black sesame, poppy, fennel, caraway, anise and cumin
(adjust the ratio based on your preference.)
2 tbsps assorted dried herbs like rosemary, basil, dill, taragon and thyme
(adjust the ratio based on your preference.)
1 tsp coarsely ground black pepper


Method
Mix the assorted seeds, herbs and cracked pepper in a bowl and keep aside.

Take a large mixing bowl, and add the flours, salt and olive oil to it. Adding a little water at a time, mix the ingredients till the dough is formed. The dough should be stiff and not crumbly. So make sure to add a liittle water at a time till you get the desired consistency. If the atmospheric conditions are humid, you may need less water versus making this recipe in dry weather. Knead the dough till it is well mixed and supple.

Divide the dough into small pieces (about 8-10) and cover this with a slightly damp cloth or plastic wrap.
Take one piece and flatten it into a disc. Sprinkle some of the seeds, herb and pepper mixture on to the rolling surface. Press the dough disc into the seeds and roll it out. If the dough starts to stick to the surface, pick it up, sprinkle a few more seeds and continue rolling. Roll the dough as thin as possible, about 2 mm in thickness. Try to roll it into a rectangle, which will make it easy to cut the dough into triangles. Cut this into small triangles about 4 inches in length and 2 inches in width at the largest side.

Preheat the oven to 450F.  Arrange the crackers on a baking sheet and place on the center rack of the oven. Bake for 7-10 minutes till the top is medium brown.

Store in airtight container after all the crackers are completely cool.


Tips
The original recipe called for pumpernickel or whole rye flour instead of ragi flour. However, I didn't have this, so I used ragi flour instead. The recipe also called for 1 tbsp of coarse salt to be added to the mixture of seeds, herbs and pepper. However, this made the crackers quite salty and so I skipped it in subsequent batches. If you do want to have a salty feel on the outside of the cracker, then reduce the salt that is added to the dough. You can grate and sprinkle some parmesan cheese on the crackers after they have been baking for about a couple of minutes. If you add the cheese at the beginning, it may burn. You can also add shredded cheddar cheese.
Alternately, you can add the cheese and toast the crackers in the oven just before serving, heating the crackers till the cheese has melted and turned a golden brown.
When baking, the initial few batches will take longer, but as the process continues, the subsequent batches will get baked faster. So keep an eye on the crackers and remove them as soon as they are medium brown.

Wednesday, May 1, 2013

Butternut Squash Soup

I have been unable to update the blog during the past couple of months. However, it was for a very good reason. I participated in my first Art fair where I presented jewelry designed and created by me. So, I spent most of my nights and weekends working on these jewelry  pieces. It was a great experience and it felt good that so many people appreciated my work. I have also been working on my first video post, but that still needs a bit of work, before I can publish it. So, that is something else that I am looking forward to. With those updates I will go onto the recipe.

This is a wonderful, velvety soup. Butternut squash is a kind of pumpkin that can be found in the grocery stores almost through the year. I use it to make a pasta sauce, as well as, stir fry it. It also makes a great side dish. It makes the most delicious soup. The sweet taste of the squash is balanced using the onions. This is a great winter soup and since it is a thick soup, it can also be a light meal. 


Ingredients
1 butternut squash
1 small red onion or 2 shallots, diced
1 tbsp butter or oil
2-3 cups of water/vegetable broth
salt to taste


Method
The butternut squash has a very tough exterior skin and it is difficult to slice it through or to peel it. So be careful when you are handling the squash. Cut the squash along the length of the squash. Remove the strands and the seeds at the center of the squash. Apply a little oil to the squash (inside and out) and then bake the two pieces, cut side down, in the oven at 350 F. Alternately, make a few more pieces and pressure cook the squash. It takes about 30-40 mins for the squash to get cooked and softened in the oven and about 15 mins in the pressure cooker. Then, take the squash out and once it cools, scoop out the squash with a spoon. Discard the skin/peel. 

In a saucepan, heat the butter and add the diced onions. Once the onion is cooked and softened, add the scooped out squash. Cook the butternut squash for a couple of minutes and then add the water or broth. Add salt. Let it boil for a minute and then puree the mixture, till you get a fine velvety consistency.  This is a thick soup and it will taste watered down if it is made too thin. Garnish with some cream and pumpkin seeds. Serve hot.


Tips
The easiest way to remove the strands and seed is to use a spoon with sharp edges and scoop it out. If the soup is watery, boil it for a few mins. You can also dissolve a little cornflour in water and then add the paste into the soup to thicken it if it is too thin. If it is too thick, then add some additional water.

Thursday, January 31, 2013

Dal Fry with Three Dals- A Delicious Mixed Lentil Soup


It has been a while since I have updated the blog. While the cooking continues, I find myself trying to manage time to be able to do all the tasks at hand. I finally got some time today and decided to pen down this delicious dal fry recipe that I had made for an elaborate dinner a few months ago. Everyone loved it, especially the kids. I got the best compliments from my friend's eight year old who asked her mom to get the recipe so that she could have it at home as well. Well, finally here it is. I made it again last week and thought this is a great recipe to make during these cold winter evenings. Just the thought of steaming hot, delicious dal served with some jeera rice, makes my mouth water. A perfect weeknight comfort meal indeed!


Ingredients
1 cup tur dal/arhar dal/ pigon peas
1/2 cup mung dal - split, peeled yellow mung dal
1/2 cup chana dal/split pea
a pinch of asafoetida/hing
1/2 tsp turmeric
1 tbsp tsp oil
1/8 tsp jeera/cumin seeds
1 bay leaf
1-2 green chillies
3 garlic cloves, finely sliced
1 inch ginger, finely minced or crushed
1 red onion, diced finely
2 tomates, diced finely
cilantro/corriander leaves, chopped to garnish
5-6 cups  water
2 tsp garam masala
salt to taste


Method
Mix together the tur dal, chana dal and mung dal. Wash the mixture at least 2-3 times. Then add double the quantity of water compared to the dal, so in this case, 4 cups of  water, hing and turmeric and cook it. I generally use the pressure cooker  to cook the dal (see tips for how to cook the dal if you don't have a pressure cooker). Once cooked, mash the dal a little with a spoon and keep aside. In a deep pan, heat some oil. Then add the cumin seeds and bay leaf. Once they start to brown and change color, add the chillies, onions and the ginger and garlic. Cook this till the onions become transparent and start to change color and the raw ginger garlic smell goes away. Then add the tomatoes and cook them well. Then add the garam masala and fry for a couple of minutes till you can smell the aroma of the masala. Now, add the dal and mix well. Add some water if the dal is too thick. Generally, dal fry is thicker dal (similar to creamy  soups) and not very watery. Add the salt and bring it to a boil and turn off the heat. Sprinkle some cilantro for garnish. Serve hot with rice, pulao, roti or naan.


Tips
If you don't  have a pressure cooker, this is how you can cook the dal without having to boil it for hours. Soak the dal for an hour in warm water. Then in a deep pan, boil the dal with at least two times the water, turmeric and hing. Stir occasionally, so that the dal at the bottom of the pan doesn't burn. Turn off the heat when the dal is cooked through, soft and can be easily mashed (about 30-40 minutes) .
As the dal cools down it will thicken. So when you reheat the dal, add a little water and then reheat it. Since the onion and tomato have not been browned, the dal will retain the yellow color. If you do brown it, then that is also okay.

Tuesday, December 18, 2012

Rasam/Rassam - A Spicy, Warm Soup

Rasam is an absolutely delicious Indian soup, which is often lentil based. It is a staple in the southern states of India and just like dal preparation, you will find a different recipe in every home. It is one of my favorite foods. It is the perfect appetizer soup to start your dinner with. Generally, it has a consistency similar to clear soups, however I do end up making it thicker, as I enjoy this with a bowl of white rice topped with some ghee. It is often prepared when someone at home is feeling a bit under the weather and is down with a cold or cough. This recipe has a lot of black pepper and garlic and provides a comforting feeling when you sip it. The spiciness helps clear up the sinuses too. I still remember the time when I was really sick and a neighbor had dropped in to say hello. She was back soon with a bowl of piping hot and spicy rasam and it really cheered me up.


Of course, I don't have to be sick to enjoy a bowl. I make this really often. I used to use the ready made spice mix to prepare rasam until a good friend gave me her recipe. Ever since then, I have been making this wonderful recipe. It is really easy and delicious and perfect for this cold weather.


Ingredients
1 tsp jeera/cumin seeds
1/2 - 1 tsp black peppercorns, adjust to taste
2-4 garlic cloves, adjust to taste
2 tsp ghee(clarified butter)/oil
1-2 green/red chillies, to taste
7-8 curry leaves
1/8 tsp mustard seeds
1 pinch hing/asafoetida powder
1 tbsp cooked tur dal (pigeon peas) (optional) - see tips section for cooking instructions
1 tomato, diced
salt to taste
1/2 tsp tamarind paste
2 cups water (500 ml)


Method
Dry roast the cumin seeds and peppercorns, till they are fragrant. Grind these into a coarse powder and then add the garlic pods to it and grind them together to make a paste.
In a deep pot, heat the ghee and add mustard seeds to it. Once they start cracking, add the hing, curry leaves, chillies and paste and roast it till the garlic gets cooked, about a minute. Do not let it brown.
Add the diced tomatoes and  cook till softened. Then add the cooked lentil, stir and add the water. Once it starts to boil, add the tamarind paste and salt.  Let it boil for a couple of minutes. Garnish with cilantro leaves and serve hot.


Tips
If you want, you can completely skip the lentils and add another tomato instead. You can also make it thicker by adding more cooked lentils. I generally like it thicker like sambar or dal, so that I can eat it with white rice as part of the main course rather than a soup. In that case, I add about 1 cup of lentil instead of 1 tbsp. Also, I increase the amount of the salt, tamarind paste and if I want it spicy, I also add more peppercorns to the paste and increase the number of garlic pods to 4 instead of 2.
You can also add a tsp of ready made rasam masala powder to the rasam after adding the cooked lentils for a slightly different taste. I usually use the MTR brand rasam masala powder that can be found in the Indian grocery store.
To cook the lentils, I use a pressure cooker. I use double the amount of water to cook the lentils. So for example if I have 1 cup of pigeon peas (tur dal), I will use 2 cups of water.  Wash the lentils three times. Then, add the water to the lentils. Next I add 1/8th tsp of turmeric and a pinch of asafoetida powder and then pressure cook the lentils till they are completely cooked through and soft. It takes about 3-5 whistles (10-15 mins) based on the type of cooker I use.

Wednesday, June 6, 2012

Minestrone Soup

This is a wonderful soup. My mom used to make it quite often, especially when Dad would travel. I understand beauty of this soup now that I am a Mom.  There are often times that I need to put a meal on the table which is wholesome but am too tired to make multiple dishes. By making just one dish, I am able to take care of all the nutritional facets, put something new on the table and since it is so delicious, it is a sure hit.

This soup has multiple vegetables, pasta and beans and is a complete meal by itself.  I make a large batch and enjoy it through the week. If you don't add the beans and pasta to it, then it is a very low fat (almost zero fat), high fiber, delicious snack or appetizer. Also, it is a forgiving recipe. Even if you don't have all the vegetables that the recipe calls for, as long as you have the basic carrots, onions, celery and tomatoes, you will be able to achieve the desired taste.


Ingredients
2 tsp extra virgin olive oil
1 carrot, sliced
1 small onion, diced
1 celery stalk, sliced thinly
2-3 garlic cloved, finely diced or crushed
5-6 tomatoes/ 1 can of whole tomatoes - diced
a wedge of cabbage, thinly sliced (about 1/8th or less head of cabbage)
5-6 green beans, diced
1 zuccini, slit it into two lengthwise and then slice it thinly into semi circles
water/ broth
1 cup spinach leaves
1/4-1/2 cup white or cannelini beans cooked (can also use red beans)
2 cups cooked pasta (use small pasta is possible like shell or macaroni shape. In the pictures here, I used penne as that was the only pasta I had on hand)
parmesan cheese, to garnish (optional)
1 tsp Italian seasoning (optional)
salt to taste
pepper to taste


Method
In a deep vessel (deep enough for the soup to boil in), heat the oil. Add garlic and stir for a minute or two. Once you get the aroma of the garlic, add the onions. Then add the Italian seasoning if you are using it. As they soften, add the celery and the carrots. Cook this mixture till the vegetables are slightly softened. Next add the green beans and cook for a few minutes. This is the time to add the tomatoes. If using canned ones, add the tomatoes as well as the juice they are in. (If adding fresh ones, then let the tomatoes cook through by boiling them in the water/broth.) Then add enough water or broth (about 3-5 cups) to make this into a water consistency.  The soup base is not very thick. Then add the zuccini and cook. This cooks very fast. Then add the cabbage slices.  Once these are semi cooked, add the spinach leaves.

Once all the vegetables are added, add the beans and pasta. Cook the pasta separately per directions on the packet. Add the cooked pasta to the soup. Bring the mixture to a boil. Add salt and pepper to taste. Garnish with grated parmesan cheese.

Serve hot as a meal, a starter or an afternoon snack.


Tips
If you don't have italian seasoning, try adding just oregano and basil if possible. This makes it more flavorful. You can skip the seasoning alltogether. If you are starting with dry beans, soak them for 6-8 hours or overnight. Then either boil them till softened or pressure cook them. It is a good idea to add some salt to the beans while being cooked so that it gets absorbed in the beans and makes them flavorful. If you are using canned tomatoes, use whole tomatoes and then dice them into cubes. Whole canned tomatoes are more flavorful than diced ones. You can also add the dry pasta to the soup and boil it in the soup directly. If you are doing that, add it as soon as the broth/water is added and then add the zuccini and spinach. If you are using canned tomatoes and beans, then taste the soup before adding more salt, as canned foods already have salt added.  You can skip or do any combination of the beans, cabbage, spinach and zuccini and still get a great tasting soup.

Thursday, May 31, 2012

Mung Dal with Garlic

Sometimes one comes across a dish in their life that stays with them forever. The taste and fragrance of the food gets so deeply embedded in your mind that just a whiff of a similar smell and it can take you back to the first time you tasted it. This dish for me is this particular prepartion of mung dal (split yellow mung). I still remember the first time I tasted it. I was a kid in school and had accompanied my parents to a place near Nashik (a city in Maharashtra). For the week that we were there, we lived in the guest house which had a large dining hall. We had to go to the dining hall for every meal and I was absolutely fascinated by the place. It was large, had lots of tables and the plates and bowls used to always be arranged on the tables, but were always kept inverted. We needed to place them back in the upright, correct position and then the servers would come out and serve us the food. I can't remember a lot about the trip, but the memory of this dal is deeply entrenched in memory and my senses. Ever since I started experimenting with recipes, I have been trying to determine the right ingredients and proportions, so that I could taste it again. And I finally got the exact taste last week!!  I am delirious with joy that I was able to recreate the recipe. While it is extremely simple, it is delicious and the perfect comfort food to take me back into the cosy comfort of childhood.


Ingredients
1 cup mung dal - split, peeled yellow mung dal
a pinch of asafoetida/hing
1/2 tsp turmeric
2-3 tsp oil
1/4 tsp jeera/cumin seeds
3 large garlic cloves, finely sliced
1 green chilli, slit lenghtwise into two
10 curry leaves
1/4 cup cilantro/corriander leaves, chopped
3-4 cups  water
salt to taste


Method
Wash the mung dal three times and then add two cups of water, asafoetida and turmeric to it. Pressure cook it if possible as it will be the fastest method to cook ot. If you don't have a pressure cooker, you can boil it on the stove top till it is cooked through and is soft and mushy. You may need to add more water if needed.


In a deep pan, heat the oil, add the jeera seeds. Once they start to crackle, add the curry leaves. Then add the garlic and green chilli and let that fry for a minute. We don't want the garlic to start turning brown. As soon as the garlic looks cooked, add the cooked mung dal. Then add water. Add at least 1 cup of water. You may want to add more water if you want a thinner consistency. Add salt. Bring the dal to a boil. Turn off the heat and immediately add the cilantro leaves. Serve hot with rice or roti/chapati. You can also serve it as a lentil soup. It is just delicious on its own.


Tips
If you are not pressure cooking the dal, you can soak it for an hour before you cook it. That will reduce the cooking time. You can also use dry red chilli instead of green chilli, but that will change the taste of the dal slightly. Mung dal thickens up as it cools down and you may want to add additional water to thin it out while reheating.

Wednesday, May 23, 2012

Chunky Vegetable Soup - Healthy, Delicious and Low Fat

I have been quite busy for the past couple of months, spending time with family and visiting them and I have a lot of catching up to do with regards to my blog. I am hoping to be more regular with the posts.

Today's recipe is absolutely delicious and suprisingly very healthy. I had bought ingredients to make minestrone soup and didn't get around to making it. After a couple of days I realised that some of the vegetables would spoil if not used soon. It also happened that I didn't have a lot of time to cook that evening and I wanted to put dinner together real quick. So, in an attempt to use those vegetables and also cook in under 30 minutes, I decided to make this soup and fried rice. The result was just delicious. The fried rice turned out scruptious too, but that is another recipe. Another great feature of this recipe is that it is made with very less amount of oil and as a result is very healthy. I can't wait to eat this again.


Ingredients
1/2 onion, diced
2 garlic cloves, finely chopped
1/4 tsp dry basil leaves
1 zuccini, sliced
1 carrot, sliced
1 can of diced tomatoes
2 cups of vegetable stock
salt to taste
1 tsp extra virgin olive oil


Method
In a deep pan, heat the oil and add the onions and garlic and let them cook till the onion is transparent. Then add the basil and stir. Next, add the carrots and cook for a couple of minutes till they are slightly softened. Next add the zuccini and again cook till slightly softened. Then add the can of tomatoes, stir and then the vegetable stock. Bring the soup to a boil. You can let it boil for a couple of minutes till it is slightly thickened.  Add salt as needed. This is a clear soup and the broth will not be thick. Enjoy hot.


Tips
Taste the soup before adding additional salt to it as the vegetable stock will already have salt. It is easy to forget that and it may result in the soup being too salty. You can substitute vegetable stock with any other stock or even water. You can also use fresh tomatoes. If you do, then use at least 4 tomatoes. The base of the soup has a tomato flavor and that should be the prominent vegetable. It does take longer for the tomatoes to cook if you add fresh ones to the pan and then boil them in stock or water. Alternately, you can cook the tomatoes separately in a pressure cooker. Cook for one whistle and then use these instead of the canned tomatoes in the recipe.

Saturday, December 10, 2011

Dal Fry - Seasoned Lentil Soup

I must start by acknowleding the long gap between the last post and this one. And for those of you who read the blog regularly, I owe an explanation. Generally, I write about only food related topics on this blog, however since the explanation is non food related, here goes. For the longest time I have tried to stay away from synchronizing my email account to my phone and hence had to long in daily to check and respond to emails. And usually after I did that, I used to start my next blog post. However, between the last blog and this, I finally caved in and added my email account to my phone. Since then, I have noticed a significant impact on the amount of time I spend on my computer. I have become more of a consumer of information rather than producing it and I didn't even realize it. Have any of you faced the same issue? Are you spending a lot more time away from your computer and on your smart phone (for non-office related activities)?


Well, now that you know the reason for my absence, I hope you will take some heart in the knowledge that I have made a conscious decision to attend to my blog more regularly. With that said, let me dive into the absolutely delicious recipe for making "dal fry" which is made from lentils and has a spicy seasoning. It is one of the most versatile recipes and I will be posting many different versions of the same in the future as well. The following is one I make most regularly and the dal goes well with rotis or rice.


Ingredients
1 cup split pigeon peas/tur dal
2 cups water
1/8 tsp turmeric powder
A pinch of hing/asafoetida powder
1 tbsp oil
1/8 tsp cumin seeds
1/8 tsp mustard seeds
1 red onion, finely diced
1 tomato, finely diced
1-3 green chillies, to taste
1 tsp garam masala (optional)
1 tsp ginger garlic paste
some cilantro/corriander for garnish
salt to taste
additional water to thin out the dal


Method
Mix together the tur dal, water, hing and turmeric and cook it. I generally use the pressure cooker  to cook the dal (see tips for how to cook the dal if you don't have a pressure cooker). Cook it for 5-6 whistles or in the Instant Pot for 12 minutes on manual mode at high pressure. Let the pressure release naturally. Once cooked, mash the dal a little with a spoon and keep aside. In a deep pan, heat some oil. Then add the mustard and cumin seeds. Once they start to crackle, add the chillies, onions and ginger garlic paste. Cook this till the onions start to brown and the raw ginger garlic smell goes away. Then add the tomatoes and cook them well. Then add the garam masala and fry for a couple of minutes till you can smell the aroma of the masala. Now, add the dal and mix well. Add some water if the dal is too thick. Generally, dal fry is thicker dal (similar to creamy  soups) and not very watery. Add salt. Bring it to a boil and turn off the heat. Sprinkle some cilantro for garnish. Serve hot with rice, pulao or roti.


Tips
If you don't  have a pressure cooker, this is how you can cook the dal without having to boil it for hours. Soak the dal for an hour in warm water. Then in a deep pan, boil the dal with at least two times the water, turmeric and hing. Stir occasionally, so that the dal at the bottom of the pan doesn't burn. Turn off the heat when the dal is cooked through, soft and can be easily mashed (about 30-40 minutes) . Add a squirt of lemon/lime juice to the dal for a tangier taste.
You can use the same method and ingredients to make dal fry using chana dal (yellow split peas).