The latest 5 recipes are displayed on the main page. For more recipes, you can browse the archive, click on the labels in the index to the left or use the Custom search below to look for a specific recipe.
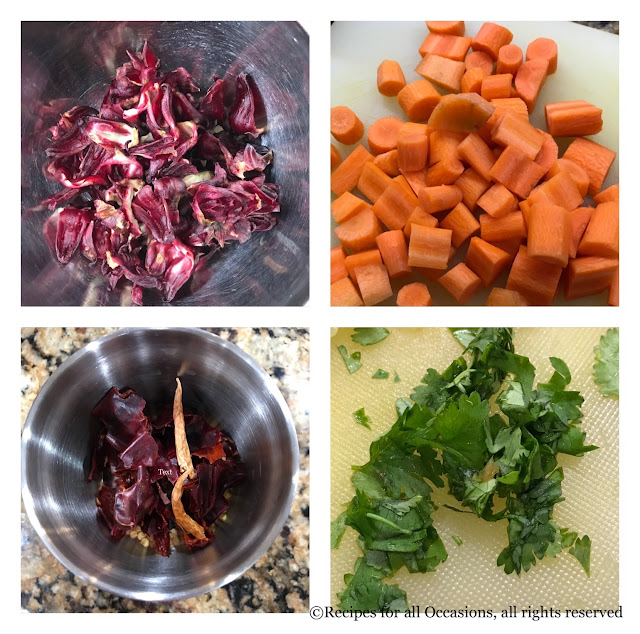
Let me start by saying that this is an amazing recipe. It is one of the tastiest Mexican foods that I have eaten in recent memory. It is spicy and has a burst of flavors and everyone in the family absolutely loved it. I am so glad to have found this recipe because it is perfect to use all the roselle hibiscus petals after making tea. And now I have a way to use the large harvest we have had this year. It does not matter if you are using fresh roselle sepals or dried ones in this recipe. The ones in the original recipe were dry whereas I used the fresh ones that I harvested today. The recipe was originally shared by a friend, Ayshica, in a wonderful gardening group called "Gardening in the Desert". She shared this recipe from a YouTube channel called "Views on the road" and highly recommended it. Ayshica is a great cook herself and I trust her food recommendations, so I thought that I had to give this recipe a try.
Now, this recipe requires certain Mexican chillies - Guajillo and Pasilla chillies. After making and eating the tacos I am of the firm belief, that these chillies are a key flavor ingredient for the birria tacos. These chillies lend an earthy taste which reminds me of the mole sauce. Also, when I searched for what birria was and other recipes for birria, I realized that the original version is meat based. The birria is a stew made with the meat and these chillies. However, this version is completely vegetarian and if you use non-dairy cheese, will be a 100% vegan. I did not use any broth or bouillon powder/cubes either and the result was still lip smacking delicious. The roselle sepals add a slight tart flavor. These also make the taco filling and provide that meatiness to the taco, that 3-4 tacos per person was a pretty good serving size for most of the family members. I think any vegetable that retains its texture after being boiled can be a used, like jackfruit or mushrooms.
The way I understand it, birria is a stew and then the meaty portion of the stew is used to fill the taco and then the taco is then grilled/cooked and eaten by dipping it into the consomme or liquid part of the stew. The stew that I made with the roselle sepals was quite soup like. Then I used the roselle sepals and carrots which were cooked in the sauce as the taco filling. And then we dipped the tacos in the soup and also drank sipped it along with the tacos. I also made the chilli oil which was mentioned in the original recipe and modified it based on what I had on hand. The combination of flavors was perfect for a cold weeknights dinner. And so so delicious!!
The highlight of the recipe was that I was able to use a lot of our homegrown produce. Roselle hibuscus was the star of the recipe, but it was great to be able to use homegrown carrots and cilantro as well. If you would like to know more details on growing, harvesting and preserving Roselle Hibiscus, do check out our videos on our YouTube channel, "Gardening and Cooking Made Easy".
How to grow Roselle Hibiscus
How to harvest and store Roselle Hibiscus
Ingredients
For the chilli oil
1/2 cup oil
3 guajillo chillies
2 spicy chillies, dry (I used Indian dry chillies)
1 bay leaf or 1 tsp broken bay leaf pieces
1/2 tsp black pepper
1/4 tsp clove powder
salt to taste
1/4 tsp sugar
For the birria
1.5 cups fresh roselle petals. If using dried ones, I would recommend using 1 cup
6-7 carrots, cut into small bite sized pieces, appropriate for filling in the taco
2 tbsp apple cider vinegar
1 medium red onion, cut into half
3 garlic pods, whole
1 pasilla chilli
4 guajillo chillies
10 cups of water
1 bayleaf
salt to taste
1/4 tsp sugar
For the tacos
corn tortillas
cooked roselle sepals and carrots from the birria/stew
finely cut cabbage
finely cut white or yellow onion
cilantro
chilli oil
shredded/grated cheese
Method
To make the chilli oil
Remove the stem of the chillies. In a coffee grinder or blender in which you can grind spice to a fine powder, grind the chillies and the bay leaf into a fine powder. If you want, you can also remove the seeds, however I did not as I wanted the oil to have the heat and spice from the chillies. Heat 1/2 cup of oil (I used olive oil) and once it is warm (do not heat to very high temperature to avoid spices burning), add the chilli and bay leaf powder. Stir, and then add the garlic powder, clove powder, black pepper powder, sugar and salt. Cook all the spices for a couple of mins, making sure to not overheat the oil. Turn off the heat and set aside.
To make the birria/stew
Boil 4 cups of water and pour over the roselle sepals (dried or fresh). Set aside for 15 mins. Strain and use the water to make tea or lemonade. Add 2 tbsp of apple cider vinegar to the sepals, toss them in it and set aside.
In a pressure cooker, Instant Pot or a regular deep sauce pan, addd the remaining 6 cups of water. Then to it add the onion, cut into two halves. Then remove the stem of the chillies and add those to the water along with the garlic cloves. If you don't like too much spice remove most of the seeds of the chillies. Add 1/4 cup of carrots. Then cook this mixture. If you are cooking it in the pressure cooker, cook for 1 whistle. In the instant pot, cook for 5 mins. Naturally release the pressure. If you are cooking it in the saucepan, cover and cook for 10-15 mins once it starts boiling, till the chillies are softened. Now, using a skimmer spoon, fish out the chillies, garlic and onion. Let them cool down a little and blend in the blender to a fine paste. This is your salsa or sauce that flavors the stew.
Add the paste back to the water. Then, add the rest of the carrots, the roselle sepals along with the vinegar and 1 bay leaf and cook for another 10 mins till the roselle and carrots are softened. If using a pressure cooker, cook till it reaches pressure and turn off heat. Instant Pot timing will be 2 mins. Let pressure cookers naturally release pressure.
Taste, add the salt and sugar and stir well. Then fish out the carrot pieces and roselle sepals and place into a bowl. Heat the liquid and boil it for a few mins.
To assemble the taco
Use a brush or spoon and smear the corn tortilla on both sides with the chilli oil. Then filling a tbsp of the roselle, carrot filling, cabbage, onions, cilantro and shredded cheese. On a hot pan, cook the taco on both sides till the cheese melts.
Serve with the consomme/soup part of the stew. Dip the tacos in the soup and eat.
Tips
The chillies are dry, so it is easy to just split the chillies into two and shake them to remove the seeds. Or remove the stem and shake the seeds out. I made corn tortillas with masa harina flour and the taste was amazing using fresh tortillas. If possible, I recommend it. If the taco is opening up (I do tend to overfill it), place a spoon on top of the taco as it cooks on one side. Then as you flip it over and cook on the other side, it should retain its folded taco shape (see photo above). If you are using other vegetables, then I recommend adding tomatoes along with the onions and garlic and puree those as well. Else, add lemon juice to the stew at the end of the cooking, before serving.
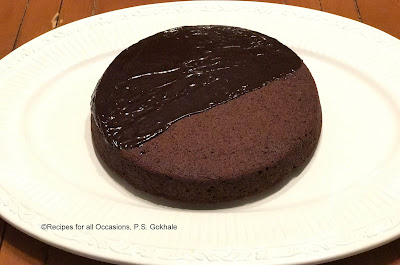
I recently made two cakes to share at a potluck where several folks had allergies or diet restrictions. The first cake was a banana ragi cake (which will be shared in a separate post) and this chocolate cake.
This cake is very versatile and ingredients can be swapped as provided in the ingredients list below to make it free of a specific allergen or all of them.
This cake is vegan, gluten free, nuts free and sugar free. It is delicious. The ragi and buckwheat with chocolate do give the cake a slightly earthy smell, however you can use wholewheat flour for a cake that only smells of chocolate, if you do not need it to be gluten free.
Ingredients
Cake
1 1/2 cup buckwheat flour or nachni satva (ragi malt) or ragi flour (finger millet) or wholewheat flour (if there is no need to be gluten free)
3/4 to 1 cup date paste- adjust based on sweetness of dates. (12 large mejdool dates, cooked with water in the microwave and puréed). If you do not have dates, then you can use 1 cup sugar.
1/4 cup unsweetened cocoa powder
1/2 tsp salt
1 tsp baking soda
1 tsp vanilla essence
1 tbsp vinegar (white or apple cider)
1/3 cup olive oil (not extra virgin) or any oil that you use for cooking
1 cup cold water
Icing
1 cup chocolate chips (dark chocolate if you want it to be dairy free)
6 tbsp water
Method
Cake
Butter a baking pan (8/9 inch round) and pre heat the oven to 350 F.
Mix dry ingredients together thoroughly. Whisk them or sieve if necessary. The baking soda must be well dispersed through.
Mix wet ingredients together and whisk them together till well mixed.
Make a well in the center of the dry ingredients and pour the wet ingredients mixture into the dry ingredients and whisk together till completely mixed. You will see the baking soda starting to react with the vinegar.
Immediately pour into the baking pan and bake at 350 for about 30 min. Use a toothpick or a knife to check if completely cooked. Pierce the cake in the center and if the toothpick/knife comes out clean, the cake is completely baked.
Icing
Mix the chocolate chips and water together and microwave for 30 seconds intervals (about 1-2 mins) till all the chocolate chips melt and then whisk it well till it looks shiny. Then pour it over your cake.
Tips
Work with the batter quickly. The baking soda and vinegar reaction makes the cake spongy. So put it in the over immediately after mixing the wet and dry ingredients. If you want the cake to be sweeter, then drizzle the cake with honey or maple syrup after it has been baked.
I recently made two cakes to share at a potluck where several folks had allergies or diet restrictions. This cake is vegan, gluten free, nuts free, and sugar free. It is possibly the easiest cake recipe that you have come across. It is delicious however and a great way to get kids to eat finger millet/ragi. You can substitute ragi with buckwheat or whole wheat flour. You can also use the batter to make banana pan cakes.
Ingredients
5 over ripe bananas (the riper the better - the skin should be starting to blacken)
1 banana cut into thin slices for garnishing (optional)
1 1/2 cup ragi flour/buckwheat flour
1/2 cup olive oil (not extra virgin) or use any other oil that you use for cooking
1/2 tsp cardamom powder
1/2 tsp baking soda
2 tsp baking powder
Method
Butter a baking pan and preheat the oven to 350 F.
Put all the ingredients except the baking soda and powder and puree in a blender.
Then to this puree add the baking powder and soda and pulse a few times till it is mixed well.
Pour this into the prepared pan and bake at 350 for about 50 min. Check with toothpick or knife if completely cooked. Pierce the center of the cake and if it is completely cooked, the toothpick or knife will come out clean.
Tips
The cake is not very sweet and you can add sugar or date puree if you want it sweeter. Taste the batter. Else, drizzle the cake with honey or maple syrup after it has been baked.
I love chocolates and all kinds of chocolate desserts. My favorite these days is a piece of really good quality dark chocolate. Just a small piece is enough as long as it is good quality. In my quest to try and make everything at home, I decided to try my hand at making chocolate at home. I first tried my hand at making milk chocolate using my Mom's recipe and it was a resounding success. The kids loved it. After that success, I decided to buy a packet of good quality cocoa butter and try out my hand at dark chocolate. I scoured the web for recipes and methods. My first try was with equal proportion of cocoa butter and cocoa powder and cold maple syrup. It tasted great but did not set well and remained soft even after keeping it in the fridge for a while.
So I went back to research the factors on which the texture of the chocolate depended. The main variables seem to be the proportion of cocoa powder to cocoa butter, and the temperature during the process of making chocolate and how quickly it is set. So with a better understanding of these factors, the tempering process (which makes the chocolate set in a crystalline pattern which provides the much needed snap), and the seeding process (by which the crystalline structure begins development), I decided to give it another go and this time the results were much better. The chocolate set beautifully and got the correct texture. I also used chocolate molds and this gave the chocolate a gourmet look. The taste was also rich and I needed only 3 ingredients.
After this successful experiment, I plan on using a thermometer to better manage the tempering process and also trying different flavors. And of course I will post updated recipes with details to make it easier and foolproof for you to get the perfect dark chocolate.
Ingredients
1/4 cup raw cocoa butter
2 tbsp cocoa powder, dutch processed, unsweetened
4-5 tsp maple syrup
Method
Sieve the cocoa powder to remove any lumps and set aside. Finely chop or grate the cocoa butter. Fill a small saucepan with about an inch of water. Heat it up till you can see bubbles on the surface and then reduce the heat to low. Place a glass or ceramic bowl, which is heat proof and can be used in the oven or microwave, on the saucepan. The bowl should be large enough to completely cover the saucepan opening. This set up is called a double boiler and is used to provide indirect heat to the chocolate so that it doesn't overheat. Add the cocoa butter to the bowl and once you see it start to melt, warm up the maple syrup for 15 seconds in the microwave. It should be at room temperature or lukewarm. Once the cocoa butter is completely melted, add the maple syrup and stir, so that it is well mixed and a homogenous liquid.
Take the bowl off the saucepan and wipe the base of the bowl which has a layer of the condensed water. Turn off the heat and move the saucepan off the stove top. Now add the cocoa powder and stir well till you get a beautifully dark glistening liquid which takes about a 20 seconds to a minute. Pour this into the chocolate mold and then keep it in the freezer for 10-20 minutes till completely set. Remove the chocolate from the mold by following the instructions on the mold package. Store in fridge.
Tips
Make sure that not even a drop of water falls into the mixture during the process, as this will cause the chocolate to seize and then the chocolate won't set and will become a mess. Use a glass or ceramic bowl rather than a steel bowl as it seems to help maintain the heat better. If you do not have a chocolate mold, you can use cup cake liners as molds to shape the chocolate. Else you can pour it in a pan and let it set as a chocolate slab and break it into pieces.
I have been unable to update the blog during the past couple of months. However, it was for a very good reason. I participated in my first Art fair where I presented jewelry designed and created by me. So, I spent most of my nights and weekends working on these jewelry pieces. It was a great experience and it felt good that so many people appreciated my work. I have also been working on my first video post, but that still needs a bit of work, before I can publish it. So, that is something else that I am looking forward to. With those updates I will go onto the recipe.
This is a wonderful, velvety soup. Butternut squash is a kind of pumpkin that can be found in the grocery stores almost through the year. I use it to make a pasta sauce, as well as, stir fry it. It also makes a great side dish. It makes the most delicious soup. The sweet taste of the squash is balanced using the onions. This is a great winter soup and since it is a thick soup, it can also be a light meal.
Ingredients
1 butternut squash
1 small red onion or 2 shallots, diced
1 tbsp butter or oil
2-3 cups of water/vegetable broth
salt to taste
Method
The butternut squash has a very tough exterior skin and it is difficult to slice it through or to peel it. So be careful when you are handling the squash. Cut the squash along the length of the squash. Remove the strands and the seeds at the center of the squash. Apply a little oil to the squash (inside and out) and then bake the two pieces, cut side down, in the oven at 350 F. Alternately, make a few more pieces and pressure cook the squash. It takes about 30-40 mins for the squash to get cooked and softened in the oven and about 15 mins in the pressure cooker. Then, take the squash out and once it cools, scoop out the squash with a spoon. Discard the skin/peel.
In a saucepan, heat the butter and add the diced onions. Once the onion is cooked and softened, add the scooped out squash. Cook the butternut squash for a couple of minutes and then add the water or broth. Add salt. Let it boil for a minute and then puree the mixture, till you get a fine velvety consistency. This is a thick soup and it will taste watered down if it is made too thin. Garnish with some cream and pumpkin seeds. Serve hot.
Tips
The easiest way to remove the strands and seed is to use a spoon with sharp edges and scoop it out. If the soup is watery, boil it for a few mins. You can also dissolve a little cornflour in water and then add the paste into the soup to thicken it if it is too thin. If it is too thick, then add some additional water.


.JPG)


