Welcome to my blog

I hope you will find the recipe you are looking for your occasion here.

Now video instructions are available for select recipes and can be accessed at

Gardening and Cooking Made Easy

The latest 5 recipes are displayed on the
main page. For more recipes, you can browse the archive, click on the labels in the index to the left or use the Custom search below to look for a specific recipe.


Search for more results

Custom Search

Monday, September 10, 2018

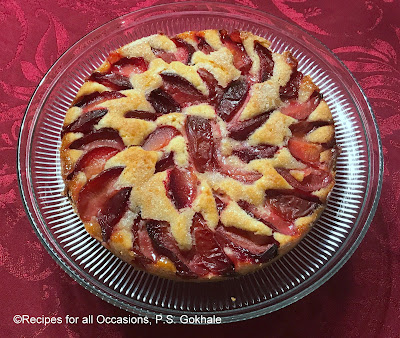
Zwetschgenkuchen- Austrian Plum Cake

I came across this recipe on Milk Street, by Chris Kimball. This is how I made it. The only change I made was to use two eggs instead of 1 large egg and 1 egg yolk. It was absolutely scrumptious and very rich. And we enjoyed it for the entire week.


Ingredients
1 cup all purpose flour
3/4 tsp baking powder
1/2 cup sugar
2 tbsp sugar for sprinkling on top
1/2 tsp salt
1/2 cup salted butter- softened at room temperature and cut into pieces
2 medium eggs (original recipe calls for 1 large egg and 1 large egg yolk)
1.5 tsp vanilla essence
5-6 pluots (you can also use plums), cut into 1/8th slices. Discard pits


Method


Preheat the oven to 325F. Grease and dust a springform pan with flour. You can use a regular pan, but since the fruit it on top, you will have to be very careful when removing it from the pan and will have to flip it over again to make sure the fruit is on top.

Whisk the dry ingredients together - flour, baking powder, sugar and salt- till well combined. You can even sieve them a couple of times. Then add the butter one piece at a time and mix till the mixture starts to look sandy. Add the eggs and vanilla essence and mix the batter till it becomes a pale yellow and fluffy.
This is a very thick batter and will not flow. Using a spatula, spoon it out into the prepared pan and spread it evenly. Then arrange the pluot/plum slices in two concentric circles. Then sprinkle the 2 tbsp of sugar on top of the fruit and bake for 1 hr 15 mins. Check after one hour has passed and when the toothpick comes out clean, the cake is baked.
Let it cool in the pan for 30 mins on a wire rack and then remove the springform base from the pan.




Tips
If you have a stand mixer, use the paddle attachment.

Guava Jam

I had once found guava jam in the local store and having been deprived of this fruit for many many years, bought a small and expensive jar of jam. The jam wasn't that great, no real guava fragrance or taste. Fast forward a few years, we now have a guava tree and got our first crop of pink guavas. I decided to convert some of the fruit into jam and what a difference! The color is beautiful and it is so fragrant. This is a simple recipe and will perfectly preserve the fruit for us to enjoy it long after the fruiting season ends.


Ingredients 
10 guavas, cut the fruit into tiny pieces. Then push these through a sieve to make pulp and strain the seeds. you can grate it but it will be difficult to remove the seeds
Once you have the guava pulp, weigh it. Then weigh an equal amount of sugar.
Water- to make syrup - 1:1 in volume to sugar 
A pinch of salt- I sprinkled this over the pulp.


Method 
Mix together the sugar and water and heat it. Cook the syrup till it thickens, beyond the two thread stage, and just before the soft ball stage. Then add the guava pulp. Stir and mix well. It will become more fluid. Now cook this mixture till it thickens. To determine if you have the correct consistency, put a spoon of jam onto a plate and pull a finger or the spoon through it. If the pattern stays intact and the jam doesn't flow to fill the path of the finger, then you have the desired consistency.
Take it off the heat and cool completely before storing in a jar. This will take a 5-6 hours.  Refrigerate this jam. Use dry spoons when removing the jam from the jar to extend shelf life. It will be good in the fridge for a few months.


Tips
If the guavas are not ripe and soft, then boil them till they become soft before making the pulp.

Friday, August 24, 2018

Mung Dal Halwa- instant version

I had been wanting to make mug halwa and as it happened, I can across the version of making halwa using dry dal instead of the presoaked one. Well, we had just had dinner and I felt like eating some dessert and decided to make it as it promised to be quick, and it was. And the family liked it so much that I doubled the ingredients and made it again. I made some changed when I doubled the recipe, so I will give both variations below.


Ingredients 
Without milk- half quantity
1/2 cup moong dal, coarsely powdered
1/2 cup jaggery finely cut.
1/4 cup sugar (It wasn't sweet enough with only jaggery, so I added 1/4 cup of sugar after the halwa was cooked. It melted and made the halwa a little fluid, so I cooked it further till I got the appropriate consistency)
3 tbsp ghee - roasted the mung flour in 2 tbsp of ghee and added 1 tbsp after halwa was cooked
1.5 cups water at room temperature
nuts roasted in ghee for garnish - optional

With milk- half, after doubling mung quantity
1 cup moong dal, coarsely powdered
3/4 cup sugar
6 tbsp ghee - roasted the mung flour in 4 tbsp of ghee and added 2 tbsp after halwa was cooked
1 cup water
1 cup milk warmed for 30 seconds in microwave
nuts roasted in ghee for garnish - optional


Method
Measure out the dal, and then pluse it in the blender till coarsely ground. Heat ghee and dal in a pan and roast it on medium low heat till the color deepens and the dal smells fragrant.  It will take a good 10-15 minutes. Roast dal on low heat if possible, as once it starts to change color it will burn easily. Keep on stirring. Next add sugar or jaggery and stir and let it start to melt for a minute or so . Now add water or the water and milk mixture and stir well. The dal will cook in the liquid and initially look like kheer. It will thicken slowly as the dal absorbs the water. Cook it and keep stirring
Till alll the water is absorbed and thicken it to the texture you prefer. It can be soft or a little dry. Add additional ghee and mix and turn off the heat. Garnish with nuts if using. You can also add cardamom powder. Serve warm.

Tips
I used hot water and warm milk when I made it the second time. It caused the halwa to splatter everywhere and was dangerous. Use room temperature water and milk to avoid this splattering. Adding some ghee during the roasting and topping off with more ghee after cooking allows you to cook the halwa in minimal ghee. You can always use more ghee. 

Friday, July 20, 2018

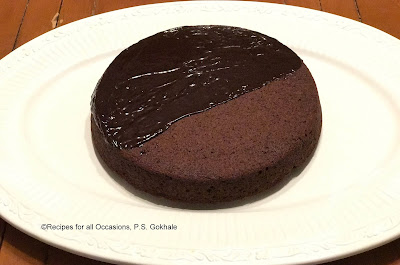
Vegan, Gluten Free, Sugar Free Chocolate Cake

I recently made two cakes to share at a potluck where several folks had allergies or diet restrictions. The first cake was a banana ragi cake (which will be shared in a separate post) and this chocolate cake.
This cake is very versatile and ingredients can be swapped as provided in the ingredients list below to make it free of a specific allergen or all of them.
This cake is vegan, gluten free, nuts free and sugar free. It is delicious. The ragi and buckwheat with chocolate do give the cake a slightly earthy smell, however you can use wholewheat flour for a cake that only smells of chocolate, if you do not need it to be gluten free.

Ingredients
Cake
1 1/2 cup buckwheat flour or nachni satva (ragi malt) or ragi flour (finger millet) or wholewheat flour (if there is no need to be gluten free)
3/4 to 1 cup date paste- adjust based on sweetness of dates. (12 large mejdool dates, cooked with water in the microwave and puréed). If you do not have dates, then you can use 1 cup sugar.
1/4 cup unsweetened cocoa powder
1/2 tsp salt
1 tsp baking soda
1 tsp vanilla essence
1 tbsp vinegar (white or apple cider)
1/3 cup olive oil (not extra virgin) or any oil that you use for cooking
1 cup cold water
Icing
1 cup chocolate chips (dark chocolate if you want it to be dairy free)
6 tbsp water
Method
Cake
Butter a baking pan (8/9 inch round) and pre heat the oven to 350 F.
Mix dry ingredients together thoroughly. Whisk them or sieve if necessary. The baking soda must be well dispersed through.
Mix wet ingredients together and whisk them together till well mixed.
Make a well in the center of the dry ingredients and pour the wet ingredients mixture into the dry ingredients and whisk together till completely mixed. You will see the baking soda starting to react with the vinegar.
Immediately pour into the baking pan and bake at 350 for about 30 min. Use a toothpick or a knife to check if completely cooked. Pierce the cake in the center and if the toothpick/knife comes out clean, the cake is completely baked.

Icing
Mix the chocolate chips and water together and microwave for 30 seconds intervals (about 1-2 mins) till all the chocolate chips melt and then whisk it well till it looks shiny. Then pour it over your cake.


Tips
Work with the batter quickly. The baking soda and vinegar reaction makes the cake spongy. So put it in the over immediately after mixing the wet and dry ingredients. If you want the cake to be sweeter, then drizzle the cake with honey or maple syrup after it has been baked.

Tomato Saar - Tomato Soup, the Maharashtrian way

Tomato soup seasoned with cumin in ghee tempering is called tomato saar in marathi. This is a favorite at home. To make it creamier I add coconut milk to the tomato soup and it elevates the taste. I am sure there are many versions of tomato saar, and we love this version of tomato saar.

Ingredients 
1 tsp ghee 
5-6 tomatoes, coarsely chopped
1/2 onion, coarsely choppes
2 cloves of garlic
1/4 inch of ginger
1 cup water 
1/2 cup coconut milk
Salt to taste
1-2 tsps of sugar (depending on how tart the tomatoes are)
For the tadka
1 tbsp ghee 
1 tsp cumin seeds
1-2 pinches of asafoetida/hing 
10 curry leaves
1-2 green chilies

Method
Heat a tsp of ghee in a pressure cooker and then add the ginger garlic and onions. Stir fry for two mins till the onion is slightly transparent. Add the tomatoes, fry for a minute and then add the water and pressure cook for 1-2 whistles or 5-7 mins in the electric cooker.
Once the pressure releases, add the coconut milk and purée this mixture. Pour it back into your cooker. Taste and then add the salt and sugar. In a small pan, heat ghee and then add the cumin seeds. Once they crackle, add the hing, chilies and curry leaves. Let these fry for a min or two and then pour this tadka into the prepared soup. Bring it to a boil. At this time you can adjust the consistency by adding water or letting it boil till it is thicker, based on your preference.

Tips
You can vary the amount of coconut milk or skip it if you want.

Easy Gluten Free, Vegan, Sugar Free Banana Bread

I recently made two cakes to share at a potluck where several folks had allergies or diet restrictions. This cake is vegan, gluten free, nuts free, and sugar free. It is possibly the easiest cake recipe that you have come across. It is delicious however and a great way to get kids to eat finger millet/ragi. You can substitute ragi with buckwheat or whole wheat flour. You can also use the batter to make banana pan cakes.

Ingredients
5 over ripe bananas (the riper the better - the skin should be starting to blacken)
1 banana cut into thin slices for garnishing (optional)
1 1/2 cup ragi flour/buckwheat flour
1/2 cup olive oil (not extra virgin) or use any other oil that you use for cooking
1/2 tsp cardamom powder 
1/2 tsp baking soda
2 tsp baking powder


Method
Butter a baking pan and preheat the oven to 350 F. 
Put all the ingredients except the baking soda and powder and puree in a blender. 
Then to this puree add the baking powder and soda and pulse a few times till it is mixed well.
Pour this into the prepared pan and bake at 350 for about 50 min. Check with toothpick or knife if completely cooked. Pierce the center of the cake and if it is completely cooked, the toothpick or knife will come out clean.

Tips
The cake is not very sweet and you can add sugar or date puree if you want it sweeter. Taste the batter. Else, drizzle the cake with honey or maple syrup after it has been baked.