Welcome to my blog

I hope you will find the recipe you are looking for your occasion here.

Now video instructions are available for select recipes and can be accessed at

Gardening and Cooking Made Easy

The latest 5 recipes are displayed on the
main page. For more recipes, you can browse the archive, click on the labels in the index to the left or use the Custom search below to look for a specific recipe.


Search for more results

Custom Search

Tuesday, February 5, 2013

Green Peas Gravy - A Rich Peas Preparation for Special Occasions

This is a recipe made using fresh green peas. I remember the good old days, when I used to spend, what seemed like hours, shelling peas with my mom. When the peas were tender and sweet, most of them used to end up going into my mouth rather than the bowl. And it always seemed unfair that the heap of shells used to be much larger than the small mound of peas in the bowl. Ah the good old days. I haven't done this for several years now because all I can find in the way of fresh peas in the local grocery stores in the US are snap peas or snow peas. These are so tender, that the peas are barely formed and they are meant to be eaten, shell and all. The frozen peas, which I use instead, are a great convenience and make it much easier to make any dish with peas. However, these are generally sweet and not best suited for spicy curry preparations. But one must make do with what one can find and try to make the best of it.
I am always on the look out for fresh peas, shelled or un-shelled and am hopefully that I will run across this sometime soon.


This is my Mom's recipe and a fantastic one. It needs time and preparation before you can start the cooking process, and the cooking process is lengthy as well, but the end result is finger licking delicious. If made with fresh peas and fresh coconut,  a lot of manual labor is involved, in terms of shelling peas and grating the coconut. That was probably the reason that my Mom made it as a treat and it has been my most favorite peas preparation to date. It tastes amazing with puris or hot chapatis and I too save it for celebratory occasions when I have time to make it right. The last time I made it was a few months ago when I had invited my friends over for lunch and it was a great hit. I hope you make it and it becomes one of your favorites too.


Ingredients
1.5 tbsp oil
1 large or 2 medium red onions, diced finely
1 cup fresh coconut, grated
1 tbsp ginger garlic paste
1-2 green chillies to taste
1/8 tsp jeera/cumin seeds
2 tsp garam masala
1 tsp dhania jeera/ corriander cumin powder
1/8 tsp turmeric
2 cups frozen peas, washed
salt to taste
2 tbsp to 1/4 cup water to grind ingredients
1- 2 cups water for the gravy


Method
Grind together the coconut, green chilli, cumin seeds and some salt. Add water to the mixture depending on your blender. Add as little as possible to get a smooth paste.
In a pan, heat oil and add the onion to it. Fry the onion till well cooked. Then add the coconut paste as well as ginger and garlic. Fry this mixture, stirring the ingredients often so they don't burn, till it is well browned. The ingredients need to be so well cooked and fried, that you can see the oil start to separate out.  Do this on low heat. If this is done on high heat, the ingredients at the base of the pan will start to burn while the ones at the top will remain under cooked. Then, add the turmeric powder, garam masala and dhania jeera powder and fry this for a couple of minutes. Finally, add the peas and stir to cover them well with the spices. Frozen peas don't need a lot of time to cook through. Finally, add enough water to form a semi thick gravy. Add salt to taste and let the gravy boil for a few minutes. Serve hot with puris or chapati.


Tips
Since you cook the recipe on low heat, it takes about 20-30 minutes for the ingredients to brown. Avoid the temptation of turning up the heat. Cook it on a day when you have the luxury to spend a lot of time to prepare this dish.
You can also use fresh peas instead of frozen peas. If you use fresh peas directly, then it will take longer for the peas to get cooked through as they boil. To speed you the process, you can also boil the peas in a separate pot while your onion mixture gets cooked. Add a tsp of salt to the water. Use enough water to cover the peas. Cook till soft. Then, put them in a bowl of cold water to stop the cooking process. Drain and keep aside. You can use these instead of the frozen peas.

Thursday, January 31, 2013

Dal Fry with Three Dals- A Delicious Mixed Lentil Soup


It has been a while since I have updated the blog. While the cooking continues, I find myself trying to manage time to be able to do all the tasks at hand. I finally got some time today and decided to pen down this delicious dal fry recipe that I had made for an elaborate dinner a few months ago. Everyone loved it, especially the kids. I got the best compliments from my friend's eight year old who asked her mom to get the recipe so that she could have it at home as well. Well, finally here it is. I made it again last week and thought this is a great recipe to make during these cold winter evenings. Just the thought of steaming hot, delicious dal served with some jeera rice, makes my mouth water. A perfect weeknight comfort meal indeed!


Ingredients
1 cup tur dal/arhar dal/ pigon peas
1/2 cup mung dal - split, peeled yellow mung dal
1/2 cup chana dal/split pea
a pinch of asafoetida/hing
1/2 tsp turmeric
1 tbsp tsp oil
1/8 tsp jeera/cumin seeds
1 bay leaf
1-2 green chillies
3 garlic cloves, finely sliced
1 inch ginger, finely minced or crushed
1 red onion, diced finely
2 tomates, diced finely
cilantro/corriander leaves, chopped to garnish
5-6 cups  water
2 tsp garam masala
salt to taste


Method
Mix together the tur dal, chana dal and mung dal. Wash the mixture at least 2-3 times. Then add double the quantity of water compared to the dal, so in this case, 4 cups of  water, hing and turmeric and cook it. I generally use the pressure cooker  to cook the dal (see tips for how to cook the dal if you don't have a pressure cooker). Once cooked, mash the dal a little with a spoon and keep aside. In a deep pan, heat some oil. Then add the cumin seeds and bay leaf. Once they start to brown and change color, add the chillies, onions and the ginger and garlic. Cook this till the onions become transparent and start to change color and the raw ginger garlic smell goes away. Then add the tomatoes and cook them well. Then add the garam masala and fry for a couple of minutes till you can smell the aroma of the masala. Now, add the dal and mix well. Add some water if the dal is too thick. Generally, dal fry is thicker dal (similar to creamy  soups) and not very watery. Add the salt and bring it to a boil and turn off the heat. Sprinkle some cilantro for garnish. Serve hot with rice, pulao, roti or naan.


Tips
If you don't  have a pressure cooker, this is how you can cook the dal without having to boil it for hours. Soak the dal for an hour in warm water. Then in a deep pan, boil the dal with at least two times the water, turmeric and hing. Stir occasionally, so that the dal at the bottom of the pan doesn't burn. Turn off the heat when the dal is cooked through, soft and can be easily mashed (about 30-40 minutes) .
As the dal cools down it will thicken. So when you reheat the dal, add a little water and then reheat it. Since the onion and tomato have not been browned, the dal will retain the yellow color. If you do brown it, then that is also okay.

Saturday, January 5, 2013

Navratan Korma - A Royal Vegetable Dish

I wish all the readers of my blog a very Happy New Year. I hope 2013 brings you good health, happiness and great food. Since food tastes good only when the cook is happy, I hope each day of yours is filled with great joy which in turn will lead to tastier food.


I have been wondering what recipe I should start the new year with and I couldn't make up my mind. Should I start with a starter and follow through with a complete meal or shall I start with a decadent sweet? Well inspiration just struck and I sat down to pen down this wonderful recipe. This is a medley of vegetables, in a rich, flavorful sauce which is also a little sweet. The dish is called "Navratan Korma". "Navratan" means nine gems and "Korma" means a medley. So literally it is a dish which has at least 9 starring ingredients, mainly vegetables, fruit or dry fruit and paneer. It is cooked in a rich cashew based sauce traditionally with cream added to finish it off. I wanted to lighten the recipe. Also, as I was planning to serve this to many people, I did not want to use any nuts in case of allergies. It was a great success and I must say that I received the best compliments from my friend's nine year old who not only ate all the vegetables, but asked for seconds and told her Mom that this was one of the best vegetable curry she had ever tasted.


Ingredients
1 large red onion, finely diced
1 tbsp + 1tsp butter
3-4 canned whole tomatoes (puree it)
1 tsp corriander/dhania powder
red chilli powder to taste
1/8 tsp turmeric powder
2 tsp corriander-cumin powder (dhania jeera powder)
1 tbsp garam masala
2 tsp ginger garlic paste
1 green chilli, sliced into 2 pieces
1 potato, diced
1/2 red bell pepper, diced
1 carrot, diced
1/2 cup peas
1/4 cauliflower, florets separated into medium size pieces
1/2 cup  green beans, diced
6-7 baby corns, diced into 1 inch pieces (I used canned baby corn)
1/2 cup paneer, diced into 1/2 inch pieces
3-4 sliced of pineapple (I used the ones which are canned, but not in syrup)
1/4 cup raisins
1/4 cup low fat milk
3/4 cup cream
salt to taste
1 cup water


Method
Heat 1 tsp butter in a flat pan, sprinkle some salt and shallow fry the paneer pieces till they are lightly browned on all sides. Keep aside.


Heat the butter in a pan which will be able to accommodate all the vegetables. Add the red onion and saute it till it is softened and translucent. Then add the ginger garlic paste, and the green chilli and fry this till the raw smell goes away. Next, add the tomato puree and cook this mixture for a few minutes. Stir and do not let this brown. Then add the turmeric, garam masala, dhania jeera powder and dhania powder. Stir and fry these spices for 2-3 minutes. Then add 1/2 cup water. Then, add the potatoes, green beans, carrots, cauliflower and red bell pepper and boil this for a few minutes, till the vegetables a partially cooked through. Then, add the rest of the vegetables, the corn, pineapple, and the peas. And finally add the paneer. Cook all of the ingredients together till the all the vegetables, especially the potatoes and cauliflower are cooked through. Then, in a small bowl, mix the milk and cream together and slowly add this mixture to the gravy. Add salt and raisins and boil for a couple of minutes. Serve hot, with some naan or tandoori roti. You can garnish this with some grapes.


Tips
Feel free to choose any combination of vegetables. You can use fewer than 9 ingredients as well. If you do not want the sweet tinge, then don't add the pineapple and raisins. If you want a richer gravy, then soak 1/4 cup of raw cashews for a couple of hours and make a paste of these cashews.  Add this paste along with the cream instead of milk. You can also add yogurt instead of cream. Make sure to whisk it till it is smooth.
I used canned baby corn and pineapple. If you use the fresh version, then remember the cooking time will increase and you should either add it in along with the potatoes (specially the corn) or may be semi-cook these in the microwave for a minute before adding to the gravy.
If you don't have canned tomatoes, then you can use fresh tomatoes. To peel them, boil water, then add the tomatoes to the boiling water. As soon as you see the skin is starting to tear up, remove these and put them in a bowl of cold water (ice water is preferred). It will be very easy to remove the skins then.

Wednesday, December 19, 2012

Arugula with Pear, Cranberry and Celery - A Delicious Salad

The first time I had arugula salad was in a restaurant. Till then I hadn't really eaten this green on it's own. I had always encountered it in a mix of different leaves. I found that the leaves had a very interesting and spicy flavor. I had always heard various chefs on the television shows describe it as peppery and that description always flummoxed me. How could a leaf taste like pepper? Well, I finally ate an arugula leaf unadulterated by dressings or other veggies and found that it did have a spiciness to it and  "peppery" was a pretty good description.

I made this salad with a very simple vinaigrette, a drizzle of olive olive and vinegar. As a result, the spiciness of the arugula and red onion, the sweetness of the pear and tartness of the dried cranberries is highlighted.  These ingredients play very well with each. You can also dress the salad with some Parmesan cheese shavings.


Ingredients
1 pack arugula leaves (about 3-4 handfuls are enough to serve 2-3 people)
1 pear, sliced
1/4 cup dry and sweetened cranberries
1 stalk of celery, diced
1/4 red onion, sliced into thin and long slices, with the layers separated
1 tsp vinegar
3 tbsp olive oil
salt, to taste
pepper, to taste


Method
Whisk the oil and vinegar together and add a little salt and pepper to this dressing. Toss arugula, pears, celery, onion slices and cranberries together. Pour a little dressing and toss together to coat the salad. Add just enough dressing so that the salad is well coated. Serve as a first course or you can even have it as a light meal with a side of bread.


Tips
Though the arugula comes pre-washed, I always rinse out my greens before using in a salad. Then I put them through a spinner to drain the water out. If you don't have salad spinner, then take a thin cotton cloth, place the greens in the cloth, and gather all the edges so that you get a nice package and then holding these ends together, move your arm in a circular manner and shake the water out of the greens. This will get absorbed in the cotton cloth. 

Tuesday, December 18, 2012

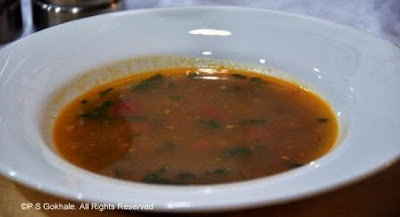
Rasam/Rassam - A Spicy, Warm Soup

Rasam is an absolutely delicious Indian soup, which is often lentil based. It is a staple in the southern states of India and just like dal preparation, you will find a different recipe in every home. It is one of my favorite foods. It is the perfect appetizer soup to start your dinner with. Generally, it has a consistency similar to clear soups, however I do end up making it thicker, as I enjoy this with a bowl of white rice topped with some ghee. It is often prepared when someone at home is feeling a bit under the weather and is down with a cold or cough. This recipe has a lot of black pepper and garlic and provides a comforting feeling when you sip it. The spiciness helps clear up the sinuses too. I still remember the time when I was really sick and a neighbor had dropped in to say hello. She was back soon with a bowl of piping hot and spicy rasam and it really cheered me up.


Of course, I don't have to be sick to enjoy a bowl. I make this really often. I used to use the ready made spice mix to prepare rasam until a good friend gave me her recipe. Ever since then, I have been making this wonderful recipe. It is really easy and delicious and perfect for this cold weather.


Ingredients
1 tsp jeera/cumin seeds
1/2 - 1 tsp black peppercorns, adjust to taste
2-4 garlic cloves, adjust to taste
2 tsp ghee(clarified butter)/oil
1-2 green/red chillies, to taste
7-8 curry leaves
1/8 tsp mustard seeds
1 pinch hing/asafoetida powder
1 tbsp cooked tur dal (pigeon peas) (optional) - see tips section for cooking instructions
1 tomato, diced
salt to taste
1/2 tsp tamarind paste
2 cups water (500 ml)


Method
Dry roast the cumin seeds and peppercorns, till they are fragrant. Grind these into a coarse powder and then add the garlic pods to it and grind them together to make a paste.
In a deep pot, heat the ghee and add mustard seeds to it. Once they start cracking, add the hing, curry leaves, chillies and paste and roast it till the garlic gets cooked, about a minute. Do not let it brown.
Add the diced tomatoes and  cook till softened. Then add the cooked lentil, stir and add the water. Once it starts to boil, add the tamarind paste and salt.  Let it boil for a couple of minutes. Garnish with cilantro leaves and serve hot.


Tips
If you want, you can completely skip the lentils and add another tomato instead. You can also make it thicker by adding more cooked lentils. I generally like it thicker like sambar or dal, so that I can eat it with white rice as part of the main course rather than a soup. In that case, I add about 1 cup of lentil instead of 1 tbsp. Also, I increase the amount of the salt, tamarind paste and if I want it spicy, I also add more peppercorns to the paste and increase the number of garlic pods to 4 instead of 2.
You can also add a tsp of ready made rasam masala powder to the rasam after adding the cooked lentils for a slightly different taste. I usually use the MTR brand rasam masala powder that can be found in the Indian grocery store.
To cook the lentils, I use a pressure cooker. I use double the amount of water to cook the lentils. So for example if I have 1 cup of pigeon peas (tur dal), I will use 2 cups of water.  Wash the lentils three times. Then, add the water to the lentils. Next I add 1/8th tsp of turmeric and a pinch of asafoetida powder and then pressure cook the lentils till they are completely cooked through and soft. It takes about 3-5 whistles (10-15 mins) based on the type of cooker I use.

Tuesday, December 11, 2012

Mexican Pizza

I have so many photos now, that I am having a hard time trying to decide which recipe to post next. And, as I backup and archive these photos, some recipes are slipping away from memory. So, I am going to try and jot down notes when I cook, so that when I finally post the recipe, I am able to remember all the details.

I am sure that you are wondering what a Mexican pizza is. Is the base made from tortillas or do I top it with salsa? Well, this is an inspiration from a pizza that I have eaten at a restaurant called "California Pizza Kitchen". It is a delicious and flavorful pizza. The pizza has a traditional base and has a thinner crust than the usual one inch crust pizzas. It it topped with blackbeans, tomatoes and onions and green lettuce. And finally the topping of tortilla chips lends the crunchy texture. So every time you bite down into a slice, you hear a nice satisfying crunch. Well, one day I decided to reverse engineer this dish and see if I could create a similar taste. The challenge was to find the right spices to create that similar and oh so tasty flavor. The end result was very close to the original. My family enjoyed it and I got great feedback from the fact that we polished off the entire pizza in one sitting. So, make this the next time your family can't decide on whether to eat Italian or Mexican. This is one tasty alternative which will satisfy everyone.


Ingredients
1 prebaked pizza base OR
pizza dough for 1 pizza
2 cups soaked and cooked black beans, alternately you can use one can of black beans
4 tomatoes, diced (or use canned tomatoes)
green chillies or jalapeno, to taste
1/8th tsp, cumin powder/jeera powder
salt to taste
1/2 onion, diced
1/4 green bell pepper, diced
1/4 yellow bell pepper, diced
1/4 red bell pepper, diced
3-4 green leaf lettuce leaves, sliced into thick ribbons
2-3 green onion stalks and leaves, diced
1 cup shredded mozzarella cheese (can use any other cheese blend)
1/4 tsp sugar, optional
10 tortilla chips, crushed into bite size pieces or you can use tortilla strips
2 tbsp sour cream, adjust to taste


Method
If you are using pizza dough, then roll out the dough to the desired thickness and blank bake (see tips) the pizza till the base is cooked through for about 10-15 minutes at 450 F. This prevents the pizza from getting soggy. While your pizza dough is getting baked, mix together the tomatoes, chillies and add salt. If the tomatoes are sour, add a little sugar. Cook this mixture down, till a thick sauce is created. You will not need a lot of sauce, just enough to cover the pizza base.
Then, heat the cooked black beans, add the cumin powder to this and some salt.
Now, you are ready to assemble the pizza.


Take your prebaked pizza base. Then spread a layer of the tomato sauce. Next spread a generous layer of the black beans. Then, sprinkle the diced onions and bell peppers as the next layer. Finally, add the layer of cheese.  Then, bake the pizza at 350F for 10 minutes or till the cheese has melted completely.


Take it out of the oven. Then, cover it with lettuce, green onion leaves and tortilla chips. Finally, drizzle a layer of sour cream on the pizza.

Serve hot with some salsa on the side.


Tips
You can find an easy to make pizza dough recipe here. You can also find pizza dough at grocery stores these days or even request a pizza restaurant to sell you some. Blank baking, means baking the pizza base without any toppings. This is to cook the pizza base, so that the pizza doesn't get soggy in the center. You can also blank bake the pizza base a couple of days earlier and then use this base when you are ready to add the toppings. Prick the dough before you bake it, else it will puff up. Else, you can place a foil on top of the rolled dough and cover it with some baking weights or beans and then blank bake the base.
If you are using canned beans, make sure to rinse them out before using it. Also, add a little water (a tablespoon or so) to the beans as you cook them with the cumin powder and salt.
If you are starting with dry black beans, then soak them overnight. Next day, pressure cook these till completely cooked and slightly softened. You can add some salt to the beans when you cook them.