Welcome to my blog

I hope you will find the recipe you are looking for your occasion here.

Now video instructions are available for select recipes and can be accessed at

Gardening and Cooking Made Easy

The latest 5 recipes are displayed on the
main page. For more recipes, you can browse the archive, click on the labels in the index to the left or use the Custom search below to look for a specific recipe.


Search for more results

Custom Search
Showing posts with label side dish. Show all posts

Wednesday, March 5, 2014

Caramelized Sweet Potatoes - No Sugar Added

Sweet potatoes is a root vegetable which is loaded with nutrients. It is very popular in India as a food to be eaten the days when one is fasting. Growing up I ate several versions of this. Boiled with milk, boiled with sugar sprinkled on it, and also cooked in ghee, with sugar. The one cooked in ghee was my  favorite version of this until I came across this recipe. This has got to be the best recipe that I have come across for cooking sweet potatoes. Before this, I hadn't realized how sweet, sweet potatoes really are. This is a recipe from my Cook's Illustrated book, that I came across when I was trying to select sides to go with a meal I was making, when entertaining a few friends. It was a festive occasion and I wanted to make an elaborate meal with new dishes. This is an easy, recipe. The cooking time is lengthy, but the preparation time is very short and there is really very little you have to do when the potatoes are cooking.

I made this the first time around, but ever since then, my husband has always made them and he will always get sweet potatoes every time he goes grocery shopping. It is so delicious and sweet, that you could also eat it as a dessert sometime. And it is completely sugar free!! Can you believe it? If not read on and do give it a try. This is my favorite sweet potato recipe and it may become your favorite recipe too!


Ingredients
4 large sweet potatoes
1 tbsp oil
salt to taste
pepper to taste


Method
Wash the sweet potatoes thoroughly, scrubbing them well to remove any dirt. You can leave the skin on or peel them. Cut these into 1/2 inch thick disks, discard the ends. Drizzle the oil on it, sprinkle some salt and pepper on it and toss these well together, to coat all the slices.

Line a baking sheet with foil. Spray oil on the foil. Line the potato slices in one layer on the foil. Then take another piece of foil and cover the baking sheet with this foil, crimping it on the sides with your fingers, so that it is nicely fitted around the sheet and forms a seal.
Now place this baking tray on the center rack of your cold oven. Do not pre-heat the oven. Once the potatoes are in the oven, set the temperature to 425F and let these potatoes cook for 30  minutes. Then remove the tray from the oven. Remove the foil covering the potatoes and then place the tray back into the oven for 10-20 minutes. Keep a check on the potatoes after 10 minutes and once you see the bottom of the slices caramelizing, remove it from the oven. Then flip all the potato slices and cook these for another 10-20 minutes till the slices have caramelized on the other side.

Serve warm, though these taste great even when cold.


Tips
You can scale this recipe up or down easily. Just make sure to scale the oil accordingly. You need a quantity of oil that is just enough to coat the slices.

Make sure to clean the potatoes really well if you plan to keep the skin on. Spraying the foil is important to make sure the potatoes do not stick to the base as they caramelize.
Once the caramelizing process starts, it is important to keep a check on the potatoes, as they can burn easily. Hence the range of 10-20 minutes is given. I have sometimes seen caramelizing occur in 10-12 minutes and sometimes at 18 minutes depending on the number of potato slices being cooked.

The original recipe called for the potatoes to be peeled and the oven to be cold at the start of the cooking process. However, through the months that we have made this, we have been successful at getting a great end result even with leaving the skins on and putting the potatoes in the oven after it had preheated to 425F. We have even cooked it with covering it with the foil and the result was still delicious. So, overall I think this is a very forgiving recipe and an easy one to make.

Wednesday, December 19, 2012

Arugula with Pear, Cranberry and Celery - A Delicious Salad

The first time I had arugula salad was in a restaurant. Till then I hadn't really eaten this green on it's own. I had always encountered it in a mix of different leaves. I found that the leaves had a very interesting and spicy flavor. I had always heard various chefs on the television shows describe it as peppery and that description always flummoxed me. How could a leaf taste like pepper? Well, I finally ate an arugula leaf unadulterated by dressings or other veggies and found that it did have a spiciness to it and  "peppery" was a pretty good description.

I made this salad with a very simple vinaigrette, a drizzle of olive olive and vinegar. As a result, the spiciness of the arugula and red onion, the sweetness of the pear and tartness of the dried cranberries is highlighted.  These ingredients play very well with each. You can also dress the salad with some Parmesan cheese shavings.


Ingredients
1 pack arugula leaves (about 3-4 handfuls are enough to serve 2-3 people)
1 pear, sliced
1/4 cup dry and sweetened cranberries
1 stalk of celery, diced
1/4 red onion, sliced into thin and long slices, with the layers separated
1 tsp vinegar
3 tbsp olive oil
salt, to taste
pepper, to taste


Method
Whisk the oil and vinegar together and add a little salt and pepper to this dressing. Toss arugula, pears, celery, onion slices and cranberries together. Pour a little dressing and toss together to coat the salad. Add just enough dressing so that the salad is well coated. Serve as a first course or you can even have it as a light meal with a side of bread.


Tips
Though the arugula comes pre-washed, I always rinse out my greens before using in a salad. Then I put them through a spinner to drain the water out. If you don't have salad spinner, then take a thin cotton cloth, place the greens in the cloth, and gather all the edges so that you get a nice package and then holding these ends together, move your arm in a circular manner and shake the water out of the greens. This will get absorbed in the cotton cloth. 

Tuesday, July 10, 2012

Grilled Vegetables

Last week, the weather cooled down slightly. The summer sun is so hot that we took advantage of this temporary cool down. We grilled some corn and vegetables and spent the afternoon in the backyard. It rained for a couple of hours in the morning while we went to the grocery store and picked up fresh and beautiful vegetables. We came home, my husband set up the grill, while I made a quick marinade and prepared the vegetables.  I generally make a tandoori style marinade, however this time I decided to keep it simple, given the warm weather. And the result was excellent. The best part was that I didn't marinate the vegetables for more than 30-40 mins while the grill was being set up and it didn't mask the natural flavors and sweetness of the vegetables. It was so delicious that we definitely ate a lot of vegetables that afternoon. I can't wait for the next cool down.


Ingredients
1 small yellow onion, finely diced (almost minced)
2 cloves garlic, minced
2 tbsp oil
1 red bell pepper, diced
1 green bell pepper, diced
1 yellow bell pepper, diced
1 zuccini, sliced
1 red onion, diced
small button mushrooms, whole (1-1.5 inches in diameter)
salt to taste
pepper to taste
lime


Method
I tried to dice and slice the vegetables into similar size large pieces about 1.5 to 2 inch cubes so that they could easily be skewered. In a large bowl, mix together the minced onion, garlic and oil. Then add some salt and pepper and the vegetables and mix them all so that they are coated with the onion and garlic mixture. Adjust the salt and pepper, mix again and let this sit for about 30 minutes. Then thread the vegetables onto the skewers. Once all the skewers are prepared, cook them on the grill for about 20 minutes. Keep rotating the vegetables so that they don't get burnt. Grill till they are cooked through and slightly charred. Take the remainder of the minced onion and garlic mixture from the marinade, place it on a piece of aluminium foil and let it cook on the grill as well. Cook this till the onion is soft.  Squeeze lime juice onto the vegetables and then top them with the grilled minced onion and garlic mixture. The result is lip smackingly delicious. 


Tips
If you make small pieces, the vegetables will fall off the skewer as they cook. So make sure that the peices are large enough. If the weather is not conducive to grilling outside, you can also broil the vegetables or even bake them at about 350-375 F.

Monday, July 9, 2012

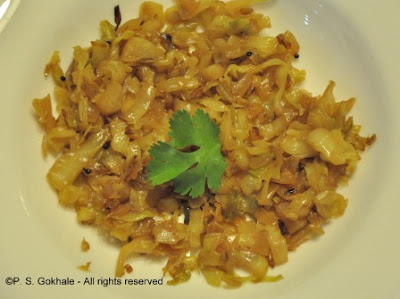
Cabbage Stir Fry

This is one of the most basic recipes.  This is a recipe that you can use with almost any vegetable to give it an Indian touch. It has minimal ingredients and spices and is a healthy and delicious recipe.  The tempered seasoning gives it the wonderful taste. You can shred the cabbage or dice it into smaller pieces and then use it.  Whenever I make this recipe, it always reminds me of a friend who used to sit patiently for a long time and cut the cabbage into really tiny pieces. I never had the patience to do that and used to generally shred the cabbage into longer strips. This time around, when I started cutting the cabbage, I remembered her and decided to cut it into smaller pieces.  I will probably revert back to longer strips the next time around just to save some time, but any kind of variety is always good.


Ingredients
1 tbsp oil
1/8 tsp mustard seeds
1/8 tsp cumin seeds
a ping of asafoetida/hing
1/8 tsp turmeric powder
1-2 green chillies, slit lengthwise, to taste
1 onion, sliced or diced (cut to match the cabbage)
1/2 cabbage, shredded into strips or diced
salt to taste
1/2 tsp sugar (optional)


Method
In a large pan, large enough to hold all the cabbage, heat the oil. To this add the mustard and cumin seeds. Once they start to crackle, add the hing and green chillies. Then add the onions and cook till the onions are soft and transluscent, add the turmeric and mix well. Then add the cabbage and mix well to coat the cabbage with the seasoning and then cover the pan with a lid and let the cabbage cook on low heat. Stir it occasionally and let it cook covered till it is has softened and looks completely cooked. Then remove the cover and add the salt and mix. At this stage, you can also add the sugar, if you want. Cook for a minute or two more. Serve hot with chapati/roti or as a side.


Tips
Sometimes you forget to stir the cabbage and it sticks to the base of the pan and it may turn a light brown shade. As long as it has not burnt and totally become black, if you mix the cabbage well and then continue to let it cook completely, the cabbage will get a nice smoky, caramelized taste.
I try to add the turmeric after adding one ingredient to the oil (like onion), so that it doesn't burn. However, if I do add turmeric directly to the oil, I add the vegetable that I am cooking immediately, to prevent the turmeric from burning. It takes just a few seconds for it to burn completely in the hot oil, so be careful.
Also, do not add water to this recipe. Even if you are tempted to add water to the cabbage thinking how can I cook it covered for so long, without water, what if it burns, resist the temptation. Cabbage contains a lot of water and if you add more, it will spoil the taste and texture of the cabbage. Just make sure to cook it on low heat, and keep an eye on it and stir often so that it doesn't burn.

Friday, June 22, 2012

Gavar Ani Bhoplya Chi Bhaaji - Cluster Beans with Banana Squash/Pumpkin

I am amazed at the large variety of squashes and pumpkins that exist. I was only aware of one kind of a pumpkin while growing up. When anyone said that they had made a pumpkin curry, it really meant that they had cooked "laal bhopla" (in Marathi) or "kaddu" (in Hindi). And squash really boiled down to "bottle gourd".  Moreover, I was not fond of pumkins so I stayed as far away as possible. It was the similar case with cluster beans which are known as "gavar" (in Marathi) or "guvar" (in Hindi). Of course times have changed, my palette has expanded and I find that any vegetable can be made to taste good. I enjoy the challege and experimenting with new varieties.

A couple of weeks ago I found a slice of "banana squash" in the local market, which upon closer inspection turned out to be the familiar "laal bhopla". I got nostaligic, remembering how I used to fuss when I had to eat it and decided to give it a second chance. I was debating how to use it when I remembered a preparation that I had eaten at an aunt's house when I was a kid. It had my two least liked vegetables "pumpkin" and "cluster beans", but the taste had been amazing and I had relished it. Luckily I had a packet of frozen cluster beans in my freezer, so I decided to recreate that recipe. It came out very close to the taste I remember and I enjoyed it. I also tried out another variation of cooking just the squash by itself, but that is another post.


Ingredients
1 tbsp oil
1/8 tsp mustard seeds
1/8 tsp cumin/jeera seeds
1/2 tsp fenugreek/methi seeds
a ping of asafoetida/hing
1/4 tsp turmeric
2-4 dry red chillies (to taste)
salt to taste
2 cups diced banana squash/laal bhopla/kaddu
1.5 cups cluster beans, cut into 1/2 to 1 inch pieces (if using frozen, they are already precut)
1 tsp goda masala (optional)
1 tbsp groundnut/peanut powder
1/2 tsp sugar


Method
Heat oil and add mustard and cumin seeds. Once they crackle, add the methi seeds and hing and red chillies. Next add the turmeric and immediately add the cluster beans. Do not let the turmeric cook in the oil for too long as it burns almost very fast. Stir and then add the diced banana squash pieces. Stir well, lower the heat and cover the pan. Let the vegetables cook till soft, stirring occasionally. Once the vegetables are cooked through, add the goda masala, salt, peanut powder and mix well. Add sugar and stir. Serve hot with chapati or roti.


Tips
If needed, you add a couple of spoons of water if the vegetables are browning too fast without getting cooked through. This is more likely to happen if you are using a steel pan versus a non-stick one. If you have a lot of banana squash, you can freeze the diced pieces in a freezer safe bag/box. If you don't have goda masala, use dhania-jeera (corriander-cumin) powder instead.