Welcome to my blog

I hope you will find the recipe you are looking for your occasion here.

Now video instructions are available for select recipes and can be accessed at

Gardening and Cooking Made Easy

The latest 5 recipes are displayed on the
main page. For more recipes, you can browse the archive, click on the labels in the index to the left or use the Custom search below to look for a specific recipe.


Search for more results

Custom Search

Sunday, June 29, 2014

Whole Wheat Pancakes with Blueberries

I have made been making pancakes for the longest time, but I have never had a go to recipe that I knew would always taste good. Most of the times I used to fall back on using multigrain flour pancake mix from the local store. Or once in a while I tried out a new recipe, though nothing really stuck as "the one".


I am a fan of America's Test Kitchen, and while perusing their cookbook, I came across their recipe to make blueberry pancakes. This has now become my go to recipe for whenever I want to make pancakes. The main reason is that all the ingredients needed to make the pancakes are generally always available in the pantry and fridge. I tried this recipe a few times as and then substituted whole wheat pastry flour for the all purpose flour.  The all purpose ones are great and I like the ones with whole wheat pastry flour even better. The whole grain adds texture and depth to the taste and this is my go to recipe to make pancakes.


Ingredients
2 cups whole wheat pastry flour
2 tbsp sugar
2 tsp baking powder
1/2 tsp baking soda
1/2 tsp salt
2 cups milk
1 tbsp lemon or lime juice
1 egg
3 tbsps unsalted butter
1 tsp vanilla essence
1-2 tsp oil
blueberries (optional)

Method
Melt the butter and set aside to cool. Whisk together milk and lemon juice and set aside. The milk will thicken (the solids start to separate from the liquid in the milk. It is more noticeable if the milk is at room temperature than when milk is cold). Whisk or sift together the flour, baking powder, baking soda and salt.
Whisk together egg, vanilla essence, and add to the milk. Add the butter as well and mix the liquid ingredients together. Make a well in the center of the flour and add the liquid ingredients slowly to the flour. Mix the ingredients together with a whisk until they are just combined. Some lumps will remain. Do not overmix.

Heat your pan or griddle, and add some oil to the pan. Pour one ladle or about 1/4 cup of batter onto the pan. If using blueberries, sprinkle about 8-10 blueberries onto the pancake.  Cook until bubble appear for 1-2 minutes and then flip the pancake over and cook in the other side till golden brown for another 1-2 minutes. If pan is large enough, you can make 2-3 pancakes at a time.


Tips
Do not overmix the batter. Once the batter looks mixed in and you cannot see the dry flour anymore, stop mixing. Even if you see clumps in the batter, do not give into temptation to mix and make the batter smooth. Over mixing the batter can lead to chewy pancakes. The original recipe calls for all purpose flour, however I have used whole wheat pastry flour.
Note: Whole wheat pastry flour is different from whole wheat flour. Whole wheat pastry flour is closer to all purpose flour in color and texture whereas whole wheat flour is darker in color and heartier in taste.
I have used cold milk directly from the fridge and also milk at room temperature and haven't noticed any change in taste or texture.
You can substitute buttermilk instead of the milk and lemon juice mixture. Use 2 cups of buttermilk instead, if available.

Friday, June 6, 2014

Sweet Crust for Mini Fruit Tarts - 200th Post Celebration!

This experiment started out with an intent to make whole wheat shakkarparas/shankarpali for the family. I have been trying to replace all purpose flour with whole wheat pastry flour in many recipes and thought that I should try replacing it here as well. However, I decided to be cautious, halved the recipe and made a whole wheat dough. It was quite late in the night, so I wrapped up the dough in plastic wrap and placed it in the fridge and decided to tackle it the next day. It so happened that I was looking for something in the kitchen cabinet the very next day and came across mini tart molds which I had bought almost two years ago but hadn't used yet. So, I got them out and one thing led to another and instead of using the dough to make shankarpali, I decided to experiment with it to make a tart crust. And the experiment was an absolute success. The crust was crispy, with the just right of sweetness, and just perfect to make fruit tarts. Once the tart crust cooled down, I filled them up with some pastry cream and fresh fruit.


What better way to celebrate the 200th post than this, eh?! The best part is that I made a batch of minit tart crusts and stored them in an airtight box. I have made a small batch of pastry cream and am able to serve up these tarts to the family whenever someone is in the mood for dessert.


Ingredients
1/2 cup butter, room temperature
1/2 cup milk
1/2 cup sugar
2.5 cups all purpose whole wheat pastry flour, approximately


Method
In a mixing bowl, mix together the milk, sugar and stir. Cut the butter into small cubes and add it in. Then, start adding the flour, half cup at a time and mix it well, so that the butter is incorporated into the flour evenly. As the dough comes together, add the flour a tablespoon at a time and then stop when you have a dough which is firm. It takes about 2.25 to 2.5 cups of flour to get to this stage. At this stage, cover the dough in plastic wrap and place in fridge for at least 30 mins.

Then make small balls of the dough and roll out small discs of about 3-4 mm thickness and place them gently into the tart mold. Using your fingers, press the dough into the mold and shape it. Then place the molds back into the fridge to cool for another 30 mins.


Pre-heat the oven to 400F. Pierce the base of the mini tart molds with a fork a few times. Then, line the base with small aluminium foil pieces and place some dry beans (chickpeas/pinto/rajma) or pie weights. Place the mini tart molds onto a baking sheet and place it into the oven on a centrally placed rack. Let it bake for 7-10 minutes till the crust is a light golden color. Then remove the sheet from the oven and remove all the foil pieces along with the weights. Place the sheet back into the oven and bake for another 5-7 minutes till the mini tart crusts are evenly browned color and have a golden brown color.

Cool down completely and store in an airtight container.

You can fill these with custard, whipped cream, ice cream, or preserves and top with fresh fruits. The tart crust can be stored for a couple of weeks, but assemble them on the day they are to be eaten.

The ones pictured here have been filled with lightly sweetened vanilla bean pastry cream and topped with fresh berries and apricot.


Tips
Whole wheat flour is not the same as whole wheat pastry flour. The pastry flour is closer to all purpose flour in texture but made from the whole grain. It is made from soft wheat and is lighter in color.
Placing the pie weights or beans while pre-baking the crusts will prevent the crust from puffing up. It is important to rest the dough in the fridge, so that the butter hardens. As it melts while cooking, it imparts a flaky texture to the crust.
Make sure that the crusts have been completely cooled before storing them in an airtight container.

Tuesday, April 15, 2014

Buckwheat Crepes

The first time I ate crepes was about a decade ago. I was was at a very upscale French restaurant for dinner and ended up ordering the crepe with cheese and spinach. While it was tasty, I couldn't eat more than a fourth of it because it was just too heavy. So, I was a bit put off by crepes after that experience. I didn't order crepes again for  a while.  The next time I tried dessert crepes. These were delicious and had fruits fillings. I thoroughly enjoyed them. However, I was never motivated to try making these at home.


All this changed after a visit to Montreal. There was a shop there selling amazing ice cream and crepes. We ordered the desert crepes there and I noticed that there was something different about the crepes. They didn't seem like they were made of all purpose flour and had a great texture and taste. They didn't get chewy even when they had cooled down as all purpose flour ones do. We enjoyed the crepes so much, that I finally asked the person making these what was different about these crepes. This was when she told me they also had buckwheat flour in addition to the all purpose flour. I had never heard of this grain before and I looked for it as soon as I cam back home.

I experimented with the recipe and was able to create one which tastes the same as the one we had in Canada. Once you have the crepe batter ready, you can use it to either make savory or sweet crepes.


Ingredients
1/2 cup buckwheat flour
1/2 all purpose flour
3 tbsp unsalted butter
3/4 cup milk
3/4 cup water
2 eggs
1 tsp vanilla essence (necessary for sweet crepes. optional for savory ones)
1/4 tsp salt (if using to make savory crepes. do not add for sweet crepes)
2 tsp sugar (if using sweet crepes. do not add for savory crepes)


Method
Melt the butter. Put all the ingredients together in the blender and pulse a few times till the batter is well mixed. The batter is ready to use.


The key to making good crepes is to have them be very thin. For this just enough batter to cover the base of your non-stick pan in a thin layer. You may have to make a couple to figure out how much batter you need. I generally need one large layer for a 12 inch skillet. Heat your pan and coat it with a little oil. You can either use a spray or a paper towel dipped in little oil.  Oil is needed because you don't want to heat an empty non-stick pan.  Once the pan is hot, pour the batter using a ladle into the pan and swirl the pan around in one direction to coat the base of the pan. Since the pan is hot, you will not have enough time to use a spatula to spread the batter before it starts cooking. So it is important to swirl it fast enough to spread it around.


Cover the pan for a minute or so. Remove the cover and check if you can easily move the crepe. If so, flip the crepe over and cook it on the other side for another minute.

This is the basic technique to make the crepe. Stack the crepes on top of each other.


You can stuff it with any stuffing you want. Desert crepes can be stuffed with a combination of berries, banana,  sweetened cream cheese or nutella. You can stuff crepes with savory filling of spinach and ricotta cheese. Last time, I made a stuffing of fresh mozarella, spinach, basil and tomato.  This was based on the caprese salad. The crepe was delicious.

You can be creative and try out different options.


Tips
Always use a non stick pan. Do not apply oil after the first crepe. Since oil is applied to the pan surface before the first crepe is made, this crepe may not spread well. You can heat your oven to 200F and keep the stacked crepes in it on a wire rack to keep the stack warm.
The batter will last for a couple of days, if refrigerated.
If you are making savory crepes, and do not want to taste the egg, you can add some spices like a mix of oregano, basil and rosemary or any one of these spices to mask the egg taste. If you decide to add vanilla, reduce the amount you add because vanilla essence makes the crepes smell sweet. 

Wednesday, March 5, 2014

Caramelized Sweet Potatoes - No Sugar Added

Sweet potatoes is a root vegetable which is loaded with nutrients. It is very popular in India as a food to be eaten the days when one is fasting. Growing up I ate several versions of this. Boiled with milk, boiled with sugar sprinkled on it, and also cooked in ghee, with sugar. The one cooked in ghee was my  favorite version of this until I came across this recipe. This has got to be the best recipe that I have come across for cooking sweet potatoes. Before this, I hadn't realized how sweet, sweet potatoes really are. This is a recipe from my Cook's Illustrated book, that I came across when I was trying to select sides to go with a meal I was making, when entertaining a few friends. It was a festive occasion and I wanted to make an elaborate meal with new dishes. This is an easy, recipe. The cooking time is lengthy, but the preparation time is very short and there is really very little you have to do when the potatoes are cooking.

I made this the first time around, but ever since then, my husband has always made them and he will always get sweet potatoes every time he goes grocery shopping. It is so delicious and sweet, that you could also eat it as a dessert sometime. And it is completely sugar free!! Can you believe it? If not read on and do give it a try. This is my favorite sweet potato recipe and it may become your favorite recipe too!


Ingredients
4 large sweet potatoes
1 tbsp oil
salt to taste
pepper to taste


Method
Wash the sweet potatoes thoroughly, scrubbing them well to remove any dirt. You can leave the skin on or peel them. Cut these into 1/2 inch thick disks, discard the ends. Drizzle the oil on it, sprinkle some salt and pepper on it and toss these well together, to coat all the slices.

Line a baking sheet with foil. Spray oil on the foil. Line the potato slices in one layer on the foil. Then take another piece of foil and cover the baking sheet with this foil, crimping it on the sides with your fingers, so that it is nicely fitted around the sheet and forms a seal.
Now place this baking tray on the center rack of your cold oven. Do not pre-heat the oven. Once the potatoes are in the oven, set the temperature to 425F and let these potatoes cook for 30  minutes. Then remove the tray from the oven. Remove the foil covering the potatoes and then place the tray back into the oven for 10-20 minutes. Keep a check on the potatoes after 10 minutes and once you see the bottom of the slices caramelizing, remove it from the oven. Then flip all the potato slices and cook these for another 10-20 minutes till the slices have caramelized on the other side.

Serve warm, though these taste great even when cold.


Tips
You can scale this recipe up or down easily. Just make sure to scale the oil accordingly. You need a quantity of oil that is just enough to coat the slices.

Make sure to clean the potatoes really well if you plan to keep the skin on. Spraying the foil is important to make sure the potatoes do not stick to the base as they caramelize.
Once the caramelizing process starts, it is important to keep a check on the potatoes, as they can burn easily. Hence the range of 10-20 minutes is given. I have sometimes seen caramelizing occur in 10-12 minutes and sometimes at 18 minutes depending on the number of potato slices being cooked.

The original recipe called for the potatoes to be peeled and the oven to be cold at the start of the cooking process. However, through the months that we have made this, we have been successful at getting a great end result even with leaving the skins on and putting the potatoes in the oven after it had preheated to 425F. We have even cooked it with covering it with the foil and the result was still delicious. So, overall I think this is a very forgiving recipe and an easy one to make.

Sunday, December 29, 2013

Apple Crumble - A delicious fruit dessert

This is a delicious fruit dessert. It is warm and perfect for a cold winter night. Add in a scoop of vanilla ice cream and it is the perfect dessert to satisfy your sweet tooth. Now, there are several recipes of apple crumble out there, however, when I wanted to make this, I turned to a recipe from America's Test Kitchen Cooking School Cookbook. I wanted a recipe which would taste great and have a crunchy crumble and knew that I could rely on this recipe. I needed to make it nut free, and the original recipe called for almonds, so I made a few substitutions and it turned out delicious. Best of all it could be eaten by everyone and I didn't have to worry about those with allergies.


Ingredients
For the crust
1 cup all purpose flour
1/4 cup sugar + 1 tbsp sugar
1/4 cup brown sugar, packed
1/8 tsp salt
7 tbsp butter, cut into cubes at room temperature
1/2 cup traditional rolled oats
2 tsp vanilla essence

For the filling
8 medium sized apples, peeled, cored and diced into 1/2 inch pieces
1/2 tsp cornstarch
4 tsp lemon juice
2/3 cup sugar
1/8 tsp salt
1/8 tsp nutmeg powder
1/8 tsp cinnamon powder


Method
Preheat the oven to a temperature of 350F. Place one rack in the middle of the oven and another baking rack at the lowest level in the oven.

In a large mixing bowl, mix together the lemon juice and cornstarch. Add in the apple pieces, sugar, salt, cinnamon and nutmeg powder. Toss all this together till the apple pieces are well coated. Pour this into a 8 inch square baking tin and cover it tightly with aluminium foil. Keep aside

Keep 1 tbsp of sugar aside. In a food processor, mix together the all purpose flour, salt, both sugars, and vanilla essence. Then add the butter pieces and 1/4 cup of rolled oats. Pulse it all together till the mixture comes together into lumps. Use a spatula to scrape the bowl down. Add the remainder of the 1/4 cup of rolled oats and pulse a couple of times till it is blended into the the mixture, but not completely powdered down.

Place this on a baking tray lined with parchment paper or a silicon mat. Shape it in a square similar to the size of the baking tin containing the apple crumble. It will be about 1/2 inch in thickness. Place this baking tray with the topping  mixture onto the middle rack and the baking tin containing the apple mixture on the lower rack in the oven.

Bake these for 20 minutes. Turn the baking tray once by 180 degrees, so that the crust gets cooked evenly. The crust will be lightly browned at this time.

Remove both the baking tray and tin from the oven. 
Increase the temperature of the oven to 375F.
Remove the foil covering the baking tin and then by lifting the mat/paper slide the crust onto the apple mixture. Sprinkle 1 tbsp of sugar on the top of the crust. Place this tin back into the oven on the lower rack and bake it for 25 minutes till the crust is browned and the apple mixture is bubbling.

Serve warm with a scoop of vanilla bean ice cream.


Tips
If you do not have 8 apples, you can also substitute some pears instead. 
You can use a spatula to break the crust and place it piece by piece onto the apple mixture, till the mixture is covered completely.

Tuesday, December 24, 2013

Chicken Tikka Masala

I am fairly new to the art of cooking chicken, though I have been eating it all my life. I finally decided to take the plunge and start cooking it at home. The main  motivation was to be able to control the quality of the meat that was being used. Another was being able to control the spice and taste levels of the chicken being served. I have tried Indian style chicken dishes in many restaurants but find most of them lacking in spice and flavor. There are just a couple of places that cook chicken curries well, but they don't come close to the taste of the food that I ate when growing up. The results have been great so far and my family has been very happy being taste testers, as I cook up new dishes.

When I decided to take the plunge and start cooking chicken, I had no clue about how to buy the chicken, whether it needed to be cleaned and how I could check if the chicken had been cooked completely. So, I looked to family, friends, and the internet for help. After reading up on it for a while, and taking advice from several people who cooked chicken very frequently, I finally was able to cook my first piece of baked chicken breast. Once, I had the basics down, I was able to move onto experimenting with marinating and making tandoori chicken and finally start cooking chicken gravies.

I have always loved eating chicken tikka masala and butter chicken in restaurants and decided to make chicken tikka masala as my first curried chicken recipe. It turned out great. In fact, we finished the entire dish in one meal, with no leftovers.

Note: For my tips on how to buy chicken, see the Tips section below.


Ingredients
1 skinless, boneless chicken breast (the one I used was about 10 oz/ half pound)
1 onion, cut into thick slices (to be used to bake the chicken)

marinade for the chicken
1/2 tsp salt
1/2 tsp cumin/jeera powder
1/2 tsp corriander/dhania powder
1/2 tsp cayenne pepper/red chilli powder
1 cup yogurt
1/2 inch ginger, grated
3 cloves of garlic, miced/grated
2 tbsp oil
1 tsp garam masala
2 tsp lemon juice

for the gravy/curry
2 tbsp oil
1 onion, finely diced
1 tsp ginger paste or 1/2 inch ginger, grated
2 cloves of garlic, minced/grated
2 tsp garam masala
1 tbsp tomato paste
1, 14 oz can of tomatoes, approximately 4-5 tomatoes, diced
1 tsp butter
1/4 cup yogurt, whisked well till smooth
salt to taste
1 tsp sugar
1/2 - 1 cup water


Method
Mix the salt, corriander powder, cumin powder and cayenne pepper together and make a spice rub.
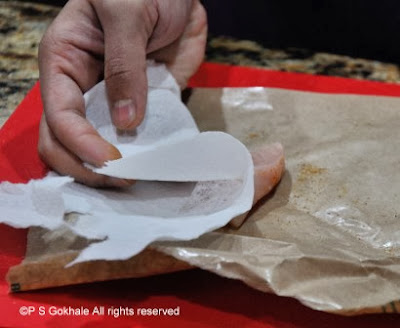
Cut the chicken into strips of similar size, so they cook evenly and take around the same time to cook. Pat each chicken piece dry and sprinkle some of the rub on both sides of the chicken piece and place in a glass container. Keep this in the fridge and marinade the chicken pieces in the spice rub for about 1-2 hours.
Next, whisk together the yogurt, ginger, garlic, oil and garam masala. Pour this mix over the chicken pieces and coat the chicken pieces in this yogurt mixture. Keep the container back in the fridge and let it marinade for an additional 3-4 hours.


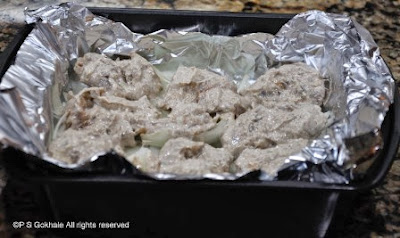
Preheat the oven to 400 F. Take a baking tray with sides and line it with foil. Slice the onion into thick slices and layer them at the base of the foil covered tray, creating a bed of onions. Layer the yogurt coated chicken pieces in a single layer on top of this onion bed.  Discard the excess yogurt. Bake the chicken in the oven for about an hour or till the temperature registers 165 F.  When you bake the chicken, the moisture from the yogurt keeps it moist and succulent. Alternately, you can also skewer the chicken pieces and broil the chicken for about 20-30 minutes. Check the chicken temperature which should be 165F. This will give it the authentic chicken tikka texture, however the meat does get a little dry.


Start cooking the gravy when you start cooking the chicken. Heat the oil and add the diced onion to it. Cook this till it is golden brown in color. Next, add the tomato paste, garam masala, ginger and garlic paste. Cook for a couple of minutes till the ginger and garlic are well cooked. Then, add the tomatoes and cook them for a few minutes till the tomatoes are cooked down. Add a little water to the gravy and let it cook for a couple of minutes. Then add the yogurt mixture to the gravy and cook it for a couple of minutes. Turn off the heat and once the gravy cools down a bit, puree it. Pour it back into the pan and then let it boil. If the gravy is too thick, add a little water to thin it down. Add salt, sugar and butter and let it simmer.

Once the chicken is cooked, let it rest for a few minutes. Then, cut the chicken strip into bite sized pieces (about 1/2- 1 inch) and then add it to the hot gravy. Do not simmer the chicken in the gravy.

Serve hot with warm rotis or white rice, along with a side of sliced onions, and lemon slices.


Tips: If you do not have tomato paste at home, you can use tomato ketchup. If you are using fresh tomatoes, blanch them and peel the skins. To blanch them, boil some water. Add the tomatoes one at a time to the boiling water and let it remain in there, till the skin of the tomato starts to break up. At this point, remove the tomato and put it into cold, ice water. Once the tomato is cool to touch, you can easily peel the skin out and then use the tomato.
Lining the pan with foil, makes it easy to clean up after the chicken is cooked. To measure the temperature of the chicken, insert a meat thermometer, into the thickest part of the chicken.

Chicken buying tips: If you are beginner like me, and not comfortable with cutting up the chicken, then the easiest method is to go to the meat department of the grocery store and speak to the butcher. Generally, someone there will help you select the meat, even cut it for you and give you advice on how to store the chicken. I was told that if you do not intend to use the chicken in the next 2-3 days, then to freeze it for up to 5 days. After 5 days the chicken can get freezer burns and is no longer good to use.

Make sure to clean your hands, the cutting board and the countertop well after handling the chicken to avoid cross contamination with other food. A plastic cutting board is easier to clean. Use a separate cutting board to cut the vegetables. Do not reuse the cutting board or knife used to cut the chicken without cleaning it thoroughly with soap and hot water.