Welcome to my blog

I hope you will find the recipe you are looking for your occasion here.

Now video instructions are available for select recipes and can be accessed at

Gardening and Cooking Made Easy

The latest 5 recipes are displayed on the
main page. For more recipes, you can browse the archive, click on the labels in the index to the left or use the Custom search below to look for a specific recipe.


Search for more results

Custom Search
Showing posts with label main meal. Show all posts

Tuesday, September 13, 2016

Cluster Beans with Carom Seasoning - Gavar Bhaji

I have come to the conclusion that distance (and time) makes the heart grow fonder. When I was a child, this was not a vegetable that I liked. I remember a frown on my face when I looked at this vegetable on my plate. Fast forward several years, after not having seen these beans for the longest time, I was surprised that I go so excited to see a packet of the frozen beans. I immediately wanted to cook it just like my Mom used to make it. I rushed home and all I could remember was the taste and the distinct smell of the caraway seeds. So, I let my memories of the taste guide me to make this and it turned out just the way Mom used to. 

These days this has become much more accessible and I can even find the fresh beans in the Indian grocery stores here. I still enjoy eating it though it is commonplace now, because whenever I make it, it takes me back to my childhood days.


Ingredients
2 tbsp oil 
1/8 tsp mustard seeds
pinch of hing/asafoetida
½ tsp carom/ajwain/owa seeds 
1-2 green chilies slit lengthwise
½ lb gavar/ cluster beans, diced
¼ tsp turmeric powder
salt to taste
½ tsp sugar (optional)
1 tsp goda masala (optional) – If goda masala is not available, substitute with ½ tsp cumin/jeera powder and ½ tsp coriander/dhania powder
1-2 tbsp water if needed


Method
In a pan, heat the oil and then add the mustard seeds. Once they crackle, add the hing and ajwain. Then add the green chillies and let them cook a little. Then add the turmeric powder, stir and add the cut gavar. Stir to coat the gavar well. If using, add the goda masala or the cumin-corrianger powder and mix well. Add the salt. Cover the pan, switch to low heat and let the beans cook stirring frequently to make sure it doesn’t burn. Once the gavar is cooked, add the sugar, stir well. Serve hot with roti/chapati.


Tips
If the gavar is not tender, and fibrous, it takes longer to cook. In this case, you can add a tbsp. of water to increase the moisture content and to help cook the beans.  

Wednesday, August 17, 2016

Dal Bafla

Dal Bafla is a wonderful dish that is similar to Dal Baati. The very first time I ate it was in Indore at my Aunt's house. The baflas were cooked in a traditional kiln and served submerged in a bowl of ghee with piping hot dal. Absolutely delicious! I ate this over 15 years ago, but still remember the experience vividly. At that time I didn't realize that Dal Bafla and Dal Baati were two individual dishes. I have heard both names often over the years, but only knew how to make Dal Baati so far.

To make baatis, I usually add baking soda and yogurt to soften them up a little. If you skip that then they turn out really hard. The best part about the bafla is that it is soft from inside and crisp from outside, so it is very easy to eat it. It is soft because it is boiled first and then baked.

It was just recently that I came across the recipe on a food group. I had to try it out immediately to see what the differences between the baati and bafla are. The dal I made along with this was also different than what I make for baatis. Once  you have bafla or baati ready, you can use any dal preparation with it.  I have included the dal recipe that I made along with the bafla as well. It is a very delicious preparation that you can also use with rice or rotis.

I am sure you will love this variation once you eat it.


Ingredients
For Bafla
3 cups of wheat flour (used the same flour that I use for chapatis)
½ cup semolina/rava
½ cup oil
salt to taste (approx. 1 tsp in the dough and 1 tsp to add in the water)
1 tsp turmeric
1 tbsp oil
ghee

For Dal
2 cups cooked chana dal
¼ cup cooked tur dal
1.5 onions, finely chopped
3 tomatoes, finely chopped
1 tbsp garlic paste
1 tbsp grated ginger
1/2 tsp red chili powder
1 tsp coriander powder
1 tsp cumin powder
5-10 curry leaves
2 tbsp oil
pinch of hing
½ tsp mustard seeds
½ tsp cumin seeds
salt to taste
cilantro/coriander leaves for garnish


Method 
For the bafla
Mix together the semolina, flour and salt till the ingredients are well mixed. Then added oil and rub it into the flour. Add water, a little at a time till it comes together as a dough. Knead it a little. It is on the drier and hard side. Let it rest for 10-15 mins. (The dough was very hard and tended to crack when rolling the baflas. I think I could have added another tablespoon of water to have smoother baflas.)
Take about a fistful of dough and make round balls and then press slightly to flatten them a little.


In a deep pot, added water, turmeric, oil and salt and let it come to a rolling boil. Then add the dough balls to this water. They will sink. Stir them around occasionally as they cook, till they become lighter and float a little. Cook on medium heat. It takes about 10-15 mins.
To eat, crush the baflas in a bowl, add ghee to these and then pour dal over the baflas. Enjoy hot!

Keep a pizza stone in the oven and preheat the oven to 350F while the baflas cook in water. Remove baflas, dry them with a cloth and put it on the hot pizza stone and let them cook for about 20-25 mins, turning them over a couple of times till they are crisp on the outside. Retain the water that the baflas have been cooked in to use in the dal.


Once baked, remove them from the oven and keep warm in a casserole till ready to heat. The traditional way is to immerse the warm bafla in ghee after creating a little crack in it so that the ghee is able to permeate the bafla. I didn’t do this as I wanted to control the amount of ghee that was in each serving.


For the dal
Heat oil in a saucepan, add mustard and cumin seeds. Then add the hing, and curry leaves. Then add onions, ginger and garlic. Cook the onions well and then add the chopped tomatoes. Once these are cooked, add the cumin, coriander and chili powders and mix well. Then add the cooked tur and chana dals. Mix well, then add salt and the water saved from cooking the baflas till the desired consistency of the dal is achieved. Boil this till well cooked. Garnish with cilantro.

Tips
If you don't have a pizza stone, use a baking sheet to bake these. If you don't want the yellowish tinge to the bafla, don't add the turmeric to the boiling water.

Saturday, August 22, 2015

Achari Aloo - Potatoes tempered with Indian pickle spices

I am updating my blog after several months. As it happens, things have become very hectic and I haven't had the energy to update the blog. I have received some really nice feedback on my site in the past few months and I have been motivated and looking for some spare time in which I could compose a recipe. I am hoping I an interrupted hour as I type this.

For those that are regular readers of my blog, you know that I recently started cooking and experimenting with chicken dishes. Also, that some members of my family are vegetarian while others relish chicken and other meat. So, when I make chicken, I need to make sure that I have a good vegetarian meal by its side as well. I decided to make "achari chicken" earlier this week. I thought what I could make as a vegetarian entree and I thought why not make "achari potatoes" using the same gravy base. It turned out to be a great idea and both turned out lip smacking delicious.

So what is "achari"? "Achar or Aachaar" in Hindi means pickle. The concept behind Indian pickles is the same as everywhere else, it is used to preserve some kind of a vegetable in brine. However, this brine is also tempered with different spices. The spices used vary from region to region and every household has their own special recipe. So, this dish uses the same spices that are used for pickles that are usually made in Northern part of India and have components like onion and fennel seeds. If you have a mixed Punjabi pickle which uses a similar spice profile, addition of a little of this pickle to finish the dish gives it a restaurant quality taste.


Ingredients

For the gravy
1 tbsp oil
1 large red onion, finely chopped
3 tomatoes (canned or fresh), finely chopped
1 tbsp ginger and garlic paste
1/ 2 cup yogurt, well beaten
1/8 tsp turmeric
1/8- 1/2 tsp red chilli powder - to taste
1-2 green chillies - to taste
4-5 potatoes - peeled and chopped into 1/2 inch pieces
salt to taste
1/2 cup water (more if gravy becomes to thick)
1 tbsp Punjabi mixed pickle (same spice profile) - optional

For the tempering
1 tbsp oil (mustard if available)
1/4 tsp cumin seeds
1/4 tsp mustard seeds
10-12 black peppercorns
1/4 tsp fennel seeds
1/8 tsp kalonji/onion seeds
1-3 red chillies (dried), to taste
1/4 tsp crushed coriander seeds
6-8 methi/fenugreek seeds


Method
Heat oil in a pan and add the onions. Saute them till they start to brown and add the ginger garlic paste. Cook till well browned and then add the tomatoes. Once the tomatoes are cooked down add turmeric, chilli powder and the green chillies. Mix well and let this cook for a couple of minutes. Then add the yogurt and let this cook till the mixture thickens a bit and the yogurt starts to look cooked.

While the gravy is being cooked, heat oil for tempering in a separate pan. Add the mustard and cumin and once it starts to crackle, add the rest of the spices and then turn the heat off. Let the spices bloom in the hot oil.

Add the potatoes to the gravy and salt to taste. Add some water and stir. Then add the tempering, cover the pan and let the potatoes cook. Keep stirring and cook till the potatoes are cooked through but stop before they over cook or get mushy.

If you have Punjabi mixed pickle, add a tbsp of this to the curry just as the potatoes are done cooking and mix well. Garnish with cilantro leaves. Serve hot with white rice or naan or chapati.


Tips
To shorten the time needed to brown the onion, add some salt after you add the chopped onions. This helps pull out the moisture from the onion and helps in browning the onions faster.  Canned tomatoes are precooked and will cook faster. A good ingredient to have on hand when you need to cook something elaborate in a short amount of time. To crush coriander seeds, use whole seeds and lightly pound them in a mortar and pestle to open them up. Do not grind them into a powder form. Fenugreek is bitter, so use a little. Avoid the temptation to increase the amount a lot even if you scale up the quantity of the dish. Beat the yogurt well and make sure it is smooth before you add it to the gravy to reduce the curdled look. As the yogurt gets cooked down, it will get an even look. Use mustard oil for the seasoning if possible to get an authentic flavor. 

Monday, January 19, 2015

A Simple Mixed Salad

It has been a long while since I last updated my blog. Well, as they say life happens and I have barely been able to come up for a breather, least of all update my blog for a while. So, I must say that this is possibly my return to blogging post. With the advent of the new year, it feels that I must get back to things that I have fun doing.

As you may have noticed, as soon as January starts, there are advertisements for gym memberships and almost every magazine that I have glanced at has had something related to healthy eating. Getting into the same spirit, I thought it  best to start off with a very simple but delicious salad recipe.

This has to be one of the easiest salads that you can make. It is a combination of vegetables, leafy vegetables and fruits. Because of the flavor combinations of these components, you don't need additional dressings for the salad. You can always dress it with balsamic vinaigrette, or sesame ginger dressing or even a creamy dressing, but it will taste great with just salt and paper too. It is a great summer recipe, since a plethora of vegetables and fruits are available in this season. You can modify the recipe based on what fruits and vegetables you find as well. It is a perfect light meal or snack.


Ingredients
1 cup grapes, sliced in halves
1 cup raspberries
3 cups organic mixed greens, chopped
1/2 cup of mixed sweet bell peppers (yellow, red or orange), sliced
1 orange, sliced and diced into bite sized pieces
1/4 cabbage, sliced
salt to taste
pepper to taste
readymade salad dressing (Optional)


Method
Toss the veggies together along with the cut grapes and orange pieces. Sprinkle salt and pepper and mix well.  Add the raspberries, the last after the heavy all the ingredients are tossed well and then gently mix them into the salad.

Serve cold.


Tips
Raspberries are fragile, so it is best to keep them last and adding them just before you intend to serve the salad. If you use a dressing (I would recommend a light dressing like ginger sesame or balsamic vinaigrette or italian dressing), then too toss the raspberries gently with a little dressing, just by themselves and add them to the salad.

Tuesday, December 24, 2013

Chicken Tikka Masala

I am fairly new to the art of cooking chicken, though I have been eating it all my life. I finally decided to take the plunge and start cooking it at home. The main  motivation was to be able to control the quality of the meat that was being used. Another was being able to control the spice and taste levels of the chicken being served. I have tried Indian style chicken dishes in many restaurants but find most of them lacking in spice and flavor. There are just a couple of places that cook chicken curries well, but they don't come close to the taste of the food that I ate when growing up. The results have been great so far and my family has been very happy being taste testers, as I cook up new dishes.

When I decided to take the plunge and start cooking chicken, I had no clue about how to buy the chicken, whether it needed to be cleaned and how I could check if the chicken had been cooked completely. So, I looked to family, friends, and the internet for help. After reading up on it for a while, and taking advice from several people who cooked chicken very frequently, I finally was able to cook my first piece of baked chicken breast. Once, I had the basics down, I was able to move onto experimenting with marinating and making tandoori chicken and finally start cooking chicken gravies.

I have always loved eating chicken tikka masala and butter chicken in restaurants and decided to make chicken tikka masala as my first curried chicken recipe. It turned out great. In fact, we finished the entire dish in one meal, with no leftovers.

Note: For my tips on how to buy chicken, see the Tips section below.


Ingredients
1 skinless, boneless chicken breast (the one I used was about 10 oz/ half pound)
1 onion, cut into thick slices (to be used to bake the chicken)

marinade for the chicken
1/2 tsp salt
1/2 tsp cumin/jeera powder
1/2 tsp corriander/dhania powder
1/2 tsp cayenne pepper/red chilli powder
1 cup yogurt
1/2 inch ginger, grated
3 cloves of garlic, miced/grated
2 tbsp oil
1 tsp garam masala
2 tsp lemon juice

for the gravy/curry
2 tbsp oil
1 onion, finely diced
1 tsp ginger paste or 1/2 inch ginger, grated
2 cloves of garlic, minced/grated
2 tsp garam masala
1 tbsp tomato paste
1, 14 oz can of tomatoes, approximately 4-5 tomatoes, diced
1 tsp butter
1/4 cup yogurt, whisked well till smooth
salt to taste
1 tsp sugar
1/2 - 1 cup water


Method
Mix the salt, corriander powder, cumin powder and cayenne pepper together and make a spice rub.
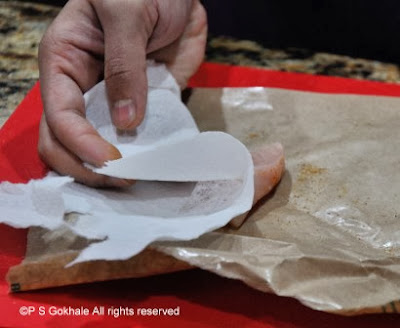
Cut the chicken into strips of similar size, so they cook evenly and take around the same time to cook. Pat each chicken piece dry and sprinkle some of the rub on both sides of the chicken piece and place in a glass container. Keep this in the fridge and marinade the chicken pieces in the spice rub for about 1-2 hours.
Next, whisk together the yogurt, ginger, garlic, oil and garam masala. Pour this mix over the chicken pieces and coat the chicken pieces in this yogurt mixture. Keep the container back in the fridge and let it marinade for an additional 3-4 hours.


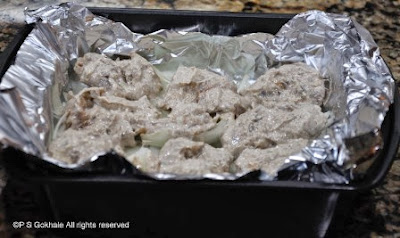
Preheat the oven to 400 F. Take a baking tray with sides and line it with foil. Slice the onion into thick slices and layer them at the base of the foil covered tray, creating a bed of onions. Layer the yogurt coated chicken pieces in a single layer on top of this onion bed.  Discard the excess yogurt. Bake the chicken in the oven for about an hour or till the temperature registers 165 F.  When you bake the chicken, the moisture from the yogurt keeps it moist and succulent. Alternately, you can also skewer the chicken pieces and broil the chicken for about 20-30 minutes. Check the chicken temperature which should be 165F. This will give it the authentic chicken tikka texture, however the meat does get a little dry.


Start cooking the gravy when you start cooking the chicken. Heat the oil and add the diced onion to it. Cook this till it is golden brown in color. Next, add the tomato paste, garam masala, ginger and garlic paste. Cook for a couple of minutes till the ginger and garlic are well cooked. Then, add the tomatoes and cook them for a few minutes till the tomatoes are cooked down. Add a little water to the gravy and let it cook for a couple of minutes. Then add the yogurt mixture to the gravy and cook it for a couple of minutes. Turn off the heat and once the gravy cools down a bit, puree it. Pour it back into the pan and then let it boil. If the gravy is too thick, add a little water to thin it down. Add salt, sugar and butter and let it simmer.

Once the chicken is cooked, let it rest for a few minutes. Then, cut the chicken strip into bite sized pieces (about 1/2- 1 inch) and then add it to the hot gravy. Do not simmer the chicken in the gravy.

Serve hot with warm rotis or white rice, along with a side of sliced onions, and lemon slices.


Tips: If you do not have tomato paste at home, you can use tomato ketchup. If you are using fresh tomatoes, blanch them and peel the skins. To blanch them, boil some water. Add the tomatoes one at a time to the boiling water and let it remain in there, till the skin of the tomato starts to break up. At this point, remove the tomato and put it into cold, ice water. Once the tomato is cool to touch, you can easily peel the skin out and then use the tomato.
Lining the pan with foil, makes it easy to clean up after the chicken is cooked. To measure the temperature of the chicken, insert a meat thermometer, into the thickest part of the chicken.

Chicken buying tips: If you are beginner like me, and not comfortable with cutting up the chicken, then the easiest method is to go to the meat department of the grocery store and speak to the butcher. Generally, someone there will help you select the meat, even cut it for you and give you advice on how to store the chicken. I was told that if you do not intend to use the chicken in the next 2-3 days, then to freeze it for up to 5 days. After 5 days the chicken can get freezer burns and is no longer good to use.

Make sure to clean your hands, the cutting board and the countertop well after handling the chicken to avoid cross contamination with other food. A plastic cutting board is easier to clean. Use a separate cutting board to cut the vegetables. Do not reuse the cutting board or knife used to cut the chicken without cleaning it thoroughly with soap and hot water.