Welcome to my blog

I hope you will find the recipe you are looking for your occasion here.

Now video instructions are available for select recipes and can be accessed at

Gardening and Cooking Made Easy

The latest 5 recipes are displayed on the
main page. For more recipes, you can browse the archive, click on the labels in the index to the left or use the Custom search below to look for a specific recipe.


Search for more results

Custom Search

Thursday, December 22, 2011

Beet Root Halwa - Beet Root Pudding

I have eaten beet roots in a variety of preparations in both the raw and cooked form, including cooked curries, salads and raitas. However, I had never tasted a sweet made from beet root. A few weeks ago, I had gone to a local Indian restaurant and I got a serving of sweet with my order. It was something I had never eaten before. It had a dark purple, blackish color, and it looked like the main ingredient had been grated. I hesitated a little before tasting it and I am quite glad that I did, because it turned out to be delicious. It was sweet and had a caramelized taste. Unfortunately, I never did get a chance to ask the server what it was made of or what it was called. I kept pondering over this dish the entire evening and finally came to the conclusion that it was probably made from beet root. Well, luckily for me, I had a couple of beet roots in my refrigerator and I was able to carry out my experiment the very next day. And the conclusion was that the sweet I had was beet root halwa indeed and it is one of the most delicious ways to use beet root.


Ingredients
2 large beet roots, peeled and grated
2 tbsp  ghee/clarified butter
2 tbsp mava/khoa/khoya (optional)
1/4 cup roasted cashewnuts (optional)
1/2 tsp cardamom powder
4-5 tbsp sugar, adjust to taste
1 tbsp raisins


Method
In a pan, heat the ghee. To this add the grated beet root and stir. Cover the pan. Let the beet root cook completely till softened. Stir occasionally to ensure that the beet root is not sticking to the bottom of the pan. Then add the mava (you can skip this), cardamom powder, raisins and sugar. The sugar will melt and the mixture will turn liquidy. Now, cook the mixture till the mixture solidifies. You can cook a little longer to let the sugar caramelize a little. Make sure that the halwa doesn't burn. Add cashews and serve warm. A healthy and tasty dessert which is fast to cook as well.


Tips
This is a faster cooking halwa compared to ones made carrots. Also, you can add some powdered milk instead of the mava to give it a creamy texture. I did not try adding milk or cream, and it wasn't needed either. To roast the cashews, in a pan, add a little ghee. Once heated, add the cahews and stir them, till they are a lightly browned. You can add more or lesser sugar based on how sweet the beet roots are as well as how many raisins are being added.
Saturday, December 17, 2011

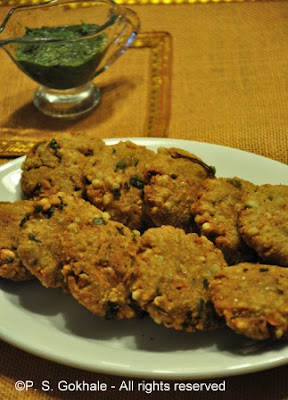
Sabudana Vada/Wada - Tapioca and Potato Fritters

This is an absolutely delicious delicacy. Tapioca is called "sabudana" in the Hindi and Marathi languages (the pronounciation varies a little), and Vada/Wada refers to deep fried dumplings. "Sabunada Vada are deep fried fritters/dumplings made with tapioca and potato, with a lot of ground peanuts sprinkled in. Absolutely lip smacking!! This is a dish that is reserved for special occasions and is one of the foods approved to be eaten on fasting days. However, most folks make it because it is so tasty. Over the years I have eaten this often, in different restaurants, at home and cooked by others and I must say, sometimes the vada can taste terrible, very chewy and dry. As a result, I had always been hesitant to make it, thinking that the recipe to get it perfect could be quite complicated. Finally, upon my family's repeated requests, I decided to try it out. I followed the advise of mom and lo and behold the end result was delicious. I am always thrilled when I am able make a recipe that I have always thought to be difficult. This one has a great end result,  and I hope you enjoy this recipe as well.


Ingredients
2 cups tapioca/sabudana (it should measure 2 cups after being soaked. Start off with 1 cup dry tapioca)
2 large potatoes, boiled and mashed
1 cup shingada/singada/singoda flour (water chestnut flour)
1 cup ground nut powder (see tips for how to make this)
1 tsp cumin powder
green chillies, finely chopped (5-8, to taste)
1/4 tsp baking soda
salt to taste
1/2 cup cilantro, chopped
1 tsp lemon juice
1/2 tsp sugar
1 tsp oil, luke warm
oil to fry


Method
See tips on how to soak the tapioca. Take the soaked tapioca and then crush it lightly, by processing in a blender or food processor. This will make it easier to mix it in with the potatoes. Then mix together the processed tapioca, singoda flour and potates. Add salt, cumin powder, ground nut powder, baking soda, and the cilantro. Add the lemon juice, sugar and the luke warm oil. Now mix this all together and knead a little, to form a dough. Take a fistfull of this dough and form it into a ball. Then flatten it to make a disc. Rest these discs on a plastic paper/sheet, so that it doesn't stick to the plate. The discs should be about 2-3 inches in diameter.


Heat the oil in a deep pan. There should be at least 3 inches of oil so that the vada can be entirely immersed in it. To test if the oil has heated enough, drop a inch of dough into the oil. If it rises up slowly, the oil is hot enough. The vadas need to be fried medium heat, so that they cook through. If fried on high heat, they will get cooked on the outside but will stay raw in the center.  Now, slowly release one vada from the side of the pan, it will go to the base of the pan and then slowly rise, once the vada starts gettting cooked. The vada will puff up and once browned, is ready to be taken out. Let the vadas rest on a paper towel to absorb the oil. These vadas will be light and very crispy. Serve with green chutney.


Tips
Singoda/shingada is water chestnut. You can find singoda/shingada flour in the local Indian store. Fry only 1-2 vadas at a time. As soon as the vada is added to the oil, the temperature of the oil decreases. So, fry only a couple at a time so that they get fried evenly and cooked through completely.
I also baked this dough, at 405 F for about 10-15 minutes, turning it over once, but these were not as crispy, though definitely low in calories.
To soak the tapioca, cover it completely with water such that there is enough water to cover all of hte tapioca and then add some more so that the water level is about a centimeter above the level of the tapioca. Soak this for at least 3-4 hours or overnight and then drain the water.

Saturday, December 10, 2011

Dal Fry - Seasoned Lentil Soup

I must start by acknowleding the long gap between the last post and this one. And for those of you who read the blog regularly, I owe an explanation. Generally, I write about only food related topics on this blog, however since the explanation is non food related, here goes. For the longest time I have tried to stay away from synchronizing my email account to my phone and hence had to long in daily to check and respond to emails. And usually after I did that, I used to start my next blog post. However, between the last blog and this, I finally caved in and added my email account to my phone. Since then, I have noticed a significant impact on the amount of time I spend on my computer. I have become more of a consumer of information rather than producing it and I didn't even realize it. Have any of you faced the same issue? Are you spending a lot more time away from your computer and on your smart phone (for non-office related activities)?


Well, now that you know the reason for my absence, I hope you will take some heart in the knowledge that I have made a conscious decision to attend to my blog more regularly. With that said, let me dive into the absolutely delicious recipe for making "dal fry" which is made from lentils and has a spicy seasoning. It is one of the most versatile recipes and I will be posting many different versions of the same in the future as well. The following is one I make most regularly and the dal goes well with rotis or rice.


Ingredients
1 cup split pigeon peas/tur dal
2 cups water
1/8 tsp turmeric powder
A pinch of hing/asafoetida powder
1 tbsp oil
1/8 tsp cumin seeds
1/8 tsp mustard seeds
1 red onion, finely diced
1 tomato, finely diced
1-3 green chillies, to taste
1 tsp garam masala (optional)
1 tsp ginger garlic paste
some cilantro/corriander for garnish
salt to taste
additional water to thin out the dal


Method
Mix together the tur dal, water, hing and turmeric and cook it. I generally use the pressure cooker  to cook the dal (see tips for how to cook the dal if you don't have a pressure cooker). Cook it for 5-6 whistles or in the Instant Pot for 12 minutes on manual mode at high pressure. Let the pressure release naturally. Once cooked, mash the dal a little with a spoon and keep aside. In a deep pan, heat some oil. Then add the mustard and cumin seeds. Once they start to crackle, add the chillies, onions and ginger garlic paste. Cook this till the onions start to brown and the raw ginger garlic smell goes away. Then add the tomatoes and cook them well. Then add the garam masala and fry for a couple of minutes till you can smell the aroma of the masala. Now, add the dal and mix well. Add some water if the dal is too thick. Generally, dal fry is thicker dal (similar to creamy  soups) and not very watery. Add salt. Bring it to a boil and turn off the heat. Sprinkle some cilantro for garnish. Serve hot with rice, pulao or roti.


Tips
If you don't  have a pressure cooker, this is how you can cook the dal without having to boil it for hours. Soak the dal for an hour in warm water. Then in a deep pan, boil the dal with at least two times the water, turmeric and hing. Stir occasionally, so that the dal at the bottom of the pan doesn't burn. Turn off the heat when the dal is cooked through, soft and can be easily mashed (about 30-40 minutes) . Add a squirt of lemon/lime juice to the dal for a tangier taste.
You can use the same method and ingredients to make dal fry using chana dal (yellow split peas). 

Sunday, November 13, 2011

Coleslaw - The Healthy Version

So, the other day I was looking at the cabbage in my fridge and wondering what I could do with it. I was tired of making the same old stir fry and wanted to try something different. Suddenly a thought struck. “Why not make coleslaw?!” I really enjoy coleslaws. But, I haven’t really made coleslaw too often because of the large amount of sugar and mayonnaise that is needed to make the dressing. So, this time I thought, maybe if I figured out  a way to make a healthier version of the recipe, I would make it more often and eat it without any guilt. The healthier version turned out great and my family really couldn't tell the difference till I pointed it out. This is definitely going to be my go to coleslaw recipe.


Ingredients
1/4 large cabbage shredded
1 carrot shredded
1/4 red onion, finely diced
1/4 cup yogurt
1/4 cup milk
1 tsp vinegar
2 tsp sugar
salt to taste
pepper to taste


Method
Mix together the yogurt, milk, vinegar, sugar, salt and pepper. Using a whisk, mix it well so that all the ingredients are well blended. This is the dressing.
In a bowl, mix together the cabbage, carrot and onion. Add the amount of dressing that you want over the vegetables and toss well. Let the salad chill for at least an hour before serving. It is the perfect side with a sandwhich.


Tips
There should be enough dressing to coat the vegatables but not so much that it drowns the vegetables. If you want, you can add a little mayonnaise to the recipe as well, or if you want to go with the original, substitute the yogurt with mayonnaise.

Saturday, November 12, 2011

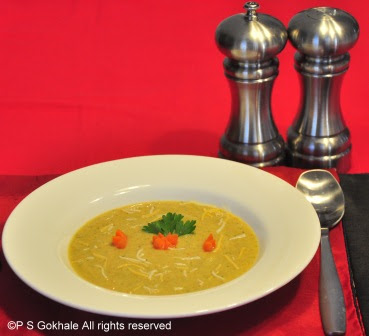
Broccoli Cheddar Soup

The temperatures have dropped, the skies are grey and the weather is cold. This is the perfect weather to have a warm bowl of soup for lunch or dinner. I enjoy soups, especially during winter. The lighter ones serve as great appetizers while the heartier ones are complete meals. Broccoli cheddar soup is a hearty soup. Add a dinner roll and you don’t need to prepare anything else. I hadn’t tasted broccoli cheddar soup for the longest time, as I was under the misconception that there was a lot of cheese in this soup. It was after a few years that I found out that the base of the soup is a white sauce and doesn't really have much cheese. You can add as much cheese as you want, so you can even make a low calorie version of the soup by adding less cheese.


Ingredients
1 tsp butter
1 tsp olive oil
1/2 red onion, diced
2 garlic pods, finely chopped
1 tbsp all purpose flour
1 broccoli, cut into florets
1 cup milk
1/2 carrot, grated
salt to taste
pepper to taste
cheddar cheese, to taste
water


Method
In a pan, boil water. Add broccoli florets to it and let them cook till they are bright green and tender, about 3-4 minutes. At this stage the broccoli will be partially cooked, and not mushy. Process 3/4 of the broccoli through the blender and process it coarsely. Keep a few small florets aside so you can eat them in the soup.


In a deep pot, heat the oil and butter together. To this add the onions and garlic and stir fry it, till it is cooked. It should get cooked through but not brown. Then add the flour to it and fry it. The flour should get cooked through and not smell raw. However, take care not to let it brown. Add a half cup of water, while stirring it continuously. The white sauce base is formed. Then add the broccoli puree as well as pieces. Next add the the shredded carrot. Add a cup of milk and bring the mixture to a boil. At this stage, if the soup is too thick, add additional water and boil. Now, add the cheddar cheese and let it melt through. Add salt and pepper to taste. Serve piping hot.


Tips
You can vary the proportions of broccoli and carrot. The more carrot you add, the oranger it gets. In case you add more water and it gets too dilute for your taste, you can dissolve a tsp of corn starch/flour in a little water (about a couple of tsps) and then add it to the soup to thicken it up. To make the soup richer you can also add some cream.

Saturday, November 5, 2011

Kesar Pedha/Peda

My last post was about "Mava/Khoya". So, it was natural to follow it up with the easiest and one of the most traditional Indian sweets - "Pedha".  Pedha is possibly the easiest Indian sweet that you can make if you have mava at home (whether home made or store bought). It is a great mithai to make for potlucks too, being very easy to scale up. Cooking time is around ten minutes or so and you can serve them as soon as the rolled out pedha cools down to room temperature.


There are many kinds of pedhas and the easiest one is kesar pedha or pedha with saffron. Of course, there are also the more complicated ones that take a lot of cooking time and are more effort intensive like the kandi pedha(Dharwadi pedha). Pedhas are a staple at any traditional Indian function.


Ingredients
2 cups mava
3/4 - 1 cup powdered sugar
1 tsp cardamom/elaichi powder
10-15 flakes of saffron
1 tsp milk
1 tsp ghee


Method
Grate or cruble the mava into small pieces and measure 2 cups.  Warm the milk a little and add the saffron strands to it, mix and keep aside. In a pan, add some ghee and the mava and cook on low heat. Stir so that it doesnt stick to the bottom of the pan. You will need to cook for about 7-10 minutes and you will start getting the aroma of mava being roasted. At this stage the color of the mava will start to turn a very light brown (almost beige). Then add the cardamom powder and the saffron milk and mix well. Let it all cook together, till the milk evaporates and then take it off the heat. When the mixture cools down where it is warm to touch, add the powdered sugar and mix thoroughly.


Then, apply a little ghee to your hands and take small amount of this mixture and roll it into a ball and flatten it to form a disc. The disc should be around an inch in diameter. Your pedha is ready. Let the warm pedhas cool down and serve at room temperature.


 These will last without refrigeration for a couple of days. For longer term storage, store in the fridge. You can store it in the fridge for two-three weeks.


Tips
I added on 3/4 cup of sugar when I made pedhas, but if you want it to be sweeter, add more to taste.
An extremely easy method to make pedhas is to reduce condensed milk and roll pedhas from it when the mixture solidifies. However, the major drawback of this method is that you are not at liberty to choose the amount of sugar that gets added to the pedha. Condensed milk tends to be very sweet and hence your pedhas will also turn out very sweet.
Upon creating the flattened pedha disc, you can add a slice of almond or pistachio on top of the pedha to decorate it.