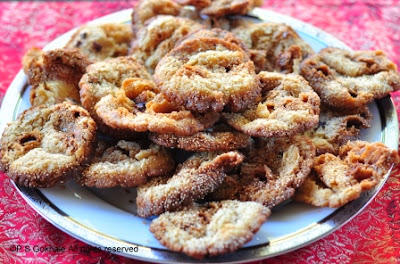
The "Plumeria" flower is called Champa/Chafa in Marathi. "Champakali" refers to the bud of this flower. As you may have guessed, the snack is supposed to be in the shape similar to the bud of the plumeria flower. It is a delicate snack and tricky to shape and fry, but looks very pretty and tastes similar to chirote or shankarpali covered with syrup. I have fond memories of making these with my Mom, for Diwali, as a child. The process of shaping a round dough disc into the bud of a flower was a lot of fun and it was a delight to see them being fried by Mom. This time around, I decided to make these with my daughter and I was transported back to those good old days from childhood. Both of us had a lot of fun making the Diwali snacks together and I hope that these memories stay with her forever.


Ingredients
1 cups all purpose flour/maida
2 tbsps oil
1/8 tsp salt
water, to knead the dough
1 cup sugar
1/4 cup water
oil to deep fry the champakali

Method
Mix together the flour, salt and oil. Adding a little water at a time and mix the ingredients together to make the dough. Knead the dough till it is supple but firm and stiff.
In a deep pan, mix the sugar and water and heat it till you get a thick syrup. The syrup should be at the 2 thread consistency. This means that if you take a drop of syrup between the tips of your forefinger and thumb and stretch it out, you will see two strands of syrup. Test the syrup once you start to see it thicken. The syrup should be warm when you add the fried champakali to it. So make it just before you start the process of frying the champakali
Take a small piece of dough and roll it into a ball about an inch in diameter. Flatten it into a disc and roll it out into a small circle about 2 inches in diameter. The disc should be thin, about 2-3 mm in thickness. Now, make parallel cuts in this disc. These cuts should not be from edge to edge, but should end about 3/4 to 1 cm before you reach the edge. Now, holding this disc with both hands between your forefinger and thumb, and twist the disc such that the parallel cuts remain parallel and the disc gets shaped into a "flower bud". Make sure to pinch the two ends of the disc together, so that it will not unravel when frying. See the photos which illustrate this. You can make all of these before you start frying.


Make sure that the oil is hot. Then, add the molded champakali and deep fry it till it is nice and a deep golden brown. Remove it onto a paper towel to remove the excess oil. Dip each champakali in the warm syrup, to coat it entirely with syrup and set it onto a plate. Shake off excess syrup, so that you will get a thin layer. As the syrup cools, it will form an outer layer on the champakali.
Store these in an airtight container after completely cooled. Refrigeration is not needed. It will last for 2-3 weeks.

Tips
If you are rolling the dough and it ends up sticking onto the rolling surface and you need to use oil or flour to stop it from sticking, then the dough is not stiff enough. Add a little more all purpose flour and mix well. Knead till the dough is supple. The dough tends to relax and may soften when you let rest, so you may have to add a little flour and knead it again before rolling it out.
You can add a couple of drops of food color to the syrup. This will make the champakali colorful. I dipped a batch in plain syrup which got a white coating and the rest of the batch was dipped into the syrup, after adding a couple of drops of pink food color to it. These turned pink upon cooling down.
1 cups all purpose flour/maida
2 tbsps oil
1/8 tsp salt
water, to knead the dough
1 cup sugar
1/4 cup water
oil to deep fry the champakali
Method
Mix together the flour, salt and oil. Adding a little water at a time and mix the ingredients together to make the dough. Knead the dough till it is supple but firm and stiff.
In a deep pan, mix the sugar and water and heat it till you get a thick syrup. The syrup should be at the 2 thread consistency. This means that if you take a drop of syrup between the tips of your forefinger and thumb and stretch it out, you will see two strands of syrup. Test the syrup once you start to see it thicken. The syrup should be warm when you add the fried champakali to it. So make it just before you start the process of frying the champakali
Take a small piece of dough and roll it into a ball about an inch in diameter. Flatten it into a disc and roll it out into a small circle about 2 inches in diameter. The disc should be thin, about 2-3 mm in thickness. Now, make parallel cuts in this disc. These cuts should not be from edge to edge, but should end about 3/4 to 1 cm before you reach the edge. Now, holding this disc with both hands between your forefinger and thumb, and twist the disc such that the parallel cuts remain parallel and the disc gets shaped into a "flower bud". Make sure to pinch the two ends of the disc together, so that it will not unravel when frying. See the photos which illustrate this. You can make all of these before you start frying.
Make sure that the oil is hot. Then, add the molded champakali and deep fry it till it is nice and a deep golden brown. Remove it onto a paper towel to remove the excess oil. Dip each champakali in the warm syrup, to coat it entirely with syrup and set it onto a plate. Shake off excess syrup, so that you will get a thin layer. As the syrup cools, it will form an outer layer on the champakali.
Store these in an airtight container after completely cooled. Refrigeration is not needed. It will last for 2-3 weeks.
Tips
If you are rolling the dough and it ends up sticking onto the rolling surface and you need to use oil or flour to stop it from sticking, then the dough is not stiff enough. Add a little more all purpose flour and mix well. Knead till the dough is supple. The dough tends to relax and may soften when you let rest, so you may have to add a little flour and knead it again before rolling it out.
You can add a couple of drops of food color to the syrup. This will make the champakali colorful. I dipped a batch in plain syrup which got a white coating and the rest of the batch was dipped into the syrup, after adding a couple of drops of pink food color to it. These turned pink upon cooling down.