Welcome to my blog

I hope you will find the recipe you are looking for your occasion here.

Now video instructions are available for select recipes and can be accessed at

Gardening and Cooking Made Easy

The latest 5 recipes are displayed on the
main page. For more recipes, you can browse the archive, click on the labels in the index to the left or use the Custom search below to look for a specific recipe.


Search for more results

Custom Search

Tuesday, August 28, 2012

Three weekends and Three Great Menus

I have spent the last three weekends in a cooking frenzy. We were entertaining friends and had them over for lunch or dinner over the three weekends. And I wanted to make it a special occasion each time. So, I put in a lot of thought in creating the menu for each meal. In total I made three exotic meals. Each meal had mainly Indian dishes though most of the desserts were quintessentially American.  I didn’t make any appetizers because the main course consisted of several dishes. Each meal had two vegetable preparations, dal or yogurt based curry to be eaten with rice, a rice preparation, salad and Indian bread.  Homemade yogurt was an additional side.

As a result of these wonderful weekends, I now have a lot of food photos and will be posting all the recipes in the upcoming weeks. (I am yet to move the older photos, back to my laptop from the back up hard disk. So the addition of these new photos comes at the most opportune time. I can procrastinate that task for a few more weeks).


It took a few days for me to come up with each menu, after a lot of careful thinking and some discussion with family and friends about what combinations of food would work the best. So, the final menus were as follows.


Menu#1

Main Course
  • Shahi Paneer - A preparation of paneer (Indian cottage cheese) in a rich cashew nut and saffron based sauce)
  • Aloo  Gobhi – A curried preparation of potatoes and cauliflower florets, with ginger and cumin flavorings
  • Vegetable Dum Biryani – An exotic rice preparation which has alternate vegetable and rice layers, with exotic flavors and dressed with fried onion, cashew nuts and saffron.
  • Boondi Raita –A yogurt based dip which has boondi (a fried snack made from chickpea flour)
  • Lachchedar Paratha – Layered bread made from wheat flour
  • Home made yogurt
  • Sliced salad – A mix of cucumber, onions, green onion, tomato, and radish slices. Served with lemons and green chillies
Dessert
Peach, nectarine, plum and raspberry cobbler with vanilla icecream and fresh fruit

Menu#2

Main Course
  • Matar Gravy – Peas prepared in a rich and exotic gravy of onions and coconut.
  • Baingan Bharta – Roasted eggplant in Indian spices
  • Dal Fry – Lentil soup with tempered seasoning of garlic and chillies
  • Jeera rice – Cumin flavored rice
  • Puris – Fried Indian bread made with wheat flour
  • Aam Ras – Mango pulp
  • Salty Lassi/Taak/Mattha – Salted, spicy yogurt drink
  • Homemade yogurt
  • Sliced salad – A mix of cucumber, onions, green onion, tomato, and radish slices. Served with lemons and green chillies
Dessert
  • Gulab Jamun – Deep fried, milk based (mava) balls  soaked in sugar syrup
Menu#3
  • Chole – A spicy chickpea/garbanzo beans preparation
  • Kadhai Paneer - A preparation of paneer (Indian cottage cheese) in a tomato based spicy gravy with green bell pepper and onions
  • Pakode Wali Kadhi – A yogurt based preparation made with besan/chickpea flour, with onion fritters added to it
  • Jeera rice - Cumin flavored rice
  • Naan
  • Homemade yogurt
  • Sliced salad – A mix of cucumber, onions, green onion, tomato, and radish slices. Served with lemons and green chillies
Dessert
  • Mango Cheesecake
  • Mixed Berry Ice cream

So if you are in a fix and need a menu to impress your guests with an exotic Indian meal, just choose one of these menus above, and I can guarantee that your guests will thoroughly enjoy the meal.

I will be posting the recipes for each menu in the following blogposts. I will try and go in sequence, however, if you want me to post any one of these recipes earlier than the other, please let me know in the comments section or on the Facebook page (http://www.facebook.com/pages/Recipes-for-all-Occasions/146379555394858).

Tuesday, August 21, 2012

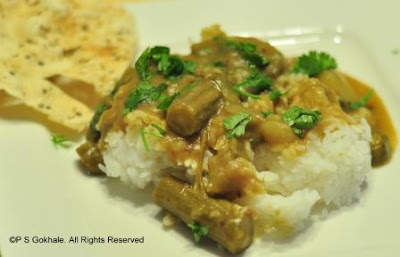
Sindhi Kadhi - A Delicious Stew

This is a recipe that my aunt gave me recently and asked me to try it out. It is called Sindhi Kadhi. It is a delicious stew or curry prepared with chickpea flour (besan) and vegetables. However, it does not conform to my traditional view of what “kadhi” should be. All the different versions of kadhi that I have made or eaten so far have always had yogurt and besan/chickpea flour as the main ingredients. The main difference in all these versions was the seasoning that I used, however the main ingredients always stayed the same i.e. yogurt and besan. I had never made or tasted Sindhi Kadhi prior to this attempt, and I am glad I finally did. It has definitely changed my perception of what kadhi can be. This particular version of the kadhi does make use of the besan flour, however it differs in the fact that, instead of using yogurt, tamarind water is used to give it a sour taste. Also, this recipe has a lot of vegetables. And while I made it with the vegetables that my aunt listed, I am sure you can change the combination of the vegetables based on what is available. The end result is a hearty, healthy and delicious stew. We enjoyed the preparation and I will definitely be making it again.


Ingredients
1 tbsp oil
1/8 tsp jeera/cumin seeds
pinch of asafoetida
1/8 tsp turmeric powder
1 cup okra/bhindi/ladies fingers ( diced)
3 tsps besan/chickpea flour
1 cup potatoes (1 large or 2 small potatoes), diced into big pieces
1 cup banana squash/red pumpkin/laal kaddu/ laal bhopla,
1 cup cluster beans /gavar /gowar, diced
1 drumstick, cut into 1-2 inch pieces
chilli powder to taste
5-6 curry leaves
1 tsp tamarind paste or 1 inch ball of tamarind
salt to taste


Method
If using tamarind paste, dissolve it in about 2 cups of water and keep aside. If using regular tamarind,  soak it in warm water and then remove the pulp and dissolve it in 2 cups of water and keep aside.


Heat the oil. To this add the cumin seeds. Once they being to crackle, add the hing/asafoetida, and the okra pieces. Stir fry the okra till well cooked and a little browned. Then add the besan flour and cook the besan flour till you get the fragrant roasted smell for the besan. Then add the cluster beans, drumstick pieces, potato and pumpkin. Stir it and add the turmeric powder and chilli powder and cook it all for a minute.  Then add the tamarind water, stirring continuously while adding the water, so that no lumps formed. Add the curry leaves. Add more water if needed. All the vegetables should be covered with the water. Then cook till the curry till it starts to boil and thicken. Add the salt. Taste and add a little more of tamarind paste if you want a more sour taste. Check to see if the vegetables are cooked. The curry shouldn’t be too watery or too thick. Garnish with cilantro leaves. Serve hot with white rice.


Tips
Steam cook or pressure cook (1 whistle) the guvar/cluster beans and the drumsticks so that they are semi cooked and softened.  This will reduce the overall cooking time. Do not precook the potato and pumpkin, since they do not need a long cooking time and will get cooked through as the curry boils. If precooked, they will turn to mush. Fry the besan and the okra well. The okra needs to be crispy and the besan needs to be a brown color which will impart a brown color to the curry.
If you decide to change the vegetables, use hearty vegetables which will not become mushy when the kadhi is being boiled. You can also add in some tomatoes in this recipe. They should be added along with the potato and other vegetables. 

Tuesday, August 7, 2012

Fennel Pasta

I formatted my laptop recently and along with that deleted all the photos that had been stored on the machine over the past few years. These included ALL the photos that we had taken over the last few years. I panicked and called up my husband to report the terrible news to him.  That was when he gave me the good news that he had backed up the photos two days before and we hadn't lost all our photos. Whoosh! That was a terrible 10 minutes, while I tried to figure out how to retrieve the photos or what I could do. I am so glad that he had backed up the photos by chance and it is definitely a lesson in backing up data more frequently.
Well, so I still haven't gotten to moving the photos back to the laptop, but I did take pictures of some dishes I made recently, so I have something to tide me over for a while. This is a fabulous dish. It has a wonderful aroma and a very mild and pleasant taste.


I hadn't cooked with fennel before, well not the plant itself, just the seeds  I had a great time exploring this new vegetable. The fragrance took me back to the old days when we used to plant fennel in our backyard and wait for the plant to bear the tender seeds. Those seeds used to taste so sweet and delicious, we used to enjoy it. However, we never thought of using the actual plant to cook any dish. This was a pasta dish that was introduced to me by my sister-in-law made when I visited them this summer. It is a perfect pasta dish for summer! I absolutely loved it and she graciously shared her recipe with me. So here it is.


Ingredients
1 fennel bulb and its leaves (discard the stalks. See details in method below)
3 cloves of garlic, finely chopped
1 tsp fennel seeds
1 tbsp extra virgin olive oil
1 lemon, zest and juice (optional)
1/2 packet of linguini pasta (about 16 ounces)
water to cook the pasta
salt
pepper
parmesan cheese


Method
In a pan deep enough to hold the linguini, take enough water to submerge the pasta. Add salt to the water, sufficient enough to make the water salty and then cook the pasta per directions on the package.


Cut the leaves off the stalks of the fennel and chop them finely. Do not use any stalks. Next, cut the large stalks off the fennel bulb and discard them. Then, divide the bulb into two and then remove the core of the bulb. Then slice the bulb into thin slices.


In a large pan (sufficient to hold the pasta), heat the oil and then add the fennel slices to the oil. Cook the fennel for about 10 -15 minutes till the fennel slices are cooked through and become soft. Cook on medium heat, so that they don't burn. The fennel slices are tough and will take some time to get cooked through. Next add the garlic and the fennel seeds to the pan and cook for a couple of minutes, till the garlic is cooked through. Then season a little with salt and pepper. Then add the cooked pasta to the pan and mix it all together. Next, add the chopped fennel to the pasta and lemon zest. Mix well. Add a little lemon juice and mix well. Cook for a minute or two till all the ingredients are well blended. Sprinkle parmesan cheese over it and serve hot.

Tips
You can cook the pasta till it is al dente if you wish or cook it for a few more minutes till it is softer. I prefer the pasta being at a softer texture. Al dente is when the pasta is cooked through, but it still has a bite to it. The fennel core is pretty obvious and can be seen as a triangle at the base of the bulb when you cut the base into two parts vertically. If you are confused, it will be the tougher, central part of the bulb which is difficult to cut through.
When you zest a lemon, remember to stop grating the lemon rind when you reach the white part of the lemon skin called the pith. This is the bitter part. The zest is just the yellow part of the rind.

Friday, July 20, 2012

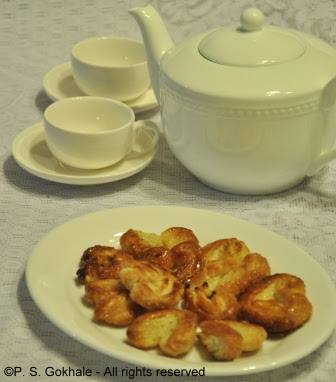
Palmiers or Elephant Ears (Puff Pastry Cookies)

When  I was a growing up, as a treat, my Mom used to get me a packet of these special heart shaped cookies. I think they were called Little Hearts. Last year I happened to spot a packet of heart shaped cookies in the local store. They had a a lovely glaze, and they reminded me of those childhood cookies, though they were much larger in size. So, I decided to try them out and bought a packet. I am so glad that I did because these turned out to be almost the same. Of course, I never saw them in the store again and I also hadn't written down the name of the cookie that I could search for it. Then, a few months later, I caught a cooking show online and saw that it was called Palmiers or Elephant ears and was rather easy to make. I furiously noted down the recipe. I finally made it a couple of weeks ago. I remembered that I had a packet of frozen puff pastry sheets in the freezer and needed to use them up. I didn't have a lot of time and wanted to make something easy, and as I was browsing through my recipe book, I came across the palmiers recipe. It took less than an hour including the baking time to cook these wonderfully delicious cookies and all of us enjoyed it thoroughly with some coffee.


Ingredients
1 cup sugar
1/8 tsp salt
1 sheet puff pastry, defrosted per package instructions


Method
Preheat the oven to 400 F. Line a cooking sheet with parchment paper.

Mix the sugar and salt well. Spread out half a cup of the sugar and salt mix, onto the surface on which you will roll out the pastry sheet. Spread it out into an even layer of about 13 by 13 inch square. Then spread the pastry sheet on this layer of sugar. Then spread the remaining half cup of sugar and salt mixture onto the top of the pastry sheet so that the pastry is between two layers of the sugar and salt mix.

Now roll the pastry sheet out so that it is approximately 13 by 13 inches in size. This will embed the sugar onto the top and the bottom side of the pastry sheet. Now, fold the sides square of the square towards the center so that they meet exactly midway. Repeat this step and again fold the sides of the folds created in the first step towards the center, so they meet midway. Then fold one half over the other half. Finally, it will look like there are 6 layers of the pastry sheet on top of each other formed into a roll.

Then cut the dough roll into thin pieces about half a centimeter in width. Place the slices cut side up onto the cookie sheet. Bake this in the oven for 7 - 10  minutes on one side till caramelized. Then flip the cookies over and bake the cookies on the other side for 4-5 more minutes till cookies are caramelized on the other side as well. As these cookies bake, the folds will open and puff up and the cookies will get the heart shape. Cool these on a cooling/baking rack.


Tips
There will be some sugar left after you roll out the pastry dough, you can sprinkle this on top of the cookies before baking for additional sweetness. You can also mix in cinnamon into the sugar, salt mixture for a different flavor. Store these after they are completely cool in an airtight container. The crisp cookies last for a couple weeks and do not have to be refrigerated.

Tuesday, July 17, 2012

Pineapple Cake with Whipped Cream icing

I enjoy baking and icing cakes. I have been trying out a variety of  cakes off late. One of my friends suggested that the next time I bake a cake, I should make a pineapple cake. Well, it was her birthday recently and I got an opportunity to try it out. I decided to make it for her. I was able to work the pineapple into the cake batter and infuse a good amount of pineapple flavor into the cake, by adding chopped pieces into the layers of the cake. I was very happy with the result. I iced it with a lightly sweetened whipped cream icing. Absolutely delicious!


Ingredients
Cake
1and 1/4 cups, plus 2 tbsp of all purpose flour (maida)
1 tsp baking powder
1/8 tsp salt
1/2 cup butter - room temperature
1 cup sugar
2 eggs
1 tsp vanilla essence
1/2 cup pineapple juice (unsweetened)
1/4 cup pineapple pieces, canned and chopped finely

Icing
2 cups  heavy whipping cream
4 tsps powdered sugar
1/2 tsp vanilla essence

Filling
1/4 cup pineapple pieces, canned and chopped finely
whipped cream icing (see above)


Method
Pineapple Cake
Grease a baking dish with some butter and dust with some all purpose flour. Preheat the oven to 350F.

Sieve all the dry ingredients together and keep aside. Sieve these ingredients a couple of times. In another bowl, whisk together the butter and sugar. Beat it till the butter is fluffy. Add one egg at a time to this and beat each egg into the mixture till it is nice and fluffy. Add the vanilla essence. Add one third of the dry ingredients to the batter and fold it in. Then add half of the pineapple juice and mix. Alternate between the pineapple juice and the dry ingredients till they are all incorporated into the batter. Then add the pineapple pieces to the batter and fold it in carefully. Do not over mix and deflate the batter.

Bake the cake at 350 F for about 30 minutes. Use a knife and insert it into the center of the cake. If it comes out clean then the cake is ready. If not, bake for a few more minutes.
Take if out and let the pan cool on a wire rack for 10-15 mins. Then invert the pan onto the cooling rack and slide the cake out. Let the cake cool if you wish to ice it.


Icing
In a mixing bowl, mix the heavy cream, essence and sugar and using a hand mixer or whisk, whisk it till the cream has thickened and when you lift the whisk, the cream stays in peaks.


Assembly
Slice the cake into two pieces horizontally. Ice the lower layer with a layer of whipped cream. Next spread out an even layer of the pineapple pieces on top of the whipped cream layer. Then place the next cake layer of the cake on top. The whipped cream and pineapple pieces are sandwhiched between the two cake layers. Then cover the cake with the whipped cream icing. Decorate with maraschino cherries and pineapple pieces.


Tips 
Raw pieces of pineapple are quite tough and hence use canned pineapple in this recipe.
While making the batter, ff the eggs are separated and the whites beaten separately before being added to the batter, the cake will be lighter. You can add the yolks right after the butter and sugar. But fold in the egg whites after all the dry ingredients are incorporated into the batter.
Wrap the cake in foil and then some plastic wrap before you freeze it. The cake will stay in the freezer from a couple of weeks to a month. The cake should be completely cooled down before icing it. If need be, refrigerate the cake or freeze it for an hour before you ice it.

Thursday, July 12, 2012

Bisibele Bhath - A Rice Delicacy from Karnataka with a twist

Bisibele bhath is a speciality from Karnataka. It is a rice and dal preparation which is akin to "khichadi" another dal and rice preparation. My mom used to make this recipe when I was a child and I remember not really liking it because it had so many vegetables. She used to serve it with a lot of ghee (clarified butter) though, which used to make it finger licking delicious. Now that I am older and wiser, I understand the beauty of this dish. First, it is a one pot meal. Second, it has all the nutritional components, it has proteins from the lentils/dal, carbohydrates from rice and you can add many vegetables to it which take care of the vitamins and fiber aspect. And best of all, it is all cooked together with yummy spices in one single pressure cooker. It is a perfect dish for that very busy weekday and you can have the satisfaction of serving something healthy and good.


I make it in the fastest way possible and that is what this recipe is about. I use store bought spices. MTR brand's Bisibele Bhath masala is easily available in the Indian store and I generally have a packet of this at home. Next, I cut vegetables that I have on hand if I have time, or I open a pack of frozen mixed vegetables ( generally contains green beans, carrots, peas and corn) and use that. That makes it easy to cook and absolutely delicious too. The twist in this recipe is that I experimented with a new grain instead of rice this time. I replaced the rice entirely with quinoa and make the dish using the exact same method and I must say the result was amazing. If it had been a blind tasting, I couldn't have differentiated between the one made with rice and one made with quinoa. I am thrilled that I have been able to make this dish even healthier. The recipe and method stay exactly the same irrespective of whether you use rice or quinoa. So here goes.


Ingredients
1 tbsp ghee or oil
1/8 tsp mustard seeds
1/8 tsp cumin seeds
a pinch of asafoetida/hing
7-8 curry leaves
1-2 green or red chillies, to taste
1 onion, diced into small pieces
1 tomato, diced into small pieces
2 cups of frozen vegetables mix (washed) or you can cut fresh vegetables like potato, carrots, green bell pepper, green beans etc. into bite sized pieces
1 cup tur dal/pigeon peas
1 cup rice or quinoa
4-5  tsp bisibele bhath masala
1 tsp tamarind pulp (you can use store bought pulp or make fresh paste)
salt to taste
6 cups water


Method
Mix the dal and rice/quinoa and rinse the mixture 2-3 times with water and set aside.
In a pressure cooker, heat the oil and add the mustard and cumin seeds. Once they start to crackle, add the hing and curry leaves and chillies. Next add the onions and let them cook. Once they start to turn a little brown, add the tomatoes and let this cook till the tomatoes are cooked through. Then add the diced vegetables mix and stir. Let the vegetables fry for a minute and then add the dal and rice/quinoa mixture and mix all the ingredients well. Then add the bisibele bhath masala to this and again mix well so that all the vegetables and grains are coated with the masala. Then add the water, the tamarind paste and salt. Stir once and then close the lid on the pressure cooker and cook it based on how much time it takes to cook tur dal in your cooker. It takes about 3-4 whistles in my cooker. Serve this hot with ghee/clarified butter, accompanied with some raita and chips or papad.


Tips
Bisibele bhath when hot is runny and very soft. It thickens as it cools down.
Quinoa is rather small, so when you rinse it, it is difficult to drain the water using your fingers or a colander. So I use a tea strainer to catch the quinoa and drain the water.
To make tamarind paste from tamarind, soak a lime sized ball of tamarind in a little warm water (just enough to cover it). You can even microwave it for 20-30 seconds. Then squeeze out the pulp and use the tamarind. Cut the green chillies lengthwise, so they will be easy to spot and you can remove it later. I generally taste a little bit of the water to determine if I need to add more salt or spices when I make such rice dishes.