Welcome to my blog

I hope you will find the recipe you are looking for your occasion here.

Now video instructions are available for select recipes and can be accessed at

Gardening and Cooking Made Easy

The latest 5 recipes are displayed on the
main page. For more recipes, you can browse the archive, click on the labels in the index to the left or use the Custom search below to look for a specific recipe.


Search for more results

Custom Search

Tuesday, September 27, 2011

Beetroot Raita/Koshimbir (Dip)

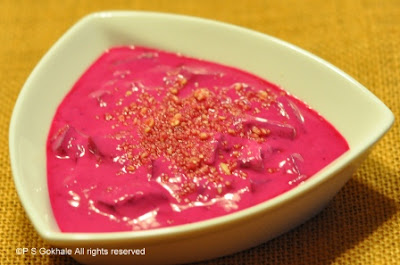
This is a very easy side dish and a wonderful use of beetroot. The ingredients are simple but very nutritious and the taste absolutely delicious. Maharashtrians make many "koshimbirs/raitas" or dips. All of these are side salads which include include chopped vegetables and are generally dressed with yogurt sauce or even some tempered oil. Groundnut features as a prominent ingredient in many of these sides. Beetroot is a beautiful vegetable. It is rich in iron and has a bright red color. It is used as an ingredient in many natural dyes as well. And when it is mixed with yogurt, the dish gets a beautiful pink color and is as appealing to the eye as to the stomach.


Ingredients
1 beetroot
2 tsp groundnut/peanut powder  (take peanuts and grind them to a coarse powder)
salt to taste
chilli powder  to taste (optional)
1/2 tsp sugar
1 cup yogurt
water, as needed

For the tempering (optional)
1 tbsp oil
a pinch of mustard seeds
a pinch of cumin seeds
pinch of asafoetida powder/hing
1 green chilli, slit through the center (optional)


Method
Cook the beetroot. I usually pressure cook it in my cooker and then peel it.  If you don't have a pressure cooker, you can also steam cook it till it is softened. The beetroot should be cooked through but not mushy, so take care not to over cook it. Let it cool, then peel it and cut it into bite sized pieces. Then mix in the groundnut powder, yogurt, sugar and salt. Mix well. If the yogurt is thick, then add a  little water to thin it out a bit. It should be sauce like in consistency. At this stage you can add some chilli powder if you want and can serve it without the tempering. The tempering adds a little spice to it. So, if you wish to add tempered oil, then heat the oil and add the cumin and mustard seeds. Once you hear them crackle, add the asafoetida powder and the green chilli and turn off the heat. Let the chilli cook in the remnant heat and then pour this over the beetroot and yogurt mixture. Mix well. Serve as a side.

Tips
It is much easier to peel a cooked beetroot.  You can easily convert this to a dip by grating the beetroot instead of using diced pieces. You can also use ghee for the tempering instead of oil. To make the peanut powder, take about a cup of shelled peanuts and then pulse it in your blender, till you get a coarse powder. Stop at the stage while it is still in a powder form. If you process it more, you will end up with peanut butter. 

Thursday, September 15, 2011

Eggplant Salad in Yogurt- "Bharit in Dahi"

This is an absolutely delicious dish. While my mom made the 'baba ghanoush' style eggplant salad quite often, the version with yogurt was a rare occurence. I really liked it but I must not have mentioned it because she was under the impression that I didn't really care for it, for the longest time. So, this recipe is definitely a reminder to appreciate good food when I eat it. All of us make dishes we perceive are well received by our family and friends. So, next time you eat something that you really appreciate, let the cook know. That is the best way to make sure that you get to eat what you like more frequently.


Ingredients
1 large eggplant
1 red onion, finely diced (about a cup)
cilantro, finely chopped (about 1/2 a cup)
1 tsp corriander powder
1/2 tsp sugar
salt to taste
1 tbsp oil
1/8 tsp mustard seeds
1/8 tsp jeera/cumin seeds
3 cloves of garlic, finely chopped
1-2 green chillies, slit (to taste)
1/8 tsp turmeric
1 cup yogurt


Method
Roast the eggplant till the skin is charred. Then peel the skin off the eggplant. Finely dice the roasted eggplant. To this add the onions, cilantro and corriander powder and mix well. In a small pan, heat the oil. To this add the cumin and mustard seeds. Once they crackle, add the garlic and cook for a minute. Do not let it burn. Then add the green chillies and turmeric. Pour this over the eggplant and mix well. When the eggplant reaches room temperature, add yogurt and mix well. Then add the sugar and salt. Enjoy at room temperature or cold.


Tips
If you have run out of garlic, use a pinch of asafoetida/hing instead. If you use both the ingredients together, the two ingredients tend to cancel out each others fragrance.  If you do not like to eat garlic, then you can just add garlic cloves to the oil, let them cook through and then remove them at the stage when they start browning. The oil will have a nice garlic flavor. If you do not have a "gas" lit stove and use a coil stove, then broil the eggplant. It is much faster than baking and you can get a nice charred outside.

Serve is as a side salad with your meal. It can also be eaten with chapati/roti or use as a dip to eat with pita chips.

Sunday, September 11, 2011

Daal Baati (Dal Bati) - Recipe for the dal

For information related to Dal Baati and the recipe to make Baati, see my previous post. The dal for the dal baati recipe is unique because it is made using urad dal. While I know that urad dal is a key component of idli and dosa batters, I haven't really seen it used as a main ingredient in too many dal recipe. The freshly baked, ghee dipped baati, is broken down into small pieces in a bowl and then piping hot dal is poured over it. The result is absolutely lip smacking. If you make this dish often, it is best to cut back on the amount of ghee that is used after the baking process to prevent those calories from adding up. But it is absolutely okay to indulge once in a while!


Ingredients
1 cup urad dal
4 tbsp split mung (yellow mung) dal
3 tbsp chana dal (yellow split pea)
3 cups water
a pinch of asafoetida powder
2 tbsp ghee or oil
1/8 tsp cumin (jeera) seeds
2 black cardamom (badi elaichi)
2 bay leaves (tej patta)
1 inch cinnamon
2 cloves garlic, crushed or finely minced
1 inch ginger, finely grated or ground
1/2 cup red onion diced
2 tomatoes diced
1-2 green chillies
red chilli powder to taste
salt to taste
1 tsp dhania (corriander) powder
1 tsp garam masala (optional)
1/8 tsp turmeric
additional water to thin out the dal
cilantro/corriander leaves, chopped for garnishing


Method
Mix the three dals together and add water to it. Add asafoetida and cook. See tips on alternatives of cooking dals. The dal mixture should be cooked through and soft. In a large, deep pan, heat the oil or ghee. To this add jeera, black cardamom, cinnamon and bay leaves. Cook these till you can smell the spices. Take care to prevent them from burning. Then add the green chilli, onion, ginger and garlic. Cook these till you do not get the raw garlic smell. The onion should be at the slightly browning phase. Then add the tomato and cook till the tomatoes are cooked through. Then add the turmeric, dhania powder and garam masala. If you want the dal to be spicy, you can add red chilli powder at this stage. Cook the spices for a couple of minutes and then add the cooked dal mixture. Add some water to thin it out a bit. The consistency should not be too watery. It should be like a thick soup. Turn off the heat when the dal boils. Garnish with chopped cilantro/corriander leaves.


Tips
The fastest method to cook dals is using a pressure cooker.  If using a stove top cooker, cook it for 5 or 6 whistles and if using the Instant Pot, 12 mins on manual mode, at high pressure. Let the pressure release naturally. However, if you do not have a pressure cooker, pre-soak the dal in warm water for a couple of hours. Then add water to the soaked dal and cook till soft. If spices being friend initially burn, it is best to start again with fresh oil. Burnt spices add a bitter taste and can potentially alter the taste of the entire dish. The list of ingredients may look daunting, but most of these should be easily available in your Indian grocery store.

Wednesday, August 31, 2011

Baati - Baked Whole Wheat Dumplings

The first time I ate authentic dal baati was in Indore, about eleven years ago. I was visiting family and there were two occasions when I was able to savor this delicacy. The baatis were authentically cooked in an earthen stove. Then, they were dunked in ghee and served with hot delicious dal. I can never forget that experience. The taste of the baatis being roasted and baked in an authentic kiln can just not be replicated in a modern kitchen. After I got married, I was pleasantly surprised to find that my husband liked this dish and even knew how to make it. Eventually, we started making it quite often. While one can't get the rustic taste, only possible using an earthern stove, the ones baked in the oven are also equally delicious. This is supposed to be a delicacy, however, I make this so often, that I am not sure I can realy classify it as a delicacy in our house anymore! I must mention that once you make this, you will realise it is much easier than toiling for hours on an elaborate menu. However, your guests will be very impressed with this dish. It is so easy that you may get hooked and make this a regular feature on your menu as well.


Ingredients
2 cups whole wheat flour
1/4 cup besan/chickpea flour
1 cup yogurt
1/2 tsp salt
2 tbsp ghee
1/4 tsp baking soda
water to knead


Method
Mix together all the dry ingredients. Then create a well in the center of the flour mixture. Into this add the ghee and yogurt. Then mix this. If the yogurt is watery, then you may not need to add any additional water to knead it all together into a soft dough. It shouldn't be too loose, nor too dry and hard. Knead the dough well and let it rest for 15-30 mins. Cover the dough with a damp cloth so it doesn't dry out.


Preheat the oven to 350F. Then roll out the dough into small balls about 1-1.5 inches in diameter. Place these on a baking sheet with enough space between them to allow for expansion. Bake in the oven for about 20-40 mins, till well browned. The baati will expand and break open and develop cracks as it cooks. The end result shouldn't be hard. When warm, pour a little ghee so that it gets absorbed through the cracks in the baati. Serve with hot dal and additional ghee.


Tips
Instead of adding ghee to the flour, you can add the milk solids that are left behind when you make ghee at home. This is a wonderful use of these solids, especially if you have used salted butter. If the milk solids are salted, then reduce the amount of additional salt that you add to the flour. Traditionally the baatis are soaked in ghee before being crushed and then hot dal is ladled onto this and is eaten hot.
To simulate an eathern kiln, use a pizza stone. Preheat it and then place the baatis onto this to be baked. 

Friday, August 19, 2011

Mushroom Soup

When I was younger, I didn't like mushrooms. Then sometime during my teens, I tasted them on top of a pizza and started liking them. Then, I tried the mushroom soup that my Mom made and I loved it. I still remember the last time I ate the one made by Mom. It was nine years ago and I still associate it with warmth, love and comfort.  So, this is a recipe I turn to during the cold months or when I want something that will fill my tummy and soul with warmth. Mushrooms are high in proteins, so it is a very nutritious soup as well. I usually make a leaner version by skipping the cream, but addition of cream towards the end of the cooking process is a must for special occasions.


Ingredients
15-20 button mushrooms, sliced
1 tbsp butter or olive oil
1/2 onion, diced
2 garlic cloves, chopped
salt to taste
some cream or milk to finish off the soup, to taste
1-2 cups of water


Method
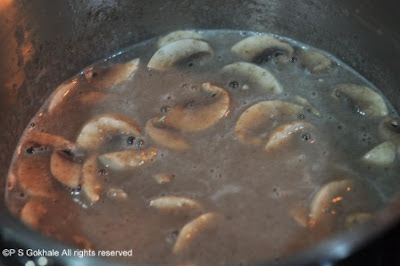
Heat butter or olive oil in a pan. Add the garlic and onion to it and sautee. Cook the onion till it is transluscent. Keep aside some mushroom slices and add the rest to the pan and cook till the mushrooms are softened. Then, puree this, adding water as needed. The soup should not be too watery. Then add the milk or cream to the pureed soup and heat. Add, the remaining mushroom slices. Add salt and stir. Turn off  the heat once it starts simmering and the mushroom pieces become tender. Serve hot. Pair it with a slice of bread for a complete and quick meal.


Tips
I have always heard everyone say that you should not wash mushrooms, but just wipe them off with a damp towel. However, I wash the mushrooms and immediately wipe them before cutting. I have not noticed any issues with doing that. If the stem of the mushroom feels too stocky, just use the cap.

Thursday, August 18, 2011

Curried Plantains/ Kelyachi Bhaji

Plantains  are relatively a new addition to my grocery list. Plantains are raw bananas and are green in color. At this stage they are starchy and not at all sweet. You cannot eat plantains raw, they need to be cooked. The taste and texture of the plantain is similar to potatoes. Also, the raw banana skin is very tightly wound around the fruit, is very fibrous and difficult to peel off. Till about a year ago, the only form of plantain that I had tasted was plantain chips. So, one day I picked up some plantain on my grocery run and decided to experiment with it. It turned out really good and my family loved it. The first time I made it, it was a little difficult to peel off the banana but the next time around I tried out a trick and the peel just came off. If that has piqued your curiosity, go ahead and read the recipe for details.


Ingredients
1 tbsp oil
1/8 tsp cumin
1/8 tsp mustard seeds
2 plantains, diced
1 tomato, diced
1/8 tsp turmeric
1 tsp corriander-cumin/dhana jeera powder
red chilli powder to taste
salt to taste


Method
See tips on how to peel the banana. Dice the bananas into small pieces. Heat the oil in a pan and add the mustard and cumin seeds. Once the mustard starts to crackle, add the tomatoes. Cook these till soft and then add the turmeric and the coriander-cumin powder. Then add the diced banana pieces and mix well. Add red chilli powder and stir well. If needed sprinkle a little water and then cover and let it cook. When cooked, add salt and mix. Serve hot as a side dish or with some hot chapatis.


Tips
There are two ways to peel the banana. One method is to use a peeler and a knife, then remove the outer green skin and keep peeling till you reach the banana. The banana is like potato and will tend to oxidize, so put the diced raw pieces  into a bowl of water. This is a laborious method and time consuming. The alternate quick method is to cook the raw banana like a potato. You can boil it in water for a few minutes, till the skin softens. Or you can also pressure cook it. Cook it for around the same time that you would a potato in the pressure cooker.  The banana will be cooked and the skin can easily be removed. If you use this method, it will take lesser time to complete the recipe as the banana is already cooked. You will not need to add any water during the preparation.