Welcome to my blog

I hope you will find the recipe you are looking for your occasion here.

Now video instructions are available for select recipes and can be accessed at

Gardening and Cooking Made Easy

The latest 5 recipes are displayed on the
main page. For more recipes, you can browse the archive, click on the labels in the index to the left or use the Custom search below to look for a specific recipe.


Search for more results

Custom Search

Sunday, March 18, 2012

Batura - Delicious Fried Bread

Batura (Bature when plural), while it looks like puri, is a little different. Batura is made from all purpose flour while the puri is made from whole wheat flour. Another difference is that yogurt is added to knead the batura dough, while the puri dough is kneaded using water. The main difference is that I have always eaten bature with chole and never with any other vegetable or curry preparation, while I have eaten puri with all types of curries and dals. This has led me to conclude that the batura must only be made when served with chole. If  anyone knows of any other combinations that you can serve baturas with, I would really like to know. This combination also finds its own place in restaurant menus and is listed as "chole bature". The restaurant version of the fried bread is generally very large, as big as the plate it is being served in (sometimes bigger) and beautifully fluffed up like a balloon. At home, you are limited by the size of the the pan that you are frying it in as well as the size of the surface that you roll it out on, and sometimes it may just puff up partially. But the best part is that, when you make it at home, you can eat as many servings as you want.
This is the first time I tried it out and I am very glad that I did, because I realized that it is very easy to make and we enjoyed the dish to our hearts' content.

INTRODUCING - Videos. If you are a regular reader of the blog, you would have noticed that it has evolved over the last two years. I am adding more photos and trying to visually present the method to make the recipes clearer. With that aim in mind, I am going to create videos for recipes (as time permits) where a visual demonstration will help explain the method of preparation. Your feedback is appreciated.


Ingredients
2 cups all purpose flour/maida
1 tsp salt
1 tbsp oil
1/2 tsp sugar
1/2 tsp baking powder
2 tbsp semolina/rava/sooji
1/2 cup of yogurt
1/2 - 1 cup water, a needed to knead the dough
oil to fry the batura (should be at least 1.5 - 2 inches deep)


Method
In a bowl, mix together the all purpose flour, salt, sugar, baking powder and rava. Then add the oil and yogurt and mix together. Add additional water as needed to knead the dough. The resultant dough should not be too soft or loose. So just add enough water that all the dough comes together and can be kneaded without it cracking. At this stage, you need to let the dough rest for a couple of hours or more. If you want, you can even rest it overnight. The dough will ferment. If it has been kept aside for a couple of hours, the rise may not be noticeable, but if kept for a longer duration, you will notice the rise. Addition of the yogurt adds the bacteria from the yogurt culture which enable the fermentation.


Once the dough has rested for a while, you are ready to roll it out into round discs and then fry it. Heat the oil. The oil must be hot when you add the rolled batura to it, else it will not puff up and also, will not become crispy.  Take a fistfull of dough and roll it into a ball (about 1.5 inches in diameter). Then flatten it into a disc and roll it out. The rolled out batura should be aboue 4-5 mm in thickness. It should not be very thin. If the dough is sticking to the rolling surface, use oil to grease it so that it doesn't stick. Do not dust the rolling surface with flour.


Release the batura gently into the hot oil. Be careful not to splash any oil on your hand. The batura will sink. Hold your slotted spoon/strainer on the batura and hold the batura down. As the batura cooks, it will start puffing up and the pressure of the spoon being held over it, will help the batura puff up evenly. This process takes a few seconds. The underside of the batura which is in the oil will become golden brown. At this stage, flip the batura over and cook it for a few seconds till it is golden brown on the other side as well.  The batura is ready to be served hot with chole.


Tips
Adding of the semolina/rava and oil in the dough helps the batura stay puffed up in a ball shape and not flatten out immediately as it cools. Make sure to use dry spoons and pans when heating oil. Addition of water droplets to the oil will cause it to splatter. Never use flour to dust the rolling surface while making puris or batura. The excess loose flour will get added to the oil as the batura/puri is fried, which will burn and as you fry more bature/puris, they will get coated with this burnt flour. The batura dough is elastic and it is a little tricky to roll it out. You may want to roll out a couple of baturas before heating the oil.  To check if the oil is hot, add a very small pinch of dough into the oil. If it rises up immediately, the oil is ready. If the oil is already hot and you are still rolling out the dough, turn the heat to low so that they oil cools down a little or turn the heat off. There is always a danger of the oil catching fire if it is overheated. In such a case, place a lid on the pan containing the oil. This will cut off the oxygen and will extinguish the fire. Never ever pour water on an oil fire as it is extremely dangerous and may cause the oil to splash out.

Thursday, February 16, 2012

Chole (Cholay/Chana) - Delicious Curried Garbanzo Beans

Chole/ Cholay or Masala Chana is a very tasty dish where chickpeas (also known as garbanzo beans) plays the main role. It is very popular in Indian restaurants and if you can't find it under the curries section, you will definitely find it paired with the puffed, deep fried bread called "Batura/Bature". It is an easy to scale up dish too and generally finds a permanent spot in buffets, in almost all Indian restaurants (especially restaurants outside India).  Hence, it is a fantastic dish to make for a large crowd at home. When I was in college, curried garbanzo was a staple and made at least once a week. However, that was a far cry from what chole should be. It is definitely not something to be cooked in a hurry by throwing various spices in it. And I would highly recommend not using canned beans (unless it is an emergency), especially if you want the end product to be impressive. The following recipe is one that you will be proud to serve to your guests, who will be left smacking their fingers and asking for more (or even the recipe).


Ingredients
1 cup raw/dry garbanzo beans/chickpeas/chana/chole
water to soak the chickpeas completely
1 tea bag
3 tbsp oil
1 black cardamom/badi elaichi
3 bayleaves
1 inch cinnamon piece
10 black peppercorns
4-5 garlic cloves, finely chopped
1 inch ginger, finely chopped
1 cup red onion/ 1 large onion
2 tsp corriander-cumin/dhania jeera powder
1 tsp amchur powder/ dry raw mango powder
1 tomato, diced
2 tsp garam masala
red chilli powder to taste
salt to taste
1/2 cup water (for the gravy - if needed)


Method
In a deep bowl, soak garbanzo beans. Make sure that you are covering the beans with sufficient water and have at least an inch of water above the top layer of the beans. Soak for at least 6 hours (best if done overnight). The beans will absorb the water and swell and the volume will double. Then take these in a deep pan and add a tea bag to it and cover with water and cook. You need to boil the chickpeas till they are softened. There should still be some bite or firmness to the chickpea and it should not get mushy. You can alternately use the pressure cooker (which is a faster method). Once cooked, take the tea bag out and keep this aside.


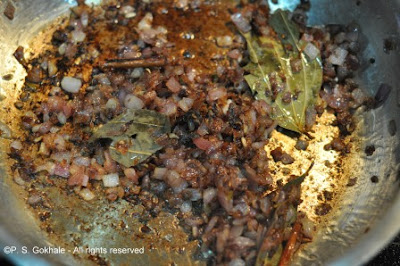
In another large and deep pan, heat oil. To this add the black cardamom, bay leaves, cinnamon and pepper corns. Let them roast in the oil for a minute till fragrant and then add the ginger and garlic and
fry for another minute. Then add the onions. Now, cook the onions till well browned. It is very important to brown the onions, to get the authentic taste. This should be done on medium heat so that the onions don't burn.


Once the onions are well browned, add the dhania-jeera powder and amchur powder and stir well and fry for a minute. Then add the red chilli powder and then the cooked chickpeas. Retain the water in which the chickpeas have been cooked. Do not add water at this stage. Mix the chickpeas well so that they get coated by the spices. Then add the tomato and about a half a cup of the retained water in which the chickpeas were cooked. Let this cook till the tomato gets cooked and softens. At this stage, add the garam masala.  If the gravy has become very thick, then add a little water and let the gravy boil for a few minutes. Add salt to taste. Serve hot with white rice or bature or naan.


Tips
You need to plan ahead when making chole as the beans need to be soaked at least for 6-8 hours before they can be cooked. The fastest method to cook chickpeas is to cook them in the pressure cooker. It takes about 8 whistles in my cooker to cook the chickpeas or I cook them in the beans mode in my Instant Pot.
I have read many recipes in which a pinch of baking soda is added to the water when it is being soaked. From what I have read, this helps the chickpeas cook faster. However, it is not necessary to do so.
Add a little salt while cooking the beans, and it will get absorbed into the chickpeas making them tasty.
If you noticed, this recipe doesn't call for any chole masala. This is an easy to make recipe which uses whole spices and only garam masala. If you want the chole to be yellow in color, then do not add the tea bag while cooking the chickpeas.
If you do use canned chickpeas, do not use the tea bag. The canned chickpeas are already pre cooked and rather soft, and if you cook them for an additional time with the teabag, they will disintegrate.
If you do happen to burn the onions a little, it will impart a slightly bitter flavor to the gravy. If you detect this, add a tsp of sugar to the gravy and mix well. This will nullify the bitterness.

Wednesday, February 8, 2012

The Cooking Tips Blog from Recipes for all Occasions

Dear Blog Readers,

I always provide tips at the end of each recipe. I am always looking for ways to improve or simplify recipes and try to provide tips that have helped me. Many of these tips apply across many recipes.

I refer to my blog often while cooking (it is my recipe notebook). During this process I realised that it would be great to have tips related to a specific method of cooking or a type of food, all in one spot. After contemplating about it for a while, I have started a new blog. I will consolidate tips, and categorise them appropriately, and post them ever so often. I will also try to incorporate pictures to demonstrate techniques and this will provide a go to site for helpful cooking tips.

Your feedback is welcome and highly appreciated. 

The link to the site is

http://tastetherecipestips.blogspot.com

It can also be found on the right side of our home page under the "My Blog List" section.

Thank you,

Regards,
P. S. Gokhale

Sunday, February 5, 2012

Upma - A Farina/Semolina Dish

Upma is a popular snack found almost everywhere in India (well at least the places that I have visited). It is a snack which is as popular as "Poha" and is just as widespread in availability. It is called many names like Uppit, Uppitu, Rava Upma, Sooji Upma, Sanja and so on (just the various names I know it by). It is made out of semolina, which is a wheat product.  It can be made using just onions for seasoning or with a lot of vegetables. It is a very flexible dish, u can use fine or coarse semolina, add as many vegetables as you want and totally make it your own. However, there are some basic principles that must be followed when making it, else the end product becomes dense and lumpy and is not appetizing at all.


Though this is a relatively easy dish, that I have made several times, I had never gotten results that would make me take a picture of the dish and I was never been happy with it. In fact it is one dish I try to avoid cooking, if possible. However, three weeks ago I finally had the bright idea to ask my Mom for her recipe (you would think that I would have the good sense to ask earlier, no??).  After talking to her I realized where I made an error and was able to satisfactorily correct it. Within the past two weeks I have already made this recipe twice with fantastic results and a lot of compliments. I  am quite sure that I will now be making it as frequently as I make my other go to snack - "Pohe". So for all of you out there that see upma as a challenge, this recipe will help you get great results.

Ingredients
1/4 cup oil/ghee (clarified butter)
1 cup semolina/sooji/rava/farina
2-2.5 cups water
1/8 tsp mustard seeds
1  tsp urad dal
a pinch of asafoetida
8-10 curry leaves
a couple of green/red chillies, to taste, sliced into a couple of pieces
1 tsp ginger and green chilli paste
1/4 cup onion, diced finely
1/2 tomato, diced finely
1/4 cup cauliflower florets, diced/separated into small florets
1/4 cup potato, diced
1/8 cup peas
1/8 cup green beans, diced finely
1/8 cup carrots, diced finely
3-4 black pepper pods
1/8 tsp cumin seeds


Method
In a pan, take the rava and roast it on medium heat. You  need to roast it till you start smelling the cooked aroma of the semolina and it no longer has the raw smell. It will be lightly browned. Keep aside.
Start heating the water. The water must be boiling when it is used, so it is important to start heating it in parallel while starting to work on the seasoning. Crush the cumin seeds and peppercorns to a coarse powder and keep aside
In a deep pan, heat the oil/ghee. To it add the mustard seeds and once they crackle, add the urad dal, curry leaves, green/red chillies. Once the urad dal turns slightly brown, add the onions and the ginger-chilli paste. Cook the onions till transparent, then add the rest of the vegetables. Cook the vegetables completely. Then add the salt and add the sugar. Then, add the roasted rava and stir till the rava is well coated with oil. Cook it for a couple of minutes.
At this phase add the crushed cumin and peppercorn to the boiling water. Then pour the water to the rava and stir well. Cover the pan and let it cook. Cook this covered for about five to seven minutes, stirring it occassionally, so that it doesn't stick to the bottom of the pan.
The rava will fluff up and the volume will double. Add cilantro and turn off the heat. Then when it has cooled for a couple of minutes, squeeze the lemon juice and mix. Also, at this phase you can add a tsp of ghee/clarified butter. If you have cooked it in ghee, then it is not necessary to add ghee to at the end.


Tips
You can also roast the rava in the microwave. Stir after every minute and after the first couple of minutes, roast it in 30 second intervals. Do this till the rava loses its raw smell. You can then store it as well.  Store it once it has cooled down.
Do not skimp on the oil. The main reason why my upma turned out not so good was because I was using about 1 tbsp oil and that is very less and will make the rava sticky. Also fry the rava for a few minutes in oil, so that it gets coated with the oil, so it will not stick to each other that much when you add water. You can also use ghee/clarified butter instead of oil to make the upma. This will make it very rich and tasty.
The water that is added in at the end must be at a rolling boil and not just hot. It is convenient if you start heating the water in a pan at the same time that you start heating the oil or even a couple of minutes before that.
You can use a combination of any of the vegetables listed above. For one cup rava, you can use a maximum of about 1 cup of vegetables (upto 1/4 cup less or more). Try and cut all the vegetables to about the same size.
You can also skip all the additional vegetables and use only onion to season it. It even tastes great with just onions and a little tomato.
To make ginger and chilli paste, grind together 1 inch ginger along with 1-2 green chillies and some salt. Then use the required amount.

Tuesday, January 24, 2012

7 Cup Fudge - Saat Vati Barfi/Vadi

I made this recently for a get together and it was a big hit. I had doubled the recipe, and prepared a large quantity and by the end of the evening, the plate was almost empty. I also got a lot of compliments and requests for this recipe. So, I must conclude that this is indeed a lip smacking sweet and is liked by others just as much as my family and I do.  The best part is that this recipe is possibly the easiest Indian sweet one can ever make. It is one where you really can't go wrong.This recipe can be easily scaled up and you can be assured that it will wow your guests. So, if you are a beginner cook or looking for something easy but impressive, then this is it.

The reason why this is called 7 cup vadi/barfi is that the amount of ingredients total up to 7 cups, so it is also an easy recipe to remember.


Ingredients
1 cup besan/chickpea flour
1 cup ghee/clarified butter
1 cup grated fresh coconut
1 cup milk
3 cups sugar
1/4 tsp cardamom powder (optional)


Method
Take a plate or tray in which you will pour out the barfi and set it and grease it well with ghee.

In a large deep pan, mix together all the ingredients. It really doesn't matter what order you put the ingredients in, however it is easier if you start off with ghee and milk and then add the dry ingredients and stir them in. Then place this pan on the stove and keep it on very low heat. Stir frequently. You don't want the ingredients at the base to burn.


The mixture will liqudefy when it gets hot as the sugar melts, however after sometime, it will start to thicken. At this stage, you will need to pay attention to check how thick it is getting. When the mixture thickens enough that when you stir it, the base of the pan can be easily viewed for a few seconds, then the mixture is ready to be poured into the greased plate. Alternately, you can take a  drop full of the mixture into a plate and as soon as it is cool enough to touch, try to roll it into a ball. If you are able to roll it, then the mixture is ready to be poured.


Use a bowl or measuring cup to spread the mixture out into the plate. Make sure to grease the base of the cup with ghee, so that the mixture doesn't stick. Use it to level the mixture and flatten it. Now, let the mixture cool. When it has cooled to a luke warm temperature, it will solidify a little. At this stage, you can easily cut it into squares. Once it has cooled down completely, you can easily separate out the vadis into individual pieces.
Make this as a sweet snack or for a special occasion.


Tips
Add the cardamom powder so that the aroma of the barfi is great. If you have the time, keep this mixture aside for about 30 mins. This will help in dissolving the sugar in the wet ingredients and the cooking time will reduce slightly. The color of the  mixture will darken as it cooks, but make sure to keep stirring it so that the ingredients at the base don't burn or stick to the pan. It maybe easier to use a non-stick pan.

If the mixture becomes too thick while cooking it, add a little more milk to thin it out and then cook it till the right consistency is reached. Also, if you remove the mixture from the heat a bit early and it doesn't set into solid individual pieces upon cooling, don't panic. Just put the mixture back into the pan and cook it for a few more minutes. It is a foolproof recipe and easy to correct if you do make a mistake.

Saturday, January 21, 2012

Amla Supari (Awla Supari) - Sundried Indian Gooseberry

The "Indian" Gooseberry is one of my favorite fruits. I shall soon explain why I am highlighting the "Indian" part. This fruit is called "awla" in Marathi and "amla" in Hindi, and those are the names that I have known it by for most of my life. Now, of course sometime in my life I learnt that it is known as gooseberry in English and I filed it away in remote recesses of my memory. Also, before I go further with my story, I must explain that this fruit is found in two sizes in India, one is a larger version, about an inch in diameter, quite tart and used to make "amla supari" (sundried spiced amla) and a much smaller version, about 1-2 centimeter in diameter which are also tart but have a slightly sweeter taste and a much smaller seed. 


I had never seen the fruit in the US before and when I came across gooseberries in the store last year I got super excited. The gooseberry looked remarkably like the smaller one I had eaten in India, and I felt almost like I had hit the jackpot, my years of wait were over and I would soon be able to relish this delicious fruit again. So naturally, I picked up a couple of boxes and as soon as I came home, I dug in. And boy was I disappointed. The fruit was nowhere close to either variety that I had eaten before. The only likeliness was in the shape and color, but the taste was more like a blueberry except there wasn't a hint of sweetness. Overall it was rather flavorless. So, of course I spent the next couple of hours moping and then picked myself up and started my research. I figured with the world becoming so small, I would definitely be able to find this exotic fruit somewhere. I finally came across some trails online which finally led me to the frozen section of the Indian store and I was in luck. I found one packet of the frozen fruit with the words "Indian Gooseberry" blazened on it.  Hence, I highlight the "Indian" part of this fruit, so that when you go looking for it in the grocery aisle you pick up the correct fruit.


Now, I have found amla only in the frozen form here, which I haven't really relished eating raw. The defrosted version just doesn't satiate. So, I made the next best thing, which is amla supari. Basically it is partially cooked amla mixed with some spices, salt and then sundried for about a week or ten days. Of course, it is so delicious that none of the batches have made it all the way to the end of the week. They get devoured by family (mainly me) and friends within the first three to four days after preparation. However, if your batch does make it to the end of the drying process, expect very hard and dark supari which will taste salty, tart and delicious and will store in a dry container for a few months to a couple of years.


Ingredients
10 raw or frozen amla
1/8 tsp hing/asafoetida powder
1/4 tsp black salt (kala namak in Hindi)
1/4 tsp rock salt (sendhva namak in Hindi)
salt to taste (about 1/4-1/2 tsp)


Method
It doesn't matter if you start out with fresh or frozen amlas, the process remains the same. Take the amlas, wash them, and then put them in a vessel that can be covered with a lid (pressure cooker safe). Do not pour any water in or around the fruit. Then place the vessel in your pressure cooker and following the instructions of your pressure cooker manual, pressure cook the amlas.  Pressure cook it for 2-3 whistles or in the Instant Pot for 5 minutes on manual mode, high pressure. Let pressure fall naturally (see tips). In the absence of a pressure cooker, you can also use a steamer to cook the amlas. Again the amlas should not be directly exposed to the water or steam.  At the end of the cooking process the amlas should be cooked through, but not so soft that they will become mushy. At this stage, the amla can easily be separated into its individual slices/flakes by just applying a little pressure. Each individual slice will easily peel off the seed but retain its shape and form. So, once the cooked amla cools down, using your fingers, separate out the slices of the amla.


Once you have separated the slices out, sprinkle the hing powder and gently coat the slices. Then add the black rock salt and the white rock salt (sendhva namak) and mix. Now taste the slice and then add regular salt as needed till it is slightly salty. Now, spread these slices out in a plate and leave it in an area exposed to air and if possible sunlight. If dried indoors, it takes about a week to ten days for the amla supari to start becoming hard, brown and dry. At the end of the process, the slices will be hard and will contain no moisture. The supari is ready. It is only at this stage that it will have a long shelf life and you can store the supari in a container for several months to a couple of years.


Tips
Generally it takes a couple of whistles in my pressure cooker when I start out with frozen amlas without defrosting them. The fruit has a very high water content and if you submerge or surround the amlas with water when you pressure cook them, them they will get overcooked and disintegrate easily. It is not easy to separate the slices of the amla and take it off the seed without cooking the fruit. But the best part is that after the cooking step, the slices can be separated in a jiffy. If the supari is not thoroughly dried before storing, it will spoil easily. The fastest way to dry the amla slices, is to cover it with a light muslin or cheesecloth and keep it outdoors in the sunlight. Now, the winter sun is quite mild, so it will definitely take longer than it would in the summer, but it will be much faster than doing it inside. However, if it is not convenient, try to keep the plate by a window where there are chances of it being exposed to the sunlight and warmth during part of the day.

The amla supari in the photos above was dried for about 5 days in the house and was still not completely hard when the photos were taken.