Welcome to my blog

I hope you will find the recipe you are looking for your occasion here.

Now video instructions are available for select recipes and can be accessed at

Gardening and Cooking Made Easy

The latest 5 recipes are displayed on the
main page. For more recipes, you can browse the archive, click on the labels in the index to the left or use the Custom search below to look for a specific recipe.


Search for more results

Custom Search

Tuesday, October 26, 2010

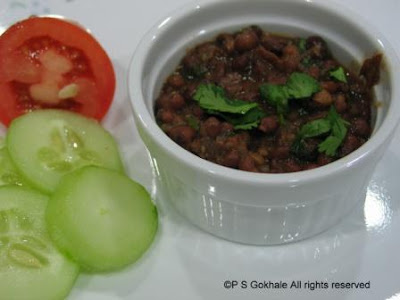
Adzuki Beans/ Red Chori/ Red Chawali

I must confess that while I had eaten black eyed beans freqently, I had never eaten the red variety or even seen it until two years ago. I was looking for pulses that I could add my menu when I came across this. I decided to experiment with it and I really liked it. It has become a regular feature these days. Black eyed beans are called "chori or chawali" and the red variety is called "red chori or red chawali". These beans are also known as Adzuki or Azuki beans and you should be able to find it in regular grocery stores as well. This is a great alternate to your daily dal. The best feature of this bean is that it doesn't need to be soaked overnight and cooks fast. It makes for a perfect recipe for a quick meal.


Ingredients
1 cup adzuki/chawali beans
2 cups water
2 cloves garlic, grate one clove
1/2 inch ginger, grated
1 green chilli
1/8 tsp turmeric powder
1 medium red onion, diced
2 medium tomatoes, diced
1 tsp garam masala
salt to taste
2 tbsp oil

Method
Pressure cook the beans, 1 garlic clove and water for 1-2 whistles depending on your pressure cooker. In another pan, heat oil. To this add the onions, chilli, grated ginger and garlic. Cook this till the onions turn a nice brown color, but do not burn. Then add the tomatoes. Cook this till the tomatoes reduce and the mixture starts turning brown. Add the turmeric powder and garam masala and cook for a couple of minutes more. Add the cooked beans and  salt. Cook this for a few minutes. Add some water if you want to thin the gravy and boil it all for a few minutes.

Serve hot with white rice or chapatis. Add a slice of lemon, some sliced onions and enjoy your meal.

If using the Instant Pot, use the beans mode or 12 minutes high pressure, manual mode with natural pressure release.

See the tips below which describes how this can all directly be made in the cooker itself which is a much faster method instead of using a separate pan for the gravy.


Tips
If you are running short of time, prepare the gravy in your pressure cooker as described above instead of a separate pan. Then add the beans and water and pressure cook for 1-2 whistles. Then boil it for a few minutes without the lid as needed to thicken the gravy. Add some water if the gravy is too thick and you want to thin it out. This is a faster way to make this vegetable for a quick meal.

Monday, October 25, 2010

Strawberry and Walnut Salad

This is a great recipe to whip up for a quick dinner. Its light and a perfect starter to a meal. Pair it with some soup and you have a ready to eat meal in less than 20-30 minutes. Its also a great way to get your daily servings of vegetables and fruits and tasty too!


Ingredients
2-3 celery stalks - thinly diced
4-5 strawberries - sliced
2 cup of assorted lettuce leaves - diced
1 cucumber - sliced
1/3 cup walnuts
1/2 orange - diced

For the dressing
juice of 1/2 orange
1 tbsp honey
2 tbsp balsamic vinegar
salt to taste
pepper to taste
1 tbsp extra virgin olive oil


Method
Whisk together all the ingredients for the dressing till the olive oil is well blended into the rest of the ingredients.
In a bowl, toss all the salad ingredients together with the dressing. Add salt and pepper if required. You can grate some parmesan cheese over the salad, if you want.


Tips
Fresh orange juice enhances the salad dressing taste. However, if you do not have oranges, you can substitute with store bought orange juice. You can experiment and change the vegetables mixture in the salad.

Wednesday, October 20, 2010

Dharwadi Pedha

This is possibly my most favorite pedha. I have eaten it very few times while growing up. It was mainly offered in weddings as a sweet. I rarely ever found it in a shop and when I did, it wasn't necessarily chosen by the others. I guess the rarity made it even more irresistable. I have heard that this is a speciality of the Dharwad region which is at the border of Maharashtra and Karnataka. It is also famous by the name "Kandi Pedha".


I was thinking about this sweet quite frequently for the last few weeks and lamenting on the fact that it is so rare to find it in shops in India, that it would be impossible to find it here. Then I thought, why not make it? I searched the internet and while I found references to this delicacy, I couldn't find a recipe. So, of course I called up my Mom and as usual she knew the recipe and gave me guidelines and offered a warning that this would take a long long time to make. So for those of you about to embark on the path to this recipe, I am duty bound to pass on this warning. This recipe can take a couple of hours to about 3 hours to make and you must pay close attention while its cooking. You don't want it to get spoilt at the end of 3 hours! If you make it, I am sure you will agree with me that it was well worth the effort.


Ingredients
1/2 cup clarified butter/ ghee
2 cups ricotta cheese (use the one with the maximum amount of fat content that you can find)
3/4 cup sugar
4 tbsp sugar (for garnish)
5 green cardamom pods, ground into a powder
couple of teaspoons of milk


Method
Process the ricotta cheese  in a food processor or blender, till it has a paste like consistency. Ricotta cheese is granular and we want it to be fine before heating it. In a pan, add the ghee and the processed ricotta cheese and heat it. Cook this for the next hour or more till the ricotta cheese slowly loses the watery consistency and takes on the mawa consistency. It is very important to keep a close eye on the cheese to make sure that it does not get stuck at the bottom of the pan or burn. Keep stirring it frequently. Once it is close to mawa consistency, you will also notice that the smell and the taste of the cheese changes significantly. At this point, you are half way through the cooking process.


Continue to reduce this mawa till it takes on a pink color and then keep roasting it till it turns light brown. Be very careful at this point and do not let it burn. You will notice that the mawa will become very granular and start separating out. Once you have a nice brown color, turn off the heat and let it cool for a few minutes. The color and consistency should be similar to the picture above.


Then add the cardamom powder and 3/4 cup sugar to this. Process it in a food processor, till the sugar mixes well into the roasted mawa. If you have browned your mawa really well, the sugar will not blend into the mawa completely. At this stage, sprinkle a few drops of milk. It is important that you do not pour too much milk into the mawa-sugar mixture. Process this again. Keep adding the milk as required till it all comes together in a dough form.


Then move it back to the pan and heat it again for a few minutes. The mixture will come together in a ball. It will be the right consistency to roll into pedhas at this stage. Turn off the heat and then knead the mixture really well. Then roll out small balls, about 3/4th inch in diameter. The mixture should still be a little warm at this stage. In another plate spread out a layer of sugar kept aside for garnish. Flatten the ball onto this sugar and make sure both the sides are coated with sugar. Keep aside. Use the entire mixture till all the pedhas are ready.

Enjoy your hardwork!!!


Tips
For the pedha to taste like kandi pedha, the mawa must be well browned. It is a key requirement. Cook this throughout on a low heat, else there are chances of burning. If you burn the mixture, you will need to start from the beginning. Do not use powdered sugar. You can feel the sugar texture in kandi pedha, so you must use granulated sugar.

Thursday, October 14, 2010

Mint and Cilantro Chutney

Green chutney is an absolute must when you make any Indian snack like samosas or patties or chaat items. Make it as an accompaniment for any meal and you will end up enhancing the dining experience for sure. There are different ingredients and recipes and proportions that are used to make green chutneys all over India. Recipes vary by each household. In fact, I myself make different versions of it based on what I plan to serve it with. The green chutney below is one I most commonly make and serve with snacks. And of course, it’s my mom’s recipe!!


Ingredients
5-10 green chilies (adjust the number to taste)
1 cup of mint/pudina leaves, packed
2 cups of cilantro leave, packed
1 tbsp lime juice
1.5 tsp split roasted gram
1-3 tbsp water
½ tsp sugar
Salt to taste


Method
Put all the ingredients together in a mixer/blender, except the water. Add a little water at a time till there is enough so that the ingredients can be blended together. Blend till the ingredients are pureed completely and have a paste like consistency. Add a little more water to adjust it to the consistency you want. Taste and adjust the salt and add more lime juice if needed.


Tips
Split roasted gram looks like yellow lentils, but it is soft and easy to bite into. It is also known as “dall” or “phutane”. Do not substitute with split yellow lentils! Add water to change the consistency depending on how you want to use it. If you want to serve it with a snack and use for dipping, it should be thicker. If it is to be used to mix into bhel then you want to make it watery.

Friday, October 8, 2010

Mooli/Muli Paratha - Daikon Flat Bread

Its been ages since I ate muli parathas. I visited the Asian store recently and found these large daikons there. That was irresistable and I bought one. In India I had always bought these white radishes also known as muli, mula in the local languages in a bunch, similar to carrots. I have only seen bunches of red radishes here though. Daikon is what comes closest to the white radish. It is not that pungent in taste and I have never seen it in bunches. Most often its really long and sold in pieces. We ate some raw with lemon and salt and I decided to make parathas with the rest of it. It was absolutely delicious.


Ingredients
1-2 white radishes or about 6 inch piece of daikon, grated
red chilli powder to taste
salt to taste
1 tsp ajwain/carom seeds
1 cup besan/gram flour
whole wheat flour - enough to knead the dough
2 tbsp oil
oil to cook
water to knead the dough


Method
Add a little salt to the grated daikon/radish. As soon as you do that, it will start releasing water. We want to knead the dough using this water. Additional water is not required. Add the carom seeds, chilli powder, salt to taste, 1.5 tsp oil and besan. Mix well. Then add enough wheat flour to be able to bring all the ingredients together and knead the flour. You may need around 1-1.5 cups. Add a little at a time. Once the mixture comes together in a dough, coat it with 1/2 tsp oil.
Then roll these out into 6-8 inch rounds. These should be a little thick, about 2-3 mm. Add a few drops of oil to your pan, cook it one one side for about a minute till it looks slightly cooked. Then flip it, add some oil around it and then cook it till the side is well cooked, indicated by light brown spots. This will take a little longer than the first side. Then flip it again, and cook it on the semi-cooked side, till that side is completely cooked.

Serve hot with butter, chutney or raita.


Tips
The daikon/radish will keep releasing water, so you may need to add a little wheat to the surface it's being rolled on so that it doesn't stick.

Wednesday, October 6, 2010

Tomato Bisque

This is inspired by Ina Garten's recipe. I made modifications to make it vegetarian, used ingredients that I generally have in my fridge and reduced the amount of oil and cream. The result was mouth watering. I had made a big batch, about forty servings for my daughter's birthday this year and it was a huge hit and was completely gone by the end of lunch. The recipe was requested by many, but I didn't have pictures. I made this a couple of weeks ago and took pictures, so now its ready to be added to the blog. This time around I added home made croutons. Croutons add just the right amount of crunch to this warm, filling soup. This is a perfect dish to make on cold fall nights. Pair it with a sandwhich and you have a quick, comforting dinner.


Ingredients
1 tbsp of oil
1/2 red onion, diced
2 carrots, peeled and diced
3-4 cloves of garlic, chopped
1/2 cup of fresh basil, chopped
4-5 tomatoes, diced
2 cups water or vegetable stock (I use water)
1/2 tsp sugar
3 tbsp heavy cream
salt to taste
pepper to taste


Method
Heat the oil, add the garlic and onions. Fry this till the onions turn pink and then add the carrots. Cook the carrots till they are tender, then add the tomatoes. Cook the tomatoes till they are tender, then add the basil, cook it for a couple of minutes and then add the water. Boil the water and then puree the soup. If the soup is too thick, add a little more water and boil further. Add salt to taste and some pepper. Turn off the heat and add the cream. Garnish with some basil. Top it with croutons and serve hot.

You can make this in the pressure cooker too. Follow the same directions above to add the vegetables to the cooker and after adding the water, pressure cook for 1-2 whistles or if using the Instant Pot, cook for 5 minutes on manual mode, high pressure and do natural pressure release.


Tips
If you don't have fresh tomatoes, and want to use canned ones, use the canned diced or entire tomatoes. Don't use the paste or pureed tomatoes as this has a very concentrated ketchup like flavor, which is not ideal for use in the bisque. You can increase the amount of cream to upto 1/4 cup if you want it to be very creamy.