Pages

Tuesday, June 30, 2020

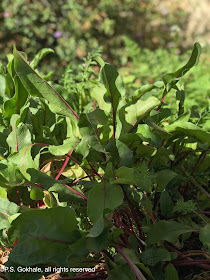
Beetroot Leaf (leaves) Salad

This is a delicious and fresh way to use beetroot leaves. Ever since we started growing beetroots, I have been able to have harvests of fresh leaves throughout the growing season. I used to use these in stir fries and curries. And then I ate this delicious salad at my friend K. J.'s house and I was hooked. I think if you have fresh, tender leaves, this is the most delicious way of enjoying them.

The dressing here is  heated oil which is seasoned, but if you don't have the seasoning ingredients, then just heat up the oil and pour it over.  Just the salt, sugar and lemon juice can be used as dressing. The peanuts add a crunchiness as well as some creamy texture. I love it as a salad ingredient. You can add whole roasted peanuts too instead of powdering them.


Here is a video on the salad preparation


Ingredients
10-15 beetroot leaves
2 tsp oil
1/8 tsp mustard seeds
1/8 tsp cumin seeds
pinch of asafoetida/hing
2 tbsp roasted peanut powder (or use whole roasted peanuts)
lemon juice, to taste
1/4 tsp sugar, to taste
salt to taste


Method
Wash the leaves thoroughly and chop them into bite sized pieces. Grind the peanuts into a coarse powder. You can also leave them whole. In a small pan, heat the oil and add the mustard and cumin seeds. Once they crackle, add the hing and turn off the heat. Pour the oil over the leaves. Add the salt, sugar, lemon juice and peanut powder and toss well together. 

A delicious salad is ready to eat. 


Tips
Place wilted leaves in ice cold water for a 10 mins to perk them up to their original crispiness. If you want to add some spice, you can also add a finely cut chili into the oil after adding the hing. Let it cook for a minute before pouring the oil over the leaves. 

Steamed Drumsticks/Moringa Pods

We have several moringa trees and this year we are reaping great harvests from them. One of the things we do is share these with our friends and others on gardening groups. But given the health benefits of the morninga pods and leaves,  I am trying out different recipes to include these. This recipe is a most basic method of cooking the moringa pods. Once they are cooked you can add it in soups, and curries or stir fries. All you need to remember is that the outer covering of mature pods cannot be eaten. Only the inside fleshy part should be eaten.  This recipe also includes a video on how to cook moringa pods and how they should be eaten.

This is probably the easiest and shortest recipe on this blog!


Ingredients
moringa pods/drumstricks/shevga chya shenga
water


Method
Cut the pods into 2/3 inch pieces, lengthwise. The pods should be about 2-3 cms in diameter and if they are really big, they may be too mature and very fibrous. One of the tests is to see if you are able to cut them. If it is really very difficult, then don't use the pod.
Pods that are 2-3 cms in thickness will still feel slightly fibrous while cutting them, but it will be possible to cut them through without excessive pressure on the knife.

Place these in a steamer and steam them for 10-15 mins. The pods should be tender.

You can also use your Instant Pot and pressure cook them for 2 mins on high setting with the vent closed. Or use your traditional stove top pressure cooker and cook them till 1 whistle. Let the pressure release naturally.

The pods will be tender and easily split open. Now they are ready to be used in other curries or eaten as is. I love eating them with just a sprinkle of salt and pepper or dipping them in a dressing or dip.

Use your bottom teeth to scoop out the inside fleshy parts. You can chew on the outer fibrous pod, but make sure to spit it out as the fibers are sharp and can hurt you if swallowed


Tips
Use a variety of dips and dressing to eat these pods.

Friday, June 12, 2020

Lemon Garlic Chicken

This is a delicious and quick recipe, which is perfect for a busy weekday or weeknight meal. It requires a few ingredients and takes just about 20 minutes to make including the cooking time. The lemon and garlic are the main flavoring ingredients and they enhance the dish. A light meal which can be paired with a side salad or steamed vegetables, to make a complete meal. Our family (the meat eater wing) love this recipe and it has become a favorite.

This is one meal where I don't have to ask the kids to finish their food. It gets eaten really quickly. So without further ado, here is how you make it.


Also here is the link to the youtube video with detailed instructions. These will help those cooks who  who may be new to cooking chicken and have questions about handling chicken and determining when is it cooked completely (without making it rubbery), like I did several years ago.


Ingredients
For the chicken
1 pound of chicken (2 chicken breasts)
1/4 cup of all purpose flour
1/2 tsp black pepper powder
1 tsp salt
1 tbsp oil

For the sauce
1 heaped tsp all purpose flour
2 large garlic cloves (about 1 tsp grated garlic)
1.5 cups broth (chicken or vegetable) - can also use water if you don't have broth
1.5 tsp butter
2 tsp lemon juice/ half of a large lemon
lemon zest


Method
If frozen, thaw the chicken breasts. Then slice the chicken into two pieces, horizontally along the surface of the chicken. You will have 4 thinner slices of chicken after this. Pound the thicker part of the chicken if needed, so that the chicken breast is uniform in thickness and cooks uniformly.

In a plate, mix the all purpose flour, black pepper powder and salt so that the flour is evenly seasoned. Heat the oil in a skillet and once it is hot, dredge each piece of the chicken in the seasoned flour and place in the hot skillet. Discard the remaining all purpose flour mixture.

Cook the chicken on each side for 2-4 mins till the chicken is browned. To check if the chicken is cooked, use an instant meat thermometer and insert it into the thickest part of the chicken breast. If the temperature is greater than 165F (74 C), the chicken is cooked. Remove it onto a plate and prepare the sauce.

Add 1 tsp of all purpose flour to the hot skillet, and half of the butter and roast it for a minute. Scrape any of the browned chicken bits. Next, add the garlic and cook it for a min. Then add the broth to mix, and mix well. Then add the lemon juice and lemon zest. Let the sauce cook and thicken and then finish the sauce with the rest of the butter which will give it a nice sheen. Add the cooked chicken breasts back to the pan and let them heat through. Garnish with lemon slices and serve hot.


Tips
Thaw the chicken in the fridge. Do not keep it out on the counter to thaw. Best way is to thaw it overnight. You can skip the butter if you want this to be a lighter meal. I have used very little oil and butter and you can also choose to increase the quantities to make it a richer sauce.  Using a thermometer ensures that the chicken is well cooked and also prevents over cooking of the chicken breast. This is an easy way to ensure that the chicken breast does not become chewy or rubbery.
If you line the cutting surface with parchment paper, it makes cleanup quick and easy. Make sure to wash your hands and clean any surface which has been in contact with raw chicken to prevent cross contamination.

Saturday, June 6, 2020

Sweet Red Bean Bread

This is a delicious bread filled with a sweet red bean filling. It is inspired by the Japanese anpan bread but is not a traditional recipe. This has been shaped as a star.  You can get really creative and shape it in any shape, like how we shaped it into a pretty bun earlier. This is a really great breakfast recipe but we often enjoy it as dessert as well. And it pairs really well with milk or coffee.


You can find a detailed tutorial on how to make the bread at the youtube link below.


Video, detailed Instructions for the sweet red bean bread

Ingredients
For the filling
3/4 cup uncooked red beans (we need only 1 cup of cooked beans)
4 cups of water
3/4-1 cup of sugar

For the dough
2 cups all purpose flour
1/4 cup potato flour (optional)
1/2 cup milk
1/2 cup water (minus 1 tbsp)
3 tbsp sugar
2 tsp yeast
1 tsp salt
3 tbsp butter
1 tsp vanilla essence
1 egg - well beaten to be used for the egg wash


Method
Soak the red beans in 2 cups of water for at least an hour. Then discard the water and add the beans to the pressure cooker (or instant pot). Add 2 cups of water and then pressure cook the beans till completely cooked. I cooked it in the instant pot for 30 mins on the beans/chilli mode and then let the pressure release naturally.

3/4 cups of beans cook to make 2 cups of cooked beans. I blended one cup of cooked beans and added 3/4 cup of sugar and made a puree. Then cook the bean paste in a pan to thicken it. Let it cool down.

While the beans are cooking, make the dough. First add the milk, 1/2 the water, sugar and yeast to the bowl of a stand mixer, and set aside for 10 mins to activate the yeast. The mixture will get frothy.  Sift the flours together, so that there are no lumps. Then add the salt, vanilla essence and butter to the frothy liquid. Turn the mixer on and using the dough hook, add the flour. Then slowly add the rest of the water, a little at a time till till a soft dough is formed. Then knead for  about 7-10 mins. Scrape the bowl down as needed.

Shape the bread into a ball and transfer to a lightly oiled bowl. Cover it with plastic wrap and let it rise for about an hour till it is doubled.

Divide the dough into 4 equal parts and shape into balls and let them rest for 10 mins. Divide the bean filling into 3 equal parts.

Now roll one dough piece into a circle with a 10 inch diameter. Place this on a baking sheet lined with parchment paper. Then, apply the egg wash. Dot the surface with the filling and use your finger tips to spread it. Then, repeat this process 2 more times. Once the final circle of dough is placed, then it is time to shape the dough

Place a small bowl/cookie cutter/measuring cup with about a diameter of 1.5-2 inches in the center of the dough. Then make 16 equal part of the dough. The bowl in the center will prevent the dough from getting cut through. At the end of this there will be small circle in the center where the bread is joined together and 16 strands. Take two strands, and twist them outwards twice (opposite in direction to each other) and then pinch the ends together to form a sharp point. You will have 8 star petals and the bread will look like a star or a flower.

Cover it lightly with plastic wrap and let it rise for 45 mins to an hour till it is risen and puffy. Then, apply the final layer of egg wash.

Preheat the oven to 400F and then bake the bread for 15-20 mins. The bread is ready when the internal temperature reaches 200F, which takes about 20 mins. You can also tap the bread to check for the hollow sound.

Cool the bread for 10 mins on a cooling rack and then it is ready to eat. You can also bake it the previous night for breakfast. Heat it in  the oven at 350 F till it is warmed through, about 10 mins and then serve warm. It tastes great with milk.


Tips
The potato flour helps retain moisture and keeps the bread moist after baking. You can skip this ingredient. Use room temperature water and milk so that you do not accidentally kill the yeast. Resting the  dough relaxes it makes it easy to roll out. If you try to spread the filling with a spatula, you may stretch or tear the dough and it is easier to gently spread it using the finger tips. When shaping the dough, pinch the edges well, so that they don't unravel when the dough proves the second time. Instead of a star, you can shape it into any other shape and then let the dough undero a second rise.