Pages

Saturday, August 21, 2021

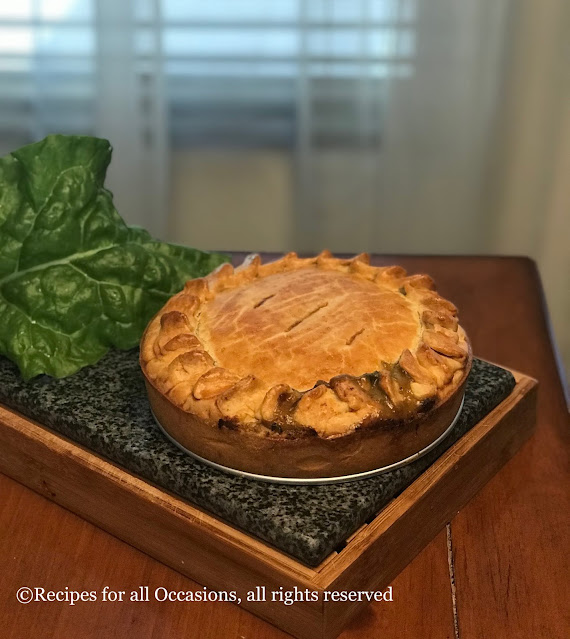
Culinary Tour of the World: Episode 7: Argentina - Tarta De Acelga Cremosa

Welcome to our seventh episode of the Culinary Tour of the World. This post takes us to the South American continent and we are making a delicious dish from Argentina. Argentina is known for its meat dishes, however as I started researching the foods, I realized that there were several vegetarian options to choose from too. So, I turned to my garden for inspiration. It was late spring when I made this and we had an abundance of eggplants and chard. So, I decided to focus my search on dishes which could be made with these two vegetables. I came across a simple recipe of grilled eggplant sliced, which were cooked with some salt, oil and cumin. I cooked up a large batch of eggplants in this manner and we ate them as is and it was delicious. I also used them in tacos and also froze a couple of batches. This seemed too simple for the video series though, so I decided to make another dish. I finally decided to make a chard pie called Tarta De Acelga Cremosa. This hearty, delicious pie is filled with a creamy chard filling and boiled eggs. The pie is a complete meal given that it has a hearty crust, eggs and a delicious sauce and green vegetables too! I skipped the boiled eggs and it still made a hearty meal.


This was a recipe, where I did not find a video, and so all I had were instructions from a reading a few Spanish language blogs. I read them all using google translate and I did have a couple of missteps with the recipe, which you can see in the video. One was that I added to much milk when I made the sauce, because of which I had to cook the filling for a much longer time. Another was cutting the pie when it was piping hot. This made the filling spill out.  So the instructions I am providing below include these adjustments  and additional notes to ensure that the end result will be great. With that said, here is the recipe.

Link to the video recipe


Ingredients

For the pastry dough
300 gm all purpose flour
1/2 tsp salt
1/2 cup or 1 stick unsalted butter
1/3 - 2/3 cup water,  ice cold
1 egg + 1 tsp of water for the egg wash 

For the filling
4 tsp oil 
15 chard leaves and stems, diced
1 large onion, diced
4 cloves of garlic, minced
black pepper powder, to taste
1 tsp ground mustard, adjust to taste
1 tbsp cream cheese
1/4 cup mixed soft cheeses (cheddar, monterey jack). I have used Mexican cheese blend
1/4 cup parmesan cheese, grated
pinch of nutmeg powder
salt to taste
 

Method

If you have a food processor, use it to make the dough. Add flour, salt and cold butter pieces to the food processor and pulse till the butter is cut into the flour and it gets a sandlike texture. Then add a little water at a time and pulse till the dough comes together into a soft dough. Do not over mix the dough. 
If you don't have a food processor, rub the cold butter into the flour till you get a sand like texture and then add the water to make a soft dough. 

Divide the dough into two and then flatten it into discs. Cover with plastic wrap and refrigerate.

Heat oil and add onions and garlic. After you fry them for a few mins and the onion softens, add the chard stems. Saute it for a few mins till the stems start to soften. Then, add a tablespoon of all purpose flour. Mix it in and let it cook for couple of minutes but don't let it brown. Cook the flour and mix it in well, so that when the milk is added, there are minimal lumps. Next, add the milk and stir while you add the milk, making sure there are no lumps. Then add the chard leaves.  Now, this is where I was tempted to add more milk to the sauce to increase the quantity of the sauce, because I felt that there was a lot of chard. However, remember that the chard leaves are going to wilt and add moisture to the sauce and they will shrink. So, resist the temptation and let the leaves cook, till they are nicely mixed into the sauce and have been cooked. Now, add the cheeses and stir them in till they melt. Finally, taste this and then add salt, if needed. Chard has a salty flavor profile and the cheeses also have salt, so you want to be careful and add salt only after tasting it. Let the mixture cool completely.

Preheat the oven to 450F or 200 C. Now roll out one disc of dough into a round pastry which is about 1/8th inch in thickness and about 11-12 inches in diameter. Place this into a deep baking tin. If the tin has a removable bottom, it will be easier to remove the pastry, but that is not necessary. Press the pastry to align to the edges of the tin. Then pour the cooled filling into the pastry. 

Roll out the second disc of dough in the same manner as the first and then place it on top of the filling. Adjust the dough to cover the filling completed. Press the edges of the bottom and the top dough sheets by pinching them and then crimp it to decorate it. Crimping will also ensure that the pie will not leak due to the pie crust splitting where the two sheets meet. Make a couple of slits in the pie top to allow for the steam to escape. 

Then place the baking tin onto a baking sheet and place it in the hot oven on the middle rack. Bake for an hour till the pastry has a golden brown color. Remove the tin and place it on a rack to cool for 10 mins. Remove it from the baking tin if it is easy to remove and let it cool down on the rack. Else you can cool it down completely in the pan and serve it straight from the pan. 

Cut into slices and serve. 


Tips
Do not make the filling too watery. As I detailed in the method, it is important to not add extra milk than what the recipe calls for.  Make sure that the filling is completely cool before filling into the pastry shell. Make sure you cool the pie before cutting otherwise the filling will flow out. 


Thursday, May 20, 2021

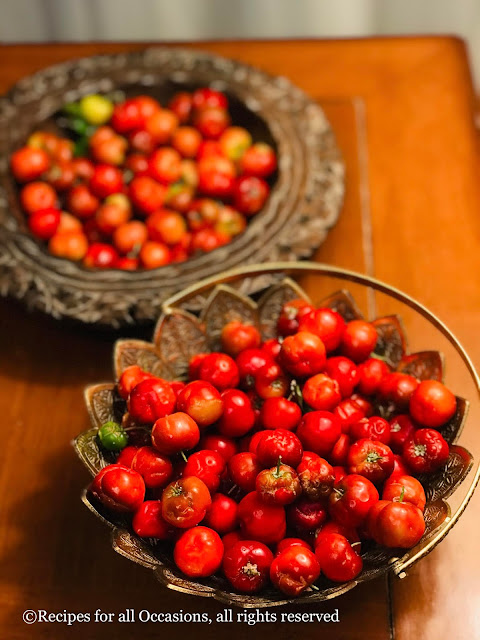
Barbados Cherry Popsicles

We have two Barbados Cherry bushes, which are about 4 years now and are producing a lot of cherries. We've been picking about a hundred cherries a day over the last 2-3 weeks. Finally the stage has come where our consumption cannot keep up with the number we are harvesting daily.  So, naturally the next step was to figure out how to use these to make something tasty out of them. Various options went through my mind. Since these cherries are slightly tart even when ripe, I thought of many options like chutney, jam,  jelly or lemonade. All of these will definitely taste good. I started with the intent of making a jelly so that I could preserve it for the year. However, as I was cooking the cherries, we started talking about ice creams and I decided to use the entire cherry pulp to make popsicles. 

Now, pitting these cherries like a normal cherry is impossible because they have 3 seeds which have a leaf like structure around them and a lot of the pulp gets stuck to these seeds. So, I decided to cook them and then separate the seeds from the pulp. So, let's get into the details of how I made these popsicles. 


Here is the Video Link

https://youtu.be/k5bwUPtUOWs


Ingredients
4 cups Barbados cherries
water
1 to 1.5 cups sugar, adjust to taste
1/8 tsp salt, adjust to taste
1 tbsp lemon juice, adjust to taste (optional)


Method
Place the cherries in a saucepan and add enough water to cover the cherries and bring it to a boil. Boil the cherries for a few minutes till the cherries soften. Then using a spatula, mash the cherries (see video) gently by pressing them to the side of the saucepan. If it is not easy to squeeze out the pulp by doing so, let the cherries cook further and get tender. Then, the seeds will start separating easily as you mash the cherries with the spatula. Then turn off the heat and let it cool down till it is easy to handle.  Next strain the pulp mixture through a large sieve. Again using a spatula or your fingers press the pulp down through the sieve till the seeds remain. Discard the seeds.

Now, add the sugar to the pulp and salt. I recommend adding about 1/2-1 cup of sugar to begin with and increase the amount to taste.  If needed, add some lemon juice to balance out the taste. I added about a tbsp of lemon juice to balance out the sweetness from the sugar.  

Stir this mixture well to dissolve the sugar and salt. Taste the mixture before pouring into molds and make adjustments before freezing. Then pour this into molds and freeze.  I was able to make 10 popsicles and froze the remaining mixture in a large glass bowl. I will cut it into slices and serve it as a sorbet. 


Tips
If the seeds still have a lot of pulp stuck to them, pour some hot water on the seeds and then using your fingers (a spoon can be used but fingers work best), separate the pulp from the seeds. Strain this pulp through the sieve.  


Friday, April 9, 2021

Restaurant Style Butter Chicken

This is the best home cooked butter chicken I have ever tasted!! Butter chicken was one of the first chicken dishes that I ever ate and it is one of my favorite chicken preparations!! It is one of the most popular chicken dishes available at Indian restaurants. I always wanted to make it at home and have it be just like the authentic restaurant version which I remember eating in India. I tried out many recipes and finally, found this one. My brother had shared this recipe with me and he was so appreciative of the taste that I just had to give it a try. Oh! It was so delicious and relatively simple, so it has now become my go to butter chicken recipe. I also use the same gravy to make paneer makhani (butter paneer). I hope you love this version as much as I do. This recipe makes a large quantity of gravy and you can increase the amount of chicken to add to the gravy. You can also halve or make a smaller portion by using 1/3rd of the ingredients. 


Here is the link to the video recipe where you can see the detailed method of making it. 


Ingredients
For the chicken
2 lbs chicken thigh meat (can also use chicken breast)
1.5 tbsp garlic paste
1.5 tbsp ginger paste
2 tbsp Kashmiri chilli powder
2 tsp salt
2 tbsp oil +2 tsp

For the gravy
1 tbsp 
6 tbsp butter
3 lb tomatoes  (1.5 kg, about 13 mid sized), roughly chopped into eigths
10 oz onion ( 300 gm, 3/4 of a large onion), roughly diced into inch sized pieces
3 tbsp garlic paste
5 oz cashew nuts or pumpkin seeds1(50 gm)
3 tbsp white vinegar
1.5 tsp garam masala
4 tbsp sugar
3 tbsp Kashmiri chilli powder
salt to taste
1/4 cup heavy cream
1 tbsp fenugreek leaves/kasuri methi


Method
Cut the chicken into inch long strips.  In a bowl, mix together the ginger, garlic pastes, oil, chilli powder and salt. Then add all the chicken strips into the bowl and toss around to coat the chicken properly.  Cover the bowl and place in the fridge as it marinates. Marinate for at least 20 mins and upto overnight. 

In a deep saucepan, heat 1 tbsp oil and 4 tbsp butter.  Once the butter melts add the onions. And then add the garlic paste. Cook this till onions are cooked and translucent. Do not brown. Then add all the tomato pieces. Cook for a few minutes till the tomatoes start to release the juices and start getting cooked. Next add the cashews or pumpkin seeds and stir them in and cook for a minute. Then add the vinegar, garam masala, sugar, chilli powder, some salt. Remember that there was salt added to the chicken, so add only a tsp of salt. You can adjust to taste after the cooked chicken is added to the gravy.  Boil the gravy for a few minutes till it is fragrant, and turn off the heat. Let it cool and then puree in a blender. 

Now, cook the chicken. Heat 2 tsp oil in a pan and once the oil is hot and shimmering, add the chicken pieces. Cook on one side for a minutes and then flip them and cook on the other side for another minute or two. We are cooking the chicken partially and then will finish cooking it in the gravy. If you want to eat the chicken pieces as a tikka, make sure to cook the chicken well till it has reached the minimum temperature of 165F or higher.  Cook all the chicken pieces. 

In a deep saucepan, heat 2 tbsp of butter. Strain the gravy through a sieve and add it to the melted butter. Once the gravy heats up, add the chicken pieces and let it boil till the chicken is cooked through. To check, use a thermometer and check the temperature of a few pieces of chicken. It should be 165F or higher.  For a visual check, cut a piece of chicken. It should cut easily and the inside should not have any pink or raw looking meat. Cooked meat turns a white color.

Then crush the fenugreek leaves between your palms, and add to the gravy. Finally add the cream and stir it in. Taste and adjust the salt. Your butter chicken is ready. Serve it hot with rice or naan. 

This makes a very large serving of chicken which can easily serve 8 people or more. You can halve the recipe for a smaller proportion.


Tips
If the chicken is frozen, I thaw it out overnight in the fridge. Clean it by patting it with a paper towel and then cut the partially frozen chicken. It is much easier to cut. Keep the chicken in the fridge during marination as well. Never leave raw chicken on the countertop as it can lead to salmonella growing on it.  You can use pumpkin seeds instead of cashew nuts to make this nut free. You can increase the amount of butter to 8 tbsp while cooking the gravy. 

Friday, March 12, 2021

Culinary Tour of the World: Episode 6: Antigua and Barbuda - Ducana

Welcome to our sixth episode of the Culinary Tour of the World. This post takes us to the Carribean islands of Antigua and Barbuda (Antigua is pronounced as "Antigah"). Antigua and Barbuda are islands in the West Indies.  As I was researching the cuisine, I learnt that there are many dishes which are similar across the various Caribbean islands like fungie. There are many seafood and other meat dishes which have a variety of vegetables too and and fresh tropical fruits are aplenty! A couple of dishes that I observed were spoken of when speciality from Antigua was discussed in some Caribbean food groups, one was home made ginger beer and the other was ducana. I bought the ingredients to make ginger beer, which was essentially a lot of grated ginger, sugar and water to create a ginger drink (non-fermented), but then realized that this is a commonly brewed drink on other islands too. So, finally I decided to make ducana which is a speciality made with coconut and sweet potato and usually served along with saltfish and vegetables. 


It was absolutely delicious!! We topped it with a little ghee (clarified butter) and oh my goodness, it made a delicious dessert. The taste is very similar to the coconut dumpling (modak), except here all the ingredients are cooked together.  It is always exciting to find similarities between known dishes and new ones I am exploring through this project!


Link to the video recipe


Ingredients
1/2 cup coconut, grated (fresh or frozen and thawed)
1/2 cup sweet potato, grated (Japanese sweet potato or one which has cream colored flesh)
1/3 cup sugar
2 tbsp water
1/2 to 2/3 cup all purpose flour 
1/4 tsp nutmeg powder
1/4 tsp ginger powder
1/2 tsp vanilla essence
banana leaves and foil to wrap the ducanas
water to boil the ducanas


Method
In a bowl, mix together the coconut, sweet potato and sugar. Mix well and then add the water, then add the spices and vanilla essence. Then mix in the all purpose flour. Add only a little to begin with and mix it to see how thick the mixture gets. It should be like a thick cake batter. I needed to use only about 1/2 cup of flour. If you live in a humid climate, or if there is a greater moisture content in your ingredients, you may need to use more flour. 

Place a banana leaf (about 8"X4") on top of a foil which has similar dimensions.  Add some batter (1/4th of the total) to the center and shape it into a rectangle (see video). Then fold the leaf over the batter, to create a rectangular packet. Then fold the foil to create a rectangular packet. 

Boil water in a saucepan or large pan. To this add the foil packets and cook for about 45 mins to an hour.  Remove the packets from water and drain well. Serve warm. It is not usually topped with butter or ghee, but adding a dollop really enhances the dish.  


Tips
Double the ingredients to make 8 ducanas. This recipe will yield 4 ducanas which are about 2 inches by 4 inches in size. You can use desiccated coconut too, if you cannot find fresh coconut. However, soak it in a little milk before using it. The amount of flour you use will depend on the moisture content of the rest of the ingredients. You need enough to create a thick batter. Too much may yield to a stiff dumpling.