Pages

Sunday, November 7, 2010

Nariyal Barfi - Coconut Burfi/ Coconut Fudge

Hope you are having a festive week, with Halloween followed by Diwali. As the celebrations wind down, I am going to add one more easy recipe which can be made for any festive occasion or as a dessert. This is a very simple recipe and very tasty.  This was a last minute addition to my Diwali spread this year and I made it just about an hour before guests arrived. What makes this recipe appealing is that it takes under 15 minutes for the entire cooking process.


Ingredients
2 cups fresh coconut - grated/scraped (if using frozen, thaw it)
2 cups sugar
1/2 cup heavy whipping cream
1/8 tsp cardamom powder


Method
Heat the coconut and sugar in a pan. The sugar will melt and turn into syrup. As the mixture starts to thicken, add the cream and cardamom powder. Stir frequently so that the mixture doesn't burn. Heat this mixture, till it is thick enough, so that when you move a spoon through it, you can see the base of the pan. In the meanwhile, grease a tin or dish with some ghee or butter. Then pour the mixture in a greased pan. Use a spatula to spread this or you can use the base of a small bowl. Grease the base of the bowl with some ghee, so that the coconut mixture doesn't stick to the base. Once it has cooled down a little and is warm to touch, cut it into small squares.  Once it has completely cooled down, you can separate the squares. Store it in the fridge.


Tips
You can scrape/grate a coconut and freeze this in an airtight bag/box for about 6-8 weeks. After you scrape the coconut, heat it for a minute in the microwave or on the stove till you can smell the coconut aroma. Then cool it and freeze it. This helps preserve the coconut for a longer period.

Thursday, November 4, 2010

Chilli Tofu

This recipe is based on the chilli paneer recipe, however I modified it based on the ingredients I had on hand. The way this came about was that I was thinking of a way to use tofu and wanted to use the bell pepper that I had in the fridge. After thinking of various options I thought of chilli paneer and decided to substitute tofu for the paneer. I must say it worked well. It is definitely a healthier dish too and a good stir fry variation. This is perfect served with some white rice.


Ingredients
1 packet of extra firm tofu, sliced into rectangular strips (1*1/2 inch strips)
1 green bell pepper, sliced into strips similar in size to the tofu strips
1 yellow onion, sliced
2-3 garlic cloved, finely chopped
1-2 green chillies, sliced (adjust to taste)
salt to taste
1-3 tbsp white vinegar
1/2 cup water
3-4 tbsp corn starch/corn flour
1 tbsp soy sauce
chilli sauce to taste
1 tbsp oil
1/2 tsp sesame oil
1/2 tsp black pepper, ground


Method
Mix 2 tbsp of corn flour,  black pepper and salt. Coat the tofu strips in this flour. Add 1 tbsp oil to a non stick pan and saute the strips till slightly browned.
In another pan, heat the oil, to it add onion and garlic. Cook the onion till transluscent. Add the chillies and bell pepper strips, stir fry for a couple of minutes. Then add the sauteed tofu strips to the pan. Make a slurry of corn flour and water and add it to the pan. Add more water if required. As the corn flour cooks, the gravy will become transparent. To this add soy sauce and vinegar. Add salt to taste. Add a few drops of the chilli sauce. Cook for a couple of minutes. Serve hot with rice.


Tips
Add less amounts of soy sauce, vinegar and chilli sauce to begin with. Taste the gravy and adjust these components based on your preference. Add a little water to the corn flour to dissolve it, and then add additional water so that lumps are not created. Stir well after adding it to the pan to avoid lumps.

Wednesday, November 3, 2010

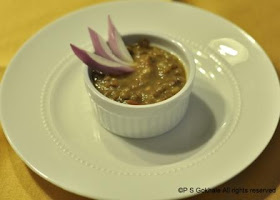
Dal Makhani - Spicy Lentil

Dal Makhani is one of my favorite dals. I remember watching the cook at a "dhaba" in Delhi prepare this. It was a long time ago, but I still remember watching in surprise as he added an entire packet of 100 gram butter to just our order of dal, and it tasted fabulour. I remember the rich taste and it tasted heavenly with hot tandoori roti and some onions. Now, my version is definitely not as rich as the authentic one, but I promise you it's just as tasty. This is a recipe that I make on days when I need to prepare a quick but wholesome meal. I use whole lentils/ masoor dal for my quick, low calorie version instead of whole urad. Since masoor is a lentil variety which doesn't need to be pre-soaked, and cooks in about 15 minutes in the the pressure cooker, it doesn't need advance preparation. Serve it with some rice or naan or bread and it makes a complete meal.


Ingredients
2 tbsps oil or ghee
2 black cardamoms
1 green cardamom
1 bay leaf
1 red onion, diced
2 tomatoes, diced
red chilli powder to taste
1-2 tsp garam masala (add 2 tsp for spicier taste)
3 cloves of garlic, chopped
1/2 inch ginger, grated/crushed
1 cup lentils/whole masoor dal
2 cups water
salt to taste
additional water as needed


Method
Add the water and one garlic clove to the dal cook in the pressure cooker. In another pan, heat the oil and add the two types of cardamom and the bay leaf to the oil, fry till you can smell the aroma, but take care not to burn them. Add the onion, ginger and garlic. Fry this till the onion is well browned. Then add the tomatoes, and cook till the tomatoes are browned. Add garam masala, red chilli powder and cook for another minute. Then add the cooked dal to the pan, stir. Add water if the dal is too thick. Add salt. Serve hot with naan or white rice.


Tips
If you want a richer version, cook it in ghee and add butter towards the end of the cooking process.

Tuesday, November 2, 2010

Shakkar Pare/Shankar Pali/ Sweet Fries

I hope you had a great Halloween. I was glad it fell on a weekend. We carved pumpkins, went trick or treating and handed out candies to the neighborhood kids. Every Halloween I realize that there are so  many kids in the community. I guess it's the one occassion when they all come out in hordes. We had a great time. Now Diwali is right around the corner and I am waiting for it eagerly. I am going to add another Diwali staple recipe today- "Shakkar Pare/Shankarpali". These are loved by everyone at home. Every year I contemplate whether I should make it, but it always makes its way to the top of the wish list. A friend had given me the basic recipe which I have experimented with for the last couple of years. This is an easy recipe, except for the fact that its time consuming to fry all the little shakkar pare. But it's totally worth it.


Ingredients
1/2 -1 cup clarified butter/ghee
1 cup sugar
1 cup milk
all purpose flour/ maida - enough to knead dough
oil to fry


Method
Mix together the ghee, sugar and milk. Add 1/4 cup of flour at a time till you can knead it into a dough. The dough should be firm. It should not be soft, else it will absorb a lot of oil when you fry it. Roll out about a 2-3 inch ball of dough into a round of about 2-3 mm thickness. The rolled out dough shouldn't be so  thin that its transparent. If its too thin, the fried shakkar pare/shankarpali will be hard. Then cut the rolled out dough into diamond shaped shakkar pare/shankarpali. Heat the oil and then fry all the shakkar pare/shankarpali till they are well browned. Let it cool and store in an airtight container. These will last a couple of weeks and do not need to be stored in the fridge.


Tips
I have experimented with various proportions of ghee and also substituted oil for ghee, but the best results are obtained when you use equal measures of ghee, sugar and milk. To cut the dough into diamond pieces, cut it into parallel strips, then cut those diagonally to make the diamond shaped shakkar pare/shankarpali. You can sprinkle some powdered sugar over the warm, fried shakkar pare/shankarpali if you want to sweeten them further. To determine if the oil is hot enough, put in a small piece of dough and if it comes up immediately, the oil is hot enough.

Monday, November 1, 2010

Halloween and Fall Special - Pumpkin Pie

I had been thinking of baking a pie for a long time, from scratch that is. The last time I baked a pie from scratch was over ten years ago. The opportunity finally knocked on my door this weekend. We were meeting at a friend's place to carve pumpkins and  decided to have a potluck. So, I jumped at the opportunity and picked up the request to bake a pumpkin pie. I must have referred to various websites and read several reviews and almost all the recipes had similar ingredients. So I finally decided to forge ahead and try my own recipe. I referred to the "Baking with Julia Child" book to prepare my crust and then referred to the the recipe on the pumpkin pie can for the filling. The house smelt so amazing, it was difficult to resist tasting a piece before heading out. The pie was a big hit and the crust was tasty and flaky. This was the first recipe that I referred to the Julia Child book for, and the pie crust turned out great.


Ingredients
For the Pie Crust
1 1/4 cup + 2 tbsp all purpose flour
1/4 tsp salt
3/4 cup butter which is the same as 3/4 stick cold butter - cut this into 1/2 inch squares
1/4 cup ice cold water

For the Filling
1 15 ounce can -100% pumpkin puree
3 eggs
1/2 cup evaporated milk
1 tsp cinnamon powder
1/2 tsp ginger powder
1/4 tsp clove powder
1/4 cup toasted pecans
3/4 cup sugar


Method
To make the pie crust
Mix the flour and salt. Next cut the butter into the dough till the dough turns into a coarse textured mixture and the butter is well mixed in. The butter should be cold and not melt while mixing it into the flour, so it needs to be a speedy process. You can use a fork if mixing by hand or the food processor if needed. Then add the cold water a little at a time, till the dough just comes together in a ball. Pat this and bring it together in a ball. Then wrap in plastic wrap and cool for at least 2 hours. I let it be in the fridge overnight.  At least an hour before you want to bake the pie, roll out the dough into a disc to cover a 9 inch pie dish, with about an inch of overhang.  Line the dough around the pie dish and cut the dough that comes out of the dish. Then, you can shape the edge or crimp it to decorate the pie crust. Put this back in the fridge to cool for another 1 hour at the least.


To make the pie
Preheat your oven to 350F. Cover your pie crust with a tin foil and add beans to the fill the pie dish and bake this for about 10 minutes. Then remove the beans and the foil and bake for another 5-10 minutes till the crust starts to change color and brown a little.

Pie Filling
Meanwhile prepare the pie filling. Mix the sugar with the spices and set aside. In a bowl beat the eggs till they are well mixed. To this add the pumpkin puree, milk and the sugar with the spices. Mix it all well. Crush the toasted pecans with your hand.


Take the pre-baked crust and add a layer of the pecans to the base. Next pour the filling into the pie crust and bake the pie for about 40-50 minutes. I baked the pie for about 40 minutes at 350 F and then cranked up the temperature to 375F and baked it for another 5 minutes. The pie is done, when a knife inserted in it comes out clean.

Let it cool and serve it topped with whipped cream


Tips
To roast the pecans, heat the oven to 350F.  Place the pecans in a baking tin and bake for 5 minutes or more till you get the toasted pecan smell. Stir them around so that they don't burn. The eggs do not need to be beaten till frothy, just enough so that they are well mixed. Sprinkle a little flour on the rolling surface before you roll out the pie crust. Roll it out from the center to the edge and move it clockwise as you roll it so that the crust is rolled out in similar thickness. Use your rolling pin to lift the crust onto your pie dish. Once the rolled out pie crust has been cooled and rested for at least an hour, you can let it warm up for a few minutes before starting the baking process. Prick the center of your pie crust a few times if need be with a fork so that it doesn't bubble up.