Pages

Thursday, September 30, 2010

Scrumptious Cake

Continuing with the cake theme, this is one of the best cake recipes that I have ever tried. It came out just like the ones that I used to bake with my  mom. I have these memories from when I was 6 or 7 years old. I used to sit in the kitchen with mom and help her mix all the different ingredients. I remember beating the eggs with a whisk and being thrilled to see the egg whites turn into foam. Each ingredient was handled individually and it used to seem like a long loving process. Moreover, we didn't have an oven, so my mom used to send me to get some sand from the garden and then bake a cake using that. And I used to wait quite impatiently for the cake to cool down before we could have a taste. It was a wonderful and magical time and I wish I could go back to those days. Baking this cake took me back to those days.


This is a recipe from the William Sonoma Cake book with some adjustments based on the ingredients I had and some modifications to the process.


Ingredients
1and 1/4 cups, plus 2 tbsp of all purpose flour (maida)
1 tsp baking powder
1/8 tsp salt
1/2 cup butter - room temperature
1 cup sugar
2 eggs
1 tsp vanilla essence
1/2 cup milk


Method
Grease a baking dish with some butter and dust with some all purpose flour. Preheat the oven to 350F.
Sieve all the dry ingredients together and keep aside. Sieve these ingredients a couple of times. In another bowl, whisk together the butter and sugar. Beat it till the butter is fluffy. Add one egg at a time to this and beat each egg into the mixture till it is nice and fluffy. Add the vanilla essence. Add one third of the dry ingredients to the batter and fold it in. Then add half of the milk and mix. Alternate between the milk and dry ingredients till they are all incorporated into the batter.
Bake the cake at 350 F for about 20 minutes. Use a knife and insert it into the center of the cake. If it comes out clean then the cake is ready. If not, bake for a few more minutes.
Take if out and  let the pan cool  on a wire rack for 10-15 mins. Then invert the pan onto the cooling rack and slide the cake out. Let the cake cool if you wish to ice it.


Tips
The cake should be completely cooled down before icing it. If the eggs are separated and the whites beaten separately before being added to the batter, the cake will be lighter. You can add the yolks after the butter and sugar. But fold in the egg whites after all the dry ingredients are incorporated into the batter.

Tuesday, September 28, 2010

Rava Cake - Eggless Semolina Cake

The first time I ate this was at a friend's place for brunch and I really loved the cake. My husband told me that this was a recipe made by his mom when he was growing up and he would love to eat this again. Later, when I was discussing this with my dad, he told me that he had eaten this cake as a child too. His grandmother used to make it and it brought back a lot of memories for him. Well, all this and the fact that the cake is absolutely delicious was just the motivation I needed to prepare this recipe. With the help of a recipe book called "Ruchira" and consulting my mom on the proportions and process, I made this cake for my husband's birthday this year. He enjoyed it thoroughly and I have made this cake a few times since then. It is an eggless recipe, so its perfect for those who don't eat eggs and would love to have a delicious cake to celebrate their special occasions.


Ingredients
1.5 cups fine rava or semolina
1 cup milk
1 cup sugar
1 cup yogurt
1/2 cup clarified butter/ghee
1/8 tsp cardamom powder
1/2 tsp baking soda
few strands of saffron (optional)
2-3 tbsp raisins (optional)
a pinch of salt


Method
Beat the yogurt and sugar together till the sugar is dissolved. To this add the milk, salt, ghee, baking soda, rava and beat this together. Then fold in the raisins and saffron strands. Keep this mixture aside overnight or at least for 5-6 hours. Then preheat the oven and bake if for 20-30 mins at 350F. Use a knife or skewer and pierce the center of the cake with it. If it comes out clean then the cake is ready. The photos here are of two different cakes. One cake was prepared with saffron but without raisins. The other one was prepared without saffron and with raisins.


Tips
If the yogurt is slightly sour, it will enhance the overall flavor of the cake. You can add the saffron strands to a tsp of warm milk and stir them in the milk to release the golden color of the cake.

Monday, September 27, 2010

Vangi Bhaat - (Spicy Eggplant Rice) in a Jiffy

This is my quick version of Vangi Bhaat. Now, this is a dish I had never eaten in India and I am not very sure what the authentic version tastes like. However, I can state that the substitute presented here is definitely very tasty and a quick preparation too. The way this recipe was cooked up was that I had bought an eggplant and was finding it difficult to decide on a preparation method. Finally, my husband suggested Vangi bhaath. He has eaten the authentic version of vangi bhaat, but he was not sure of how its prepared and wasn't much help when it came to the recipe. So, of course I turned to the internet. All the recipes I found had instructions to make the required masala from the basic ingredients. Well, it was nearing lunch time and I had nothing to show for my efforts so far, so I decided to wing it. And we were both very happy with the end result.

Definitely a good recipe to have up your sleeve when you need to prepare a meal in a jiffy.


Ingredients
1 Large eggplant/ 4-5 small eggplants - sliced into strips.
1/8 tsp mustard
1/8 tsp jeera/cumin seeds
1/2 tsp split urad daal (peeled)
pinch of asafoetida
couple of pinches of turmeric powder
1 tbsp oil
green chillies to taste - chopped
5-6 curry leaves
1 tsp sambar masala
1 tsp rasam masala
1/2 tsp tamarind paste (can be varied to taste)
salt to taste
2 cups cooked rice


Method
Heat the oil. To this add the mustard and cumin seeds. Once they being to crackle, add the hing/asafoetida, urad daal and curry leaves. Add the turmeric powder and then the eggplant strips. Add a little salt at this time. It will help with the cooking process. Once the eggplant is cooked and softened, add the masalas and tamarind paste. Cook for a couple of minutes. Finally add the rice and mix it well with the cooked eggplant mixture. Adjust the seasoning. Serve hot along with some yogurt.


Tips
It doesn't really matter what kind of eggplant you use for this recipe. Also, you can cut it into cubes instead of strips, but it will take longer for the cubes to cook. I used readymade store bought masalas. You can increase the masala proportions to make it spicier.

Sunday, September 26, 2010

Panha - A Refreshing Raw Mango Drink

This is one of the most refreshing summer drinks and always takes me back to those long summer vacations spent at my maternal grandmother's place. She used to make pitchers of "panha" during summer along with other summer drinks like "taak" and "limbu sarbat". This is also a great accompaniment to the "kairi chi daal". I made panha this summer and realised that it is a very simple recipe. I shall definitely be making it every summer from now on. The main ingredient for this is the raw mango (kairi) and as its available only during early summer, this is a seasonal drink. Its definitely a bit late to find raw mangoes now but do try it the next time you bring raw mangoes home.


Ingredients
1 large/ 2 medium green mango - must be raw
salt to taste
jaggery to taste - depends on how tart and sour the mango is
a couple of pinches of cardamom powder
a few strands of saffron
1-2 cups of water - depends on how much pulp you get from the mango


Method
Pressure cook the mango. I cooked it till I heard 1 whistle. Once the mango cools, peel the skin and discard. Scrape the pulp off the mango and discard the seed. To this pulp add the jaggery, salt, cardamom powder and the saffron strands. Add about half a cup of water and blend all these ingredients together. Increase the amount of water and adjust the salt and jaggery based on the kind of consistency you want. You will also need to adjust the salt and the sweetness based on how sour the mango is.

In the Instant Pot you would cook it for 3 minutes on manual mode, high pressure and then let the pressure release naturally.


Tips
A friend gave me a tip that if the skin of the mango is a bit tough and not very sour, then its best to peel the mangoes before cooking them. That will prevent the drink from any bitterness. You can substiture jaggery with sugar. Brown sugar has molasses and will have a taste closer to jaggery, but if you don't have brown sugar use regular white sugar. If the raw mango is not very sour, you may need to add some lemon or lime juice to adjust the tartness.

Wednesday, September 22, 2010

Blueberry Smoothie

I enjoy smoothies, for breakfast, as desserts or even as an occasional meal. There was a smoothie shop right around the corner from where I worked and I was regular visitor. I remember my afternoon trips to the smoothie shop very fondly. Most often than not, after browsing through the menu, I used to end up selecting one of the berry smoothies. These days, I enjoy making these berry smoothies at home. The following smoothie recipe is perfect with a dollop of vanilla icecream.


Ingredients
1 cup vanilla yogurt
1 cup frozen blueberries
1 banana
1 cup orange juice
1/2 cup crushed ice
vanilla ice cream (optional)


Method
Blend together all the ingredients except for the ice cream. If its too thick, add a little more ice or orange juice. Serve with a scoop of vanilla ice cream.


Tips
If you do not have flavored yogurt, you can use regular yogurt.

Tuesday, September 21, 2010

Vegetable Manchurian - Baked, Healthy and Delicious

After the success of gobi manchurian, I decided to tackle another fried manchurian dish, the vegetable manchurian. Now this is a labor intensive dish, especially when you fry all the vegetable manchurian balls. But baking it takes most of the hard work out of it. You can use a fine grater setting in your food processor to process the various vegetables but if it is not fine enough, I would recommend grating it manually with a grater. This will help to bring the components together in so a dough like consistency needed to keep the dumpling in one piece. Now, the disclaimer!! If you really enjoy the crispy taste of the manchurian balls/dumplings, you should stick to the frying method.  However if you like the texture and taste when the manchurian balls are well marinated in the sauce, then this is definitely a recipe you will want to try. I was hesitant to bake it initially since I wasn't sure if the dumplings would cook through completely, but it was definitely a successful experiment.


Ingredients
For the manchurian balls
1 cup cabbage finely grated
1/2 cup carrots finely grated
1/2 cup yellow onion very finely chopped
1 tbsp garlic ginger paste
4-5 tbsp all purpose flour/ maida
2-3 tbsp corn flour
salt to taste
pepper to taste
1 tbsp oil


For the sauce

2 tbsp oil
1/4 cup onion - diced
2-3 garlic cloves - finely chopped
1/8 tsp ginger - finely grated
green chillies - finely chopped, to taste
1 cup of green onion leaves - chopped
3-4 tbsp soy sauce
salt to taste
2 cups water
1-2 tbsp corn starch
salt to taste


Method
Mix together the cabbage, carrots, chillies and onion. Add the oil, salt and pepper. Add the maida and cornflour. Mix it all together to a dough like consistency. If the mixture is watery add more cornflour. Make small balls about 1-1.5 inches in diameter. Place all the manchurian balls on a baking sheet. Grease the baking sheet with some oil so that they do not stick to the sheet. Bake the manchurian balls at 450 F for about 10 minutes, then turn them over and bake on the other side for another 10 minutes. The manchurian balls will be well browned at this point.


In another pan, heat some oil. Add the onion and saute for a couple of minutes. Add the chillies, ginger and garlic and cook for a few more minutes. Make a slurry of water and cornflour. Add this to the pan and let it cook till the mixture starts thickening a little. To this add the soy sauce, salt and the manchurian balls. Let the manchurian balls cook in the sauce for a few minutes, so that they are cooked till the center and they absorb the sauce. This will also ensure that they are completely cooked to the center in case they are not completely done during the baking process. Then add the green onions and cook for a couple of minutes.
Serve hot with fried rice or chowmein.


Tips
As soon as  you add the salt, the manchurian vegetables will release a lot of liquid. It is important that you mix all the ingredients quickly and fry the manchurian balls or bake them immediately. If you line the baking sheet it with a parchment paper or aluminium foil, spray some oil on the foil or paper so that the manchurian balls don't stick. If the sauce doesn't thicken sufficiently, add a little bit of more cornflour. To avoid creating lumps, dissolve the cornflour in a little water and then pour this slurry into a larger amount of liquid. Stir thoroughly and this will help avoid lumps.

Monday, September 20, 2010

Paneer - Basic Recipes

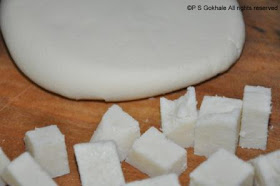
I used to think that making paneer would be a tedious and time consuming process and was resigned to using the store bought one. However, I always missed the fresh taste of paneer that I remembered from childhood. So finally, I decided to try it out and the result was so good that I always make paneer at home. It is definitely not a long, cumbersome process. You need to keep an eye on your milk, so it doesn't boil over, but thats about the extent of attention that it needs. Make it a day ahead of when you want to use it and it will be well set by the next day. That way you can make those perfect cubes that you get in restaurant dishes.


Ingredients
1/2 gallon milk
1/4 cup white vinegar
3/4 cup water
linen cloth to tie the paneer in
salt (optional)


Method
Heat the milk in a thick bottomed pan. Mix together the vinegar and water. Once you see small bubbles forming on the top, add the vinegar-water mixture and stir it around. The milk solids will separate from the water and you will get whey and curd. Using the linen cloth and a colander, drain out the whey water and keep that aside. The milk solids/curd is the paneer. Squeeze out the remaining whey water from the paneer and then rinse the paneer, so that the vinegar remnants are washed out. If you want to use the paneer in a vegetable, then add a little salt to the milk solids at this stage and then knead the paneer thoroughly. It will come together after a couple of minutes and will become soft and dough like. Then tie this in the linen cloth, making sure that the cloth is tightly wrapped around it. Place a heavy pan on top to flatten it out. You can also shape it a bit and then tie it up. Once its cooled down, keep in the fridge for a few hours. Once its set, you can use it in your paneer preparation.


Tips
Use a pan with a thick bottom, else the milk at the bottom may get burnt. You can use whey water to make bread or chapati dough. If you use a lower fat or fat free milk, the resultant paneer will be very crumbly. Adding salt to the paneer when kneading it will make it flavorful and it will not taste bland when you add it to your paneer vegetable dish.If you plan to make a sweet dish using the paneer, do not add salt to the paneer. You can freeze the paneer for a few weeks.

Palak Paneer

I met a couple of friends last night who mentioned that they really enjoy reading the recipes and try them out occasionally. I must say that it definitely motivated me to update the blog more frequently. So keep posting and emailing your feedback and comments. Also, requests for recipes are most welcome. Today's recipe is one that you can find at most Indian buffets in the US. The problem is that most of the times it is one of the worst vegetarian dishes on the menu. I am talking of none other than the famous palak paneer. I think it is one of the most well known Indian dishes here and have even seen it in the frozen section of grocery stores. But none of the versions I have eaten here in the past several years have come close to being tasty or appetizing.
This is my mom's version of palak paneer. I had prepared it a couple of times when friends came over for dinner and I was asked for the recipe on all occasions. Well, I finally got a chance to take the requisite pictures for the blog and here it is. Palak paneer does not need to be bland and flavorless anymore!!


Here is a detailed video on how to make palak paneer. This is a great curry to include other leafy greens as well (except mustard, since the leaves are spicy). 


Ingredients
1 bunch spinach/palak - chopped coarsely
3-4 cloves of garlic - finely chopped or grated
1/2 inch ginger - finely grated or ground into a paste
1 tomato - diced
1 red onion  - diced
1/8 tsp - cinnamon
2 tsp garam masala
4-5 mint leaves
green chillies to taste, diced
salt to taste
paneer - cubed
1 tsp ghee
1 tbsp oil


Method
Heat oil and to it add the onions, ginger and garlic. Fry till the onion transluscent, then add the chillies and tomatoes. Cook for a few minutes till the tomato is cooked and then add the spinach to it. Cook for a few minutes till the spinach is wilted. Add the spices - garam masala, cinnamon and if you want add the mint at this stage. Add the salt, stir and cook for a couple of minutes and then take it off the heat. Puree it in a mixer/blender. Add a 1-2 tbsp water if needed to grind it.
In a pan, heat the ghee, sprinkle a pinch of salt and add the cubed paneer to it. Roast it on a least two sides of the cube. Add this to the pureed spinach mixture and heat for a few minutes. Serve hot with chapati, naan or jeera rice.


Tips
The little amount of mint and cinnamon enhance the palak taste. If you want to make it more decadent, you can add a tbsp of cream to finish it off after you heat the puree with the paneer.